You are using an out of date browser. It may not display this or other websites correctly.
You should upgrade or use an alternative browser.
You should upgrade or use an alternative browser.
What manual shifter knob do you have?
- Thread starter Tigerman
- Start date
OMG! I cannot imagine that being comfortable, unless I am just not understanding the design. How do you grab that?
The rock knobs look very cool. I might just grab a nice spice colored rock and polish it, drill it and make it into a shift knob. I love making things for myself, unique things  .
.
OMG! I cannot imagine that being comfortable, unless I am just not understanding the design. How do you grab that?
Just fine lol. It’s comfortable. It really is. It’s been on there for 6 years now. But it sucks when the top is off. It gets super hot.
If you want to sell it, I just might be interested lol
Dang, I was all ready to call dibs! That would be a cool TC shifter knob.
If anyone really wants that shift knob, PM me your best offer & final offer. Otherwise I will just put it on eBay. Someone should be enjoying it. By the way, its shape is really comfortable, I picked it out of of a bunch of shifter rocks based on how it felt in my hand.
Neal
TJ Enthusiast
I put a couple of vintage CJ-5 knobs on my shifters. Their thread size was way smaller than the threads on my shifter canes so I had to drill out the insides and glue in nutserts with JB Weld to make them fit. No shift patterns on either knob - that's my millennial car thief deterrent...

Your shifter will never notice its weight.It is a bit on the heavy side but pretty comfy.
this is the shifter I use. the picture was from the Ammo Can edition Jeep I built. (sold It) the shifter is now in my 97 Sahara. Its a 40mm Grenade from MK19 Practice range. Drilled and Mig welded a 10x1.5 nut. life is good

this is the shifter I use. the picture was from the Ammo Can edition Jeep I built. (sold It) the shifter is now in my 97 Sahara. Its a 40mm Grenade from MK19 Practice range. Drilled and Mig welded a 10x1.5 nut. life is good
As long as the grenade is not a live one, life will be good
AJBlack98TJ
Member
Me too. I had a T handle for a bit, but went back to stockIm boring and rock the stock shifter.
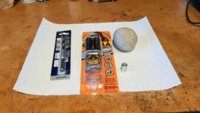
I got so excited about the rock shift knob that on the way home I stopped by Home Depot and picked up a masonry drill and couple of supplies. It is now almost complete, waiting for the epoxy to cure, so let me show you the pictures I took along the way and maybe you will want to make one yourself 
Supplies:
1. 5/8 Masonry drill bit
2. Epoxy
3. 5/16 threaded rod coupler (no metric M10x1.5 anywhere in sight)
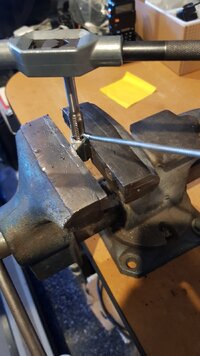
4. M10x1.5mm tap
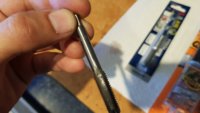
Step 1: Preparing the insert
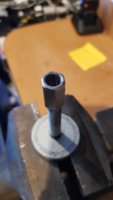
It was time to fire up the good old mill. I did not have an 8.5mm drill so I used a 8.6mm drill. It is actually better to slightly oversize the hole for tapping but not the other way around. You will most likely break the tap if the hole is not at least what it is supposed to be.
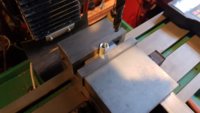
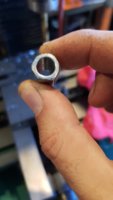
Step 2: Tap it
Tapped the drilled piece using oil and reminding myself to back-up when it got tight.
Step 3: Drill the rock
This was one of the the hardest things I have ever drilled. I think only the Inconel 718 was harder. I first set it up under the mill and made a little water pool around the drill, but that did not work!
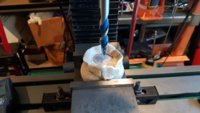
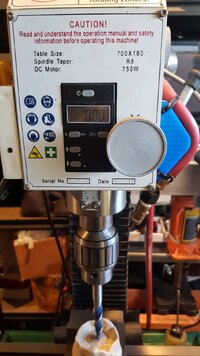
I ended up submerging the entire rock under water and using 3 different masonry bits gradually increasing the size.

Finally, I got a hole deep enough (1.100").
Step 3: Glue the insert
I mixed up some epoxy resin and poured into the opening, filling the hole approximately half way. Epoxy doesn't flow easily, that is why I did not first install the insert. Then, i rolled a piece of paper and stuck it through the insert to seal off the thread from epoxy.
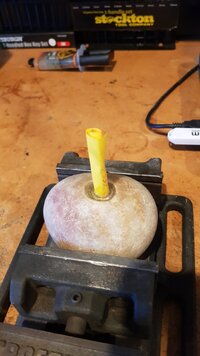
Step 4: Cut the paper off, clean the threads with a drill and tap
The final step is when this thing is completely cured. I will have to cut off the paper, use a drill to clean the hole and run the tap to make sure the threads are good.
Step 5: Polish the rock?
Not sure about this step at all, I am thinking that I might either leave it the way it is, or spray it with clear coat paint. What do you guys think?
Cheers
Supplies:
1. 5/8 Masonry drill bit
2. Epoxy
3. 5/16 threaded rod coupler (no metric M10x1.5 anywhere in sight)
4. M10x1.5mm tap


Step 1: Preparing the insert
It was time to fire up the good old mill. I did not have an 8.5mm drill so I used a 8.6mm drill. It is actually better to slightly oversize the hole for tapping but not the other way around. You will most likely break the tap if the hole is not at least what it is supposed to be.


Step 2: Tap it
Tapped the drilled piece using oil and reminding myself to back-up when it got tight.


Step 3: Drill the rock
This was one of the the hardest things I have ever drilled. I think only the Inconel 718 was harder. I first set it up under the mill and made a little water pool around the drill, but that did not work!


I ended up submerging the entire rock under water and using 3 different masonry bits gradually increasing the size.
Finally, I got a hole deep enough (1.100").
Step 3: Glue the insert
I mixed up some epoxy resin and poured into the opening, filling the hole approximately half way. Epoxy doesn't flow easily, that is why I did not first install the insert. Then, i rolled a piece of paper and stuck it through the insert to seal off the thread from epoxy.

Step 4: Cut the paper off, clean the threads with a drill and tap
The final step is when this thing is completely cured. I will have to cut off the paper, use a drill to clean the hole and run the tap to make sure the threads are good.
Step 5: Polish the rock?
Not sure about this step at all, I am thinking that I might either leave it the way it is, or spray it with clear coat paint. What do you guys think?
Cheers
Artemis
TJ Enthusiast
Here is the finished shift knob 
I used a sander with 800 grit sandpaper in water to smooth it out. It is natural but very smooth. Feels pretty good.

I used a sander with 800 grit sandpaper in water to smooth it out. It is natural but very smooth. Feels pretty good.
How do you like that in cab winch control? I was considering getting one from 12VoltGuy, but I don't know If I would ever have the use for one...
How do you like that in cab winch control? I was considering getting one from 12VoltGuy, but I don't know If I would ever have the use for one...
<side bar>
That is a 12volt guy switch. I usually build my own or did on my old rigs, but I found this was pretty cool. It is a switch for power and push buttons in and out. I love it. It was seriously reasonable, came with all of the wiring. I mean all of the wiring. It was pretty slick. The only thing is if you have a warn you have to ground the selenoid or run two more ground wires in the cab. It was much easier just to ground the middle pin to the unit than run two wires in and out. Plus the 12 volt guy wires are set up for a 3 wire not a 5 wire. Here is a picture of what I mean. I just added double spades to the solenoids so I could still use the remote if I wanted or the in cab switch. You can see how the remote wires and the cab wires are plugged into together. Notice the black wire that is needed because the new warn winches have a on-off power and an on-off ground. I bypassed it by just grounding the center pin. If you don't understand, pm me when you are ready and I will try and explain it better.
Sorry to hijack the thread CARRY ON!
</side bar>
Kiwi TJ
I don't suffer from insanity I enjoy every minute
Supporting Member
Ride of the Month Winner
Glad I didn't disappoint you lolFor some reason this doesn't surprise me.......


