
You are using an out of date browser. It may not display this or other websites correctly.
You should upgrade or use an alternative browser.
You should upgrade or use an alternative browser.

Wildman's TJ is getting a face lift
- Thread starter Wildman
- Start date
OP
Okay thanks for the replies folks. I'll just leave it here. I just know there had been some comments about how long this thread was getting and trying to find info was hard sometimes.
Check out @Squatch thread. It’s as long, if not longer and nothing has happened. He’s old and can therefore can kick my ass, but he’s 5 hrs from me, so I’ll risk it.Okay thanks for the replies folks. I'll just leave it here. I just know there had been some comments about how long this thread was getting and trying to find info was hard sometimes.

My TJ is only one of my eleven vehicles, and I'm the entire family's "mechanic". That's my response, and I'm sticking to it!Check out @Squatch thread. It’s as long, if not longer and nothing has happened. He’s old and can therefore can kick my ass, but he’s 5 hrs from me, so I’ll risk it.
")
You know I love you! If it wasn’t for this COVID freak-out I would have already dropped by to give you some help with the family auto’s!My TJ is only one of my eleven vehicles, and I'm the entire family's "mechanic". That's my response, and I'm sticking to it!
T'sall good, brother! I've created my own mess by taking on far more projects than I'll ever get done in a lifetime. I'll get to my rig eventually. Until then, I enjoy everyone else's build threads, such as this one right here!You know I love you! If it wasn’t for this COVID freak-out I would have already dropped by to give you some help with the family auto’s!
Me too! Wildman is indeed a Wildman. I hope to meet up with him soon tooT'sall good, brother! I've created my own mess by taking on far more projects than I'll ever get done in a lifetime. I'll get to my rig eventually. Until then, I enjoy everyone else's build threads, such as this one right here!
OP
Got the block pulled back out of the Jeep and bolted up to engine stand. And now the FUN begins. I so want this done so I can get other things going. I will be on this for a while I am sure as I want to make sure everything is correct.


So the first part of the FUN is setting the end gap on the piston rings. And each one has to be ground for each cylinder. And there are 4 rings that have to be checked as you do this.
First is the top ring which has a 0.036 clearance.

Then the second ring which is set to 0.026

And then the oil rings which are set to 0.015 clearance. So as I get each set done I'm setting them in that cylinder until I'm ready to install them on the piston. And before I start assembling the engine I need to run brushes thru the block and make sure it's all clean.
So the first part of the FUN is setting the end gap on the piston rings. And each one has to be ground for each cylinder. And there are 4 rings that have to be checked as you do this.
First is the top ring which has a 0.036 clearance.
Then the second ring which is set to 0.026
And then the oil rings which are set to 0.015 clearance. So as I get each set done I'm setting them in that cylinder until I'm ready to install them on the piston. And before I start assembling the engine I need to run brushes thru the block and make sure it's all clean.
OP
Figured I would add some more info in the parts going into the engine.
Total Seal makes the gapless rings in two different styles. It can be either the top compression ring or the 2nd compression ring. Which one you choose depends on application from what I understand.
https://www.totalseal.com/rings/gapless-rings
The gap is larger because of the gapless rings but also because of the KB hyper pistons.
Here's a link to the KB pistons install instructions.
https://uempistons.com/file/2702-KB+Automotive+Installation+Instructions.pdf
I'd never tried the gapless rings before so I thought I would give them a try. And since I was trying to build this engine with torque as it's main goal and not top end HP. We'll have to wait and see how it works out when it's all said and done.
Total Seal makes the gapless rings in two different styles. It can be either the top compression ring or the 2nd compression ring. Which one you choose depends on application from what I understand.
Why Choose a Gapless® Top or Gapless® 2nd Ring?
A Gapless® top provides the greatest performance benefit (increased horsepower and crankcase vacuum). However, a Gapless® 2nd provides excellent oil control and blow-by prevention (less oil consumption).As such, we typically recommend a Gapless® top for naturally aspirated applications, especially V8 and straight engines.For flat (horizontally opposed) engines and turbo or surper-charged engines, we recommend a Gapless® 2nd.Most Total Seal® piston ring styles are available in Gapless® configurations.
https://www.totalseal.com/rings/gapless-rings
The gap is larger because of the gapless rings but also because of the KB hyper pistons.
KB Automotive Hyper
Created from a high-silicon aluminum alloy, KB Performance pistons are lightweight to improve throttle response and RPM changes while still being strong enough to withstand high compression and high temperatures. Each piston is engineered with race ready features like high upper compression-ring locations, gas-accumulator grooves, drilled oil returns, and spiral-lock retainer grooves.
KB Performance pistons are available for many popular engine makes and displacements. They also come in a variety of compression ratios to suit your performance needs. Have a look through our catalog and find the piston that meets your needs and wants today!
Here's a link to the KB pistons install instructions.
https://uempistons.com/file/2702-KB+Automotive+Installation+Instructions.pdf
I'd never tried the gapless rings before so I thought I would give them a try. And since I was trying to build this engine with torque as it's main goal and not top end HP. We'll have to wait and see how it works out when it's all said and done.
OP
So I don't know how many people are interested in the what's and why's of setting up clearances and building a engine. Now first off I am NO expert. So please research if you are doing this for the first time.
I finished getting all the piston rings gapped to the specifications for my application. Here's a little info on Why are the rings gapped.
https://www.enginelabs.com/engine-tech/pistons/piston-ring-gap-how-to-get-them-correct/
And I took some shots of the gapless rings to try and explain them more. Here you can see the ring has a ridge in inner part of the ring. When it is installed on the piston this ring would be turned over so the ridge is facing downward.

Then a thinner ring is placed up against that ridge which closes off the gap in the ring that would normally be there.

This is what it looks like with the two pieces together.


To grind the gap properly you need a piston ring grinder. Since I have never done this before I really didn't know which one to buy. All the other engines I have rebuilt I had always gotten the pre-gapped rings instead. And I would just check to verify it had the minimum gap required. There are many different styles of ring grinders.


Rings are all installed on the pistons and now it's time to clean the block and then paint it before I start assembling the engine.


If you have questions ask away and I'll try to answer them. If you see something I am not doing correctly please speak up and say something. This is the 8th engine I have ever rebuilt. And the most performance wise that I have ever done. All my other builds have been just basic rebuilds.
I finished getting all the piston rings gapped to the specifications for my application. Here's a little info on Why are the rings gapped.
https://www.enginelabs.com/engine-tech/pistons/piston-ring-gap-how-to-get-them-correct/
And I took some shots of the gapless rings to try and explain them more. Here you can see the ring has a ridge in inner part of the ring. When it is installed on the piston this ring would be turned over so the ridge is facing downward.
Then a thinner ring is placed up against that ridge which closes off the gap in the ring that would normally be there.
This is what it looks like with the two pieces together.
To grind the gap properly you need a piston ring grinder. Since I have never done this before I really didn't know which one to buy. All the other engines I have rebuilt I had always gotten the pre-gapped rings instead. And I would just check to verify it had the minimum gap required. There are many different styles of ring grinders.
Rings are all installed on the pistons and now it's time to clean the block and then paint it before I start assembling the engine.
If you have questions ask away and I'll try to answer them. If you see something I am not doing correctly please speak up and say something. This is the 8th engine I have ever rebuilt. And the most performance wise that I have ever done. All my other builds have been just basic rebuilds.
OP
OP
Well not a lot has been happening over the past few days. Just needed to take a small break.
The fires on the west coast really have been messing with shipping. I ordered this part from GenRight on 9/12/20 and it FINALLY got here today. It was shipped out on 9/14 and originally was supposed to be here last Friday. Then Saturday and then yesterday. So FedEx just dropped it off today.


This is GenRight's twisted pitman arm. After messing around with my steering I decided I would try running heim joints instead of TRE's.
Mounted on the steering box I like how it looks. We'll have to see how well it works once I get the steering moked up again. I need to get some more PVC pipe since I cut the piece too short for the drag link.


I'm running into town soon to get some items I need to assemble my engine. So expect some updates tomorrow.
The fires on the west
coast really have been messing with shipping. I ordered this part from GenRight on 9/12/20 and it FINALLY got here today. It was shipped out on 9/14 and originally was supposed to be here last Friday. Then Saturday and then yesterday. So FedEx just dropped it off today. This is GenRight's twisted pitman arm. After messing around with my steering I decided I would try running heim joints instead of TRE's.
Mounted on the steering box I like how it looks. We'll have to see how well it works once I get the steering moked up again. I need to get some more PVC pipe since I cut the piece too short for the drag link.
I'm running into town soon to get some items I need to assemble my engine. So expect some updates tomorrow.
Can you go into detail about what this pitman arm is suppose to accomplish and how? GR website doesn’t provide much information about this.Well not a lot has been happening over the past few days. Just needed to take a small break.
The fires on the west
View attachment 193605
View attachment 193606
View attachment 193607
This is GenRight's twisted pitman arm. After messing around with my steering I decided I would try running heim joints instead of TRE's.
Mounted on the steering box I like how it looks. We'll have to see how well it works once I get the steering moked up again. I need to get some more PVC pipe since I cut the piece too short for the drag link.
View attachment 193609
View attachment 193610
I'm running into town soon to get some items I need to assemble my engine. So expect some updates tomorrow.
looks good.............that sucker ain't cheap. did you get the sway links sorted yet?Well not a lot has been happening over the past few days. Just needed to take a small break.
The fires on the west
View attachment 193605
View attachment 193606
View attachment 193607
This is GenRight's twisted pitman arm. After messing around with my steering I decided I would try running heim joints instead of TRE's.
Mounted on the steering box I like how it looks. We'll have to see how well it works once I get the steering moked up again. I need to get some more PVC pipe since I cut the piece too short for the drag link.
View attachment 193609
View attachment 193610
I'm running into town soon to get some items I need to assemble my engine. So expect some updates tomorrow.
M
motomick76
Guest
In 100 years, everything else on that jeep will be gone but that pitman arm! Very nice piece!
Very nice piece!
OP
Can you go into detail about what this pitman arm is suppose to accomplish and how? GR website doesn’t provide much information about this.
From talking with the sales rep on the phone the main purpose of this pitman arm is to give more flex DOWN for those people running coilovers so that you don't get any bind in the heim joint. Plus you end up with a double shear setup on your drag link. For me it moved the drag link back a little and since I was running heims it just made sense to me to try it out.
looks good.............that sucker ain't cheap. did you get the sway links sorted yet?
Yes they are PROUD of this piece of metal. Very Very Proud of it. No I haven't tackled the swaybar links yet. I wanted to get this first so I could figure out where my drag link was going to be.
In 100 years, everything else on that jeep will be gone but that pitman arm!
Yes it is very well constructed. Now I need to figure what could I want to paint it.
OP
Well thought I had posted this already but I guess I didn't. I have got to put my engine build on hold for a few days. Some how I for got to get new main cap bolts or studs for the engine. When I had realized this I figured I would old studs for the main caps and once they arrived I'd continue the assembly but after talking with some more experienced builders I found out that if I want to use studs I would need to take the block back to the machine shop to have the block line honed again. So now I am thinking I'll just get ARP bolts instead.
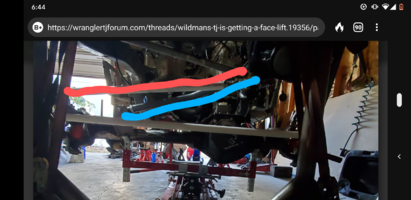
So Saturday I started to mess around with the steering again now that I have the new pitman arm. I'll have to say I really like that it is double shear mounting for the heim joint. So I had bought some more PVC pipe to make mockup tie rod & drag link pieces.
To start with I got everything connected and started with the axle at full bump.


Everything clears and I from what I can see it's going to work but of course I'm sure I'll run into issues somewhere.
Next here it is sitting at ride height.


The trackbar is 30.25" long and the drag link is 32" long so I hope it's close enough to not have much if any bump steer. I don't remember having any before but am not sure if having steering assist has anything to do with that.
When I go done with that I started betting my floor jacks around so I could start to flex and then got pulled away to take care of some other things. So plan to hopefully get a few hours working on it today and tomorrow.
So Saturday I started to mess around with the steering again now that I have the new pitman arm. I'll have to say I really like that it is double shear mounting for the heim joint. So I had bought some more PVC pipe to make mockup tie rod & drag link pieces.
To start with I got everything connected and started with the axle at full bump.
Everything clears and I from what I can see it's going to work but of course I'm sure I'll run into issues somewhere.
Next here it is sitting at ride height.
The trackbar is 30.25" long and the drag link is 32" long so I hope it's close enough to not have much if any bump steer. I don't remember having any before but am not sure if having steering assist has anything to do with that.
When I go done with that I started betting my floor jacks around so I could start to flex and then got pulled away to take care of some other things. So plan to hopefully get a few hours working on it today and tomorrow.
B00mb00m
The Church of Cutting Brakes of Atlas-Front Digs
Supporting Member
Ride of the Month Winner
OP
If this is at ride height you will have definite bump steer. Why is your track bar not matching your drag link? You're making everything from scratch why not make it all match?
The trackbar is a premade bar from TNT Customs and I have the axle mounting bracket pushed over as far as I can get it. The only other thing I could do is get a different frame mounting bracket and I'm sure how much I can move it out and not hit the air bag. I've got to look at that more today.