Doing It The Hard Way - JL Steering Box and a Front Stretch

Ok I figured it out. Started off trying to make the kind TMR/Ruffstuff sell, maybe what @Mike_H was talking about:
IMG_0705 Large.jpeg


Didn't turn out great, couldn't get the metal to curve where the legs are bent down and was just generally a pain in the butt.

Next idea was similar to what I already did but a bit more refined. Made a press fixture to put a consistent joggle in a strip of 14ga:
IMG_0706 Large.jpeg


The thinner material let me use the rubber from those Adel clamps I got
IMG_0708 Large.jpeg


Fits around the reservoir body much better due to the squish in the rubber, and the thinner steel puts the hose clamp in less of a crease too
IMG_0707 Large.jpeg


3 more, really easy after figuring out the first one
IMG_0710 Large.jpeg


Welded onto the tower:
IMG_0709 Large.jpeg


And the final product. Looks slick.
IMG_0713 Large.jpeg


Oh, and I painted everything
IMG_0712 Large.jpeg


IMG_0711 Large.jpeg


Used a foam roller from the quart can of Steelit for most of it, maybe used about 6oz of paint, then went over all of the tight spots I couldn't get with the aerosol can, probably about 3/4 of a spray can used. If I were to do it again, I'd probably just go with spray cans. $37 a pop makes it tough though.
 
Got all the steering stuff installed, loctited, torqued, and marked. I used blue loctite everywhere, hopefully red isn't needed. Don't know if I'll need to take anything apart after a test drive or anything. Went ahead and put the shocks in and peeled the tape off too.
IMG_0716 Large.jpeg


Ran out and got some hardware, then installed the brake lines with stainless button heads. Those hard lines are looking nice against the fresh paint.
IMG_0718 Large.jpeg


I'm tempted to install the axle tonight, but the paint is still pretty soft due to how humid it is, and I'm sure to scrape some off the control arm brackets if I do.
 
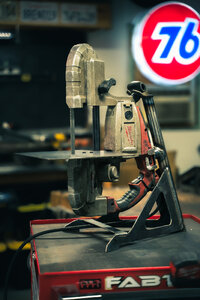
Thought I'd share my fabrication setup. It ain't much! I got a portable band saw from Harbor Freight in December. I just have a long bolt through the handle and mounted in the vice. A larger table would be nicer and probably safer, as would a foot activated power switch, but it has worked well like this so far. I don't know why I resisted getting a band saw for so long, I never want to cut out brackets from steel plate with an angle grinder again.
View attachment 516176
I hardwired mine to a standard light switch and leave the trigger zip tied. SWAG off-road has a nice kit for most porta-band brands.
 
  • Like
Reactions: carrotman
I hardwired mine to a standard light switch and leave the trigger zip tied. SWAG off-road has a nice kit for most porta-band brands.

I made my own table out of an old broken Milwaukee portaband that I got for free and repaired. Zip tied the trigger and used a Wen foot pedal switch ($12 on Amazon). Works wonders cutting thinner plate. I can pull the bandsaw off the stand and use it portably too.

DSC02431.jpg
 
Busy day! First things first, I wanted to patch in that hole I created when I was trying to extract the broken bolt under the battery tray. Welded a flange nut to a 1" circle piece of steel made with a hole saw, then welded it in to the sheet metal. Not perfect but I don't care, it's covered up anyways.
IMG_0719 Large.jpeg


Next, I started installing the axle. Looks like I warped the track bar bracket when I welded up the inside corners. Should have known better than to weld it without a spacer in there. Used a couple bolts and nuts to jack the sides apart a tiny bit which worked great.
IMG_0720 Large.jpeg


Made a mistake when installing my drag link and forgot to line up the cotter pin hole at an angle I could actually access. Had a heck of a time getting the TRE back out of the taper. Hammering on it did not work, and I couldn't fit my pitman arm puller on it.
IMG_0723 Large.jpeg


120psi through this thing didn't do anything.
IMG_0725 Large.jpeg


Tried a two jaw puller but it was kind of slipping off and the tie rod was in the way.
IMG_0722 Large.jpeg


Took the tie rod off, which the pitman arm puller did work for, and did a 3 jaw puller on the drag link.
IMG_0724 Large.jpeg


Finally, this worked. I think I'm going to have to figure out or make a better tool for this particular joint, that was a pain in the ass. Let's call this a learning experience. If anyone was wondering how the weld in TRE inserts from TMR work, THEY WORK.

Got the stupid cotter pin in. Bit of a bummer about scratching the fresh paint. Oh well.
IMG_0726 Large.jpeg


After all that, the axle is in!
IMG_0727 Large.jpeg


Torquing the control arm bolts to 129lb-ft was quite a struggle! Probably would have been easier without the jack stands in the way.

Just waiting on a few things from amazon then I can put the rest together.

Thought this was a cool shot:
IMG_0721 Large.jpeg
 
Amazon package came in. Got some new bump stop cups, old ones were pretty rough. The paint job is pretty poor but they'll work fine.
IMG_0728 Large.jpeg


Also got my 42mm socket for the pitman arm nut, and learned that I need to remove my track bar to get the socket on. Not a big deal but good to know. I might laser cut a custom wrench to be able to get at it without dropping the track bar though. 184lb-ft, tight! Helped to wedge something against the pitman arm too to keep it from turning. I could have torqued it against the steering stop, but without the track bar attached it was just pushing the axle sideways.

IMG_0729 Large.jpeg


Track bar back in, and got the springs in and shocks attached. Trying to keep track of what tools work best when reassembling this thing.
IMG_0730 Large.jpeg


Next on the list, axle shafts and brakes. Still need to make one hard line for the firewall, then it's mostly just more assembly.
 
Got my longer wheel studs in to accommodate my 1/4" wheel spacers. Took a while to find the right part number, but these are Dorman 610-290 in case anyone is wondering. Remember, they are for JK unit bearings, don't know if the splined section is correct for a TJ hub.
IMG_0731 Large.jpeg


IMG_0732 Large.jpeg


IMG_0734 Large.jpeg


I think the 10 pack on amazon was $25, definitely beats the ones NAPA sell for $8 EACH.

Got one of the axle shafts assembled. I've never done a u-joint before, but it wasn't bad. I need a better set of snap ring pliers though. I used the circlips that came with the yukon shafts instead of the spring style ones that came with the spicer joints. Hopefully that was a good call.

IMG_0737 Large.jpeg


First shaft installed!
IMG_0738 Large.jpeg
 
Got the brakes cleaned, lubed, and fully installed today.
IMG_0741 Large.jpeg


For the brake line going to the master cylinder, I bent one of the brake clip fitting brackets at a 45° angle and installed a rivnut on the lip at the bottom of the firewall

IMG_0747 Large.jpeg


IMG_0748 Large.jpeg


Then I got the line made. This one was pretty easy, basically just a couple of 90° bends. It is a bit close to the steering shaft, but I don't see any way they would actually interfere with each other. I also installed a 3/8-24 IF plug at the rear port of the distribution block.
IMG_0749 Large.jpeg


At this point, my front brakes are done. I flushed some fluid through and did spring one leak at the T block.
IMG_0750 Large.jpeg


I took it apart to double check that the connection looked clean. I think I may have made that flare a little too deep. Put it back together and really put a lot of torque on the nut, and it doesn't seem to be leaking now. I cleaned it up really well with brake cleaner and shoved a paper towel under the fitting. We'll see in the morning if it is still dripping. Need to get some more brake fluid tomorrow to complete the flush.


For the rear brake line, I'm hoping it will be fine to just run a hard line between the body and the frame. That's how the factory did it, so I think so, but I know there is some relative movement between the two.

Another question, when I put together my driver side axle shafts, I was able to slide the u-joint caps into the main shaft's ears by hand with not that much effort. Is this normal, or do I need to take it back apart and peen the inside surface of the ears? I wouldn't say there was any slop, just wasn't a press fit.
 
  • Like
Reactions: Sj's TJ and Wildman
Didn't like how mucky the bottom of the brake fluid reservoir looked, so I took it off and cleaned it out with brake cleaner.
IMG_0752 Large.jpeg


After about 1 can:
IMG_0753 Large.jpeg


Filled it up with fresh fluid and did a bleed. Found a few more leaky fittings after pumping the brakes with some real pressure, but I tightened everything up just a bit more and it seems ok now. I'm a little nervous about my flares, hope I don't need to buy the $250 tool and re-do the hard lines, but if that's what it takes, I will.

Made a realization that I jumped the gun putting the springs in, or at least the passenger side one.
Got smart this time and stuck the allen wrench through a ratcheting box end wrench. Much easier than just turning the allen key a quarter turn at a time. My normal ratchet won't fit in the coils, so I'll keep this method in mind for my toolkit.
IMG_0754 Large.jpeg


Wanted to see if I could get it back out without dropping the shock. It is a bit tight but it worked fine. I wasn't able to get the bump stop out of the cup with the spring in, but it ended up not being necessary.
IMG_0755 Large.jpeg


Discovered a slight interference where the pitman arm tucks under the frame. Luckily, it is just the cotter pin scratching the paint off, no hard interference. I might put a cotter pin in sideways instead (bend it around the nut, not the stud). Still a bit closer than I'd like to see it, hopefully nothing flexes in use offroad and causes more severe interference.
IMG_0756 Large.jpeg


Got the grille in so I could start working on radiator fitment. Double checking that the pitman arm clears, looking good:
IMG_0757 Large.jpeg


Here is where my interference is:
IMG_0758 Large.jpeg


Not very clear in that photo but the drain contacts the top of the drag link at full right turn and with about 2.5-3" of uptravel left. I think my only option is to move the bottom of the radiator forward, and it doesn't look like it would need very much, maybe 1.5". Just need to work on figuring out how to go about that. Will be drawing inspiration from @Dev 's build here. Definitely retaining A/C, Florida stop lights are not survivable without it. 🔥
 
  • Like
Reactions: Sj's TJ and Dev
Moved the whole grille as far forward as I could to see where I'm at. Still interferes about 1" before full bump:
IMG_0760 Large.jpeg


The limit right now is the radiator bottom tank hitting the body mount bracket.
IMG_0761 Large.jpeg


After some brainstorming, I think I have an idea...
IMG_0762 Large.jpeg


IMG_0763 Large.jpeg


:unsure:
 
  • Like
Reactions: Sj's TJ
  • Like
Reactions: carrotman
Took apart the bottom structure of the grille by drilling out the spot welds.
IMG_0767 Large.jpeg


IMG_0768 Large.jpeg


Trimmed that piece for clearance. Mind the mess...
IMG_0770 Large.jpeg


Trimmed the piece that I trimmed to remove 1.5"
IMG_0772 Large.jpeg


Condenser test fit
IMG_0773 Large.jpeg


Need to trim the bracket with the body mount next but calling it a day.
 
  • Like
Reactions: Sj's TJ
Welded the shortened bottom bracket together. The burning body paint near the weld area smelled disgusting
IMG_0774 Large.jpeg


Got it clamped to the grille, tacked on the body mount bracket
IMG_0775 Large.jpeg


Drilled a new body mount hole in the frame support, cut off the excess bracket. I don't love how close the hole is to the edge, but I think it will be alright.
IMG_0776 Large.jpeg


Removed the supports from the radiator for mockup, installed the grille and test fit the radiator. Looks like everything will clear now, though I might need a lower profile drain stopper.
IMG_0777 Large.jpeg


IMG_0778 Large.jpeg


You can see here the body mount will bolt in front of the grille now.
IMG_0779 Large.jpeg


Needs some work still but I think the proof of concept is there.
 
Did you need to trim the top part of the grille?

Nope, top is all still factory. I think since the condenser mounts on rubber grommets allowing some misalignment, it likely won't need any modification.


I think to get the radiator in, I'm going to make my own side brackets to replace the ones that came with it, rather than modifying the grille. Seems like an easier route.
 
  • Like
Reactions: Wildman
Anyone know where to get replacement grille corner body mount bumper thingies? Having a hard time with google search results.
IMG_0765 Large.jpeg
 
Got the grille welded back together and made the preliminary radiator mount
IMG_0790 Large.jpeg


Here is a shot of the body mount
IMG_0791 Large.jpeg


After cycling steering at full articulation, we've got clearance!
IMG_0792 Large.jpeg


I think the pitman arm might have ended up closer to the radiator, but it still clears too.
IMG_0794 Large.jpeg


Just need to finish weld the radiator mounts and add some gussets. Need to order some fresh well nuts for the condenser too. I don't really want to go down the rabbit hole of doing body work right now, but I might at least sand down and prime the grille. The exposed metal needs covering anyways.
 
Been kind of a busy week but doesn't feel like I've gotten much done. Lots of running around, lots of sanding.
To start, I wanted to fill in a couple holes I welded up with body filler. Should be no big deal, I've got the filler..
Squeezed the hardener to see if it was ok, top of the tube popped off and it volcanoed everywhere, face, arm, open toolbox.. ugh.
IMG_0795 Large.jpeg


Alright, ran down to Ace and picked up some new hardener, only to come back and find the putty had died too. Can't keep stuff in Florida heat!
IMG_0797 Large.jpeg


That one's on me, I should have checked it before leaving. I was able to score some new well nuts for the condenser though, or expansion nuts as Ace calls them.
I was told all of these little rusty rock chips needed to be treated before coating them, or they might cause the paint to bubble. I'm not so sure, but it seemed easy enough to mitigate.
IMG_0796 Large.jpeg


After bringing the whole front face of the grille down to bare metal, I rubbed Ospho on the whole thing, then rinsed it off with soapy water and a scotchbrite pad 15m later. All the brown rust turned to black, so hopefully that means it was neutralized. The Ospho also turned all of the still galvanized (I'm guessing) metal dark like a chalk board. I hope that's normal. There are lots of opinions online about using Ospho before epoxy primer.
IMG_0798 Large.jpeg


Ran to O'Reilly to get some fresh Evercoat glazing putty, and filled in some dents and divots from the welded area.
IMG_0799 Large.jpeg


I hadn't really put much thought into what I was going to do with all this bare metal. I found a local company with SprayMax 2k Epoxy cans and brought one home, thinking it would be enough. Definitely not, I was able to cover about half of the under side of the grille and not very well. It layed down super dry and gave a rough texture, with lots of loose overspray too. Not sure if I did something wrong, or if that is just the nature of this paint. I cut open the can to make sure I popped the catalyst button hard enough, which I did. It was about 90° in my garage when I sprayed it, maybe that is why.
Before:
IMG_0800 Large.jpeg


After:
IMG_0802 Large.jpeg


I didn't really like how much unadhered paint dust was on the panel from overspray, so after the SprayMax cured I decided to pressure wash the grille, then scrub it with soapy water again. Knocked down the rough texture with some 150 grit paper too. It does seem like a pretty tough coating, I'll admit.

Instead of getting 3 more $35 cans of primer, I went ahead and got a quart of PPG Omni Epoxy and a cheap Harbor Freight spray gun for about the same cost. After lots of research on how to use it, I think that turned out a lot better. I was able to get all the nooks and crannies on the inside of it done, tomorrow I'll flip it over and do the front.
IMG_0806 Large.jpeg


I also got the 3m PPS knockoff system at Harbor Freight, and I'm glad I did. It makes cleanup a bit easier, and lets you save a pot of paint between coats when you go to clean out the gun. But the real benefit was being able to empty all the air out of the paint cup and have it dispense sideways and upside down. I don't think I would have gotten very good coverage on the insides of the grille without being able to do that.
I was also shocked at how little overspray got elsewhere in my garage using the HVLP gun. Way less than rattle cans.

I probably picked the worst panel to learn all this stuff on, but definitely learned a lot this week.