

I'm installing a MORryde tailgate reinforcement (a.k.a. Gr8Tops Exogate v2) on a Jeep-tub trailer to implement a one-piece barn door for a new fiberglass camper top on this trailer made from the same molds as the LJ Safari Cab hardtop. Since this installation is on a trailer made from two Jeep tubs, what I'll describe here applies to installation on a TJ/LJ as well.
The trailer currently has Savvy low-profile tail lights (https://savvyoffroad.com/product/sav-tl/) which are not compatible with the tailgate reinforcement for two reasons - first, the body-side reinforcement has a cutout for the base of the stock tail lights and the Savvy tail lights don't have the tail light housing that the factory lights do so they don't fit in the cutout. Second, because the Savvy housing is larger it will interfere with the upper hinge pin bolt on the new HD hinges. Some people have installed Savvy lights with the reinforcement by cutting the reinforcement but that doesn't solve the problem of interference between the top of the Savvy housing and the head of the hinge pin bolt on the upper hinge. Both of these problems are fairly simple to solve.
Before:
.jpg")
The reinforcement installed, showing the incompatibility between the cutout and the Savvy tail light:

Also in the photo above, the bolt head of the top hinge pin is going to interfere with the light housing
An easy way to solve the problem of the too-small cutout in the body-side reinforcement is to make a filler for the cutout. The reinforcement is made from 1/4" thick steel plate, so a cutout filler can be made from any convenient 1/4" material. I used black plexiglass because it won't rust, is easy to cut and I had it on hand. The template in place:

The next problem is that the head of the hinge pin bolt on the top hinge won't clear the larger Savvy tail light housing.
The solution to this is to replace that bolt with a flathead and drill a countersink in the hinge. In the next photo I'm drilling the countersink. I'm using a drill press but a hand electric drill will work fine too. Be sure to touch up the countersunk area with paint to prevent rust.

With the tail light installed:
.jpg")
A full-size template for the filler plate:
.jpg")
There's a 6" scale in the drawing above so you can check that your printout is the correct size. I made the prototype for this filler plate on a YJ tub that had its tailgate hinge holes adjusted to fit TJ hinge spacing. It is possible that the three taillight mounting holes could be slightly misplaced due to the use of the YJ tub but if they are drilled as shown in the drawing and don't exactly line up with the actual holes in the TJ tub the holes in the filler plate can be slotted or enlarged to fit.
One caveat about replacing the hinge pin bolt with a flathead bolt - the hinge pin bolt MORryde supplies has a smooth body above the threads that serves as the bearing surface but flathead screws will generally be fully threaded, which means that the threads of the flathead screw will be the bearing surface. As long as the hinge is lubricated and since tailgates don't open thousands of times a day this shouldn't be a problem but over time if wear develops the bushings can be replaced and can be found a many hardware stores.
Completed installation:

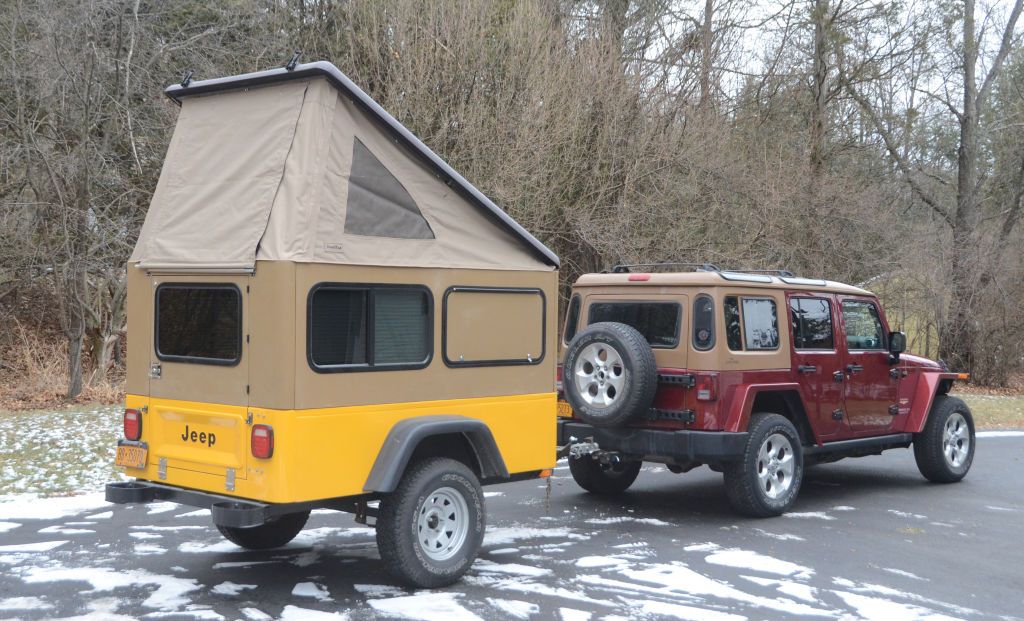
About the camper top project: The top on the trailer in the photos above is a proof-of-concept top made with TrailTop fiberglass framing (which matches the curves at the corners of the Jeep tub) and 1/4" plywood. I'm retiring that proof-of-concept top in favor of a fiberglass one made in the same molds as the Safari Cab hardtop for the LJ and the tailgate with the reinforcement will be used with the Safari Cab barn door.
The about to be retired proof-of-concept top:
When I designed the LJ/TJ Safari Cab and its modular parts, part of the design was that parts from the same molds could be assembled into a camper top for Jeep-tub trailers.
I discussed the camper top idea with Gr8Tops back then and they provided some preproduction parts from their molds and I molded a few others to build a proof-of-concept camper top. The parts assembled very easily into a camper top and Gr8Tops even displayed it at a Jeep show as a possible future product. I never fully finished it, I just assembled the basic shell at the time. Didn't put windows in or do anything about the interior for the proof-of-concept build. These photos were taken in 2011:

Rear barn door:

Front hatch:

Showing its parentage:

After Gr8Tops showed the trailer at that show I disassembled the shell and the parts have been sitting here ever since. I'm now working on completing it - adding windows, paint, etc.
I also plan to do a side-open pop-top for it:

One nice thing about doing the pop-up - since the parts are standard Safari Cab parts, the pop-top design and parts could be installed on an LJ Safari Cab to create an LJ pop-up camper.
The trailer currently has Savvy low-profile tail lights (https://savvyoffroad.com/product/sav-tl/) which are not compatible with the tailgate reinforcement for two reasons - first, the body-side reinforcement has a cutout for the base of the stock tail lights and the Savvy tail lights don't have the tail light housing that the factory lights do so they don't fit in the cutout. Second, because the Savvy housing is larger it will interfere with the upper hinge pin bolt on the new HD hinges. Some people have installed Savvy lights with the reinforcement by cutting the reinforcement but that doesn't solve the problem of interference between the top of the Savvy housing and the head of the hinge pin bolt on the upper hinge. Both of these problems are fairly simple to solve.
Before:
The reinforcement installed, showing the incompatibility between the cutout and the Savvy tail light:
Also in the photo above, the bolt head of the top hinge pin is going to interfere with the light housing
An easy way to solve the problem of the too-small cutout in the body-side reinforcement is to make a filler for the cutout. The reinforcement is made from 1/4" thick steel plate, so a cutout filler can be made from any convenient 1/4" material. I used black plexiglass because it won't rust, is easy to cut and I had it on hand. The template in place:
The next problem is that the head of the hinge pin bolt on the top hinge won't clear the larger Savvy tail light housing.
The solution to this is to replace that bolt with a flathead and drill a countersink in the hinge. In the next photo I'm drilling the countersink. I'm using a drill press but a hand electric drill will work fine too. Be sure to touch up the countersunk area with paint to prevent rust.
With the tail light installed:
A full-size template for the filler plate:
There's a 6" scale in the drawing above so you can check that your printout is the correct size. I made the prototype for this filler plate on a YJ tub that had its tailgate hinge holes adjusted to fit TJ hinge spacing. It is possible that the three taillight mounting holes could be slightly misplaced due to the use of the YJ tub but if they are drilled as shown in the drawing and don't exactly line up with the actual holes in the TJ tub the holes in the filler plate can be slotted or enlarged to fit.
One caveat about replacing the hinge pin bolt with a flathead bolt - the hinge pin bolt MORryde supplies has a smooth body above the threads that serves as the bearing surface but flathead screws will generally be fully threaded, which means that the threads of the flathead screw will be the bearing surface. As long as the hinge is lubricated and since tailgates don't open thousands of times a day this shouldn't be a problem but over time if wear develops the bushings can be replaced and can be found a many hardware stores.
Completed installation:
About the camper top project: The top on the trailer in the photos above is a proof-of-concept top made with TrailTop fiberglass framing (which matches the curves at the corners of the Jeep tub) and 1/4" plywood. I'm retiring that proof-of-concept top in favor of a fiberglass one made in the same molds as the Safari Cab hardtop for the LJ and the tailgate with the reinforcement will be used with the Safari Cab barn door.
The about to be retired proof-of-concept top:
When I designed the LJ/TJ Safari Cab and its modular parts, part of the design was that parts from the same molds could be assembled into a camper top for Jeep-tub trailers.
I discussed the camper top idea with Gr8Tops back then and they provided some preproduction parts from their molds and I molded a few others to build a proof-of-concept camper top. The parts assembled very easily into a camper top and Gr8Tops even displayed it at a Jeep show as a possible future product. I never fully finished it, I just assembled the basic shell at the time. Didn't put windows in or do anything about the interior for the proof-of-concept build. These photos were taken in 2011:
Rear barn door:
Front hatch:
Showing its parentage:
After Gr8Tops showed the trailer at that show I disassembled the shell and the parts have been sitting here ever since. I'm now working on completing it - adding windows, paint, etc.
I also plan to do a side-open pop-top for it:
One nice thing about doing the pop-up - since the parts are standard Safari Cab parts, the pop-top design and parts could be installed on an LJ Safari Cab to create an LJ pop-up camper.


