((Mods: delete if this isn't up to our How To standards.))
This has been written up elsewhere, but our little forum didn't have a version, and there isn't a ton of chatter about this particular mod here, so maybe people don't know about it or just never drive through water. The crew I wheel with loves water, and several of the trails in Oklahoma are essentially river trails, so water is part of our lives.
The general premise is that the 32RH has a somewhat unconventional breather; it's just a hole inside the bell housing, behind the torque converter. Most other transmissions have the breather fitting on top of the transmission housing somewhere, with an attached hose that runs up into the engine compartment. What this means for us 3-speed auto drivers is that if you get water up to about your door sills, you very much run the risk of getting water up in that hole and down into your transmission. This is bad. Google it. So we will plug the factory hole and move it to a more traditional location.
You may be tempted to put an elbow fitting right into the existing vent hole. I was tempted, and even attempted this method. However there is so little clearance behind the torque converter that I was unable to get the fitting in deep enough to not still contact the torque converter. I really really tried to make that work. I couldn't do it. Maybe you're smarter than me. If so, please share.
This is what an elbow in the factory vent location might look like. Except it would not clear the torque converter once fully inserted.
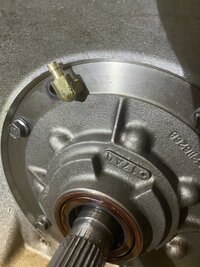
(Pictured: attempting to make the elbow work in the factory vent location, and failing hard.)
Other stuff you may want to do at the same time, but not required:
Replace any bad sensors/wiring/pigtails that are harder to get at with the transmission in the jeep
Transmission mount
speedo gear if you have recently re-geared or changed tire size
speedo gear O-ring
transfer case shifter linkage to cable shifter
selector shaft seal, if leaking, or just peace of mind.
transmission dipstick O-ring
transmission pan with drain plug
.....and since your trans pan is off anyway, maybe add a bung for a trans temp sender?
if you want to get even deeper, because removing the exhaust is a little easier if the exhaust is already off the trans mount
Oil pump
Rear main seal
That's a lot of stuff to do for one measly breather tube, but once the transmission is out it's your one shot to do a lot of things.
Tools Required:
basically every wrench & socket in your toolbox
E12 (inverted torx) socket, to remove the top 2 bell housing bolts
8mm Crowfoot for torquing the band adjuster screw
inch-pound torque wrench
foot-pound torque wrench
A whole mess of extenders
Jack stands
Transmission jack
I found an additional floor jack to be handy as well
Slide hammer (borrow from Autozone)
a 3/8-16" bolt & washer upon which the slide hammer might slide & hammer
a couple of 5/16" all thread studs to help guide the pump back in place
Parts needed
New transmission pump gasket
optional: input shaft seal
optional: transmission pump O-ring (around the outside of the pump surface)
All that stuff came in this kit: https://www.oregonperformancetransmission.com/product/NTP-K12900-7.html
1/8" NPT / 1/4" barbed 90deg fitting - https://www.amazon.com/dp/B0753F3XVG/?tag=wranglerorg-20
1/8" NPT plug* - https://www.amazon.com/dp/B07439ZFXW/?tag=wranglerorg-20
1/8" NPT tap & drill bit - https://www.amazon.com/dp/B01M4RXY21/?tag=wranglerorg-20
Teflon tape
* Due to the nature of the tapered NPT fitting, a longer plug may be a better option to let it fit tighter as it threads deeper.
1. Remove the transmission
I'm not going to write up these steps in great detail because you can find them plenty of other places, but I will call out some details:
- remove the cooler lines from the transmission (16mm & 21mm iirc), but you may find it easier to remove them completely, as they tend to get hung up on bracketry etc
- I left the transfer case installed. It was more weight but with a transmission jack it actually helped balance the weight of the torque converter
- speaking of the torque converter, I'm told it's important to keep the TC in the same orientation as the flex plate, and to use the same bolts in the same positions when you reinstall. I used 4 different colors of spray paint to hit the bolt heads, the flex plate, and then the threaded hole of the TC. This worked great, there was no confusion about how to align it when it went back in.
- Removing the dipstick tube is something nobody seems to ever mention in this process. There's a bracket on the passenger side of the bell housing you need to unbolt, then it just sort of wiggles out. You MUST have the transmission drained before you complete this step. Ask me how I know. Never mind I'll tell you. The ATF level sits well above/into the dipstick tube at rest. When you remove the tube everything above that level will come out, in a hurry.
2. Remove the torque converter
It will just slide off, but it's pretty dang heavy, and it's also full of ATF so lay it on it's back, and then stuff a clean paper towel into the opening so you don't spill your Dr. Pepper and Golden Chick down in there you big goon. Also watch out that your transmission balance on the jack will change with the TC removed. You had it strapped to the jack, right?
3. Adjust the first band
This is straight out of the FSM, but you may have to do some cleanup first. Not everyone who does this work performs this step. I actually went through this piece of the process 3 times, I skipped it once, and did it the other two times. It's YOUR transmission, but I would do this step. It holds the outermost drum in place when you remove the pump here in a minute. If you do this horizontally, the drum will soft of fall forward and down, and MAY cause a thrust washer behind it to fall out of place. If you do it vertically, it's probably less of a problem.
a) clean the screw & bolt with brake kleen; you need both components to turn cleanly w/o one turning the other.
b) using an 8mm box wrench to hold the screw in place, use a 3/4" box wrench to remove the locking nut so you can clean it up, and the rest of the adjuster screw. Leave the adjuster screw in the transmission.
c) ensure the adjust screw turns freely; tighten it down into the transmission, and tighten down the locking nut over it.
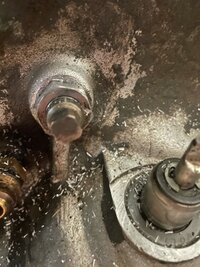
(Pictured: square-headed band adjustment screw & 3/4" lock nut. Also appearing: selector shaft & seal)
4. Remove the transmission pump
Make a note of how recessed the pump is before you pull it out, for reference when you go to re-install it.
Remove all 6 bolts around the edge of the pump with a 1/2" socket. Note the location of the vent hole for when you put it back in. Next take a 3/8-16 bolt and use the slide hammer to remove the pump. 2 of the pump holes are threaded for this purpose. It took me 5 pulls on each bolt, alternating. You do not need to pull super hard, just a nice firm tug (TWSS) and then move to the other bolt.
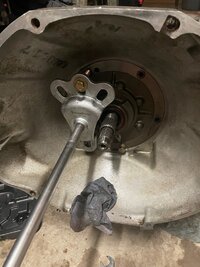
(Pictured: using a rented slide hammer to extract the pump from the housing.)
If you're doing this horizontally, be careful not to let it fall all the way out and crash to the floor. As you remove the pump, note the condition of the gasket. None of the other write-ups mention replacing this gasket, but mine was torn & brittle so I opted to replace. I was not leaking before, so I opted to not replace the seals. Time will tell if that was a bad call. Also note the condition of the rubber O-ring that goes around the entire pump circumference. I had evidence that my trans was recently serviced, and that o-ring looked like it was in great shape. I opted to leave this as well.
If you did the band adjustment, you'll probably not notice that the transmission didn't fall out of the case on you. If you didn't do the adjustment, you will probably notice that it fell out on you.
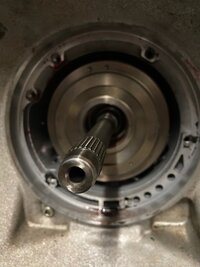
(Pictured: first layer of transmission internals once the pump is removed. Note the drum remains centered on the input shaft, and does not fall slightly out & down. This is because I tightened that band before opening.)
5. Clean the pump mating surfaces
The pump itself is cast iron, so you can pretty much go to town with a scraper or razor blade. The transmission housing is aluminum, so be very careful here to not scratch anything.
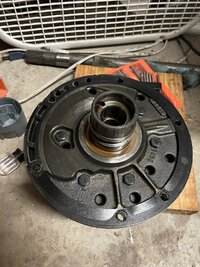
(Pictured: back side of pump, along with the brittle & broken trans pump gasket.)
6. Plug the existing hole
The hole is already just about the same size as the drill bit that came with the tap, so I did not drill here. I put some anti-seize on my tap to grab any filings, and turned the pump upside down and tapped the hole from underneath. The hope was that any shavings the anti-seize didn't catch would just fall out. I believe this worked. I've seen other write-ups where they opened the pump, but I don't think it's necessary.
Now take your 1/8 NPT plug and wrap it with Teflon tape, and thread into the old vent hole. Don't go too far, it could drop into the pump and I'm confident that would be bad. Some people weld this shut. That seems like a non-reversible step.
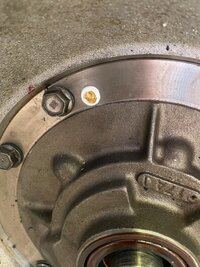
(Pictured: old vent hole now plugged with a 1/8" NPT plug + teflon tape)
7. Drill/tap the new hole
To avoid getting all those shavings down in your transmission, take a piece of heavy paper or thin cardboard and smear grease all over it. Then bend it to match the curvature of the trans housing and slide it into the transmission above the drum and below the "roof" of the housing. When you drill & tap, the shavings will fall onto the grease and stick there. This absolutely works. Make sure it's in deep enough so the shavings don't land right on the edge of the grease paper.
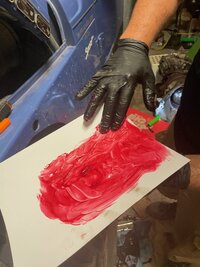
(Pictured: grease smeared onto a sheet of cardstock I borrowed from wife's craft room)
Pick a spot where you want to drill your hole. Too far forward and you can interfere with the pump. Too far back and you risk fluid being slung into the tube. I aimed for a spot that was over the first band, but far enough back that I would be able to turn the elbow fitting w/o hitting the "step" where the bell housing transitions into the trans housing. (Actually I was a bout 1/8" too close still, and I had to shave one barb off my fitting to allow it to turn. Don't be like me).
Drill slowly & carefully. You don't want your bit to shoot through the hole and hit the drum/band, and you don't want your bit to stir up all those shavings you worked so hard to keep in check. Once you're done, make sure you get all the shavings out of the hole while your paper is there to catch them. Then remove the paper and throw it away unless you're planning to recycle the paper & aluminum.
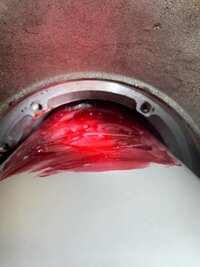
(Pictured: grease paper inserted into top of transmission, with drill & tap shavings nicely caught by the grease)
7. Thread in your fitting
Wrap with a few turns of teflon tape, and thread your fitting into your new hole. no need to make it flush on the inside, just get it in & tight, and then pointing to the about 2 o'clock on the passenger side, since we're going to route our vent hose along the dipstick tube. Note that I was a shade too close after all that planning, and ended up grinding off one barb. Would love to have that moment back.
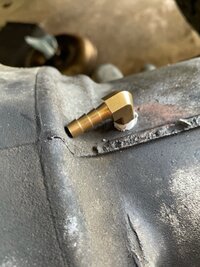
(Pictured: elbow threaded into new vent hole with teflon tape)
8. Re-insert the pump
I can't believe I don't have a picture of the gasket, but I don't. It looks like the old gasket only not brittle & broken. You may find that these next few steps are easier to do if the transmission is upright, which is easier said than done. I had 2 friends help me stand it up, being super careful not to have any weight on the rear yoke, and instead put the weight on the other side of the transfer case while resting on the transmission jack set high enough that the tail housing was still above the ground. I would have got a picture of that but we had our hands full at that moment.
Thread a couple of 5/16" studs into a couple of the bolt holes to serve as a guide to make sure the pump goes in perfectly aligned. You may have noticed all those holes on the pump & in the housing and gasket? If those aren't aligned then the pump won't be able to push fluid into the right places. You also likely won't be able to bolt up the pump, so maybe that's a moot point.
Gently place the gasket over the studs and lay it into the recessed area where the pump will sit. You may notice your gasket has a couple of holes less than your pump housing...that's ok, the OEM gasket is the same way. Next, align your pump properly slide it along the studs until you can't guide it in any further by hand.
3 Options for Driving it Home:
Case 1: the first 2 times we did this, it did not just drop into place. It took a little coaxing from a deadblow. However once it reached a certain point it fell right in, so it may be more of an alignment thing than it is a pounding thing. Regardless, if you need to pound it in, find something that will go over the input shaft, like a section of pipe or a comically deep & wide socket, just make sure it's not going to ride on the input shaft seal. I found that the old tail housing from when I did my SYE was a perfect fit. I slid that over, then put a 2x10 over that and pounded with big orange. At first there was no progress, then bam, it slipped all the way in.
I should also mention that if you turn it upright, you will absolutely spill more ATF out the cooler line fittings. So have cardboard down or whatever.
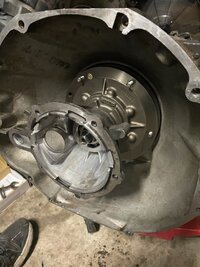
(Pictured: tail housing from a 231 perfectly fits over the input shaft and is wider than the seal seat. We attempted this horizontally at first with no luck.)
Case 2: The second time we did it, the pump would not drop in. I wondered if maybe that band adjuster was my problem, since I hadn't tightened it the first time. Since we were vertical I wasn't too worried about the drum falling out of position, so I loosened the band adjuster screw. One tap and it fell right in. So maybe that adjustment was preventing it from dropping in?
Case 3: for various reasons that aren't relevant here, immediately after case 2 I had to re-pull & re-align the pump slightly. I re-tightened the adjuster screw, re-aligned the pump, and it fell right in without any coercion whatsoever.
In any case, do not use the pump bolts to draw the pump into the housing. The housing is aluminum and I could see those threads getting damaged under those circumstances. Mine dropped right in so it was never an issue, although it was tempting during case 2 when it wouldn't fall in easily.
Lastly, tighten the pump bolts to 15 ft-lbs. Lower than what I expected.
9. Re-adjust the band
There is a documented procedure in the FSM, but it goes like this.
step 1) loosen the 3/4" lock nut several turns (I actually took mine off)
step 2) if your band adjuster screw is still tight, back it off several turns
step 3) tighten the screw to 72 inch-pounds
You may find it hard to torque this screw since it has a square head. Maybe you have an 8mm square socket in your box of hens teeth & Honus Wagner baseball cards, but if you don't, you may find an 8mm Crowfoot to be handy. Speaking of torquing bolts with a Crowfoot, make sure you're aware of how to do it properly:
https://www.tekton.com/how-to-accurately-use-a-torque-wrench-with-a-crowfoot-wrench
step 4) for a 32RH, back the adjuster screw off 2.25 turns. This backoff amount is different for a 30RH, check the FSM.
step 5) carefully thread the 3/4" lock nut over the adjuster screw being extremely careful to not turn the adjuster screw. I used the 8mm box wrench to hold it while my helper used a 3/4" box wrench to tighten it to 30 ft-lbs. I had to estimate this, as I was not willing to put a socket over it and lose the ability to hold the adjuster screw stationary. A 3/4" Crowfoot would solve this problem.
10. Add your hose & hose clamp to your new breather fitting
This won't be impossible to do while the transmission is in the jeep, but it's easier to do now. You'll have to route the hose after transmission re-install. Zip tying to the dipstick seems like an ok solution, but anything that gets it up high is great. Then find you one of those caps that lets it breathe but keeps dirt out, like what you find on differential/axle breather tubes. If somebody finds that part #, please post it here.
11. Re-install the transmission
Again, this is covered in other places so I won't go into detail, except to talk about the dipstick tube, since nobody ever talks about this. Once the trans is bolted in, you can re-insert the dipstick tube. You'll know it's in far enough when the bracket lines up with the hole in the bell housing. You might replace the O-ring, but good luck finding that part. One of the O-rings out of a Harbor Freight O-ring sampler pack may be perfect, IDK.
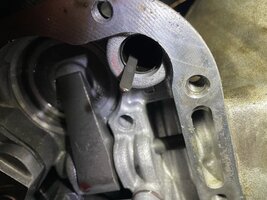
(Pictured: dipstick tube at the proper depth to tie it into the bell housing. It will go in further than this, and it will even feel more secure, but it won't bolt to the bracket...unless it's supposed to go in another inch further than this and bolt to the NEXT hole in the bell housing?)
12. Enjoy an Old Style, you earned it.
= = = = = = = = = = = = = =
So that's how I did it. I made plenty of mistakes along the way, but it all went back together ok, especially considering this was the first time I ever removed a transmission from a vehicle. There are a couple of other write-ups on other forums, but the all more or less tackle this the same way. The one variable in the process is where to put the new vent hole. Some do it about where I did, some people put it in the tail housing, one person even put it on the ridge where the bell housing transitions into the trans housing. A few people also report that ATF pukes up through the new vent tube, but there doesn't seem to be much correlation between vent location and puking.
If I missed a step or need clarification, don't hesitate to ask. I tried to document what I could, but I have a new respect for guys like Bleepin Jeep & Jeepsolid who get all this on film & narrated as they go.
This has been written up elsewhere, but our little forum didn't have a version, and there isn't a ton of chatter about this particular mod here, so maybe people don't know about it or just never drive through water. The crew I wheel with loves water, and several of the trails in Oklahoma are essentially river trails, so water is part of our lives.
The general premise is that the 32RH has a somewhat unconventional breather; it's just a hole inside the bell housing, behind the torque converter. Most other transmissions have the breather fitting on top of the transmission housing somewhere, with an attached hose that runs up into the engine compartment. What this means for us 3-speed auto drivers is that if you get water up to about your door sills, you very much run the risk of getting water up in that hole and down into your transmission. This is bad. Google it. So we will plug the factory hole and move it to a more traditional location.
You may be tempted to put an elbow fitting right into the existing vent hole. I was tempted, and even attempted this method. However there is so little clearance behind the torque converter that I was unable to get the fitting in deep enough to not still contact the torque converter. I really really tried to make that work. I couldn't do it. Maybe you're smarter than me. If so, please share.
This is what an elbow in the factory vent location might look like. Except it would not clear the torque converter once fully inserted.

(Pictured: attempting to make the elbow work in the factory vent location, and failing hard.)
Other stuff you may want to do at the same time, but not required:
Replace any bad sensors/wiring/pigtails that are harder to get at with the transmission in the jeep
Transmission mount
speedo gear if you have recently re-geared or changed tire size
speedo gear O-ring
transfer case shifter linkage to cable shifter
selector shaft seal, if leaking, or just peace of mind.
transmission dipstick O-ring
transmission pan with drain plug
.....and since your trans pan is off anyway, maybe add a bung for a trans temp sender?
if you want to get even deeper, because removing the exhaust is a little easier if the exhaust is already off the trans mount
Oil pump
Rear main seal
That's a lot of stuff to do for one measly breather tube, but once the transmission is out it's your one shot to do a lot of things.
Tools Required:
basically every wrench & socket in your toolbox
E12 (inverted torx) socket, to remove the top 2 bell housing bolts
8mm Crowfoot for torquing the band adjuster screw
inch-pound torque wrench
foot-pound torque wrench
A whole mess of extenders
Jack stands
Transmission jack
I found an additional floor jack to be handy as well
Slide hammer (borrow from Autozone)
a 3/8-16" bolt & washer upon which the slide hammer might slide & hammer
a couple of 5/16" all thread studs to help guide the pump back in place
Parts needed
New transmission pump gasket
optional: input shaft seal
optional: transmission pump O-ring (around the outside of the pump surface)
All that stuff came in this kit: https://www.oregonperformancetransmission.com/product/NTP-K12900-7.html
1/8" NPT / 1/4" barbed 90deg fitting - https://www.amazon.com/dp/B0753F3XVG/?tag=wranglerorg-20
1/8" NPT plug* - https://www.amazon.com/dp/B07439ZFXW/?tag=wranglerorg-20
1/8" NPT tap & drill bit - https://www.amazon.com/dp/B01M4RXY21/?tag=wranglerorg-20
Teflon tape
* Due to the nature of the tapered NPT fitting, a longer plug may be a better option to let it fit tighter as it threads deeper.
1. Remove the transmission
I'm not going to write up these steps in great detail because you can find them plenty of other places, but I will call out some details:
- remove the cooler lines from the transmission (16mm & 21mm iirc), but you may find it easier to remove them completely, as they tend to get hung up on bracketry etc
- I left the transfer case installed. It was more weight but with a transmission jack it actually helped balance the weight of the torque converter
- speaking of the torque converter, I'm told it's important to keep the TC in the same orientation as the flex plate, and to use the same bolts in the same positions when you reinstall. I used 4 different colors of spray paint to hit the bolt heads, the flex plate, and then the threaded hole of the TC. This worked great, there was no confusion about how to align it when it went back in.
- Removing the dipstick tube is something nobody seems to ever mention in this process. There's a bracket on the passenger side of the bell housing you need to unbolt, then it just sort of wiggles out. You MUST have the transmission drained before you complete this step. Ask me how I know. Never mind I'll tell you. The ATF level sits well above/into the dipstick tube at rest. When you remove the tube everything above that level will come out, in a hurry.
2. Remove the torque converter
It will just slide off, but it's pretty dang heavy, and it's also full of ATF so lay it on it's back, and then stuff a clean paper towel into the opening so you don't spill your Dr. Pepper and Golden Chick down in there you big goon. Also watch out that your transmission balance on the jack will change with the TC removed. You had it strapped to the jack, right?
3. Adjust the first band
This is straight out of the FSM, but you may have to do some cleanup first. Not everyone who does this work performs this step. I actually went through this piece of the process 3 times, I skipped it once, and did it the other two times. It's YOUR transmission, but I would do this step. It holds the outermost drum in place when you remove the pump here in a minute. If you do this horizontally, the drum will soft of fall forward and down, and MAY cause a thrust washer behind it to fall out of place. If you do it vertically, it's probably less of a problem.
a) clean the screw & bolt with brake kleen; you need both components to turn cleanly w/o one turning the other.
b) using an 8mm box wrench to hold the screw in place, use a 3/4" box wrench to remove the locking nut so you can clean it up, and the rest of the adjuster screw. Leave the adjuster screw in the transmission.
c) ensure the adjust screw turns freely; tighten it down into the transmission, and tighten down the locking nut over it.

(Pictured: square-headed band adjustment screw & 3/4" lock nut. Also appearing: selector shaft & seal)
4. Remove the transmission pump
Make a note of how recessed the pump is before you pull it out, for reference when you go to re-install it.
Remove all 6 bolts around the edge of the pump with a 1/2" socket. Note the location of the vent hole for when you put it back in. Next take a 3/8-16 bolt and use the slide hammer to remove the pump. 2 of the pump holes are threaded for this purpose. It took me 5 pulls on each bolt, alternating. You do not need to pull super hard, just a nice firm tug (TWSS) and then move to the other bolt.

(Pictured: using a rented slide hammer to extract the pump from the housing.)
If you're doing this horizontally, be careful not to let it fall all the way out and crash to the floor. As you remove the pump, note the condition of the gasket. None of the other write-ups mention replacing this gasket, but mine was torn & brittle so I opted to replace. I was not leaking before, so I opted to not replace the seals. Time will tell if that was a bad call. Also note the condition of the rubber O-ring that goes around the entire pump circumference. I had evidence that my trans was recently serviced, and that o-ring looked like it was in great shape. I opted to leave this as well.
If you did the band adjustment, you'll probably not notice that the transmission didn't fall out of the case on you. If you didn't do the adjustment, you will probably notice that it fell out on you.

(Pictured: first layer of transmission internals once the pump is removed. Note the drum remains centered on the input shaft, and does not fall slightly out & down. This is because I tightened that band before opening.)
5. Clean the pump mating surfaces
The pump itself is cast iron, so you can pretty much go to town with a scraper or razor blade. The transmission housing is aluminum, so be very careful here to not scratch anything.

(Pictured: back side of pump, along with the brittle & broken trans pump gasket.)
6. Plug the existing hole
The hole is already just about the same size as the drill bit that came with the tap, so I did not drill here. I put some anti-seize on my tap to grab any filings, and turned the pump upside down and tapped the hole from underneath. The hope was that any shavings the anti-seize didn't catch would just fall out. I believe this worked. I've seen other write-ups where they opened the pump, but I don't think it's necessary.
Now take your 1/8 NPT plug and wrap it with Teflon tape, and thread into the old vent hole. Don't go too far, it could drop into the pump and I'm confident that would be bad. Some people weld this shut. That seems like a non-reversible step.

(Pictured: old vent hole now plugged with a 1/8" NPT plug + teflon tape)
7. Drill/tap the new hole
To avoid getting all those shavings down in your transmission, take a piece of heavy paper or thin cardboard and smear grease all over it. Then bend it to match the curvature of the trans housing and slide it into the transmission above the drum and below the "roof" of the housing. When you drill & tap, the shavings will fall onto the grease and stick there. This absolutely works. Make sure it's in deep enough so the shavings don't land right on the edge of the grease paper.

(Pictured: grease smeared onto a sheet of cardstock I borrowed from wife's craft room)
Pick a spot where you want to drill your hole. Too far forward and you can interfere with the pump. Too far back and you risk fluid being slung into the tube. I aimed for a spot that was over the first band, but far enough back that I would be able to turn the elbow fitting w/o hitting the "step" where the bell housing transitions into the trans housing. (Actually I was a bout 1/8" too close still, and I had to shave one barb off my fitting to allow it to turn. Don't be like me).
Drill slowly & carefully. You don't want your bit to shoot through the hole and hit the drum/band, and you don't want your bit to stir up all those shavings you worked so hard to keep in check. Once you're done, make sure you get all the shavings out of the hole while your paper is there to catch them. Then remove the paper and throw it away unless you're planning to recycle the paper & aluminum.

(Pictured: grease paper inserted into top of transmission, with drill & tap shavings nicely caught by the grease)
7. Thread in your fitting
Wrap with a few turns of teflon tape, and thread your fitting into your new hole. no need to make it flush on the inside, just get it in & tight, and then pointing to the about 2 o'clock on the passenger side, since we're going to route our vent hose along the dipstick tube. Note that I was a shade too close after all that planning, and ended up grinding off one barb. Would love to have that moment back.

(Pictured: elbow threaded into new vent hole with teflon tape)
8. Re-insert the pump
I can't believe I don't have a picture of the gasket, but I don't. It looks like the old gasket only not brittle & broken. You may find that these next few steps are easier to do if the transmission is upright, which is easier said than done. I had 2 friends help me stand it up, being super careful not to have any weight on the rear yoke, and instead put the weight on the other side of the transfer case while resting on the transmission jack set high enough that the tail housing was still above the ground. I would have got a picture of that but we had our hands full at that moment.
Thread a couple of 5/16" studs into a couple of the bolt holes to serve as a guide to make sure the pump goes in perfectly aligned. You may have noticed all those holes on the pump & in the housing and gasket? If those aren't aligned then the pump won't be able to push fluid into the right places. You also likely won't be able to bolt up the pump, so maybe that's a moot point.
Gently place the gasket over the studs and lay it into the recessed area where the pump will sit. You may notice your gasket has a couple of holes less than your pump housing...that's ok, the OEM gasket is the same way. Next, align your pump properly slide it along the studs until you can't guide it in any further by hand.
3 Options for Driving it Home:
Case 1: the first 2 times we did this, it did not just drop into place. It took a little coaxing from a deadblow. However once it reached a certain point it fell right in, so it may be more of an alignment thing than it is a pounding thing. Regardless, if you need to pound it in, find something that will go over the input shaft, like a section of pipe or a comically deep & wide socket, just make sure it's not going to ride on the input shaft seal. I found that the old tail housing from when I did my SYE was a perfect fit. I slid that over, then put a 2x10 over that and pounded with big orange. At first there was no progress, then bam, it slipped all the way in.
I should also mention that if you turn it upright, you will absolutely spill more ATF out the cooler line fittings. So have cardboard down or whatever.

(Pictured: tail housing from a 231 perfectly fits over the input shaft and is wider than the seal seat. We attempted this horizontally at first with no luck.)
Case 2: The second time we did it, the pump would not drop in. I wondered if maybe that band adjuster was my problem, since I hadn't tightened it the first time. Since we were vertical I wasn't too worried about the drum falling out of position, so I loosened the band adjuster screw. One tap and it fell right in. So maybe that adjustment was preventing it from dropping in?
Case 3: for various reasons that aren't relevant here, immediately after case 2 I had to re-pull & re-align the pump slightly. I re-tightened the adjuster screw, re-aligned the pump, and it fell right in without any coercion whatsoever.
In any case, do not use the pump bolts to draw the pump into the housing. The housing is aluminum and I could see those threads getting damaged under those circumstances. Mine dropped right in so it was never an issue, although it was tempting during case 2 when it wouldn't fall in easily.
Lastly, tighten the pump bolts to 15 ft-lbs. Lower than what I expected.
9. Re-adjust the band
There is a documented procedure in the FSM, but it goes like this.
step 1) loosen the 3/4" lock nut several turns (I actually took mine off)
step 2) if your band adjuster screw is still tight, back it off several turns
step 3) tighten the screw to 72 inch-pounds
You may find it hard to torque this screw since it has a square head. Maybe you have an 8mm square socket in your box of hens teeth & Honus Wagner baseball cards, but if you don't, you may find an 8mm Crowfoot to be handy. Speaking of torquing bolts with a Crowfoot, make sure you're aware of how to do it properly:
https://www.tekton.com/how-to-accurately-use-a-torque-wrench-with-a-crowfoot-wrench
step 4) for a 32RH, back the adjuster screw off 2.25 turns. This backoff amount is different for a 30RH, check the FSM.
step 5) carefully thread the 3/4" lock nut over the adjuster screw being extremely careful to not turn the adjuster screw. I used the 8mm box wrench to hold it while my helper used a 3/4" box wrench to tighten it to 30 ft-lbs. I had to estimate this, as I was not willing to put a socket over it and lose the ability to hold the adjuster screw stationary. A 3/4" Crowfoot would solve this problem.
10. Add your hose & hose clamp to your new breather fitting
This won't be impossible to do while the transmission is in the jeep, but it's easier to do now. You'll have to route the hose after transmission re-install. Zip tying to the dipstick seems like an ok solution, but anything that gets it up high is great. Then find you one of those caps that lets it breathe but keeps dirt out, like what you find on differential/axle breather tubes. If somebody finds that part #, please post it here.
11. Re-install the transmission
Again, this is covered in other places so I won't go into detail, except to talk about the dipstick tube, since nobody ever talks about this. Once the trans is bolted in, you can re-insert the dipstick tube. You'll know it's in far enough when the bracket lines up with the hole in the bell housing. You might replace the O-ring, but good luck finding that part. One of the O-rings out of a Harbor Freight O-ring sampler pack may be perfect, IDK.

(Pictured: dipstick tube at the proper depth to tie it into the bell housing. It will go in further than this, and it will even feel more secure, but it won't bolt to the bracket...unless it's supposed to go in another inch further than this and bolt to the NEXT hole in the bell housing?)
12. Enjoy an Old Style, you earned it.
= = = = = = = = = = = = = =
So that's how I did it. I made plenty of mistakes along the way, but it all went back together ok, especially considering this was the first time I ever removed a transmission from a vehicle. There are a couple of other write-ups on other forums, but the all more or less tackle this the same way. The one variable in the process is where to put the new vent hole. Some do it about where I did, some people put it in the tail housing, one person even put it on the ridge where the bell housing transitions into the trans housing. A few people also report that ATF pukes up through the new vent tube, but there doesn't seem to be much correlation between vent location and puking.
If I missed a step or need clarification, don't hesitate to ask. I tried to document what I could, but I have a new respect for guys like Bleepin Jeep & Jeepsolid who get all this on film & narrated as they go.

