Stereo system upgrade

HoosierRich

Member
Joined
May 15, 2020
Messages
39
Location
Indiana
So a couple friends and I did stereo system upgrades recently (my buddy has the 95 Sahara in the background) I based the equipment on some suggestions on this board, budget, and desire to keep a factory look. I snapped some pics along the way, although not as many as I should have!

Here’s the list of what I installed:
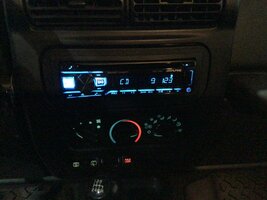
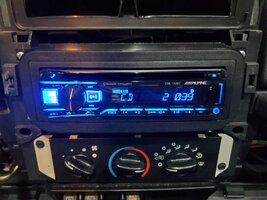
Head Unit - Alpine CDE 172 BT Alpine Head Unit

Amp - Soundstream Picasso Nano amp

Front Speakers - Kicker 5 1/4“ CSC5 Front Speakers

Rear Soundbar Speakers -Kicker 5 1/4” CSC5 Rear soundbar speakers

Sub (retrofit into center console sub) - Kicker CompRT 6.75”Console subwoofer

Amp wire kit - TopstrongGear 8 Guage Amp wire kit

8081BCB0-B7FD-42E1-B6C6-D308BDABA41E.jpeg


18EBA1A2-8609-4B13-8801-BEF22600C6FC.jpeg


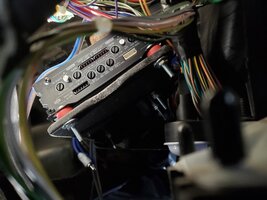
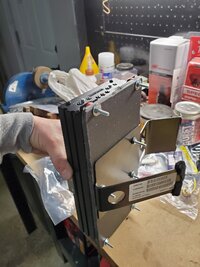
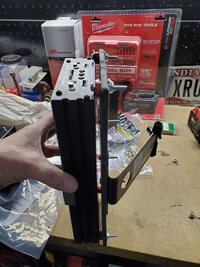
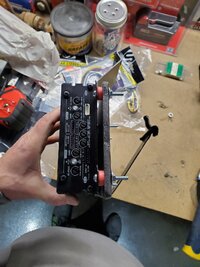
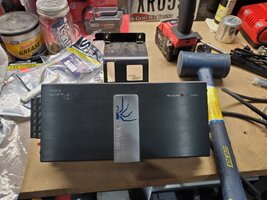
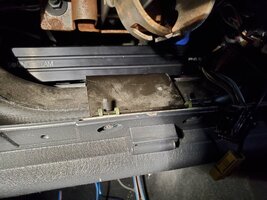
First thing I tackled was where to put the amp! Some on this board suggested under the steering column, so that’s where I started. I ran into an issue where it looked like there was already a small “box” installed on a bracket in that location. I discovered this was a factory installed satellite radio module. I decided to remove the old module and attempt to use the mounting bracket from it for a nice clean install spot. I did use a cutting board with some spacers to allow the amp to “breathe” on all sides.
31D510C9-360A-4DC9-9092-B931B86EAF3E.jpeg 43388063-FACC-47E9-A295-0622B892D4FA.jpeg 954E72EE-CB25-4169-ABBA-4EFEA8F7CA96.jpeg 08A1036F-2FBF-4E6A-BB26-63EEF96EF43B.jpeg


Next I mounted the amp in the factory bracket location under the steering column.


DF76E415-9D02-45DA-844B-1071B11F3446.jpeg 1A069844-0964-4F6B-AFD5-1AE552C571D2.jpeg

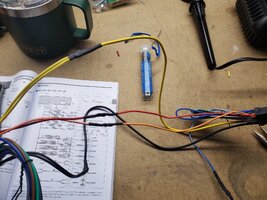
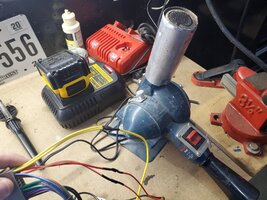
Next came soldering and heat shrinking all connections for the wiring.

91F81C42-28F8-4C59-9F68-FE48DA14E100.jpeg19617713-3CCA-498D-ACC5-D89F81D3F0B0.jpeg

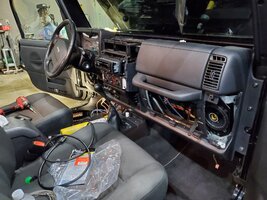
Ran all the wiring within the dash for the speakers, to the amp, and routed to the head unit. It was at this time I tackled the center console sub. I forgot to take pics during this as well as during routing the wiring up the roll bar and into the soundbar (speaker pods). I removed the center console to run the speaker wire under it and hide the wiring. The sub install required snipping some of the interior baffles of the factory sub box, but I was able to screw into the previous sub mounting hole. I removed the old amp from the center console box and covered the hole with Eastwood sound deadening material. I then reinstalled in reverse order.
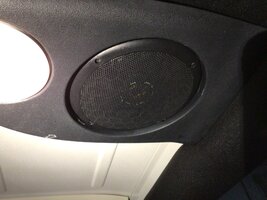
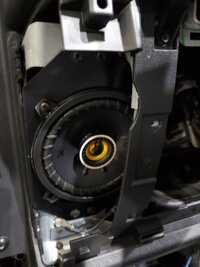
After reinstalling the console sub and running all other wires I was able to install the speakers. I used Crutchfield relocation brackets for the front speakers. The rear speakers fit perfectly into the pods.

3F9BEF31-2069-437A-A3F8-0CC538E2C2D6.jpeg ED15C75E-0C9E-44AE-AA7D-104DBC098CAC.jpegAA3FD793-E02B-4EBF-83B3-B7DFB0D44D5B.jpeg

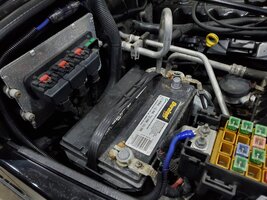
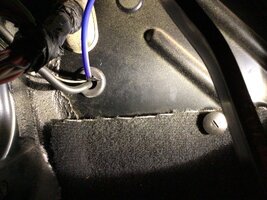
I ran the power wire through the firewall in the driver footwell by carefully cutting a slit into the hardtop washer fluid line grommet.

0F8B84FF-5903-4672-A129-EC170E959ECB.jpeg 7C9DCB91-0C61-461B-B0B1-2F553C15CFB7.jpeg

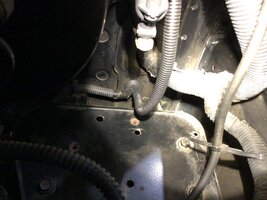
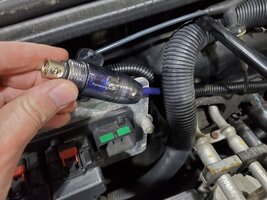
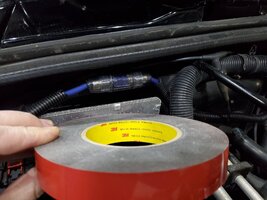
As you can see in the second pic above, I put sheath around the 8 gauge wire to run through the engine bay. I then mounted the inline fuse with 3m two sided tape to the firewall above the battery. I connected the wire by bolting onto the positive connection in the fuse block.

0D859259-5846-4289-8ACB-EC7482DB4DA2.jpeg 80A91655-7AC8-478B-AFAA-E88ACE6EFBD7.jpeg 07FAF6AF-C315-44B8-89E8-38AD1396AFB0.jpeg


Finally I installed and connected the head unit and began the fun of fine tuning the amp!

5474FEC2-82DB-46D4-BED8-F975D5554250.jpeg 149F127F-BE2A-4F3E-BEE0-875C0AFE9D54.jpeg

EBA9FE52-0013-45D4-9BB1-9E40A5117E93.jpeg
 
Very nice! I went with Polk Speakers DB462s(4"x6") for the front, Polk DB 522s(5.25") for the sound bar, and this Kenwood headunit. I also put as much polyfill stuffing as I could fit inside the sound bar and behind the front speakers. Currently, im looking at putting an 8" Kicker amp in my center console (custom ammo can) and mounting an amp to it. I also sound deadened my interior with noico 80 mil and Bedrug carpet. I love to see others setups as im becoming an audiophile.

Here are some pics of my setup so far
155888-388429ae76508b48895822360f5b010b.jpg
155890-bbca037cab7d102b9b29f9f2112314fe.jpg
214811-cb65cd5b91744fd34e5c0b8c04f54028.jpg
28ee4ea6-0065-47b8-b551-ab3016b237ff-jpeg.jpg
 
Very nice! I went with Polk Speakers DB462s(4"x6") for the front, Polk DB 522s(5.25") for the sound bar, and this Kenwood headunit. I also put as much polyfill stuffing as I could fit inside the sound bar and behind the front speakers. Currently, im looking at putting an 8" Kicker amp in my center console (custom ammo can) and mounting an amp to it. I also sound deadened my interior with noico 80 mil and Bedrug carpet. I love to see others setups as im becoming an audiophile.

Here are some pics of my setup so far
View attachment 233716View attachment 233717View attachment 233718View attachment 233719
Thank you, You have a great set up too. I definitely think I would appreciate an 8” sub, but I wanted to keep it in the factory console location. I didn’t do the poly yet, but figure that’s an easy thing to go back and add
 
  • Like
Reactions: D M
Thank you, You have a great set up too. I definitely think I would appreciate an 8” sub, but I wanted to keep it in the factory console location. I didn’t do the poly yet, but figure that’s an easy thing to go back and add
I can tell you 100% that the poly made a big difference. Easy, cheap, and well worth the sound improvement. I bought mine here if you need some, they give you a huge bag that will give you lots leftover and then some
 
Quick question, what brackets did you use to get the 5.25" in the front? Im kicking myself because after I ordered the 4x6s, I found out people were fitting 5.25s in the front
 
Quick question, what brackets did you use to get the 5.25" in the front? Im kicking myself because after I ordered the 4x6s, I found out people were fitting 5.25s in the front
The brackets were included free from Crutchfield which is where the front speakers actually were bought. They sell the brackets pretty cheap on Amazon too. Jeep front speaker mounting bracket
 
Pretty sure I crammed 6.5s in my dash. I had to trim the speaker with Tin snips. The plastic cover bulges slightly. I didn’t use brackets I had to get creative with the mounting.
 
So a couple friends and I did stereo system upgrades recently (my buddy has the 95 Sahara in the background) I based the equipment on some suggestions on this board, budget, and desire to keep a factory look. I snapped some pics along the way, although not as many as I should have!

Here’s the list of what I installed:
Head Unit - Alpine CDE 172 BT Alpine Head Unit

Amp - Soundstream Picasso Nano amp

Front Speakers - Kicker 5 1/4“ CSC5 Front Speakers

Rear Soundbar Speakers -Kicker 5 1/4” CSC5 Rear soundbar speakers

Sub (retrofit into center console sub) - Kicker CompRT 6.75”Console subwoofer

Amp wire kit - TopstrongGear 8 Guage Amp wire kit

View attachment 233700

View attachment 233693

First thing I tackled was where to put the amp! Some on this board suggested under the steering column, so that’s where I started. I ran into an issue where it looked like there was already a small “box” installed on a bracket in that location. I discovered this was a factory installed satellite radio module. I decided to remove the old module and attempt to use the mounting bracket from it for a nice clean install spot. I did use a cutting board with some spacers to allow the amp to “breathe” on all sides.
View attachment 233694 View attachment 233695 View attachment 233696 View attachment 233697


Next I mounted the amp in the factory bracket location under the steering column.


View attachment 233698 View attachment 233699

Next came soldering and heat shrinking all connections for the wiring.

View attachment 233707View attachment 233708

Ran all the wiring within the dash for the speakers, to the amp, and routed to the head unit. It was at this time I tackled the center console sub. I forgot to take pics during this as well as during routing the wiring up the roll bar and into the soundbar (speaker pods). I removed the center console to run the speaker wire under it and hide the wiring. The sub install required snipping some of the interior baffles of the factory sub box, but I was able to screw into the previous sub mounting hole. I removed the old amp from the center console box and covered the hole with Eastwood sound deadening material. I then reinstalled in reverse order.
After reinstalling the console sub and running all other wires I was able to install the speakers. I used Crutchfield relocation brackets for the front speakers. The rear speakers fit perfectly into the pods.

View attachment 233706 View attachment 233705View attachment 233714

I ran the power wire through the firewall in the driver footwell by carefully cutting a slit into the hardtop washer fluid line grommet.

View attachment 233712 View attachment 233713

As you can see in the second pic above, I put sheath around the 8 gauge wire to run through the engine bay. I then mounted the inline fuse with 3m two sided tape to the firewall above the battery. I connected the wire by bolting onto the positive connection in the fuse block.

View attachment 233704 View attachment 233703 View attachment 233702


Finally I installed and connected the head unit and began the fun of fine tuning the amp!

View attachment 233701 View attachment 233715

View attachment 233709
Great job!
 
  • Like
Reactions: HoosierRich
So a couple friends and I did stereo system upgrades recently (my buddy has the 95 Sahara in the background) I based the equipment on some suggestions on this board, budget, and desire to keep a factory look. I snapped some pics along the way, although not as many as I should have!

Here’s the list of what I installed:
Head Unit - Alpine CDE 172 BT Alpine Head Unit

Amp - Soundstream Picasso Nano amp

Front Speakers - Kicker 5 1/4“ CSC5 Front Speakers

Rear Soundbar Speakers -Kicker 5 1/4” CSC5 Rear soundbar speakers

Sub (retrofit into center console sub) - Kicker CompRT 6.75”Console subwoofer

Amp wire kit - TopstrongGear 8 Guage Amp wire kit

View attachment 233700

View attachment 233693

First thing I tackled was where to put the amp! Some on this board suggested under the steering column, so that’s where I started. I ran into an issue where it looked like there was already a small “box” installed on a bracket in that location. I discovered this was a factory installed satellite radio module. I decided to remove the old module and attempt to use the mounting bracket from it for a nice clean install spot. I did use a cutting board with some spacers to allow the amp to “breathe” on all sides.
View attachment 233694 View attachment 233695 View attachment 233696 View attachment 233697


Next I mounted the amp in the factory bracket location under the steering column.


View attachment 233698 View attachment 233699

Next came soldering and heat shrinking all connections for the wiring.

View attachment 233707View attachment 233708

Ran all the wiring within the dash for the speakers, to the amp, and routed to the head unit. It was at this time I tackled the center console sub. I forgot to take pics during this as well as during routing the wiring up the roll bar and into the soundbar (speaker pods). I removed the center console to run the speaker wire under it and hide the wiring. The sub install required snipping some of the interior baffles of the factory sub box, but I was able to screw into the previous sub mounting hole. I removed the old amp from the center console box and covered the hole with Eastwood sound deadening material. I then reinstalled in reverse order.
After reinstalling the console sub and running all other wires I was able to install the speakers. I used Crutchfield relocation brackets for the front speakers. The rear speakers fit perfectly into the pods.

View attachment 233706 View attachment 233705View attachment 233714

I ran the power wire through the firewall in the driver footwell by carefully cutting a slit into the hardtop washer fluid line grommet.

View attachment 233712 View attachment 233713

As you can see in the second pic above, I put sheath around the 8 gauge wire to run through the engine bay. I then mounted the inline fuse with 3m two sided tape to the firewall above the battery. I connected the wire by bolting onto the positive connection in the fuse block.

View attachment 233704 View attachment 233703 View attachment 233702


Finally I installed and connected the head unit and began the fun of fine tuning the amp!

View attachment 233701
So a couple friends and I did stereo system upgrades recently (my buddy has the 95 Sahara in the background) I based the equipment on some suggestions on this board, budget, and desire to keep a factory look. I snapped some pics along the way, although not as many as I should have!

Here’s the list of what I installed:
Head Unit - Alpine CDE 172 BT Alpine Head Unit

Amp - Soundstream Picasso Nano amp

Front Speakers - Kicker 5 1/4“ CSC5 Front Speakers

Rear Soundbar Speakers -Kicker 5 1/4” CSC5 Rear soundbar speakers

Sub (retrofit into center console sub) - Kicker CompRT 6.75”Console subwoofer

Amp wire kit - TopstrongGear 8 Guage Amp wire kit

View attachment 233700

View attachment 233693

First thing I tackled was where to put the amp! Some on this board suggested under the steering column, so that’s where I started. I ran into an issue where it looked like there was already a small “box” installed on a bracket in that location. I discovered this was a factory installed satellite radio module. I decided to remove the old module and attempt to use the mounting bracket from it for a nice clean install spot. I did use a cutting board with some spacers to allow the amp to “breathe” on all sides.
View attachment 233694 View attachment 233695 View attachment 233696 View attachment 233697


Next I mounted the amp in the factory bracket location under the steering column.


View attachment 233698 View attachment 233699

Next came soldering and heat shrinking all connections for the wiring.

View attachment 233707View attachment 233708

Ran all the wiring within the dash for the speakers, to the amp, and routed to the head unit. It was at this time I tackled the center console sub. I forgot to take pics during this as well as during routing the wiring up the roll bar and into the soundbar (speaker pods). I removed the center console to run the speaker wire under it and hide the wiring. The sub install required snipping some of the interior baffles of the factory sub box, but I was able to screw into the previous sub mounting hole. I removed the old amp from the center console box and covered the hole with Eastwood sound deadening material. I then reinstalled in reverse order.
After reinstalling the console sub and running all other wires I was able to install the speakers. I used Crutchfield relocation brackets for the front speakers. The rear speakers fit perfectly into the pods.

View attachment 233706 View attachment 233705View attachment 233714

I ran the power wire through the firewall in the driver footwell by carefully cutting a slit into the hardtop washer fluid line grommet.

View attachment 233712 View attachment 233713

As you can see in the second pic above, I put sheath around the 8 gauge wire to run through the engine bay. I then mounted the inline fuse with 3m two sided tape to the firewall above the battery. I connected the wire by bolting onto the positive connection in the fuse block.

View attachment 233704 View attachment 233703 View attachment 233702


Finally I installed and connected the head unit and began the fun of fine tuning the amp!

View attachment 233701 View attachment 233715

View attachment 233709
IMG_20210309_163156643.jpg
IMG_20210309_163550067.jpg
IMG_20210309_163058624.jpg
 
So a couple friends and I did stereo system upgrades recently (my buddy has the 95 Sahara in the background) I based the equipment on some suggestions on this board, budget, and desire to keep a factory look. I snapped some pics along the way, although not as many as I should have!

Here’s the list of what I installed:
Head Unit - Alpine CDE 172 BT Alpine Head Unit

Amp - Soundstream Picasso Nano amp

Front Speakers - Kicker 5 1/4“ CSC5 Front Speakers

Rear Soundbar Speakers -Kicker 5 1/4” CSC5 Rear soundbar speakers

Sub (retrofit into center console sub) - Kicker CompRT 6.75”Console subwoofer

Amp wire kit - TopstrongGear 8 Guage Amp wire kit

View attachment 233700

View attachment 233693

First thing I tackled was where to put the amp! Some on this board suggested under the steering column, so that’s where I started. I ran into an issue where it looked like there was already a small “box” installed on a bracket in that location. I discovered this was a factory installed satellite radio module. I decided to remove the old module and attempt to use the mounting bracket from it for a nice clean install spot. I did use a cutting board with some spacers to allow the amp to “breathe” on all sides.
View attachment 233694 View attachment 233695 View attachment 233696 View attachment 233697


Next I mounted the amp in the factory bracket location under the steering column.

View attachment 233698 View attachment 233699

Next came soldering and heat shrinking all connections for the wiring.
View attachment 233707View attachment 233708

Ran all the wiring within the dash for the speakers, to the amp, and routed to the head unit. It was at this time I tackled the center console sub. I forgot to take pics during this as well as during routing the wiring up the roll bar and into the soundbar (speaker pods). I removed the center console to run the speaker wire under it and hide the wiring. The sub install required snipping some of the interior baffles of the factory sub box, but I was able to screw into the previous sub mounting hole. I removed the old amp from the center console box and covered the hole with Eastwood sound deadening material. I then reinstalled in reverse order.
After reinstalling the console sub and running all other wires I was able to install the speakers. I used Crutchfield relocation brackets for the front speakers. The rear speakers fit perfectly into the pods.
View attachment 233706 View attachment 233705View attachment 233714

I ran the power wire through the firewall in the driver footwell by carefully cutting a slit into the hardtop washer fluid line grommet.
View attachment 233712 View attachment 233713

As you can see in the second pic above, I put sheath around the 8 gauge wire to run through the engine bay. I then mounted the inline fuse with 3m two sided tape to the firewall above the battery. I connected the wire by bolting onto the positive connection in the fuse block.
View attachment 233704 View attachment 233703 View attachment 233702


Finally I installed and connected the head unit and began the fun of fine tuning the amp!
View attachment 233701 View attachment 233715

View attachment 233709
Did you do anything up front?
I ask because I installed an JL / Hertz set up. I put some tweeters in the pillars to raise the soundstage and brining to the front and added some components down in the footwell too for same reason. I put sound deadening inside overhead and this made a biff difference too.

5338B195-4477-421A-9C47-24D1EC35A3AB.jpeg


491572F4-FB52-4198-8EC6-9AACB8608F10.jpeg


4AA401D7-2823-4DC2-84E1-4FE0AC04AA17.jpeg


0ED6C27D-0FEB-478C-B173-9302F7B1F43D.jpeg


4C2C9B5A-47CE-4DC2-81E6-D5A0145D904F.jpeg


2AFE2835-7196-4A6C-945B-55FA43C0D4F4.jpeg


4E84CFB3-02EC-42F5-9185-7F00DD7CC6C7.jpeg


97485B6D-C3EA-49F1-AC7C-F66E962DB5AC.jpeg
 
  • Like
Reactions: Tranz Zam
Ya just some kickers but now thinking about component speakers all around and 10w's built into my seat.... Why did you go that way with your subs? Is it better?