The Tool or Jewel LJR build thread

I've had the doors off since the weather turned nice, but I thought it would be easier to flip a switch to turn on the dome lights, rather than pull and replace fuse #4 every time.

I have roof lights that were installed by the PO, or maybe the PO before him, and I'm not sure if it was done DIY or professionally. I'm leaning toward DIY since they had the power wires running into the cab to the relay they shoved up under the dash.
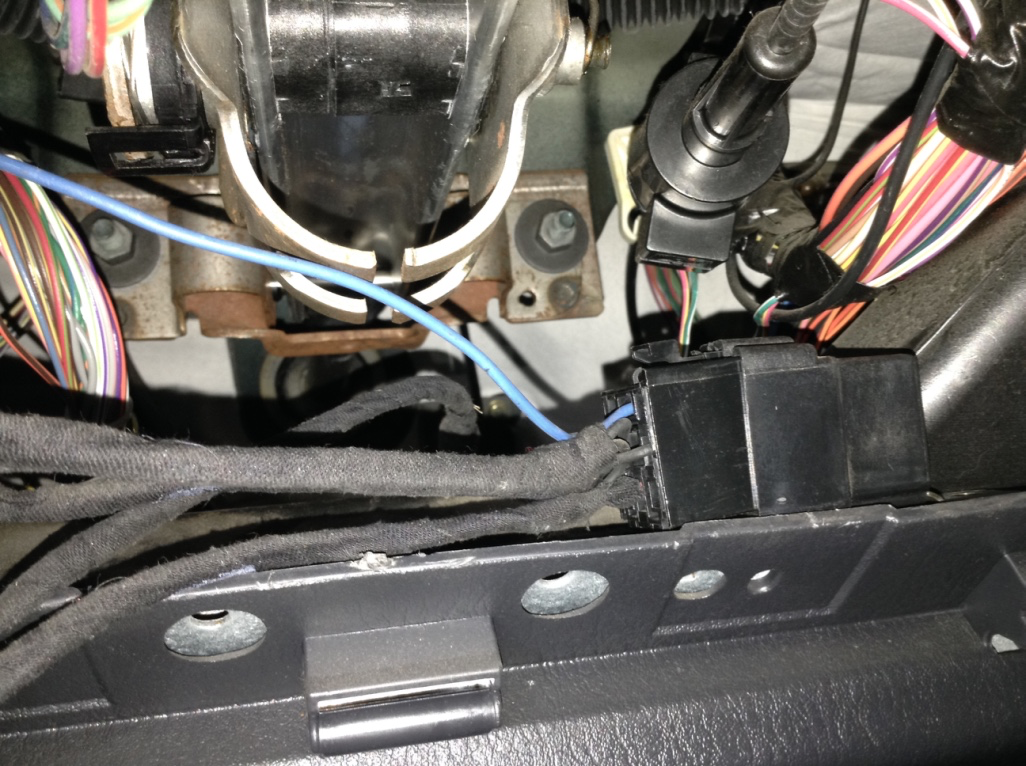
1585748102723.png


They also spliced into the existing wiring with a solder joint wrapped in hockey tape. While it certainly works, it's not the way I would have done things.
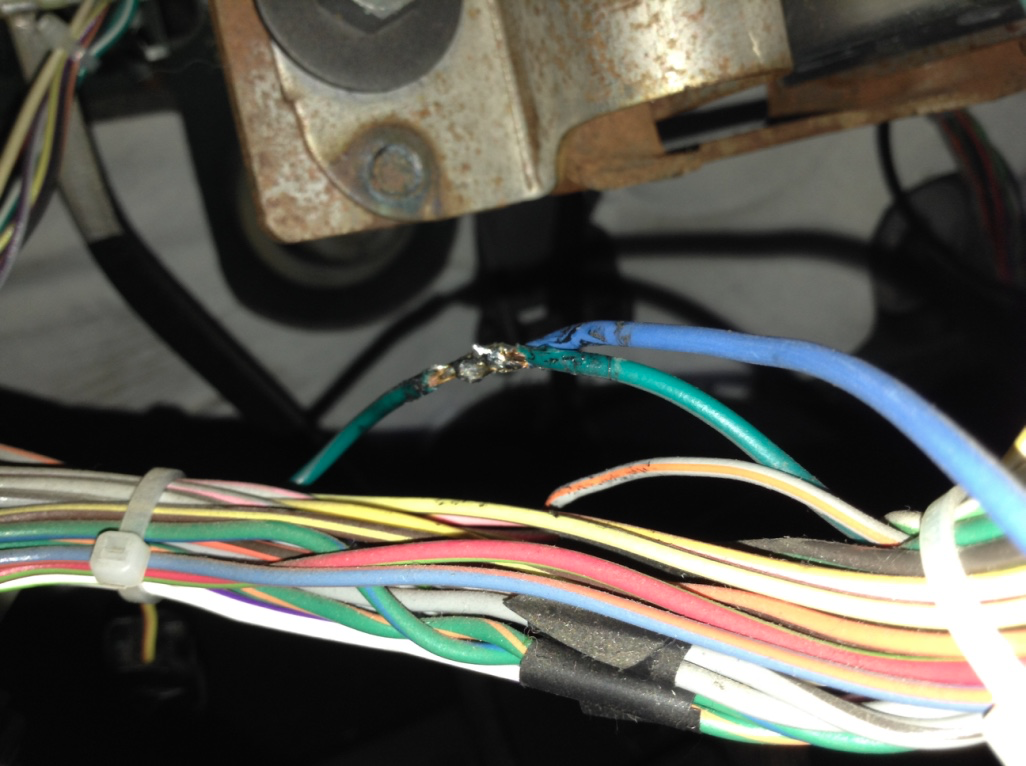
1585748177335.png


The roof lights were wired to a switch placed to the right of the steering wheel, but I plan on relocating the light switch (and all the other wiring) later on, so I decided to re-purpose it for the dome lights. It's far enough out of the way that it won't accidentally get hit.

Once I pulled the fuse panel there are three wires coming off fuse 4. The yellow/green wires run from the plunger switches on the doors, and the black wire is ground. I figured it would be easier to interrupt the side with one wire.
IMG_0368 copy.jpg


I ran some 18g wire behind the AC controls and butt-spliced them in, making sure to leave myself plenty of slack to get the panel off and out of the way in the future.
1585749303791.png


Then I crimped in some quick-disconnects and joined everything together. I put male and female ends on the ground wire ends, so if I ever decide to delete the switch I can just reconnect the grounds to each other.
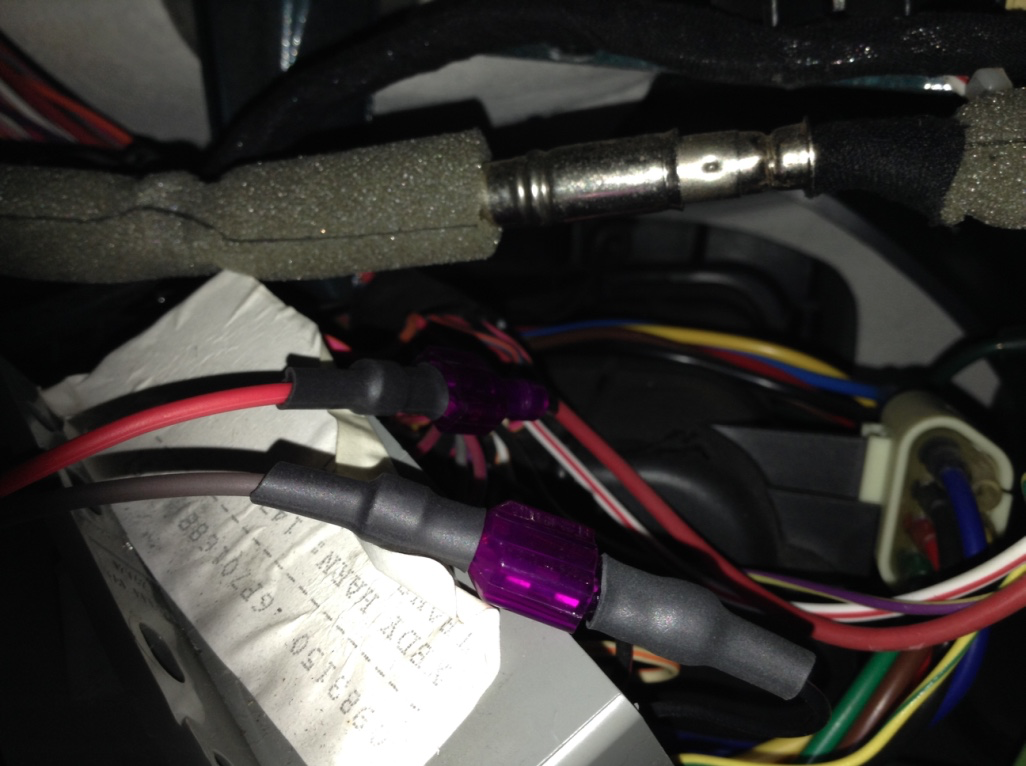
1585749551102.png


The switch also now serves as a dome light illuminator (when the doors are off) that's easier to fiddle with than the one on the steering column.

1585751521847.png


But only after I did all this did I discover the rear-tailgate-dome-light mod, which is something I'd like to do.
 
Last edited:
In addition to the Big 3 upgrade, I wanted to do something to allow for easy electric accessory expansion. I considered Bleepin Jeep's DIX relay box, but wanted something less...janky? Plus, I don't have much in the way of junkyards where I live. Most of them are just scrappers who immediately turn the vehicle into a nondescript block of metal.

I explored some other "relay boxes" on Amazon, but none of them seemed to fit the bill for waterproofing, durability and quality. Then I wandered through Bodenzord's DIY fuse/ relay block writeup and knew that it was the way I wanted to go. But if you add up everything on his shopping list, it's over $500, so I wanted to cut some corners where I could.

1586996360362.png
 
I, like most, had some open space behind the washer fluid reservoir, so I mocked up a cardboard template for the bracket I was going to use to mount the relay box.

1586996612001.png


I mostly used existing bolts that mount the cruise control to the fender (I think that's what that is). The last hole (bottom right) is perfectly sized for a 1/4- 20 tap, so that's what I did.

IMG_0328 copy.jpg


We'll see how sturdy it is with only three legs, and I may end up adding more somehow if it's not stable enough.

The final cardboard mockup looked like this, and i cut and bent it out of some sheet metal I had around. Not sure the gauge, but fairly stout.

1586997080967.png


1586997099373.png
 
Building the Bussmann itself was something I've slowly been working on since February. I pretty much followed the directions in the writeup, and took some tips from this thread as well. Since I'll be adding accessories piecemeal, I didn't want to commit to using the fancy pants connectors that Bodenzord uses. I figured I could get away with butt connectors, quick disconnects and ring terminals, and be able to add pieces and parts one at a time.

1586997782800.png


This was the whole setup before I installed the wiring coming from the fuses and the relays' pin 87.

and after

1586998052287.png


backside. I ran out of red 10awg, so the black is hard to see.

1586998106940.png
 
  • Like
Reactions: Nickgsjeep
Building the Bussmann itself was something I've slowly been working on since February. I pretty much followed the directions in the writeup, and took some tips from this thread as well. Since I'll be adding accessories piecemeal, I didn't want to commit to using the fancy pants connectors that Bodenzord uses. I figured I could get away with butt connectors, quick disconnects and ring terminals, and be able to add pieces and parts one at a time.

View attachment 153108

This was the whole setup before I installed the wiring coming from the fuses and the relays' pin 87.

and after

View attachment 153112

backside. I ran out of red 10awg, so the black is hard to see.

View attachment 153113
Wizardry
 
IMG_0518 copy.jpg


On the left, power flows from pin 87 on the relays into a bus that's paired with the opposite screw, which then flows off to whatever accessory I'm trying to control. In this case, some roof lights. Ground returns to the bus just opposite.

On the right, fused power flows into a similar bus and then on to whatever I'm controlling that doesn't need a relay. In this case, power for my locker defeat solution.

Like I said, hopefully this will allow things to be more interchangeable than in the tutorial.

All the cabling (wires for the switches and any accessories that are in the cab) comes right through the driver's side firewall.

1587001482460.png
 
I posted this in the locker defeat thread too, but might as well put it here too if I'm going to use this as a catalogue of mods.

I wanted to do the Wanderingtrail locker defeat mod to give myself more versatility. Stock lockers only work if certain system conditions are met and I, like most, would much rather have them work whenever I told them to.

Their instructions are pretty self-explanatory, but I didn't like that some of the steps seemed more appropriate for trail fixes and not for controlled, in-the-garage mods. I wanted to go for the full defeat, meaning the lockers could be engaged at any speed and in any transfer case position, but I didn't like that the only thing between me and potentially destroying my diff would be a toggle switch with a cover. I have a nephew that loves to touch stuff, and I can only imagine the destruction he could inflict. Plus, I'm not the hugest fan of how the safety toggles look, so I picked up a few switches from OTRATTW.

The simplest way to have a 3-switch system is to tie pins 6 and 7 to ground via two switches, but have a third that interrupts the path AFTER the individual locker switch, but BEFORE the ground, as in the diagram below.

Screen Shot 2020-04-16 at 10.54.37 AM.png

This way, the "locker power" switch needs to be actuated before the F/R switches will work. My first idea was to remove the stock locker switch and replace it with a OTRATTW locking rocker, keeping everything close together. But it turns out that the OTRATTW switches don't fit into the stock space without a lot of effort.

1587049401961.png


I could have gone with a stock-looking on/ off switch from amazon, but the man-child in me wanted something a little more "kewl."

I also spent a lot of time looking at FSMs trying to figure how exactly I could get some things like the dash indicator lights and speed-related safety interlocks to work even with the mod in place, but in place of the switch on the FSM wiring diagram is a big box that says LOGIC. In the real world, that looks something like this

1587049753401.png


So I gave up on that idea and just focused on actuating the lockers with as much stock wiring as possible.
 
I also had been looking at sPODs, and liked the idea and look of the switches up in the header. I had already started working on the Bussmann, so I had no need for the whole sPOD system, and I was finding it hard to find just the header trim with switch cutouts, but the more I looked at it, the more it seemed like the sPOD header was the same dimensions as the stock one I already had.

After doing some measuring, I figured I could fit 7 OTRATTW switches in the header comfortably.

The header is about 8 inches wide if you leave about 1/8" inside the visor holder cutout on each side.
The switches I used were the Contura XIV rockers from OTRATTW, which are about 0.97" total (0.83" body only).
7 switches total added up to 6.8", which I subtracted from the 8" width to give me about 0.2", or 13/64" between each switch.
Sorry for the decimals. I was using calipers with a decimal inch function.

The body height was about 1.47", but its not as important, since it's easy to trim them to fit without having to worry about spacing issues. I think I tried to line them up halfway between the visor cutout and the bottom. The more space you can give yourself at the top, the better.

Here's the layout
Screen Shot 2020-04-16 at 11.56.53 AM.png
Screen Shot 2020-04-16 at 11.57.07 AM.png


1587053225283.png

Obviously, you want to trim to the INNER rectangle. The outer rectangle (aka overall width) represents the flange on the switch and is only on the diagram to help visualize spacing.

The plastic the header is made of is actually very soft and cuts pretty easy with a razor knife once you get going. I would recommend drilling or melting WELL INSIDE of the marks, then cleaning it up with a razor knife. You will also have to remove the center body clip and anything else sticking up on the inside of the header if you plan to fill it up completely.

I tried to get the bottom of the switch body at about the centerline of the visor holder notch. You want to put the switches pretty low for a couple reasons. One is so all the wiring fits behind without too many issues, and another reason is so they lay as flush as possible. The header itself has a slight curve to it, but is more flat at the bottom. They are a little proud at the top and bottom, but it's not noticeable from the driver's seat, and they are far enough back that the mechanism to lock the switches in place is fully engaged.

1587053281890.png


In order to get wires and everything to fit once the header is put in place, you will need to slightly modify the switches by bending the uppermost and middle terminals downward far enough to prevent them from hitting the upper windshield. It'll also be easier if you use flag connectors on the top two terminals.

1587053636717.png


But once you do all that, they fit pretty well. I ran my wires down the driver's side A-pillar without issue. I only have two switches in for now, with plans to add more as things progress.

1587053738641.png
 
So now that I was set on using lighted switches, I worked on trying to find a way to get all the electronicals working together.

My first idea was to continue with the "'locker power' switch interrupts the ground" idea. Here's a diagram of what I tried first.


Screen Shot 2020-04-07 at 10.00.06 PM.png

The upper diagram was my understanding of how the switches worked. It turns out I was wrong, but I'll get to that.

Power to the lower LEDs would be supplied by tying into the dash dimmer lights.
I would tie pins 6 and 7 into the "power in" on their respective switches, and the "power out" would simply be a path to ground. I jumpered all the grounds together on the F and R switch lights, which would cause the switches in the dash to illuminate only AFTER the "locker power" switch was actuated.

I mocked everything up, and the switches were actuating the locker pumps fine, but from some reason the upper LEDs wouldn't come on once the switch was activated. Turns out, the switches upper LED gets power from the "switched power out" terminal, meaning it needs 12v coming across it.

After doing some tweaking and experimenting, and some advice from @Jerry Bransford I came up with the idea to skip the stock switch harness altogether (mostly) and try to wire the compressors directly.

I wanted to avoid cutting or splicing into any stock wiring, so I figured all the pumps really need is 12v into the 87pin socket on the stock relay located in the PDC.

Here's another confusing diagram of what I settled on

Screen Shot 2020-04-15 at 10.41.39 PM.png


Power for the lower LEDs comes in from tapping into the Orange/ Brown panel lamps feed wire behind the dash.
Power for the compressors, upper lights, and lower LEDs for the F and R locker switches, comes from a 5A fuse on the Bussmann.
Ground for the LEDs on the Locker Power switch return to the Bussmann.
Once the Lpcker Power switch is actuated, it connects to the power in terminal for both F and R switches, as well as powers their lower LEDs (green wire)
Once the individual F and R switches are activated, it sends power to its respective pin 87 in the PDC.
Ground for the lower switch LEDs ties into the ground from the stock locker harness.

I was able to pry apart the stock locker harness and use a tiny, tiny screwdriver to remove pin1. I also had a few connectors that were the same size as the pins on the stock switch, so I was able to fit it all together to provide a solid connection for the lower LEDs ground
1587056073987.png

1587056136400.png

1587056172705.png


I threw some heat shrink on to hold everything together and keep it insulated.

1587056219182.png


I can now tuck the harness up and out of the way.

I ran the wires to the PDC along the fender and up through some notches I cut in the lid and side of the PDC container. A pair of male quick disconnects fit perfectly into the pin sockets.

1587056317458.png

1587056336872.png


The only thing I wish I had figured out was a way for the lights in the dash to work. The first method I tried, using pins 6 and 7, caused the indicators in the gauges to flash, which I thought was a nice reminder that the lockers were engaged. This way, however, does not. I'll just have to be more mindful.

1587056475854.png

1587056500272.png

1587056509572.png
 
Last edited:
While I was dinking around with wires, I thought I might as well install an in-cab winch controller for My Smittybilt Gen2. The hardest part was figuring out where to put the damn thing. The OTRATTW switch I got is kind of clunky, so finding a spot that would accommodate its girth was the biggest challenge. I settled on a spot on the console right in front of the parking brake lever.

I bought a DPST switch thinking I would have two circuits: one for the LEDs on the switch and one for the winch operation itself. Then I realized I could just run the lights off of the winch control power.

1587773498195.png


I'm not sure which employee-of-the-month at Smittybuilt is responsible for the colors on these wires not matching up, but this is the circuit from the plug-in winch controller to the motor. Power comes from Red/ Yellow and, depending on whether you want the winch to cable-in or cable-out, power goes through either the Blue/ Brown or Yellow/Blue (again, WTF).

1587773905833.png


The idea was to delete the connector altogether and splice in a pair of quick-disconnects for each wire on the plug-in side. So working one pair at at time so as not to confuse myself, I cut and stripped the wire and added a butt splice with a pair of QDs on the other end.

1587774292557.png


1587774310753.png


1587774228604.png


Eventually they were all done

1587774347636.png


I then ran a wire from the extra QD on the brown wire to the power-in side of the toggle switch. To get it out of the control box, I figured I would follow the path they chose in the factory, and drilled a hole in the bottom of the case.

1587775040922.png


1587775258952.png


1587774426286.png


From the toggle switch, I have two wires for the OTRATTW upper and lower LEDs, and one for the power-in on the rocker. In hindsight, they were a little long.

1587774512611.png


I also ran a pair of additional wires for the In/Out side of the controls from the winch control box, and plugged everything up to its respective terminal on the OTRATTW switch. After a some short trial and error to figure out which wire made the winch go in or out, I was ready to rock.

1587775098575.png


To add a ground for the switch lights I suppose I could have grounded to one of the bolts inside the console near the shifter, but I decided to play it safe and run a short wire out to the factory ground used for the speakers.

1587774960880.png


Now the switches are within easy reach from the driver's seat and I don't have to worry too much about them taking up space or being accidentally hit.

1587775808165.png


1587775819180.png
 
Last edited:
  • Like
Reactions: Tldelaney
Also got some new boots a while ago but just now got around to making sure the bumps were set correctly.

1587824890750.png


Cooper Discoverer ST MAXX 285/75R16 on the stock Moab wheels. I went with 33s after reading several posts that advocated more flex over bigger tires. Looking at things now, I probably could have fit 35s without having to do much extra, but I also don't plan on regearing for a little bit, so I wanted something that would be more tolerable at 4.10. Maybe when it comes time for the next set of new tires I'll reassess.

The rear axle still looks like it's a little further forward, but everything checks out at full bump. Short arms, man.

1587825032713.png


I only have about 1.25" of shock travel left, but I think if I got some aftermarket fenders or just did some trimming I could decrease the amount of bump without too many issues.

1587825114747.png


1587825136245.png


1587825154660.png


The fronts were pretty good too. I added 1.25" spacers to all 4 wheels to keep the them from rubbing the control arms at full lock.

1587825475993.png


1587825267367.png


1587825291967.png


I have considerably less shock travel remaining in the front

1587825387833.png
 
Last edited: