TJ Build

Front Speakers

I ended up going for Rockville 4x6 speakers to replace the stock fronts. It's a quick swap over so I threw them straight in without much thought and prepared myself for a huge sound improvement. It was better yes, but I was actually a bit disappointed as it was not nearly as good as I thought it should have been.
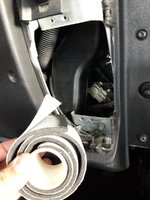
You know why right? There's no actual pod for these things, they are wide open at the back other than a mess of ducting & steel! I take the doors off quite often so that option was out, and I could not find anything around online to address this. As I already had the speakers, I started looking around my workshop for a plan B. I found this:
20200305_192425.jpg

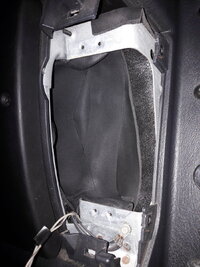
Its a foam plumbing tape for insulating pipes, super sticky one side. I Multilayered it around until it looked something like this:
20200306_194924.jpg
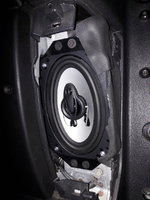
It ended up making a pretty good seal, so I put the speaker back in and cranked up some sounds to see if there was any difference between this and the one I had not done yet. There sure was, a very easily noticeable and much improved difference at that, so I carried on to do the other side. It does not look like it in the photo but it makes a decent sized cavity for the speaker to work in.
20200306_200431.jpg
Not fantastic, but the best I could come up with with what I had to hand, and sure sounds a whole lot better than stock now.
Rear pods are next on the list.
 
Last edited:
  • Like
Reactions: Chris
This site contains affiliate links for which Jeep Wrangler TJ Forum may be compensated.
Amplifier, Subwoofer, and Seat Riser Kit

I spotted a JVC amp on sale, so the next project kicked off. It was bigger than I wanted as ideally I wanted it behind the dash but it is 60W x 4 RMS and cheap so I grabbed it! After a few measurements I decided it was a good time to order the 1.5" seat riser kit (which you can clearly see the pucks in the photos) and hey, might as well order that Pioneer active sub as well!


This job requires removal of both seats so out they came, pretty easily too.

The amp went under the passengers seat, and as the head unit (mentioned above) only has 1 pair of RCA's out I had to use a splitter, which means you lose the fader but I was able to use the input sensitivity on the amp to get it just right anyway. I screwed it down to the ridge under the seats with some silicone under to prevent any rattles later.

The sub went under the drivers seat, and you can see in the photo I had to make a plate up out of ply due to the aforementioned ridge not being wide enough for the fixing points on the sub. Again dobbed a little silicone around. With no RCA's left I wired it to the speaker outs on the head unit.

After a bit of fine tuning it sounds incredible, the sub has a seperate controller and damn near blasts you out of the seat if you crank it too high.

The seat riser kit is a no brainer to install, probably dont even have to take the seats out, and I sure like the extra height as its a lot easier to see over the bonnet now, and when rock crawling all day my shoulders aren't sore anymore from pulling on the steering wheel to see over the bonnet..

Downside? Butt clenching river crossings you may ask? I have had 2 JK's (a 2008 and 2016 both Rubi's) and those things leaked if the water went over the running boards, the TJ has yet to have a wet floor so if it gets deep enough to leak I probably should not be in there anyway....

EDIT: With the seat riser kit you need to cable tie the adjustment cable out of the way or it will jam when moving the seat forward.


20201208_175310.jpg


20201208_175532.jpg
 
Last edited:
  • Like
Reactions: Kiwi TJ
Amplifier, Subwoofer, and Seat Riser Kit

I spotted a JVC amp on sale, so the next project kicked off. It was bigger than I wanted as ideally I wanted it behind the dash but it is 60W x 4 RMS and cheap so I grabbed it! After a few measurements I decided it was a good time to order the 1.5" seat riser kit (which you can clearly see the pucks in the photos) and hey, might as well order that Pioneer active sub as well!


This job requires removal of both seats so out they came, pretty easily too.

The amp went under the passengers seat, and as the head unit (mentioned above) only has 1 pair of RCA's out I had to use a splitter, which means you lose the fader but I was able to use the input sensitivity on the amp to get it just right anyway. I screwed it down to the ridge under the seats with some silicone under to prevent any rattles later.

The sub went under the drivers seat, and you can see in the photo I had to make a plate up out of ply due to the aforementioned ridge not being wide enough for the fixing points on the sub. Again dobbed a little silicone around. With no RCA's left I wired it to the speaker outs on the head unit.

After a bit of fine tuning it sounds incredible, the sub has a seperate controller and damn near blasts you out of the seat if you crank it too high.

The seat riser kit is a no brainer to install, probably dont even have to take the seats out, and I sure like the extra height as its a lot easier to see over the bonnet now, and when rock crawling all day my shoulders aren't sore anymore.

Downside? Butt clenching river crossings you may ask? I have had 2 JK's (a 2008 and 2016 both Rubi's) and those things leaked if the water went over the running boards, the TJ has yet to have a wet floor so if it gets deep enough to leak I probably should not be in there anyway....


View attachment 209006

View attachment 209007
Nice work..Thats the same sub I have too under the passenger seat...it thumps.
 
  • Like
Reactions: Kerry
Storage Solutions
I had been storing my recovery gear in a 60L plastic bin, but this required the rear seat to be stowed so I could not take any passengers in the rear when off road if I wanted that gear with me, or I would end up stowing it all over the place. I could not find what I was looking for online, so decided to build my own solution out of customwood and just paint it.
I can fit more in this than the last container, so its surprisingly roomy.
I used the rear lashing hook bolts to secure some tabs to stop it sliding around when the rear seat is up, and fitted some cam locks with combination. The whole thing is hidden when the top is down so probably wont lock it often.
Super easy to lift in and out and all the random bits and pieces I carry around in one place now.

20210114_173300.jpg


20210303_183543.jpg
 
Last edited:
Locker & Air System
Out on the trail we hit a spot where we were going to get crossed up pretty good while going slightly uphill. I knew the TJ would come to a halt so I send a friend in a Rubi thru first, then I winched over off her truck. I have had 2 JK Rubi's, and this was just a reminder of how capable they are, so I ignored the bank balance and went ahead and ordered up a locker for the front.
I went for an ARB with air system, as the Rubi lockers can take ages to lock up sometimes, and you reach the obstacle and that lights still flashing, so reverse a bit to try get it to lock up, and the next truck is up your rear end, you know the drill....
The ARB is instant as advertised, and the bonus compressor means re-inflating the tires is a pleasure now.

An interesting difference is that, when diff locked, the Rubicon steering gets really heavy, I found it almost impossible to turn tight corners in the 2 Rubi's that I had. By comparison the ARB when locked is light as a feather.

And genuine TJ switches OFC :cool:


Locker.jpg
 
Jeep TJ Rear tail lights – LED Swap out

Suits NZ Right Hand Drive (export version - Americans please ignore :ROFLMAO:)

My LED’s have yellow indicator/white reverse

LED Tail.png


CONNECTIONS

LHS


......JEEP............FUNCTION......LED LAMP
Red/Black-————-Turn-———-Yellow

Purple/Black-——-Reverse-——--White

Black/Yellow-——-Brake-———--Red

Red(Or White)—--Tail Light-——--Blue

Fix to To Body-—— Earth-———-Black


RHS

.......... JEEP.............FUNCTION......LED LAMP
Brown/Red-—————-Turn-———-Yellow

Red/Purple & Black-—-Reverse-—--White

White/Brown-————-Brake-——--Red

Black/Yellow-————--Tail Light-—-Blue

Black/Red-—————-Earth-———-Black
-

NOTES:
  • In NZ you will need to add 1 red reflector each side (I stuck them on the bumper) as these were built into the stock lamps
  • There is no easy way to access the back of the right hand lamp in the 03-06. Left is thru the gas tank inlet.
  • You will need to drill out the existing holes a little
  • You will need to change the 5 pin relay on top of the steering column to a Novita LM470. I tried a generic EP27 and the hazards did not work.
 
Last edited:
  • Like
Reactions: UKTJ and Kiwi TJ
Interior LED bulb swapout

You can get LED bulb kits for a few dollars on Ebay

They include spares that you can use elsewhere, I used one in the rear highstop when it blew.

The old lamps give off a very yellow light, these are nice and white, and slightly brighter.
 
  • Like
Reactions: Kiwi TJ
This site contains affiliate links for which Jeep Wrangler TJ Forum may be compensated.
Jeep TJ Rear tail lights – LED Swap out

Suits NZ Right Hand Drive (export version - Americans please ignore :ROFLMAO:)

My LED’s have yellow indicator/white reverse

View attachment 432186

CONNECTIONS

LHS


JEEP FUNCTION LAMP
Red/Black Turn Yellow

Purple/Black Reverse White

Black/Yellow Brake Red

Red(Or White) Tail Light Blue

Earth(to body) Black


RHS

JEEP FUNCTION LAMP
Brown/Red Turn Yellow

Red/Purple & Black Reverse White

White/Brown Brake Red

Black/Yellow Tail Light Blue

Black/Red Earth Black


NOTES:
  • In NZ you will need to add 1 red reflector each side (I stuck them on the bumper) as these were built into the stock lamps
  • There is no easy way to access the back of the right hand lamp in the 03-06. Left is thru the gas tank inlet.
  • You will need to drill out the existing holes a little
  • You will need to change the 5 pin relay on top of the steering column to a Novita LM470. I tried a generic EP27 and the hazards did not work.

Can you provide a link to these please?
Look like they would work for UK requirements, whereas all I have seen before don’t.