FYI, you will have clearance issues w/ the (lower) rear spring perch w/ those shocks. Chances are they will hit. There are threads here about clearancing (grinding).Hopefully this gets on this weekend with an absolute minimum of death and destruction.
View attachment 172525
You are using an out of date browser. It may not display this or other websites correctly.
You should upgrade or use an alternative browser.
You should upgrade or use an alternative browser.
What did you do to your TJ today?
- Thread starter LJRubiconGuy
- Start date
bagpiper22
Member
Finished installing my O2 sensors. I had changed 2/2 after getting a code, but it was such a bear of a job that I ignored the other 3. Did them all today, and they were a breeze. Happy to have them all done now. All NTK parts.
Looks like it's just a #10 zipper slider, pick a couple up for a few bucks on amazon, use one to fix it, keep the other as a spare. There are a couple of videos on how to get them onto the zipper on a soft top on YT.
https://www.amazon.com/dp/B00DTVPLMY/?tag=wranglerorg-20
the one that split apart had #10 stamped on the casting, makes sense. i had been having a hard time with the zipper even with lube, but seems as though i have internally worn out the aluminum casting and it finally failed.
the repair shop i wanted to go to wouldnt answer the phone and voicemail said shes 3 months behind and its just her so no more incoming work allowed. and 2nd shop showed me a identical zipper pull but told me it wouldnt work, flipped the remaining zipper around for me but that did nothing to retain the section where the zipper joints start at.
im down to the wire which is what my dilemma is, i leave for colorado/moab with the jeep on the 10th. ill just pick up them pulls and cross my fingers. i understand how to remove the stop at the end to get the pulls back on. thanks.
Swapped out my 1.25 spacers for 1.5, fixed my rubbing issues.
Also adjusted my parking brake so it actually holds
Also adjusted my parking brake so it actually holds
Babygools99
TJ Enthusiast
Drove a good 300 mile round trip to get a Transmission for the other car. Turned over 231k.
Swapped out my 1.25 spacers for 1.5, fixed my rubbing issues.
Also adjusted my parking brake so it actually holds
How was adjusting of the parking brake?
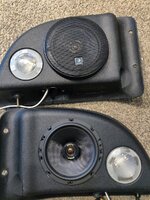
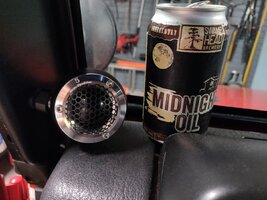
Completed what appears to be my annual audio mod by adding some new Helix 6.5"s in the speaker pods and some new tweeters, along with a beer sent from @Tom18 in exchange for a center console. Love non-monetary forum transactions.


Capt'n
TJ Enthusiast
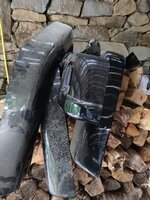
Fixed the cracks and painted my fender flares.


It was pretty easy, though the aftermarket parking brake components made it a bit more complicated then it should have been compared to the youtube videos. Basically I had to rotate the gear the opposite direction on one side.How was adjusting of the parking brake?
I jacked up the rear axle, popped out the tensioner access plug and rotated the little gear to further push out the shoes. After a few clicks, tested the resistance by rotating the tire. Repeated a few times. Also tightened up the cable a few threads.
Jeep will hold on an incline for the first time since I owned it
Noticed your user name, I play as wellFinished installing my O2 sensors. I had changed 2/2 after getting a code, but it was such a bear of a job that I ignored the other 3. Did them all today, and they were a breeze. Happy to have them all done now. All NTK parts.
Fixed the cracks and painted my fender flares.
View attachment 172628
View attachment 172629
View attachment 172630
View attachment 172631
Great job. What method did you use, sand, prime, paint etc? I just picked up some stock Rubi flares today that are on the borderline of needing a makeover.

Shawn came over to the shop today to rebuild his 231 transfer case. I'll be putting together a how to video when I can find time.

04solartj
TJ Enthusiast
Took the wife shopping in it.. And had totally enough of the garbage speakers and just got done ordering
kicker cs series all around it. 5.25 fronts and 6.5 rears they should be here mid week just in time for me to leave and go to the lake LOL...
kicker cs series all around it. 5.25 fronts and 6.5 rears they should be here mid week just in time for me to leave and go to the lake LOL...
grumblebee
TJ Enthusiast
Removing the third brake light and its wiring harness as one piece as part of my exterior detail and trim restoration project. I have the mount unbolted from the spare tire mount and the connectors disconnected from the mount inside the tailgate, but
What's the trick to getting a rubber gasket like this to come out?


What's the trick to getting a rubber gasket like this to come out?
changed my rear diff oil, I do this every summer & usually just pop the drain plug but today I pulled the cover for the first time in a couple years to inspect the gears, everything looks to be in order; couldn't get a good shot of the pinion but I got the light in there & spun it around a few times by the shaft & it also looks perfect


ordered this thing 2 weeks ago, I think it traveled around the globe before showing up today, Amazon suggested it was 'lost' and that I should request a refund and reorder which I was going to do on Monday but alas it appeared. Never used one before, I like it


spun everything around a few times just to be sure, I couldn't find any chips or anything else that looked out of place, ARB works as expected also.
ordered this thing 2 weeks ago, I think it traveled around the globe before showing up today, Amazon suggested it was 'lost' and that I should request a refund and reorder which I was going to do on Monday but alas it appeared. Never used one before, I like it
spun everything around a few times just to be sure, I couldn't find any chips or anything else that looked out of place, ARB works as expected also.
Capt'n
TJ Enthusiast
I’ve been using automotive touchup paints. All RAttle cans... primer, base, clear coat. Color matched... I’ve been happy with the products, but rattle cans aren’t very forgiving. But I’m content with the results. I filled cracks with plastic bondo, sanded it smooth with 1000, 1500 grit wet sandpaper, applied 3 coats of primer, no sanding.... 4 coats of base... no sanding... and 4 coats of clear... then lightly buffed with 2000 grit wet and then, polished with 3m auto rubbing compound... I attached other TJ work I have done with the paint.Great job. What method did you use, sand, prime, paint etc? I just picked up some stock Rubi flares today that are on the borderline of needing a makeover.
View attachment 172636
Living in a winter climate I have many friends who disagree. I kind of on the wire. But discs on the rear axle in a salt filled winter environment seldom last more than 4 years, drums tend to last forever. Front disc brakes just like TJ frames from the transfer case forward last forever. Also Rubicon parking brakes, the size of a hockey puck, are useless. I quit fixing mine 10 years ago. I just put it in first and shut off the engine. But I agree discs are simpler to work on.You would think auto mfgs would just do away with drums altogether - surely basic disks are about the same cost to build what with the drum's greater fussiness and complexity.
I’ve been using automotive touchup paints. All RAttle cans... primer, base, clear coat. Color matched... I’ve been happy with the products, but rattle cans aren’t very forgiving. But I’m content with the results. I filled cracks with plastic bondo, sanded it smooth with 1000, 1500 grit wet sandpaper, applied 3 coats of primer, no sanding.... 4 coats of base... no sanding... and 4 coats of clear... then lightly buffed with 2000 grit wet and then, polished with 3m auto rubbing compound... I attached other TJ work I have done with the paint.
View attachment 172656
View attachment 172657
View attachment 172669
View attachment 172670
View attachment 172671
Very nice looking work!!!
Just make sure which can you're grabbing in the future... It looks like you have the primer and base coat caps swapped on their respective cans...
Last edited:
I’ve been using automotive touchup paints. All RAttle cans... primer, base, clear coat. Color matched... I’ve been happy with the products, but rattle cans aren’t very forgiving. But I’m content with the results. I filled cracks with plastic bondo, sanded it smooth with 1000, 1500 grit wet sandpaper, applied 3 coats of primer, no sanding.... 4 coats of base... no sanding... and 4 coats of clear... then lightly buffed with 2000 grit wet and then, polished with 3m auto rubbing compound... I attached other TJ work I have done with the paint.
View attachment 172656
View attachment 172657
View attachment 172669
View attachment 172670
View attachment 172671
Awesome, your work is great! I have a couple small bottles of that paint, I used it when I installed my sliders, to prime/paint/gloss the holes, and also on a couple bare spots, so wow, now I may do this. Thanks for the tips, yours came out excellent.
Last edited:

