No pics but I ordered 4 round lights to mount onto the light bar
You are using an out of date browser. It may not display this or other websites correctly.
You should upgrade or use an alternative browser.
You should upgrade or use an alternative browser.
What did you do to your TJ today?
- Thread starter LJRubiconGuy
- Start date
Took the ugly nerf bar slider steps off...awaiting my motobilt sliders as replacements. Wife now complains about difficulty of getting in lol.


Put on some 32x12.5x15 Mastercraft Courser MXT tires. Had already done a 2" bb.

Neal
TJ Enthusiast
Had to make a field repair to the swing out tire carrier on my Dirtworx rear bumper. Going up a trail in Red River, NM the tire carrier swung out and banged against the stop with no warning. I figured the latch had let go on its own, as it has once or twice if I haven't checked the tension on it recently. I went to re-latch it and found that the rubber tip that presses against the arm had departed the scene. I picked up a broken branch that was laying nearby and whittled off a small piece, using it as the bearing surface for the latch. Worked great and held up until I got back home. This is the third time the rubber tip on the Harbor Freight-sourced latch has broken off and I decided that it was time for a change. Back in the garage, I cut a small piece of laminate flooring that had a rubber surface on one side to fit the arm and glued it in place. Works fine so far and it ought to hold up nicely, although I will probably replace it with a thick piece of solid rubber when I get around to it.
Lacking the rubber tip that should be on there I had to use some repurposed organic material. Living in harmony with nature, right?

Flooring sample glued to the swing out arm.

All right and tight. No rattles, no shakes, no worries.

Lacking the rubber tip that should be on there I had to use some repurposed organic material. Living in harmony with nature, right?
Flooring sample glued to the swing out arm.
All right and tight. No rattles, no shakes, no worries.
Looks great, my socket drawer is a nightmare! One-a these days........
Thanks wasn’t a bad DIY. The rails harbour freight has them they were on sale, used 1/2” plywood and just some wood screws, covered the plywood with those rubber liner from the dollar store. Overall cost probably $30 if that, and I still have spare rails left as my collection grows.
Scott B.
Member
Nice “field expedient” repair.Had to make a field repair to the swing out tire carrier on my Dirtworx rear bumper. Going up a trail in Red River, NM the tire carrier swung out and banged against the stop with no warning. I figured the latch had let go on its own, as it has once or twice if I haven't checked the tension on it recently. I went to re-latch it and found that the rubber tip that presses against the arm had departed the scene. I picked up a broken branch that was laying nearby and whittled off a small piece, using it as the bearing surface for the latch. Worked great and held up until I got back home. This is the third time the rubber tip on the Harbor Freight-sourced latch has broken off and I decided that it was time for a change. Back in the garage, I cut a small piece of laminate flooring that had a rubber surface on one side to fit the arm and glued it in place. Works fine so far and it ought to hold up nicely, although I will probably replace it with a thick piece of solid rubber when I get around to it.
Lacking the rubber tip that should be on there I had to use some repurposed organic material. Living in harmony with nature, right?
View attachment 110748
Flooring sample glued to the swing out arm.
View attachment 110749
All right and tight. No rattles, no shakes, no worries.
View attachment 110750
I feel your pain on the Harbor Freight over center clamps.
I used their house brand clamps a few years ago on a horizontal mortise machine that I made. They lasted long enough to prove the design, but broke a couple of times.
I replaced them with genuine DeStaCo brand clamps and have no more issues.
Kiwi TJ
I don't suffer from insanity I enjoy every minute
Supporting Member
Ride of the Month Winner
Nice tiresPut on some 32x12.5x15 Mastercraft Courser MXT tires. Had already done a 2" bb.
32x11.5x15Put on some 32x12.5x15 Mastercraft Courser MXT tires. Had already done a 2" bb.
The mud was free as I live on a dirt road, the tires not so much.Nice tiresand I like the way you got the mud on your side step to match your soft top too

Schwifty Rich
TJ Enthusiast
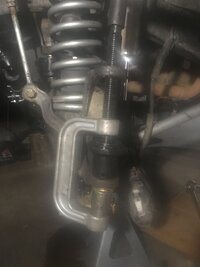
Took it to the shop to get a tire mounted and then all of them balanced. They told me the upper ball joint had some play..
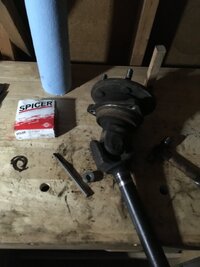
so I spent my day removing all 4 ball joints today and decided that while I’m there I would replace my U joints as well.
It started getting dark and by the time I got the old ball joints out and 1/2 of the first U joint. The new ball joints come in tomorrow so I’ll finish the U joints, install the ball joints, do an alignment, grease it up, and double check everything.
On Friday I’m headed to Colorado and I’m going to really see what I can do.
The phone got a little dirty here, whoops.

Wiped the lense

so I spent my day removing all 4 ball joints today and decided that while I’m there I would replace my U joints as well.
It started getting dark and by the time I got the old ball joints out and 1/2 of the first U joint. The new ball joints come in tomorrow so I’ll finish the U joints, install the ball joints, do an alignment, grease it up, and double check everything.
On Friday I’m headed to Colorado and I’m going to really see what I can do.
The phone got a little dirty here, whoops.

Wiped the lense

Made some room in my junkyard so I can work on the tj in comfort. Lil man "helped"
If it falls it's because he's climbing it / pushing it over lol.Dangerous place for the little one. Something could....fall?/?
But his favorite thing to do is sit down and play with the dirt
Motobilt Front Bumper:


To allow for the Antirock:

And yes, those links are too long - the shorter ones are inbound. I cut these down about 1.5” and still need more. There’s a little space to play with but I got angry and lazy.
Finally I played with onboard air mounting locations, right now only for tires but decided to just “buy once, cry once” on the ARB. The final spot is the ABS tray for now, wiring will hopefully be the weekend.


The final mount:

Now to decide where to keep the airing supplies since I’d rather just leave in onboard all the time since this is pretty inconspicuous. So far.
To allow for the Antirock:
And yes, those links are too long - the shorter ones are inbound. I cut these down about 1.5” and still need more. There’s a little space to play with but I got angry and lazy.
Finally I played with onboard air mounting locations, right now only for tires but decided to just “buy once, cry once” on the ARB. The final spot is the ABS tray for now, wiring will hopefully be the weekend.
The final mount:
Now to decide where to keep the airing supplies since I’d rather just leave in onboard all the time since this is pretty inconspicuous. So far.
Last edited:
Clean dirts good for you. Folks nowadays are afraid to let their kids play in the dirt, might get dirty.
Kiwi TJ
I don't suffer from insanity I enjoy every minute
Supporting Member
Ride of the Month Winner
Don't we all !!! lolBut his favorite thing to do is sit down and play with the dirt
Kiwi TJ
I don't suffer from insanity I enjoy every minute
Supporting Member
Ride of the Month Winner
In the first pic I thought you had made a Jeep Front bumper swing for your kids hahaMotobilt Front Bumper:
View attachment 110933
View attachment 110927
To allow for the Antirock:
View attachment 110928
And yes, those links are too long - the shorter ones are inbound. I cut these down about 1.5” and still need more. There’s a little space to play with but I got angry and lazy.
Finally I played with onboard air mounting locations, right now only for tires but decided to just “buy once, cry once” on the ARB. The final spot is the ABS tray for now, wiring will hopefully be the weekend.
View attachment 110929
View attachment 110930
Now to decide where to keep the airing supplies since I’d rather just leave in onboard all the time since this is pretty inconspicuous. So far.
I finally installed bumpers that I’ve been wanting to do for 4 years!!


Nordic
TJ Enthusiast
Painted my fender flares today, here's a before pic from last year:

And here's after:

And a little comparison:

Paint used was Krylon Fusion Satin Black, paint job wasn't perfect but hey, the fenders weren't perfect so I'm very happy with it. It's looking a bit glossy for my taste right now, but I finished spraying an hour ago so I assume it needs a bit more time to cure. Also, had issues with some of the rivnuts in the body, 2 of them started spinning, and that's when I gave up and just masked the fenders. If anyone has any idea as to how to remove the bolts when it comes time to install sliders, let me know..
And here's after:
And a little comparison:
Paint used was Krylon Fusion Satin Black, paint job wasn't perfect but hey, the fenders weren't perfect so I'm very happy with it. It's looking a bit glossy for my taste right now, but I finished spraying an hour ago so I assume it needs a bit more time to cure. Also, had issues with some of the rivnuts in the body, 2 of them started spinning, and that's when I gave up and just masked the fenders. If anyone has any idea as to how to remove the bolts when it comes time to install sliders, let me know..

