Went for a little trail ride in the thumb with the missus. Does it count if I stayed in 2wd?


You are using an out of date browser. It may not display this or other websites correctly.
You should upgrade or use an alternative browser.
You should upgrade or use an alternative browser.
What did you do to your TJ today?
- Thread starter LJRubiconGuy
- Start date
Drained coolant, flushed last week. Ran around a bit with heater on and today filled with Zerex Z05. New radiator cap also. It was
 fun to do a little pm between larger projects!

Installed one of the two since one of the clips came broken in the package. Have to get customer service on the line see how to get the other clip for the passenger side. So far I like the install. Seems sturdy and tight.


madcanvis
Member
Interesting side note a 2002-2006 Mini Cooper cover fits real nice (The mirror pockets line up perfect) for those who want to keep debris/light rain out while the rig is parked topless over night. Got mine from CL for $30.In the past week I got a cheap cover to keep the bird crap from baking into the red paint...
I’ll post a pic in the AM.
Rear Main Seal, New Oil Pan and Gasket.
After many viewings on the subject, I decided to tackle it today. Let me say, the clips help but left a lot to chance, so I thought I'd share my experience on my '04 TJ 4.0, 5 sp. with 104k miles. Drain the oil early so you have less dripping on you. And also disconnect the ground on your battery.
1) Remove the tranny skid plate and prop up the front of the tranny. 3/4 main bolts (6) and 14 mm trans nuts (4). Now you'll have access to the muffler flange.
2) No one mentions the exhaust. Mine was the y cats, so 4 flange bolts. Totally remove the front section of cats and drop it all the way down. No clearance unless you doHave a 3/8 15 mm swivel cause it made it easier ( not easy though) and a 15mm for the muffler flange. Unplug the leads to the 2 lower O2 sensors before lowering. Help is good when it comes loose!
3) Remove starter and set it on the frame. Had 2 different size bolts, 9/16 and 3/4.
4) Drop oil pan 28 x 7/16 bolts. Take your new gasket out and lay it on the box it came in. Mark the holes and drill them out so you have a storage spot for all the bolts and it'll keep them in the exact location for reinstalling. Mark front , back, left and right on the box pattern. Saves a boat load of time! Also, there is a tranny cover on the rear of the pan, it may look like you can't get to those bolts but it's only crud covering bolts.
5) Drop the girdle that runs the length of the bottom of the engine 14 x 9/16 nuts.
6) Now you have access to the rear main cap. Remove 2 bolts and don't use an impact wrench, just a breaker bar. Wiggle it from front back and it'll drop, make sure it doesn't break away and hit concrete, just keep a hand on it, may need a screw driver to pry it back and forth (gently). Both seals came out very easily. Follow those other videos on how to treat the seals for installation and cap conditioning. The Fel Pro tab works great to install the upper half seal, use it. Make sure you use the correct RTV on the cap (Anaerobic). Install the lower cap back to the upper, bolts tighten to 80 lbs.
7) Install the girdle, 14 x 9/16 at 35 lbs torque.
8) Clean the mating surfaces on the block and oil pan ( I just spent $50 on a new one). Install the Fel Pro tabs that came with the gasket to the four corners of the block. I recommend just a couple of turns and not seated all the way ( Couldn't get one out and had to remove the oil pan and gasket to get it out, aaarrggghhhh!)
9) Install gasket with RTV on the correct spots, then the oil pan, again with RTV on the correct spots too. Install 28 bolts. Check on the torque.
10) Reinstall starter, exhaust, plug in 2 x O2 sensors, tranny skid plate, change oil filter, add new oil, connect battery and viola, you're done. $100 in parts and saved maybe $500 in labor, maybe more.
WNC05willys
TJ Enthusiast
Rear Main Seal, New Oil Pan and Gasket.
After many viewings on the subject, I decided to tackle it today. Let me say, the clips help but left a lot to chance, so I thought I'd share my experience on my '04 TJ 4.0, 5 sp. with 104k miles. Drain the oil early so you have less dripping on you. And also disconnect the ground on your battery.
1) Remove the tranny skid plate and prop up the front of the tranny. 3/4 main bolts (6) and 14 mm trans nuts (4). Now you'll have access to the muffler flange.
2) No one mentions the exhaust. Mine was the y cats, so 4 flange bolts. Totally remove the front section of cats and drop it all the way down. No clearance unless you doHave a 3/8 15 mm swivel cause it made it easier ( not easy though) and a 15mm for the muffler flange. Unplug the leads to the 2 lower O2 sensors before lowering. Help is good when it comes loose!
3) Remove starter and set it on the frame. Had 2 different size bolts, 9/16 and 3/4.
4) Drop oil pan 28 x 7/16 bolts. Take your new gasket out and lay it on the box it came in. Mark the holes and drill them out so you have a storage spot for all the bolts and it'll keep them in the exact location for reinstalling. Mark front , back, left and right on the box pattern. Saves a boat load of time! Also, there is a tranny cover on the rear of the pan, it may look like you can't get to those bolts but it's only crud covering bolts.
5) Drop the girdle that runs the length of the bottom of the engine 14 x 9/16 nuts.
6) Now you have access to the rear main cap. Remove 2 bolts and don't use an impact wrench, just a breaker bar. Wiggle it from front back and it'll drop, make sure it doesn't break away and hit concrete, just keep a hand on it, may need a screw driver to pry it back and forth (gently). Both seals came out very easily. Follow those other videos on how to treat the seals for installation and cap conditioning. The Fel Pro tab works great to install the upper half seal, use it. Make sure you use the correct RTV on the cap (Anaerobic). Install the lower cap back to the upper, bolts tighten to 80 lbs.
7) Install the girdle, 14 x 9/16 at 35 lbs torque.
8) Clean the mating surfaces on the block and oil pan ( I just spent $50 on a new one). Install the Fel Pro tabs that came with the gasket to the four corners of the block. I recommend just a couple of turns and not seated all the way ( Couldn't get one out and had to remove the oil pan and gasket to get it out, aaarrggghhhh!)
9) Install gasket with RTV on the correct spots, then the oil pan, again with RTV on the correct spots too. Install 28 bolts. Check on the torque.
10) Reinstall starter, exhaust, plug in 2 x O2 sensors, tranny skid plate, change oil filter, add new oil, connect battery and viola, you're done. $100 in parts and saved maybe $500 in labor, maybe more.
I did this exact same thing a few months ago, I added in the valve cover gasket for good measure!! Great write up!!
NyTj13
Member
Today I started the journey to go flat fender. Got the drivers side cut in far too late in the afternoon only to discover the local hardware store had no speed-nuts to replace the 3 that I discovered had rusted completely away...which now that I think about it has become a daily battle, lol. So when I ran out of momentum and parts for the fenders I switched over (in between rain storms) and managed to get two coats of Raptor liner on the Poison Spyder rockers that I scored an amazing deal on. All in all, far more productive today than I intended to be, because damn does time just get lost when I’m wrenching on my Jeep! I’m sure you guys can relate.
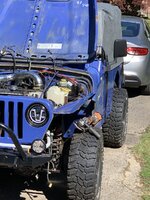
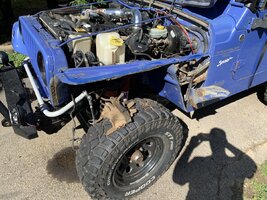
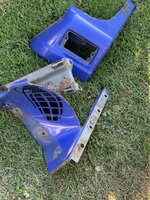
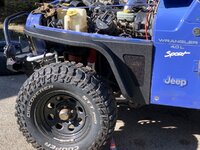
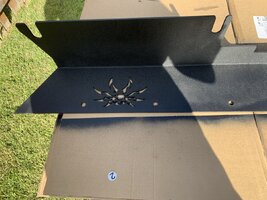
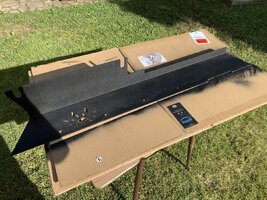


NyTj13
Member
Great write up! This is next on my list when I work myself through the three projects I have active now. I’ve been cleaning the engine compartment every weekend for the last two saturdays in preparation of doing the valve cover gasket at the same time. On a mission to get rid of all the little annoying leaks so This was really helpful to read through!Rear Main Seal, New Oil Pan and Gasket.
After many viewings on the subject, I decided to tackle it today. Let me say, the clips help but left a lot to chance, so I thought I'd share my experience on my '04 TJ 4.0, 5 sp. with 104k miles. Drain the oil early so you have less dripping on you. And also disconnect the ground on your battery.
1) Remove the tranny skid plate and prop up the front of the tranny. 3/4 main bolts (6) and 14 mm trans nuts (4). Now you'll have access to the muffler flange.
2) No one mentions the exhaust. Mine was the y cats, so 4 flange bolts. Totally remove the front section of cats and drop it all the way down. No clearance unless you doHave a 3/8 15 mm swivel cause it made it easier ( not easy though) and a 15mm for the muffler flange. Unplug the leads to the 2 lower O2 sensors before lowering. Help is good when it comes loose!
3) Remove starter and set it on the frame. Had 2 different size bolts, 9/16 and 3/4.
4) Drop oil pan 28 x 7/16 bolts. Take your new gasket out and lay it on the box it came in. Mark the holes and drill them out so you have a storage spot for all the bolts and it'll keep them in the exact location for reinstalling. Mark front , back, left and right on the box pattern. Saves a boat load of time! Also, there is a tranny cover on the rear of the pan, it may look like you can't get to those bolts but it's only crud covering bolts.
5) Drop the girdle that runs the length of the bottom of the engine 14 x 9/16 nuts.
6) Now you have access to the rear main cap. Remove 2 bolts and don't use an impact wrench, just a breaker bar. Wiggle it from front back and it'll drop, make sure it doesn't break away and hit concrete, just keep a hand on it, may need a screw driver to pry it back and forth (gently). Both seals came out very easily. Follow those other videos on how to treat the seals for installation and cap conditioning. The Fel Pro tab works great to install the upper half seal, use it. Make sure you use the correct RTV on the cap (Anaerobic). Install the lower cap back to the upper, bolts tighten to 80 lbs.
7) Install the girdle, 14 x 9/16 at 35 lbs torque.
8) Clean the mating surfaces on the block and oil pan ( I just spent $50 on a new one). Install the Fel Pro tabs that came with the gasket to the four corners of the block. I recommend just a couple of turns and not seated all the way ( Couldn't get one out and had to remove the oil pan and gasket to get it out, aaarrggghhhh!)
9) Install gasket with RTV on the correct spots, then the oil pan, again with RTV on the correct spots too. Install 28 bolts. Check on the torque.
10) Reinstall starter, exhaust, plug in 2 x O2 sensors, tranny skid plate, change oil filter, add new oil, connect battery and viola, you're done. $100 in parts and saved maybe $500 in labor, maybe more.
Totally! I think I've lost about 2 years over the last 4 weeks!... damn does time just get lost when I’m wrenching on my Jeep! I’m sure you guys can relate.
View attachment 173715View attachment 173716View attachment 173717View attachment 173718View attachment 173719View attachment 173720
Installed a set of Rigid 15W flood lights that I purchased from one of the Forum members.
They can be used as fog lights or remove the amber lens and they can be used as driving lights.
View attachment 173654
How do you like them? Are they enough light?
Does anyone else struggle to justify "4wd"? I feel the Jeep never feels like getting stuck.

Put some Autolite XP-985 iridium plugs in it and they will last as long as your Jeep.Changed my spark plugs, they were definitely over due. They were supposed to gapped at .035 two were over .080 and the rest were over .060.View attachment 173649
You're doing it all wrong then.Does anyone else struggle to justify "4wd"? I feel the Jeep never feels like getting stuck.
View attachment 173765
Last edited:
How do you like them? Are they enough light?
I tried the lights at dusk and with the Amber lens covers the light was sufficient for a foggy night. I still need to test the lights with the lens covers off to see how much light they provide at night.
Stage #1 on my upper door crack fix. Waiting for it to completely dry before filling it in smooth. Hopefully it will hold up.

Stage #1 on my upper door crack fix. Waiting for it to completely dry before filling it in smooth. Hopefully it will hold up.
View attachment 173787
Good luck with the repair...
What did you use to mend the crack ?
Rear Main Seal, New Oil Pan and Gasket.
After many viewings on the subject, I decided to tackle it today. Let me say, the clips help but left a lot to chance, so I thought I'd share my experience on my '04 TJ 4.0, 5 sp. with 104k miles. Drain the oil early so you have less dripping on you. And also disconnect the ground on your battery.
1) Remove the tranny skid plate and prop up the front of the tranny. 3/4 main bolts (6) and 14 mm trans nuts (4). Now you'll have access to the muffler flange.
2) No one mentions the exhaust. Mine was the y cats, so 4 flange bolts. Totally remove the front section of cats and drop it all the way down. No clearance unless you doHave a 3/8 15 mm swivel cause it made it easier ( not easy though) and a 15mm for the muffler flange. Unplug the leads to the 2 lower O2 sensors before lowering. Help is good when it comes loose!
3) Remove starter and set it on the frame. Had 2 different size bolts, 9/16 and 3/4.
4) Drop oil pan 28 x 7/16 bolts. Take your new gasket out and lay it on the box it came in. Mark the holes and drill them out so you have a storage spot for all the bolts and it'll keep them in the exact location for reinstalling. Mark front , back, left and right on the box pattern. Saves a boat load of time! Also, there is a tranny cover on the rear of the pan, it may look like you can't get to those bolts but it's only crud covering bolts.
5) Drop the girdle that runs the length of the bottom of the engine 14 x 9/16 nuts.
6) Now you have access to the rear main cap. Remove 2 bolts and don't use an impact wrench, just a breaker bar. Wiggle it from front back and it'll drop, make sure it doesn't break away and hit concrete, just keep a hand on it, may need a screw driver to pry it back and forth (gently). Both seals came out very easily. Follow those other videos on how to treat the seals for installation and cap conditioning. The Fel Pro tab works great to install the upper half seal, use it. Make sure you use the correct RTV on the cap (Anaerobic). Install the lower cap back to the upper, bolts tighten to 80 lbs.
7) Install the girdle, 14 x 9/16 at 35 lbs torque.
8) Clean the mating surfaces on the block and oil pan ( I just spent $50 on a new one). Install the Fel Pro tabs that came with the gasket to the four corners of the block. I recommend just a couple of turns and not seated all the way ( Couldn't get one out and had to remove the oil pan and gasket to get it out, aaarrggghhhh!)
9) Install gasket with RTV on the correct spots, then the oil pan, again with RTV on the correct spots too. Install 28 bolts. Check on the torque.
10) Reinstall starter, exhaust, plug in 2 x O2 sensors, tranny skid plate, change oil filter, add new oil, connect battery and viola, you're done. $100 in parts and saved maybe $500 in labor, maybe more.
You should add this to the how to thread...
High temp silicone since it's flexible and sticks good.Good luck with the repair...
What did you use to mend the crack ?
I would be interested to know how well the silicone will work over time...
I used some to seal water out on some rocker guards I bought several Jeeps ago. I sold the Jeep and the guy thought he missed some bolts while trying to remove them. After 5 years, the silicone had to be cut to remove the guards without pulling the paint off.I would be interested to know how well the silicone will work over time...

