Where (Else) Are Headlights Grounded?

SSTJ

———
Original poster
Lifetime Supporting Member
Joined
Aug 24, 2019
Messages
3,476
Location
SE USA
There is a small wire on the back side of the grill, directly behind each headlight. I think it’s the ground wire for the headlight.

If so, is this the only factory ground for headlights? (In pic, never mind the white wire that has been cut.)
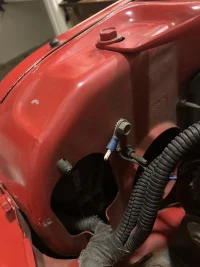
image.jpg

Conclusion: I was surprised to see that the eye connector wasn't touching bare metal, and that the only ground path seemed to be through the screw's threads in the sheet metal. But I was reminded below how that's true in several locations on the TJ, like the tail-lights themselves being grounded through the three mounting screws. For a pic of how there are more threads making contact than appears at first sight, see here. And it's clearly been working fine for 25 years, so just goes to show you don't always need the paint scraped away.
 
Last edited:

Yes, those are your headlamp grounds. G102 and G103

Thanks. I'm surprised to see that the paint isn't scraped away around the hole, and of course the sheet metal itself is only about a 1/2 thread thick for the screw being used. So that one half-thread is a sufficient ground path for the headlights? Makes me feel like I've gone overkill on every other ground connection I've made in the past.
 
  • Like
Reactions: tr21triton
Thanks. I'm surprised to see that the paint isn't scraped away around the hole, and of course the sheet metal itself is only about a 1/2 thread thick for the screw being used. So that one half-thread is a sufficient ground path for the headlights? Makes me feel like I've gone overkill on every other ground connection I've made in the past.
It's more than sufficient if the ground wire's ring connector is making good contact with bare metal there. If not use a Dremel to give it enough bare metal.
 
You can also splice into the ground wire itself and give it a secondary tap in point with another self tapper

Just something to consider doing if that doesnt appear solid enough
 
It's more than sufficient if the ground wire's ring connector is making good contact with bare metal there. If not use a Dremel to give it enough bare metal.

No, as mentioned above, what surprises me is that the ring connector is making contact with paint, not metal. So it seems that the ground path is through the screw's threads touching the inside of the hole in the sheet metal.

I did go ahead and scrape away the paint. It's just surprising that it came like that from the factory, and that it was working at all.
 
You can also splice into the ground wire itself and give it a secondary tap in point with another self tapper

Just something to consider doing if that doesnt appear solid enough

All good; I just scraped the paint away. This post is more about how surprising it is that this was working as a ground for my headlights in the first place.
 
  • Like
Reactions: CreepinDeth
All good; I just scraped the paint away. This post is more about how surprising it is that this was working as a ground for my headlights in the first place.
Screw threads going through bare metal are used in several locations to ground light assemblies including the rear tail lights. The rear tail lights are grounded by three small bolts that screw into threaded holes in the tub.
 
I know the factory uses self tapping screws but being an electrician where we are forbidden by code to use self tapping screws for grounding I drill and tap a 10/32" hole, then use a 10/32" grounding screw with a star washer. I also clean away the paint to bare metal and apply a vey thin wipe of dielectric grease to the surface and to the star washer and ring terminal, basically just wipe it back and forth between my fingers.

I have a set of these for the purpose,

https://www.amazon.com/Greenlee-DTA...untersinking/dp/B0041FIR1E?tag=wranglerorg-20

greenlee2.webp
 
  • Like
Reactions: SSTJ
No, as mentioned above, what surprises me is that the ring connector is making contact with paint, not metal. So it seems that the ground path is through the screw's threads touching the inside of the hole in the sheet metal.

I did go ahead and scrape away the paint. It's just surprising that it came like that from the factory, and that it was working at all.
The ground path is through the screw threads and the underside of the head of the screw just like all the other similar connections. There are 2 at the firewall like that since they paint first before they install the wiring. The tail lights are grounded exactly the same way as are a couple of places under the dash. Absolutely no need whatsover to remove the paint.

If you are worried at all about any of those under the hood, hook your test meter up to the connection in question and run the other side over to the negative terminal on the battery. ;)
 
I know the factory uses self tapping screws but being an electrician where we are forbidden by code to use self tapping screws for grounding I drill and tap a 10/32" hole, then use a 10/32" grounding screw with a star washer. I also clean away the paint to bare metal and apply a vey thin wipe of dielectric grease to the surface and to the star washer and ring terminal, basically just wipe it back and forth between my fingers.

I have a set of these for the purpose,

https://www.amazon.com/Greenlee-DTA...untersinking/dp/B0041FIR1E?tag=wranglerorg-20

View attachment 492004

Being an electrician I would have figured you know how it works and not gone through all that bullshit to fix something that didn't need fixing. That and you know your code doesn't apply to vehicles, at all.
 
Screw threads going through bare metal are used in several locations to ground light assemblies including the rear tail lights. The rear tail lights are grounded by three small bolts that screw into threaded holes in the tub.

Yes, that's familiar now that you mention it.

Just interesting to know that's all it takes.
 
  • Like
Reactions: Jerry Bransford
Being an electrician I would have figured you know how it works and not gone through all that bullshit to fix something that didn't need fixing. That and you know your code doesn't apply to vehicles, at all.

Being an electrician I have seen corroded grounding points fail and using a self tapping sheet metal screw for grounding in an area that gets wet is sub standard IMHO. It's not like I go around re-doing factory grounding points that are working but when I install my own I'm doing it the best way.
 
  • Like
Reactions: R49
The ground path is through the screw threads and the underside of the head of the screw just like all the other similar connections. There are 2 at the firewall like that since they paint first before they install the wiring. The tail lights are grounded exactly the same way as are a couple of places under the dash. Absolutely no need whatsover to remove the paint.

If you are worried at all about any of those under the hood, hook your test meter up to the connection in question and run the other side over to the negative terminal on the battery. ;)

Yep, all makes sense, thanks. As you can tell, I was just surprised to learn that such a minimal connection (perhaps 1/2 of a thread, given how thin the sheet metal is) is all that it takes.
 
Being an electrician I have seen corroded grounding points fail and using a self tapping sheet metal screw for grounding in an area that gets wet is sub standard IMHO. It's not like I go around re-doing factory grounding points that are working but when I install my own I'm doing it the best way.

And yet, if this was a substandard method, there would be 100's of posts daily asking why the headlights don't work and how to create a different ground path to make them work. There would be a big "how-to" section with a step by step remedial methodology outlining how to fix all of Jeep's bad grounding solutions to sheet metal. That and if you read the posts on here about problems with grounds, the most common is the NON self tapper to bare metal at the engine block.

The screws at the headlight grounds are not self tappers, they are self threading versions that cut threads into an extruded tube of the correct diameter. That is a very key distinction due to the self tapper in normal sheet metal will only have 1/2 of a thread to keep it tight and the self threading version in the extruded sheet metal tube has several. The underside of the head is serrated so they don't loosen easily, and the ring terminals are the type with little points that dig into the surface to prevent rotation.
 
  • Like
Reactions: NskLJ
Yep, all makes sense, thanks. As you can tell, I was just surprised to learn that such a minimal connection (perhaps 1/2 of a thread, given how thin the sheet metal is) is all that it takes.

It isn't half a thread. They extrude the sheet metal to make a tube. Then the self threading, not self tapping screw is installed which threads the tube so there are several threads holding.

Similar concept to extruded U-nuts.

If you look close at this one, it is for sheet metal coarse thread screws and it reasonably approximates what happens when the factory screws the self threading screws into the extruded tubes in sheet metal.

1705418783790.webp
 
  • Like
Reactions: SSTJ
Thanks all. Updated the original post in case anyone else comes across this later.
 
It isn't half a thread. They extrude the sheet metal to make a tube. Then the self threading, not self tapping screw is installed which threads the tube so there are several threads holding.

Similar concept to extruded U-nuts.

If you look close at this one, it is for sheet metal coarse thread screws and it reasonably approximates what happens when the factory screws the self threading screws into the extruded tubes in sheet metal.

View attachment 492009

Aha, I get it. That makes a lot of sense now. Thanks.

Also makes sense of how the screw seemed to be catching (not slipping) very well for just what I thought was a half-thread.