Battery Tray Rust

Gia

New Member
Supporting Member
Joined
Apr 24, 2023
Messages
18
Location
United Arab Emirates
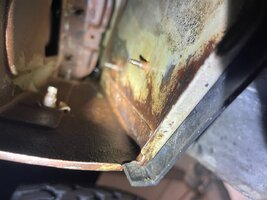
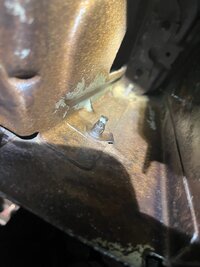
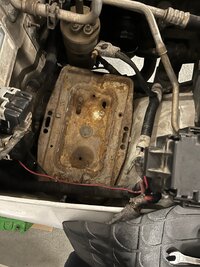
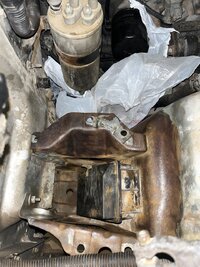
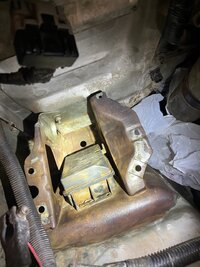
Hey all, need some guidance on tackling this rust on and underneath the battery tray. Reached a point while wiring the rust that it’s hard brown solid metal, can’t seem to be able to take that off with the wire wheels. Is it safe to leave it like that?

What would you recommend doing at this stage, clean as much as possible and apply a rust reformer or primer and paint?

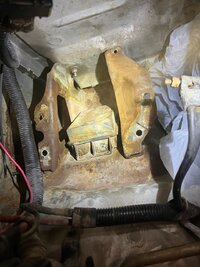
Should I Change tray brackets? Can’t reach with wire wheels in some areas I.e. between the bracket and the plastic box. Removing the bracket would allow me to probably reach a lot of areas with the wire that otherwise I can’t. But I’m not a mechanic and don’t want to push it beyond my capabilities and tools if not required.

The frame is clean but this section underneath the battery must have been exposed to battery fluids or something with POs.
IMG_5799.jpeg

IMG_5798.jpeg

IMG_5797.jpeg

IMG_5800.jpeg

IMG_5851.jpeg

IMG_5852.jpeg

IMG_5859.jpeg

IMG_5860.jpeg

Thanks
 
Rust converter, primer, paint like you suggested. I'd bore scope that frame hole too and look inside.

Plastic box is a vacuum reservoir.

Know anyone with a sandblaster or dry ice blaster?

Just did something similar on my truck...but most of my corrosion was just on the tray.

-Mac
 
It looks like you already got a lot of the rust off. That's basically bare metal, it looks good. Don't leave it exposed for too long or you will have to wire wheel it again.
 
Buy a gallon of this, Home Depot, Blaines, etc
Yes its $$$ but $$$ well spent
Slather it on, 2 coats

Ive used POR before and I prefer this

https://www.farmandfleet.com/produc..._source=google&blaintm_medium=lia&setstore=39
If you cant get a brush on it, buy the spray can
I personally prefer the brush method for heavy coats

I HVLP sprayed my hardtop with the white can satin black
Didnt need the silver can primo stuff for that
 
Last edited:
Members, Members, Members, it's all about Location, Location, Location! and if this is being done in the United Arab Emirates it may be hard to find certain brands, stores or even the rust that we have over here.

Hey all, need some guidance on tackling this rust on and underneath the battery tray. Reached a point while wiring the rust that it’s hard brown solid metal, can’t seem to be able to take that off with the wire wheels. Is it safe to leave it like that?

Where you're at it's probably so safe that it will last forever as is.

If you want to make that area under the battery look more normal I'd probably remove those brackets and do some more wire wheeling. I don't think that plastic box would be too hard to remove either so I'd get it out of the way too. Some rust reformer then primer and paint and making sure you have a sealed battery (battery with no lids or leaks) should get you beyond lasting forever.
 
I second the POR-15! That stuff works great for rust prone areas and a little bit goes a long way. Just make sure you're in a well ventilated area when applying it.
 
Members, Members, Members, it's all about Location, Location, Location! and if this is being done in the United Arab Emirates it may be hard to find certain brands, stores or even the rust that we have over here.


Where you're at it's probably so safe that it will last forever as is.

If you want to make that area under the battery look more normal I'd probably remove those brackets and do some more wire wheeling. I don't think that plastic box would be too hard to remove either so I'd get it out of the way too. Some rust reformer then primer and paint and making sure you have a sealed battery (battery with no lids or leaks) should get you beyond lasting forever.

Thanks that makes a lot of sense and I guess doable for me.

I’ll see how the tray turns out after wiring/painting it and could just replace it when I come across a spare one.

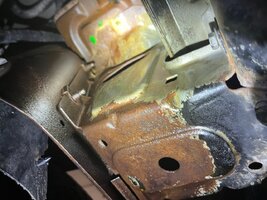
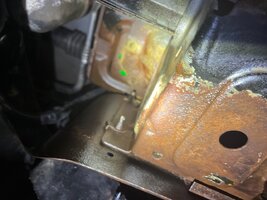
For the body panel interior same treatment I guess? Third picture from the top. There’s nothing major on it. But would like to avoid having rust popping out on the exterior of the panel down the line.

Thanks everyone for the feedback, always find great support on here and being a new TJ owner this is invaluable.
 
Last edited:
If you can get POR-15 there that's how I'd go. POR-15 is a rust converter when it's just a surface rust, it doesn't just hide it.
 
Thanks for posting! When I changed my battery out a couple years ago I noticed I needed to do this but didn't make it a priority. I'll get to it!
 
Trying to unmount the bracket however I can’t seem to be able to find an access to the back side of the bottom bolts of the bracket. How do I re attach these bolts once removed? Are they just screw on or there’s a loose nut on the other side?

IMG_5861.jpeg
 
Went ahead and remove those bolts at the bottom without an issue. However due to these bolts at the top (2 of them) I can’t remove the bracket. Can I push these back with a hammer or does the fender have to come off to slide the bracket out?

IMG_5862.jpeg
 
Went ahead and remove those bolts at the bottom without an issue. However due to these bolts at the top (2 of them) I can’t remove the bracket. Can I push these back with a hammer or does the fender have to come off to slide the bracket out?

View attachment 466521

If I recall the fender has to be loose or removed as there isn't enough room to remove the bracket. I could be wrong though
 
Went ahead and remove those bolts at the bottom without an issue. However due to these bolts at the top (2 of them) I can’t remove the bracket. Can I push these back with a hammer or does the fender have to come off to slide the bracket out?

View attachment 466521

Mine had a nut with a washer on that, it's a stud on a bracket from inside the footwell. Your previous picture showing the 2 bolts, has another bolt above it. And if I remember correctly there were bolts underneath the fender holding the bracket also. Search around you will find them.

I was able to remove the bracket without loosening the fender. I needed to paint the bracket and surrounding area after painting the battery tray.

A couple of pictures that might help. And yes the forth picture is the crap I have to deal with, it is what it is. Hope this helps!

IMG_0823.JPG


IMG_0822.JPG


IMG_0825.JPG


IMG_0815.JPG


IMG_0826.JPG
 
Mine had a nut with a washer on that, it's a stud on a bracket from inside the footwell. Your previous picture showing the 2 bolts, has another bolt above it. And if I remember correctly there were bolts underneath the fender holding the bracket also. Search around you will find them.

I was able to remove the bracket without loosening the fender. I needed to paint the bracket and surrounding area after painting the battery tray.

A couple of pictures that might help. And yes the forth picture is the crap I have to deal with, it is what it is. Hope this helps!


Did you remove those 2 studs to take it completely off?


I can’t seem to find any way to slide it off without having to fender
Mine had a nut with a washer on that, it's a stud on a bracket from inside the footwell. Your previous picture showing the 2 bolts, has another bolt above it. And if I remember correctly there were bolts underneath the fender holding the bracket also. Search around you will find them.

I was able to remove the bracket without loosening the fender. I needed to paint the bracket and surrounding area after painting the battery tray.

A couple of pictures that might help. And yes the forth picture is the crap I have to deal with, it is what it is. Hope this helps!

View attachment 466770

View attachment 466771

View attachment 466772

View attachment 466773

View attachment 466774

I can’t seem to find any way to slide the thing off with those 2 studs at the top and not loosening the fender, how did you manage??