I've read a ton, and I'll post my questions, and then background so if someone doesn't need to read it all they can skip. Funny, she's got great bones, no rust etc really, pics make it look dirty as all get out, ha.
1. On the rear, the upper control arms had holes and the parking brake line was bolted to upper arms on both sides. I can figure something out, I'm wondering what guys that have done 100's of these switch outs have done.
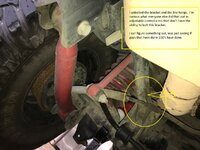
2. Torque I used was based on factory, and I installed Savvy Double Adjusting Control Arms upper and lower in the rear. Called for 130 ft/lbs both sides lower CA and 55 ft/lbs both sides upper CA. Just want to make 100% sure that's the same when installing these. I looked, and have not found this (I'm sure someone will post a link in :30, apologies I couldn't confirm this one myself).
3. Rear Upper CAs the new bolts didn't go through Jeep hole fittings. I re-used the factory (tab nut is pretty helpful) and I didn't want to start drilling since the factory bolts were snug in the JJ sleeve. Any huge concerns? They torqued down and were in fine shape.
4. I "kind of" put them at the same length I took off (PO put on a 3.5" Rancho lift with these fixed length Rancho red lower CAs) You can see the gap, so much play it's comical, ride was SUPER sloppy, so there's no way to be withing 1/16th of inches on this. So, I'm going to need to do measurements and make sure all is right when this is done. My question is, how tough is it to adjust? I get you loosen the jam nut and turn the tube, but under weight is it going to take a pipe wrench? I don't want to reinvent the wheel, I can get it done, just looking for experienced advice on these specifically.
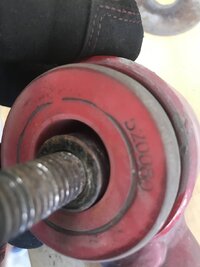
5. Front is next step, and Cam Bolt setup is used on the axle side of the lowers (I know it wouldn't be frame side, just being specific here). The washer with the Savvy CAs is not big enough to fill the the horseshoe, so my options are get @mrblaine washers (which will happen, I'd like to get this done for now and then add those, that's how bad the play in these lower CA bushings are) or re-use these Which I'll do probably for now. These front lowers axle side is obviously very important, but with all the play, I'm going to have to re-measure and get it exact. I can't find a place that has that process, if there's a "how to" I haven't found it. Is that out there? CA will be set, and I'll adjust them to get measurements exact, I'm looking for some tips on where y'all measured, what to look for, tips like that on my TJ.
Thanks a ton anyone who has time to take a look.
Background:
Had a ton of movement, all over. Doing 40 on a normal road, let up on the accelerator the Jeep shifts under your rear end, crazy. My son's been driving it few years HS and 1 year college, and now I'm getting her back. I was shocked, and before all this virus silliness I took it in for other items, and an Austin Jeep shop said "mechanic said it runs fine"? Seriously? They work on JEEPS only, ha. Not gonna bash, on our 2008 JK they did some awesome weld and save job for me, so they are good guys with good work, not sure how they didn't feel this.
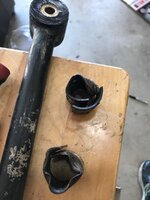
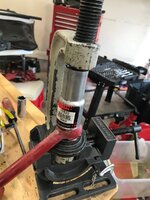
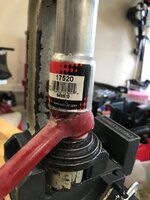
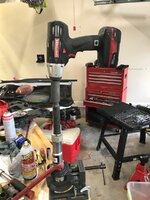
I got bushings for rear track bar and sway bar (I know, could have gone adjustable and on and on, I didn't for now). Either way... They are tight for now. Had an amazingly fun time getting track bar bushing out. Almost laughed and ordered a new one, but my Grandpa was a machinist going back to WWII and actually hand made the first ruffles potato chip cutting blade prototype, he would have been embarrassed I couldn't get it done, so I did. Was a touch ugly, but oh well. I had to use a hack saw blade on the reciprocating saw through the hole to cut the outer metal bushing sleeve and use a chisel to bend up the flare side that I could get under. I then used a flat head and hammered it down to bend the sleeve in on itself to get them out. Sleeves are bent an in pic below. Before that I used a ball joint press loaned from O'Reilly's, was easy, but the outer sleeve was really molded in there.
Sway Bar body bushing were easy, and used Energy Bushings. Got both tight and they were not the issue, which I knew was probably the case, but they were first.
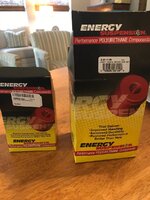
Getting the Energy Bushings into the sway bar links was also very, very, very fun. The first one was a massive bear, and I took a breath and thought it through, and went to O'Reilly's to see if they had smaller sleeves to go with the ball joint press. Nope.....but I walked the aisles and found an exhaust fitting and BAM. Put it on over the bushing, hit the press with the impact and each fitting took about 30 seconds to set on the press and push in, presto. By the way, this type does NOT have a metal bolt sleeve.
Of course the movement was still there and I decided I wasn't just putting in CA bushings, and I got the Savvy double adjustable, personally I like the aluminum look, I'll admit it, yeah, I thought they looked slick, ha. The black Currie are cool too, I just went with these.
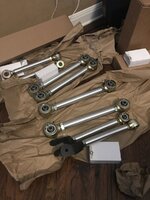
I put them on and Friday Night Lights baby, the rear end is buttoned up. Very nice. I still feel the fronts and their play, but the majority was those rear lowers they had SO much play, ridiculous. These arms are killer from where I sit, but just got them. Any new CAs would be way better than where she was, but these are substantial and look great. Adjustment looks to be super straight forward for when (soon) I work on serious measurements.
Couple things I did for other first timers that may make it easier, first the video from Extreme Terrain on adjustable CA it's a "Review and Install". They used a lift and I don't have one obviously, so I put jack stands under a little behind the skid plate and put them as high as they would go. I jacked up the frame to get 1 notch above that then set it on the stand, so tire is on the ground, but not 100% of the weight. I also put a solid strap on the axle each side I was working, and took nut off lower CA, and then worked the ratchet strap slightly to get the bolt with little tension. Pulled it and so putting the new arm in the holes were pretty, pretty close. Once in there, it was minor to get the bolt through, so that setup worked very well, there are certainly many other ways to do that with jacking pinion or pushing a tire etc.
Might be some tips that help.
1. On the rear, the upper control arms had holes and the parking brake line was bolted to upper arms on both sides. I can figure something out, I'm wondering what guys that have done 100's of these switch outs have done.

2. Torque I used was based on factory, and I installed Savvy Double Adjusting Control Arms upper and lower in the rear. Called for 130 ft/lbs both sides lower CA and 55 ft/lbs both sides upper CA. Just want to make 100% sure that's the same when installing these. I looked, and have not found this (I'm sure someone will post a link in :30, apologies I couldn't confirm this one myself).
3. Rear Upper CAs the new bolts didn't go through Jeep hole fittings. I re-used the factory (tab nut is pretty helpful) and I didn't want to start drilling since the factory bolts were snug in the JJ sleeve. Any huge concerns? They torqued down and were in fine shape.
4. I "kind of" put them at the same length I took off (PO put on a 3.5" Rancho lift with these fixed length Rancho red lower CAs) You can see the gap, so much play it's comical, ride was SUPER sloppy, so there's no way to be withing 1/16th of inches on this. So, I'm going to need to do measurements and make sure all is right when this is done. My question is, how tough is it to adjust? I get you loosen the jam nut and turn the tube, but under weight is it going to take a pipe wrench? I don't want to reinvent the wheel, I can get it done, just looking for experienced advice on these specifically.

5. Front is next step, and Cam Bolt setup is used on the axle side of the lowers (I know it wouldn't be frame side, just being specific here). The washer with the Savvy CAs is not big enough to fill the the horseshoe, so my options are get @mrblaine washers (which will happen, I'd like to get this done for now and then add those, that's how bad the play in these lower CA bushings are) or re-use these Which I'll do probably for now. These front lowers axle side is obviously very important, but with all the play, I'm going to have to re-measure and get it exact. I can't find a place that has that process, if there's a "how to" I haven't found it. Is that out there? CA will be set, and I'll adjust them to get measurements exact, I'm looking for some tips on where y'all measured, what to look for, tips like that on my TJ.
Thanks a ton anyone who has time to take a look.
Background:
Had a ton of movement, all over. Doing 40 on a normal road, let up on the accelerator the Jeep shifts under your rear end, crazy. My son's been driving it few years HS and 1 year college, and now I'm getting her back. I was shocked, and before all this virus silliness I took it in for other items, and an Austin Jeep shop said "mechanic said it runs fine"? Seriously? They work on JEEPS only, ha. Not gonna bash, on our 2008 JK they did some awesome weld and save job for me, so they are good guys with good work, not sure how they didn't feel this.
I got bushings for rear track bar and sway bar (I know, could have gone adjustable and on and on, I didn't for now). Either way... They are tight for now. Had an amazingly fun time getting track bar bushing out. Almost laughed and ordered a new one, but my Grandpa was a machinist going back to WWII and actually hand made the first ruffles potato chip cutting blade prototype, he would have been embarrassed I couldn't get it done, so I did. Was a touch ugly, but oh well. I had to use a hack saw blade on the reciprocating saw through the hole to cut the outer metal bushing sleeve and use a chisel to bend up the flare side that I could get under. I then used a flat head and hammered it down to bend the sleeve in on itself to get them out. Sleeves are bent an in pic below. Before that I used a ball joint press loaned from O'Reilly's, was easy, but the outer sleeve was really molded in there.

Sway Bar body bushing were easy, and used Energy Bushings. Got both tight and they were not the issue, which I knew was probably the case, but they were first.

Getting the Energy Bushings into the sway bar links was also very, very, very fun. The first one was a massive bear, and I took a breath and thought it through, and went to O'Reilly's to see if they had smaller sleeves to go with the ball joint press. Nope.....but I walked the aisles and found an exhaust fitting and BAM. Put it on over the bushing, hit the press with the impact and each fitting took about 30 seconds to set on the press and push in, presto. By the way, this type does NOT have a metal bolt sleeve.


Of course the movement was still there and I decided I wasn't just putting in CA bushings, and I got the Savvy double adjustable, personally I like the aluminum look, I'll admit it, yeah, I thought they looked slick, ha. The black Currie are cool too, I just went with these.

I put them on and Friday Night Lights baby, the rear end is buttoned up. Very nice. I still feel the fronts and their play, but the majority was those rear lowers they had SO much play, ridiculous. These arms are killer from where I sit, but just got them. Any new CAs would be way better than where she was, but these are substantial and look great. Adjustment looks to be super straight forward for when (soon) I work on serious measurements.
Couple things I did for other first timers that may make it easier, first the video from Extreme Terrain on adjustable CA it's a "Review and Install". They used a lift and I don't have one obviously, so I put jack stands under a little behind the skid plate and put them as high as they would go. I jacked up the frame to get 1 notch above that then set it on the stand, so tire is on the ground, but not 100% of the weight. I also put a solid strap on the axle each side I was working, and took nut off lower CA, and then worked the ratchet strap slightly to get the bolt with little tension. Pulled it and so putting the new arm in the holes were pretty, pretty close. Once in there, it was minor to get the bolt through, so that setup worked very well, there are certainly many other ways to do that with jacking pinion or pushing a tire etc.
Might be some tips that help.
Last edited:

