Super 16 brake install trouble

Midnight LJR

In search of Rubicon flares.
Original poster
Supporting Member
Ride of the Month Winner
Joined
May 30, 2019
Messages
1,692
Location
Southern Utah
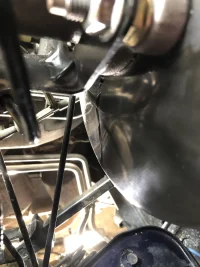
Installing my new Vanco super 16 kit. Install the new master and i see this.
9EBB2303-5CC3-4A7C-A475-0513E8C08CCE.webp

Any idea what this could be I wiped it up and it came back. I am not if it was just from a little bit of spillage when peaking ornof the master could be leaking into the booster?

Edit: Figured it out somehow it was looking from the front line in the cylinder. I did not have it right enough tighten it down good and fix the leak.


Other small trouble.

After initial brake in the vehicle is stopping good but the pedal seems much mushier than before. I have bleed them good. I will try again after driving around for a bit. But I can’t help but feel that I don’t have the master cylinder adjusted correctly.

The pedal used to amazing rock solid and firm in the Jeep and now it’s very mushy. I don’t hear others talk about this with the kit so must be my installation.

It’s been about 5 years since I installed a master cylinder and that one did not require any adjustment.
 
Last edited:
I recently installed the super 16 and the pedal will be a bit softer than the stock brakes. Even though Blaine gives you a larger cylinder, I seem to recall that the surface area ratio of the caliper pistons to master cylinder is still higher than stock.

If it bothers you, I believe Blaine can help you source an even larger master cylinder. The problem is with larger cylinders is that by increasing the surface area, you decrease the overall brake line pressure that the combination of the drivers foot and the vacuum booster would provide at the same force. Essentially you're trading line pressure for reduced pedal travel.

However, be sure to do a very thorough flush. This includes having someone mash the pedal hard while someone else opens a bleeder screw. Any air bubbles will negatively impact performance. With the engine off I can only marginally move the brake pedal without famous massive amount of force.

If the brake pedal starts firmer but gets softer when braking, you're not done bleeding. I went through about 3 large bottles of DOT 4 fluid before I felt I was done bleeding and flushing.

I did not have to adjust the master cylinder at all when I installed mine. Bolted right in.

Did you bench bleed the cylinder before install? One of the mistakes I made was not doing a completely thorough bench bleed. I did it and saw only a few tiny bubbles at the end so I thought it was good enough. It wasn't.
 
Installing my new Vanco super 16 kit. Install the new master and i see this.
View attachment 108704

Any idea what this could be I wiped it up and it came back. I am not if it was just from a little bit of spillage when peaking ornof the master could be leaking into the booster?

Edit: Figured it out somehow it was looking from the front line in the cylinder. I did not have it right enough tighten it down good and fix the leak.


Other small trouble.

After initial brake in the vehicle is stopping good but the pedal seems much mushier than before. I have bleed them good. I will try again after driving around for a bit. But I can’t help but feel that I don’t have the master cylinder adjusted correctly.

The pedal used to amazing rock solid and firm in the Jeep and now it’s very mushy. I don’t hear others talk about this with the kit so must be my installation.

It’s been about 5 years since I installed a master cylinder and that one did not require any adjustment.
The mush in the pedal can be from air in the lines or in the master. How did you do the bleeding process? How did you bench bleed the master? Specifically, step by step?
 
Was thinking about buying one of these to make set the gap easier.

https://www.summitracing.com/parts/...MImZS7_eby4wIVFh6tBh1-BgayEAQYBCABEgKm1_D_BwE
Anyone ever use one? Seems like it would make it much easier.

To set the gap, pull the o-ring off the back of the master. Push it up tight to the booster and note the gap between the back of the master and face of the booster. It needs to be around .030. Adjust the push rod inside the booster if needed. Don't forget to put the o-ring back on.
 
I recently installed the super 16 and the pedal will be a bit softer than the stock brakes. Even though Blaine gives you a larger cylinder, I seem to recall that the surface area ratio of the caliper pistons to master cylinder is still higher than stock.

If it bothers you, I believe Blaine can help you source an even larger master cylinder. The problem is with larger cylinders is that by increasing the surface area, you decrease the overall brake line pressure that the combination of the drivers foot and the vacuum booster would provide at the same force. Essentially you're trading line pressure for reduced pedal travel.

However, be sure to do a very thorough flush. This includes having someone mash the pedal hard while someone else opens a bleeder screw. Any air bubbles will negatively impact performance. With the engine off I can only marginally move the brake pedal without famous massive amount of force.

If the brake pedal starts firmer but gets softer when braking, you're not done bleeding. I went through about 3 large bottles of DOT 4 fluid before I felt I was done bleeding and flushing.

I did not have to adjust the master cylinder at all when I installed mine. Bolted right in.

Did you bench bleed the cylinder before install? One of the mistakes I made was not doing a completely thorough bench bleed. I did it and saw only a few tiny bubbles at the end so I thought it was good enough. It wasn't.

I would be highly reluctant to let anyone install a larger bore master.

Anyone doing a master install should NOT ever do the bench bleed with the little hoses and circulate the fluid back into the master reservoir. That method tells you nothing about the master, the air in it, or the condition of the master.

The best method is to treat the master just like a brake caliper.

It comes with plugs in the ports to protect the threads and keep dirt out. Use those as bleed screws.

I use vise grip clamps with pads. Put the master in a vise holding it by one of the bolt flanges. Clamp the front plug into place tightly enough to not leak, but not so tight that you tear up the flanges providing the seal. Fill the reservoir over halfway with brake fluid.

Use your hand to hold the back seal while pushing in the master push rod. Hold it loosely, push in the rod all the way, clamp the seal tightly, slowly release push rod. Repeat until fluid is present at that port. Once fluid is there, clamp it off with the other vise grip to seal it. What is happening is when you push it in with the port open and then seal off the port and let the push rod back out is the vacuum created pulls fluid into the master bore. Some masters are problematic to get primed, this method is fast and perfect.

With the rear port sealed, move to the front port and repeat the process until fluid is at the port and then seal it.

After that is done, stroke the master push rod in and out until you can only push it in about 1/8" or so. Only takes a few strokes to get it there.

If you can't get it there, that tells you the master is bad or there is an issue with one or more of the cup seals. If you can get it to that point, there is no air left or it would be compressing and letting the push rod move further.

Those problems can not be seen or felt with the circulating hose bullshit.

This is also the same method that is on the instructions included with the master.

If you can't get the air out of the system when bleeding after 5-10 pedal cycles per corner, stop. All you are doing is wasting fluid.
 
The mush in the pedal can be from air in the lines or in the master. How did you do the bleeding process? How did you bench bleed the master? Specifically, step by step?

I bench bleed the master with a recirculating hose kit from Autozone.

From reading below that was a mistake.


For bleeding the brakes. I used the manual method.

I would have a friend step on the pedal firmly.

Than Open the bleeder screw. That would cause the pedal to finish dropping to the ground. Where they would hold it.

Then close the screw.

And have them lift and push again before opening.

Single pump and holds each time.
 
I bench bleed the master with a recirculating hose kit from Autozone.

From reading below that was a mistake.


For bleeding the brakes. I used the manual method.

I would have a friend step on the pedal firmly.

Than Open the bleeder screw. That would cause the pedal to finish dropping to the ground. Where they would hold it.

Then close the screw.

And have them lift and push again before opening.

Single pump and holds each time.
If you step on the pedal with the bleed screw closed, you are introducing small air bubbles into the fluid. Open bleed screw, push pedal to the floor and hold, close bleed screw. Even that method introduces a few small bubbles. I always hit each corner a couple of times the next day after the air has had some time to coalesce at the top of the caliper.
 
To set the gap, pull the o-ring off the back of the master. Push it up tight to the booster and note the gap between the back of the master and face of the booster. It needs to be around .030. Adjust the push rod inside the booster if needed. Don't forget to put the o-ring back on.

This is how I thought I did it but I may not have pushed it up against the booster tightly enough. I may have been overly cautious not wanting to cause a situation where the brakes drag.
 
If you step on the pedal with the bleed screw closed, you are introducing small air bubbles into the fluid. Open bleed screw, push pedal to the floor and hold, close bleed screw. Even that method introduces a few small bubbles. I always hit each corner a couple of times the next day after the air has had some time to coalesce at the top of the caliper.

Ok, thank you I was incorrectly taught that opening first would let Air in. But thinking it through I see how it would not do that. I will re-bleed each corner today.

Do you have a preferred order to do the brakes? I replace all 4 calipers.
 
Also make sure the mating surface where the rubber seal on the master hits the booster is clean.
Bleed order is RR, LR, RF, LF
 
Ok, thank you I was incorrectly taught that opening first would let Air in. But thinking it through I see how it would not do that. I will re-bleed each corner today.

Yep, I see that as the rule all the time. I just ask them what would happen right now if you went and opened a bleed screw? That's right, brake fluid runs out. If fluid runs out, air isn't going in.

Also, bleeding needs to be done with the key on to light up the instrument cluster and parking brake off. Then watch for the brake light on the dash to turn on. If it does, pump the pedal with the bleeders closed to reset the shuttle valve. Some of them we have had to do it for each pedal pump.

Do you have a preferred order to do the brakes? I replace all 4 calipers.
Furthest to closest.
 
.....
Also, bleeding needs to be done with the key on to light up the instrument cluster and parking brake off. Then watch for the brake light on the dash to turn on. If it does, pump the pedal with the bleeders closed to reset the shuttle valve. Some of them we have had to do it for each pedal pump. .....

Thank you I will do it exactly this way.

Just for my education would you mind elaborating exactly what is going on when we pump the brakes to reset the brake light? I was doing this at first but stopped because it was coming on every time and taking one pump to get it to go off. I am glad to hear you have experienced that before.
 
Thank you I will do it exactly this way.

Just for my education would you mind elaborating exactly what is going on when we pump the brakes to reset the brake light? I was doing this at first but stopped because it was coming on every time and taking one pump to get it to go off. I am glad to hear you have experienced that before.
Inside the combo valve between the front and rear circuits is a shuttle valve that operates off of differential pressure. The plunger in the brake light switch is spring loaded and lands in a detent in the middle of the shuttle valve. When pressure is high enough on one side, it will overcome the spring pressure and shift the valve to the low pressure side to slow down or stop what is considered to be a leak in order to preserve some level of braking ability. Later years have a much lower spring pressure or shallower detent and it shifts very easy.
 
Probably not the case as you have a fair amount of stop, but I’d double check your calipers are on the intended side. I’ve seen a few posts around where left and right have been switched.

View attachment 108733

Thanks for the double check. I at least got that right!
 
  • Like
Reactions: tomtaylz
Thanks for the double check. I at least got that right!
When you are doing the break in at any time, you are pushing hard enough on the pedal to try and induce lock up. If you aren't pushing that hard, you aren't going to get them broken in right. If you don't get some smoke off of the brake pads, they aren't hot enough. You need to do the back to back stops on at least the first two sets of stops to get the pads into hot fade where they nearly quit working and you can tell that they are not stopping nearly as well as when you started the stops.
 
When you are doing the break in at any time, you are pushing hard enough on the pedal to try and induce lock up. If you aren't pushing that hard, you aren't going to get them broken in right. If you don't get some smoke off of the brake pads, they aren't hot enough. You need to do the back to back stops on at least the first two sets of stops to get the pads into hot fade where they nearly quit working and you can tell that they are not stopping nearly as well as when you started the stops.

Thank you. I was trying to brake heard to nearly lock them up. This is what I felt last night.

I did the first set of stops, and the felt ok.

Then on the second set after driving 15 minutes it took way less effort and nearly locked them them up on the first 3 stops then by stop 7 they seemed very hot and were not working nearly as good as first couple of the second set and I could smell them.

I have not gotten to do the second set of break ins yet.

Even with the mushy pedal the second set was a AMAZING improvement in braking I have never had any of jeeps stop like that.

That’s why I am so excited to to get the pedal feel back. It really seems to be a nice kit.
 
@mrblaine spent a good 30 minutes with me on the phone today teaching me and walking through re-bleeding and installing my Master Cylinder.

After his help the pedal feels rock solid, the brakes feel amazing and this is literally the single best Jeep modification I have ever done. I cannot recommend Black Magic Brakes enough. Answering the phone on a Sunday and walking me through problems I was having due to my incorrect installation. Customer service simple does not exist like that in the world anymore.

THANK YOU Blaine, the brakes are AMAZING.
 
@mrblaine spent a good 30 minutes with me on the phone today teaching me and walking through re-bleeding and installing my Master Cylinder.

After his help the pedal feels rock solid, the brakes feel amazing and this is literally the single best Jeep modification I have ever done. I cannot recommend Black Magic Brakes enough. Answering the phone on a Sunday and walking me through problems I was having due to my incorrect installation. Customer service simple does not exist like that in the world anymore.

THANK YOU Blaine, the brakes are AMAZING.
You are welcome and thank you for being able to follow my explanations of how stuff works and apply that to the goal you are trying to achieve. Always makes it easier.