What did you do to your TJ today?

HVAC blower motor chirping noise fix:

The chirping started yesterday. Didn't go away at any fan speed.

Watched this vid:

Easy removal.

The fan had a bunch of leaves. (17 years worth!) Removed the leaves, cleaned the fan, re-installed.

Turned it on — chirping continued.

Removed it again.

Hit the underside shaft hole with WD-40.

Re-installed.

Boom. Noise gone.
 
Could you elaborate on sources, please?

I had a new key made at the hardware store. I don't have the SKIM system. I bought one of these to go with the new key. All the new sharp edges made it impossible to pull the key out if I had it in a ACC position.

You can use it with the key they send or manually match the old key with the supplied parts. I wanted the same key to work on all the locks so I manually reprogrammed the tumbler.

https://www.amazon.com/dp/B002WH7B0G/?tag=wranglerorg-20
This was off my amazon purchase list from back in 2020. So 3 years of zero issues with it and no more battery issues.
 
Last edited:
After working from home since Mr Covie came along I had to go into the office today… Couldn’t resist admiring my Jeep from the office balcony

IMG_4145.jpeg
 
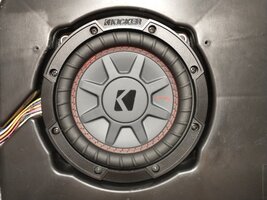
Shortly after acquiring my LJ a few months ago, I did a quick overhaul of the factory sound system. Nothing crazy just wanted something that worked and had USB and AUX inputs and improved sound. A new head unit and speakers all around kicked things off. My Jeep didn't come with the subwoofer option but I decided to add it shortly after the initial overhaul. Picked up a complete rear console on Ebay two weeks ago for the box and wiring pigtail and proceeded to make the harness extension and adapters as well as figure out how to shoehorn the new Kicker driver into the factory sub box.

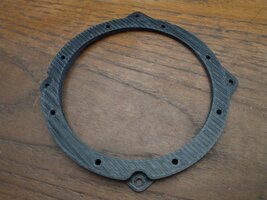
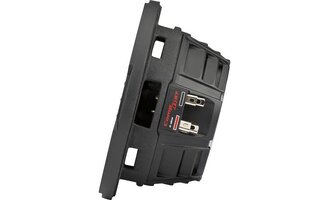
I've seen some posts and videos of people removing plastic ribs from inside the box to get their chosen drivers to fit. I didn't see depth as much of an issue in my case as this particular Kicker is only 1/8" taller than the box depth as is. But since the Kicker has a bit of a fat booty due to its sizeable magnet, it actually interferes with the recess in the top of the box that allows for the console tray above. I designed an adapter ring that shifted the new driver as low as possible in the factory sub opening, kicked the driver 1/8" out at the top and 1/2" at the bottom to clear any offending box innards, had a small relief for the wiring harness and picked up on the four factory mounting points.

A 3D sketch of the designed adapter ring:

subwoofer ring2.png

Designing the ring as a solution was great, but without a means to produce it essential a pointless exercise. Fortunately a friend on the left coast recently acquired a 3D printer and was keen to have a crack at it. So I obliged and sent him the file...

The ring early on in the printing process:

IMG_20230713_184454.jpg

The finished ring fresh off the glass printing platter, with raft and supports intact:

IMG_20230714_111909.jpg

The ring was posted to me in the above state last Friday and arrived before noon today (on the right coast). Here's the adapter ring cleaned up and prepped for installation:

IMG_20230718_111754065.jpg

Adapter affixed to the sub box with factory screws:

IMG_20230718_131222439_HDR.jpg

Sub driver attached thru ring into box:

IMG_20230718_142755656.jpg

Fin.

IMG_20230718_165211418.jpg

I used a foam tape seal between each component and packed the sub box with batting before reassembly. Fun project and collaboration with a buddy long distance was a bonus. (y)
 
Shortly after acquiring my LJ a few months ago, I did a quick overhaul of the factory sound system. Nothing crazy just wanted something that worked and had USB and AUX inputs and improved sound. A new head unit and speakers all around kicked things off. My Jeep didn't come with the subwoofer option but I decided to add it shortly after the initial overhaul. Picked up a complete rear console on Ebay two weeks ago for the box and wiring pigtail and proceeded to make the harness extension and adapters as well as figure out how to shoehorn the new Kicker driver into the factory sub box.

I've seen some posts and videos of people removing plastic ribs from inside the box to get their chosen drivers to fit. I didn't see depth as much of an issue in my case as this particular Kicker is only 1/8" taller than the box depth as is. But since the Kicker has a bit of a fat booty due to its sizeable magnet, it actually interferes with the recess in the top of the box that allows for the console tray above. I designed an adapter ring that shifted the new driver as low as possible in the factory sub opening, kicked the driver 1/8" out at the top and 1/2" at the bottom to clear any offending box innards, had a small relief for the wiring harness and picked up on the four factory mounting points.

A 3D sketch of the designed adapter ring:

View attachment 442574

Designing the ring as a solution was great, but without a means to produce it essential a pointless exercise. Fortunately a friend on the left coast recently acquired a 3D printer and was keen to have a crack at it. So I obliged and sent him the file...

The ring early on in the printing process:

View attachment 442575

The finished ring fresh off the glass printing platter, with raft and supports intact:

View attachment 442576

The ring was posted to me in the above state last Friday and arrived before noon today (on the right coast). Here's the adapter ring cleaned up and prepped for installation:

View attachment 442577

Adapter affixed to the sub box with factory screws:

View attachment 442578

Sub driver attached thru ring into box:

View attachment 442579

Fin.

View attachment 442580

I used a foam tape seal between each component and packed the sub box with batting before reassembly. Fun project and collaboration with a buddy long distance was a bonus. (y)

very nice, I had to use a heat gun and "massage" the housing for clearance
 
I had to use a heat gun and "massage" the housing for clearance

Even with the ring I think it was still close inside, probably within 1/8". The only thing I hadn't factored was the potential difference in the speaker's chassis and magnet...and that Kicker is quite a fatty.

g20648CT672-o_other5.jpg

I kind of got lucky as the console I found already had the sub replaced with one of the factory-fit upgrade drivers Quadratec sells (unknown at the time of finding), but I had already purchased the Kicker in prep for the job and fancied the challenge of designing a solution. It was fun using the technology to create something useful and solve a problem on a personal level.
 
Certainly not all today but a little catching up I guess:
Installed Uniden 980ssb CB radio with a 102 whip that was laying around.
Lithium battery from Ablithium, 12lbs vs the 54lbs interstate it replaced.
Daystar hood straps. Solid thumbs up for those.

Tim

View attachment 442366

View attachment 442367

View attachment 442368

View attachment 442369

View attachment 442371
Great idea using the hood latches for the antenna!!

Saw them in concert for that album. One of the tightest bands I’ve seen right up there with Pink Floyd. It was like listening on head phones. Almost 50 yrs later and I still remember the concert and the girl I was with.
Two bands in my Top 5! Pink Floyd is #1.
 
Shortly after acquiring my LJ a few months ago, I did a quick overhaul of the factory sound system. Nothing crazy just wanted something that worked and had USB and AUX inputs and improved sound. A new head unit and speakers all around kicked things off. My Jeep didn't come with the subwoofer option but I decided to add it shortly after the initial overhaul. Picked up a complete rear console on Ebay two weeks ago for the box and wiring pigtail and proceeded to make the harness extension and adapters as well as figure out how to shoehorn the new Kicker driver into the factory sub box.

I've seen some posts and videos of people removing plastic ribs from inside the box to get their chosen drivers to fit. I didn't see depth as much of an issue in my case as this particular Kicker is only 1/8" taller than the box depth as is. But since the Kicker has a bit of a fat booty due to its sizeable magnet, it actually interferes with the recess in the top of the box that allows for the console tray above. I designed an adapter ring that shifted the new driver as low as possible in the factory sub opening, kicked the driver 1/8" out at the top and 1/2" at the bottom to clear any offending box innards, had a small relief for the wiring harness and picked up on the four factory mounting points.

A 3D sketch of the designed adapter ring:

View attachment 442574

Designing the ring as a solution was great, but without a means to produce it essential a pointless exercise. Fortunately a friend on the left coast recently acquired a 3D printer and was keen to have a crack at it. So I obliged and sent him the file...

The ring early on in the printing process:

View attachment 442575

The finished ring fresh off the glass printing platter, with raft and supports intact:

View attachment 442576

The ring was posted to me in the above state last Friday and arrived before noon today (on the right coast). Here's the adapter ring cleaned up and prepped for installation:

View attachment 442577

Adapter affixed to the sub box with factory screws:

View attachment 442578

Sub driver attached thru ring into box:

View attachment 442579

Fin.

View attachment 442580

I used a foam tape seal between each component and packed the sub box with batting before reassembly. Fun project and collaboration with a buddy long distance was a bonus. (y)

I was able to shave my enclosure and drop it in.

The only issue I see with adding the ring is that you lose extension. I ran a 1/4” nylon spacers between the enclosure and center console and it greatly increased the thump bc I could run more power to extend the subwoofer without hitting the opening. You should be able to run 3/8” spacers no problem.

If you add spacers, Dynamat does a great job holding each spacer in place for inserting the screws…and also firms up the walls of the enclosure if you want more output.
 
  • Like
Reactions: chili_pepper
Skipped sleep to heat wrap the fuel rail and injectors. Not the most fun I’ve ever had but it’s done.

Added some of the Mopar heat guard that busted into three pieces on me before ever installing it. I taped it up and then busted it all again when trying to install it.

Need to get the stud size so I can run washers and nuts over the guard.

IMG_5847.jpeg


IMG_5848.jpeg


IMG_5849.jpeg


Yesterday’s storm tested the hood louver for the first time. All was good and the engine bay took less than five minutes to clean up.
 
  • Like
Reactions: matkal and Kiwi TJ
I was able to shave my enclosure and drop it in.

Not sure exactly why but I had the desire not to modify the sub box if at all possible. Save for eight screw holes, I actually manged this.

The only issue I see with adding the ring is that you lose extension. I ran a 1/4” nylon spacers between the enclosure and center console and it greatly increased the thump bc I could run more power to extend the subwoofer without hitting the opening. You should be able to run 3/8” spacers no problem.

Part of the design scope was to keep the proudest feature across the face of the speaker below the surface of the sub box to avoid any direct contact with any other items. I was successful in this though I didn't account for small vertical ribs on the back of the bars in the console's speaker grille area. It looked a little close to the top of the foam surround (only) for my liking, so Inserted some 00 rubber faucet washers between the sub box and console at the three screw holes for an extra buffer. Bear in mind I am not running a high powered system here, this is stock in terms of power output.

Dynamat does a great job holding each spacer in place for inserting the screws…and also firms up the walls of the enclosure if you want more output.

I did add some thin adhesive felt pieces at spots where I saw the potential for contact/vibration between the two. The Dynamat is not a bad idea.
 
Last edited: