Sab-a-dab-a-doo! The back-country LJ build has officially started

This morning I started early on the cross-member design before going to my meeting in Austin. I took advantage of the trip to "the big City" to pick up some DOM tubing for the cross-member (more on that in a minute.) After dinner, I made my way back out to the shop and put the last three nutserts in the frame. Then I came back to the house to finish the cross-member design.

The design I have in mind was inspired by this design @mrblaine posted here a few years back. Of course, it wouldn't be a sab design unless I over-complicated it! I'll take the 1" x 3" x .120" rectangular tubing that I have and drill four small holes all the way through from top to bottom with a pattern that matches the OEM rubber mount's studs. Then, I'll drill the top holes to .375" diameter (or so, haven't decided) and the bottom holes will be cut to 1" diameter from the bottom side to the bottom of the top wall using an annular cutter. Next, I'll cut the tubing down a plane halfway between the top and bottom surfaces and bevel the edges. Then, I'll cut four pieces of the 1" x .120" wall DOM tubing I bought today to go into the 1" holes. With the .760" I.D., a 13mm socket will fit inside.

I'll then weld it in this order:
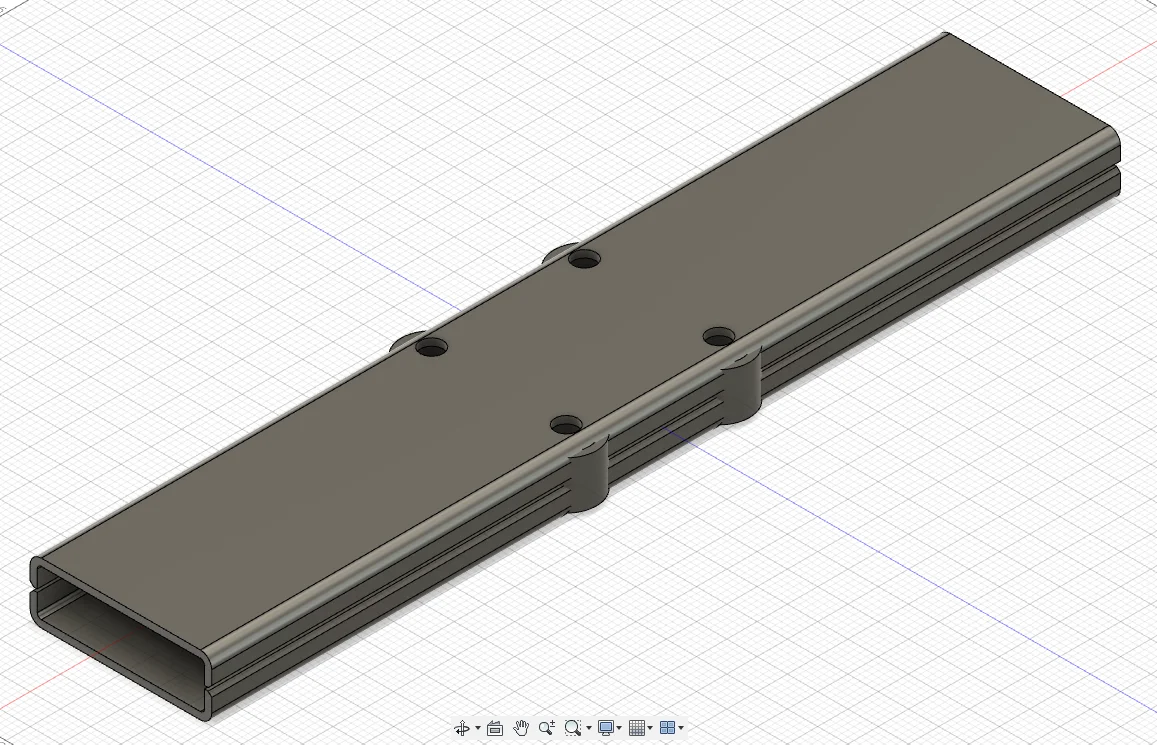
  1. Fixture and weld the tops of the tubes to the inside of the top tubing section (that's why I'm cutting the rectangular tubing in half - to have access to weld)
  2. Fixture the top and bottom pieces back together and weld the bottom side of the tubes
  3. With it still in the fixture, weld the two halves back together
Since a picture is worth a thousand words, here's two-thousand more words you don't need to read (top view first - center section only):
1729650481634.png


1729650586146.png


Tomorrow, I'll start building it. Stay tuned!

(skip to Post #318 for the continuation of the cross member build)
 
Last edited:
This morning I started early on the cross-member design before going to my meeting in Austin. I took advantage of the trip to "the big City" to pick up some DOM tubing for the cross-member (more on that in a minute.) After dinner, I made my way back out to the shop and put the last three nutserts in the frame. Then I came back to the house to finish the cross-member design.

The design I have in mind was inspired by this design @mrblaine posted here a few years back. Of course, it wouldn't be a sab design unless I over-complicated it! I'll take the 1" x 3" x .120" rectangular tubing that I have and drill four small holes all the way through from top to bottom with a pattern that matches the OEM rubber mount's studs. Then, I'll drill the top holes to .375" diameter (or so, haven't decided) and the bottom holes will be cut to 1" diameter from the bottom side to the bottom of the top wall using an annular cutter. Next, I'll cut the tubing down a plane halfway between the top and bottom surfaces and bevel the edges. Then, I'll cut four pieces of the 1" x .120" wall DOM tubing I bought today to go into the 1" holes. With the .760" I.D., a 13mm socket will fit inside.

I'll then weld it in this order:
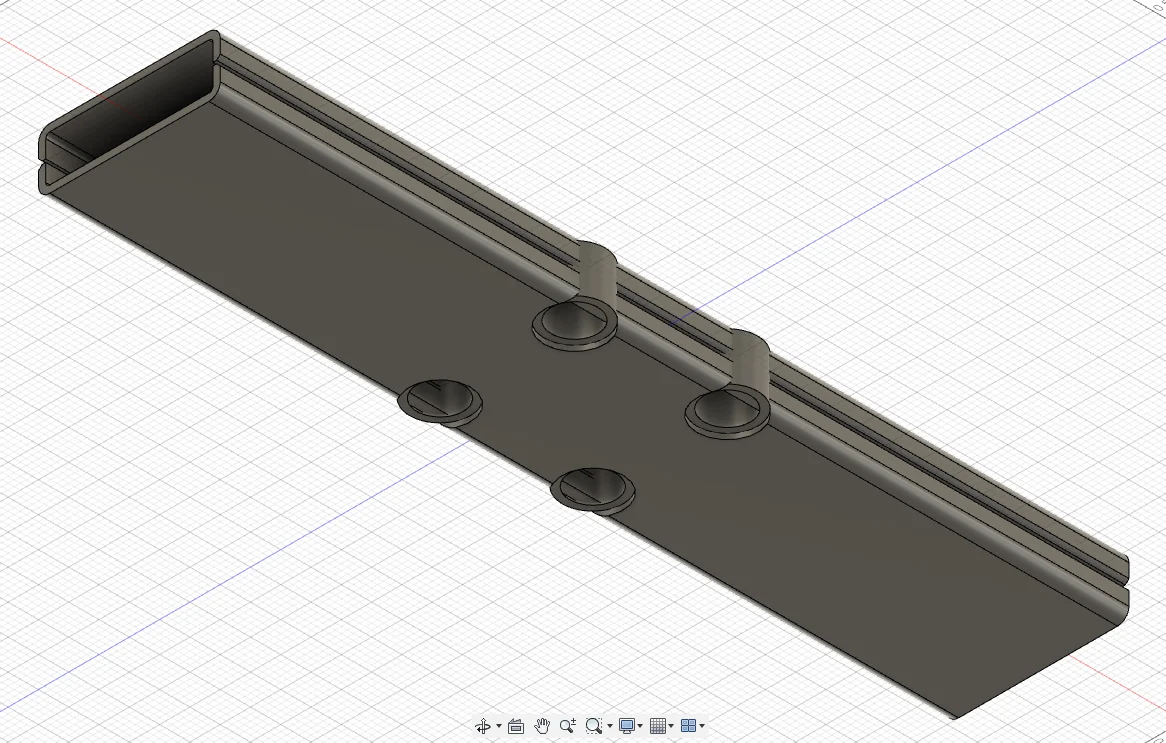
  1. Fixture and weld the tops of the tubes to the inside of the top tubing section (that's why I'm cutting the rectangular tubing in half - to have access to weld)
  2. Fixture the top and bottom pieces back together and weld the bottom side of the tubes
  3. With it still in the fixture, weld the two halves back together
Since a picture is worth a thousand words, here's two-thousand more words you don't need to read (top view first - center section only):
View attachment 567432

View attachment 567433

Tomorrow, I'll start building it. Stay tuned!

If someone was accepting of a crossmember with some dip in it (like Blaine's that you linked) would that have required less "massaging" of the tub floor to make room for the Atlas 4?
 
If someone was accepting of a crossmember with some dip in it (like Blaine's that you linked) would that have required less "massaging" of the tub floor to make room for the Atlas 4?
There's no way I'd ever try putting an Atlas 4 speed in an LJ (even more so with a TJ) with an NSG370 with a perfectly flat belly pan. From the start, I was following Mr. Blaine's advice to use the 1" drop skid blank that he has available. As usual, his advice was spot on. If I wanted a flat belly, the Atlas would be 1" higher, and the tub mods necessary would have been much more extensive. As it is, I still have to fix the kink in the floor pan that I caused...
 
If someone was accepting of a crossmember with some dip in it (like Blaine's that you linked) would that have required less "massaging" of the tub floor to make room for the Atlas 4?
His floor mangling is a bit further back than most will encounter with the 4 speed. I doubt most would try the 4 speed behind a manual in a TJ and try to get by with a 12" rear driveshaft. Even with the dip which has more benefit for us than lowering the mount, it is intentionally done to follow the skid plate. It acts as a reinforcement to try and slow down skid plate failure in a severe event. Also one of the reasons the ends at the frame are solid mounted instead of on bushings. Ties the frame together side to side to give more resistance to upward movement in the severe event.
 
There's no way I'd ever try putting an Atlas 4 speed in an LJ (even more so with a TJ) with an NSG370 with a perfectly flat belly pan. From the start, I was following Mr. Blaine's advice to use the 1" drop skid blank that he has available. As usual, his advice was spot on. If I wanted a flat belly, the Atlas would be 1" higher, and the tub mods necessary would have been much more extensive. As it is, I still have to fix the kink in the floor pan that I caused...

We use the 1" drop at the center which is 13" wide so we don't have to attach the engine skid on a drop spacer once it gets under the trans oil pan.
 
Rats. My annular cutter set only goes up to 15/16", but I found a 1" in stock down in Austin, about 5 miles from where I was yesterday. I'm kicking myself for not looking yesterday before I left for that meeting. Two trips to Austin in two days. That's normally about six month's worth of Austin trips for me...
 
  • Like
Reactions: freedom_in_4low
There's no way I'd ever try putting an Atlas 4 speed in an LJ (even more so with a TJ) with an NSG370 with a perfectly flat belly pan. From the start, I was following Mr. Blaine's advice to use the 1" drop skid blank that he has available. As usual, his advice was spot on. If I wanted a flat belly, the Atlas would be 1" higher, and the tub mods necessary would have been much more extensive. As it is, I still have to fix the kink in the floor pan that I caused...

This aligns with my understanding, which is why I asked. I think I just mistook the straight tube in the model screenshot you posted as a straight crossmember, which would imply you were going for a flat skid, and maybe what I'm seeing is just the lowest, middle section of the beam.

Anyway, great design as usual. I've been rolling this project around in my head because of how much I hate removing my front driveshaft with the UCF skid, but I'm hesitant to do it until I know what I'm doing for a transfer case in the long term.
 
Rats. My annular cutter set only goes up to 15/16", but I found a 1" in stock down in Austin, about 5 miles from where I was yesterday. I'm kicking myself for not looking yesterday before I left for that meeting. Two trips to Austin in two days. That's normally about six month's worth of Austin trips for me...

I do way more of this than I should.
1729693857005.webp
 
I think I just mistook the straight tube in the model screenshot you posted as a straight crossmember, which would imply you were going for a flat skid, and maybe what I'm seeing is just the lowest, middle section of the beam.
In my defense, I did make an attempt to prevent your confusion :ROFLMAO::
1729699822019.webp


... I'm hesitant to do it until I know what I'm doing for a transfer case in the long term.
Be careful, that's how I ended up with an expensive Atlas case! :sneaky: I was going to just keep the Rubicon case, but then when I realized how much work it was going to be to figure out how do the mount, I decided to buy the Atlas now, rather than waiting to see if I wanted it later.
 
  • Like
Reactions: NashvilleTJ
I do way more of this than I should.

Unfortunately, where I live, that's almost never an option. Same item for me:
1729700161328.webp


It's more expensive and delivery is almost a week! I'm back from the big city with my new annular cutter, so the destruction will now commence...
 
  • Sad
Reactions: Apparition
In my defense, I did make an attempt to prevent your confusion :ROFLMAO::
View attachment 567562


Be careful, that's how I ended up with an expensive Atlas case! :sneaky: I was going to just keep the Rubicon case, but then when I realized how much work it was going to be to figure out how do the mount, I decided to buy the Atlas now, rather than waiting to see if I wanted it later.


Yep, you sure did and missed it...I blame myself for forum-ing with my PHOOOOOOONE. 🤣

Beyond the transfer case I don't even know what transmission I might end up with in the future, as I can't completely rule out trying to be a pioneer with a 32rh swap into an NGC LJ with a standalone homebrew Arduino based "TCM" to handle the TCC lockup.
 
  • Haha
Reactions: Apparition
Yep, you sure did and missed it...I blame myself for forum-ing with my PHOOOOOOONE. 🤣

Beyond the transfer case I don't even know what transmission I might end up with in the future, as I can't completely rule out trying to be a pioneer with a 32rh swap into an NGC LJ with a standalone homebrew Arduino based "TCM" to handle the TCC lockup.

If you spent as much time doing adjustments as you do typing, it would already be done.
 
If you spent as much time doing adjustments as you do typing, it would already be done.

reading between the lines to determine the context, based on my other posting activity (because I didn't specifically mention my driveline vibe issues in this thread)...it's quite easy to take a few 5 minute breaks to type while I'm already at my computer, waiting for code to compile, multiple times per day. It's different to go out and spend the time it takes to make incremental adjustments, test, get increasingly frustrated blindly poking around while not knowing whether I'm getting closer or farther away from the solution, and repeat ad nauseam. Because I've already done it so many damn times that it's quite possibly my most hated Jeep related task. At this point I think I'd rather replace a heater core.
 
reading between the lines to determine the context, based on my other posting activity (because I didn't specifically mention my driveline vibe issues in this thread)...it's quite easy to take a few 5 minute breaks to type while I'm already at my computer, waiting for code to compile, multiple times per day. It's different to go out and spend the time it takes to make incremental adjustments, test, get increasingly frustrated blindly poking around while not knowing whether I'm getting closer or farther away from the solution, and repeat ad nauseam. Because I've already done it so many damn times that it's quite possibly my most hated Jeep related task. At this point I think I'd rather replace a heater core.
Jerry would say that's simply not true and none of them need that much adjustment. Regardless of your excuses and reluctance, it really isn't that hard to do. Pick a spot to start, mark the arms with arrows that show either longer or shorter so you don't have to thing about it. Lay on your back and turn them both at the same time so you can feel how much bind each one is in to approximate roughly the same length. It is literally 5 minutes per stop. We've done some that were 20 adjustments in a few hours.
 
  • Like
Reactions: freedom_in_4low
Made some progress today, but, as usual, not as much as I had intended. Just as I was getting started laying out the cross member holes, the UPS and FedEx man showed up with stuff. SendCutSend did a beautiful job on the mount pieces:
IMG_7019.JPG


All the time I spent on the tab and slot tolerances paid off - they fit together perfectly! I'm really impressed with SendCutSend. I've placed many orders with them for this build, and they have not dropped the ball once. Prices are great, quality is great, and they make things quickly. These parts were ordered last Thursday!

Here it is in place:
IMG_7020.JPG


It took a long time to design this due to the attention to details required. I already mentioned that I didn't have a lot of extra vertical space, so clearances were pushed to the limit. For instance, there's a cut at the top rear (relative to the LJ) of the bracket to clear the Atlas planetary housing:
IMG_7022.JPG


Also, I knew I was likely going to have to clearance the bottom rear of the transmission due to this interference I expected:
IMG_7024.JPG


A little work with the fiber disc:
IMG_7027.JPG


And I have some clearance:
IMG_7026.JPG


One other detail I had to work into the design is easy access to the planetary housing's drain plug:
IMG_7021.JPG


After checking out the mount, I finally got to laying out the cross member holes:
IMG_7029.JPG


I then drilled 1/8" holes all the way through so that the top and bottom holes are coaxial, drilled the top side to 11/32", and drilled the bottom side to 1" with the annular cutter I picked up this morning, stopping at the bottom of the top surface of the tubing:
IMG_7030.JPG


A little die grinder work to clean it up, and the holes are done:
IMG_7031.JPG


And right at the end of the day, the machine shop called to let me know the skid plate countersinking will be done tomorrow. I was worried it would be two weeks until it was done, which really kills this build, but they got it turned around quickly for me! Barring any major hiccups, I should be able to get the skid and cross member mounted by next Monday.

Tomorrow, I'll weld up the transmission mount so that I can test it's deflection under load. Then I'll continue work on the cross member. Stay tuned!

To see the welding of the mount, jump ahead to Post #324.
To see the continuation of the cross-member, jump ahead to Post #327.
 
Last edited:
Made some progress today, but, as usual, not as much as I had intended. Just as I was getting started laying out the cross member holes, the UPS and FedEx man showed up with stuff. SendCutSend did a beautiful job on the mount pieces:
View attachment 567628

All the time I spent on the tab and slot tolerances paid off - they fit together perfectly! I'm really impressed with SendCutSend. I've placed many orders with them for this build, and they have not dropped the ball once. Prices are great, quality is great, and they make things quickly. These parts were ordered last Thursday!

Here it is in place:
View attachment 567629

It took a long time to design this due to the attention to details required. I already mentioned that I didn't have a lot of extra vertical space, so clearances were pushed to the limit. For instance, there's a cut at the top rear (relative to the LJ) of the bracket to clear the Atlas planetary housing:
View attachment 567631

Also, I knew I was likely going to have to clearance the bottom rear of the transmission due to this interference I expected:
View attachment 567632

A little work with the fiber disc:
View attachment 567652

And I have some clearance:
View attachment 567653

One other detail I had to work into the design is easy access to the planetary housing's drain plug:
View attachment 567655

After checking out the mount, I finally got to laying out the cross member holes:
View attachment 567656

I then drilled 1/8" holes all the way through so that the top and bottom holes are coaxial, drilled the top side to 11/32", and drilled the bottom side to 1" with the annular cutter I picked up this morning, stopping at the bottom of the top surface of the tubing:
View attachment 567658

A little die grinder work to clean it up, and the holes are done:
View attachment 567659

And right at the end of the day, the machine shop called to let me know the skid plate countersinking will be done tomorrow. I was worried it would be two weeks until it was done, which really kills this build, but they got it turned around quickly for me! Barring any major hiccups, I should be able to get the skid and cross member mounted by next Monday.

Tomorrow, I'll weld up the transmission mount so that I can test it's deflection under load. Then I'll continue work on the cross member. Stay tuned!

Become a big fan of Send-Cut-Send with only a little experience with them so far. So easy to use them with goo results and very reasonable pricing.

Did you have them do the bending? If so, any feedback on that process? I know they're growing their offerings. Curious about the bending for a potential project or two if you have any feedback and/or advice how it went giving them the design.
 
  • Like
Reactions: freedom_in_4low
Did you have them do the bending? If so, any feedback on that process? I know they're growing their offerings. Curious about the bending for a potential project or two if you have any feedback and/or advice how it went giving them the design.
Yes, they did the bending. It was a seamless process using Fusion's sheet metal tools and setting up the sheet metal rules to match SendCutSend's values (mainly the k factor and effective bend radius, which, incidentally, is different for each gauge, but easily found on their website.)

I mentioned in my last post about how much time I spent on the tolerances for the tabs and slots I put on the parts to make assembly easier. I worked through all the SendCutSend production tolerance bands stacking up (including their angular bending tolerance) to come up with the slot size to work for all production variations. As it turns out, their actual accuracy was so good that the slot could have been tightened up considerably. That speaks well for their quality control (or my luck, which is usually not so good :sneaky:)
 
  • Like
  • Love
Reactions: Tob and FarFire70