
You are using an out of date browser. It may not display this or other websites correctly.
You should upgrade or use an alternative browser.
You should upgrade or use an alternative browser.

3D printing of TJ parts
- Thread starter KCsTJ
- Start date

Okay, now I'm curious what kind of stuff you guys want, I have access to both AutoCAD and an entire printer farm.
Sam Ryan
New Member
Printer farm sounds nice, I'm working on getting mine just back up on it's feet since i had the motherboard burn out, parts wise I am looking into modeling small trim stuff, but if It was more serious a larger multi-piece print could be used to make a vacuum formed mold for production level pieces.
Sam Ryan
New Member
in the near future especially, old jeeps don't have as many aftermarket parts, at least not cheap ones. I offered a buddy of mine who wants to get into racing to make vacuum form molds for plastic trim. I could easily see jeeps doing the same thing with greater ease because they're already so easy to work on.

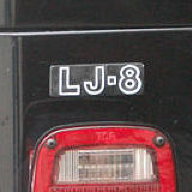
If you're referring to my custom "LJ-8" emblem, I used Smooth-Cast two-part urethane casting resin, not epoxy.I've dabbled around with printing cavities and cores for doing low run injection molding. Vacuum forming is a great idea. poured Casting would be a good application too. @jscherb had done some emblems and stuff out of two part epoxy that would probably translate very well to a 3d printed mold.
The mold was made from RTV silicone (the black stuff is mold release residue, and washes off):
Parts out of the mold:
A finished emblem:
Speaking of vacuum forming, that is a viable technique for making some Jeep parts. This JL-Style Grille for the JK is vacuum formed. I designed this grille and made a few prototypes in fiberglass and when a company wanted to put it in production I introduced them to a thermo-forming company and this is one of the first vacuum formed grilles:
Yes, that is the one I was thinking of. Sorry I got the details wrong. Anyway, I thought it was a neat process and have always thought that there is a market for very low run prototype parts that are of the material you intend to go to production with. I know you don't ever intend on production, but lots of people do. That's always been my interest with 3d printing injection molds.If you're referring to my custom "LJ-8" emblem, I used Smooth-Cast two-part urethane casting resin, not epoxy.
The mold was made from RTV silicone (the black stuff is mold release residue, and washes off):
View attachment 235217
Parts out of the mold:
View attachment 235218
A finished emblem:
View attachment 235219
Speaking of vacuum forming, that is a viable technique for making some Jeep parts. This JL-Style Grille for the JK is vacuum formed. I designed this grille and made a few prototypes in fiberglass and when a company wanted to put it in production I introduced them to a thermo-forming company and this is one of the first vacuum formed grilles:
View attachment 235220
View attachment 235221
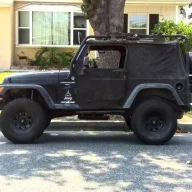
For large internal trim parts look into a CR-30. With the belt based bed it can print long objects.
PETG will hold up well in the heat as I understand it. I also think it's less UV reactive than ABS(please confirm). PETG is also much more sandable than most other plastics.
HMU if you ever need small parts printed. I have a general printer and will be getting an SLA/resin printer shortly. I've been in the printing world for about 10 years now. So feel free to message me if you have questions as well.
PETG will hold up well in the heat as I understand it. I also think it's less UV reactive than ABS(please confirm). PETG is also much more sandable than most other plastics.
HMU if you ever need small parts printed. I have a general printer and will be getting an SLA/resin printer shortly. I've been in the printing world for about 10 years now. So feel free to message me if you have questions as well.


I would think the bezel under the radio would be an easy part to print if you could model it. I made mine out of metal because I didn’t want to pay 12volt guy $150! Like most things, pride got the best of me. At my hourly rate, I have way more than $150 in the piece! Once you design it, should cost you nothing to print.Okay, now I'm curious what kind of stuff you guys want, I have access to both AutoCAD and an entire printer farm.
Also, I want this shifter handleOkay, now I'm curious what kind of stuff you guys want, I have access to both AutoCAD and an entire printer farm.
https://cdn.thingiverse.com/renders/0b/1c/ed/f2/3d/image_preview_featured_display_large.jpg
Sam Ryan
New Member
Shifter handle would be pretty straightforward to model, I've been talking about posting to Thingiverse, so I might take a crack at modeling that out. For the shifter part I would make it so you could buy an adapter and glue it into the base.Also, I want this shifter handle
https://cdn.thingiverse.com/renders/0b/1c/ed/f2/3d/image_preview_featured_display_large.jpg
——-
Somebody beat me to it! , just make sure you read the description for proper settings.
https://www.thingiverse.com/thing:4723405 — Hoonigan Crazy Cart Grip STL




Tom,Yeah I’ve been considering getting this, sanding it down and trying to take some gloss off it and paint it to look more oem. I’ll update if I decide to do so.
I've tried the sanding route and didn't get the results I wanted. Next time I would try this method. https://hackaday.com/2018/06/15/smoothing-pla-with-two-paints/
Only parts I've made for my TJ is a spacer to take up the slack in my Swayloc system and a Baofeng radio holder. The spacer held up to the wheeling season last year without complaint. Radio holder ended up warping due to hot/cold/sunlight and being printed out of PLA. Next step will be to figure out ABS.
THEREALJIM
TJ Enthusiast

ejay
TJ Addict
I've done a good amount of consumer 3D printing as well as some commercial utilizing commercial printers. The problem is that unless you use very very expensive printers you're going to end up with striations that are dirt magnets and make your print look amateur. There are acetone vapor chambers that can smooth the surface out a bit but even then....
Depending on the use, I don't know how much I would trust metal prints.
It's probably less expensive to take a functional plastic part, mold it, and buy everything you need to create your own injection mold to duplicate it than to buy a super expensive 3D printer and try to recoup the cost by printing various random junk.
Depending on the use, I don't know how much I would trust metal prints.
It's probably less expensive to take a functional plastic part, mold it, and buy everything you need to create your own injection mold to duplicate it than to buy a super expensive 3D printer and try to recoup the cost by printing various random junk.
Paint to smooth is quite easy. Light sand it. Then use self leveling automotive primer. Then sand. Then another coat of the primer. The self leveling primer takes out layer lines.Tom,
I've tried the sanding route and didn't get the results I wanted. Next time I would try this method. https://hackaday.com/2018/06/15/smoothing-pla-with-two-paints/
Only parts I've made for my TJ is a spacer to take up the slack in my Swayloc system and a Baofeng radio holder. The spacer held up to the wheeling season last year without complaint. Radio holder ended up warping due to hot/cold/sunlight and being printed out of PLA. Next step will be to figure out ABS.
Try sanding PETG next btw. PLA is the hardest to smooth. PETG sands easier and will withstand the temps of sitting in the sun better.
Create your own injection mold? There isn't anything cheap about trying to injection mold parts. The molds are are 10's of thousands, and a cheap press is nearly a hundred k. Of course, you could just have your mold run somewhere... For 35-50 dollars an hour plus material. Injection molding can produce a high volume of parts very inexpensively. Low volume...very expensive.It's probably less expensive to take a functional plastic part, mold it, and buy everything you need to create your own injection mold to duplicate it than to buy a super expensive 3D printer and try to recoup the cost by printing various random junk.
A decent, entry level industrial printer will be 10k or so, last time I checked. Something like a markforge desktop model. It won't have a big build envelop, but it will give you a nice part that can be very strong.
If the part is shaped such that a fairly simple mold will work, fiberglass is a very inexpensive way to mold things. Most people think fiberglass is for making hardtops or boats, but it can also be used for small parts. Here's an example I did recently.
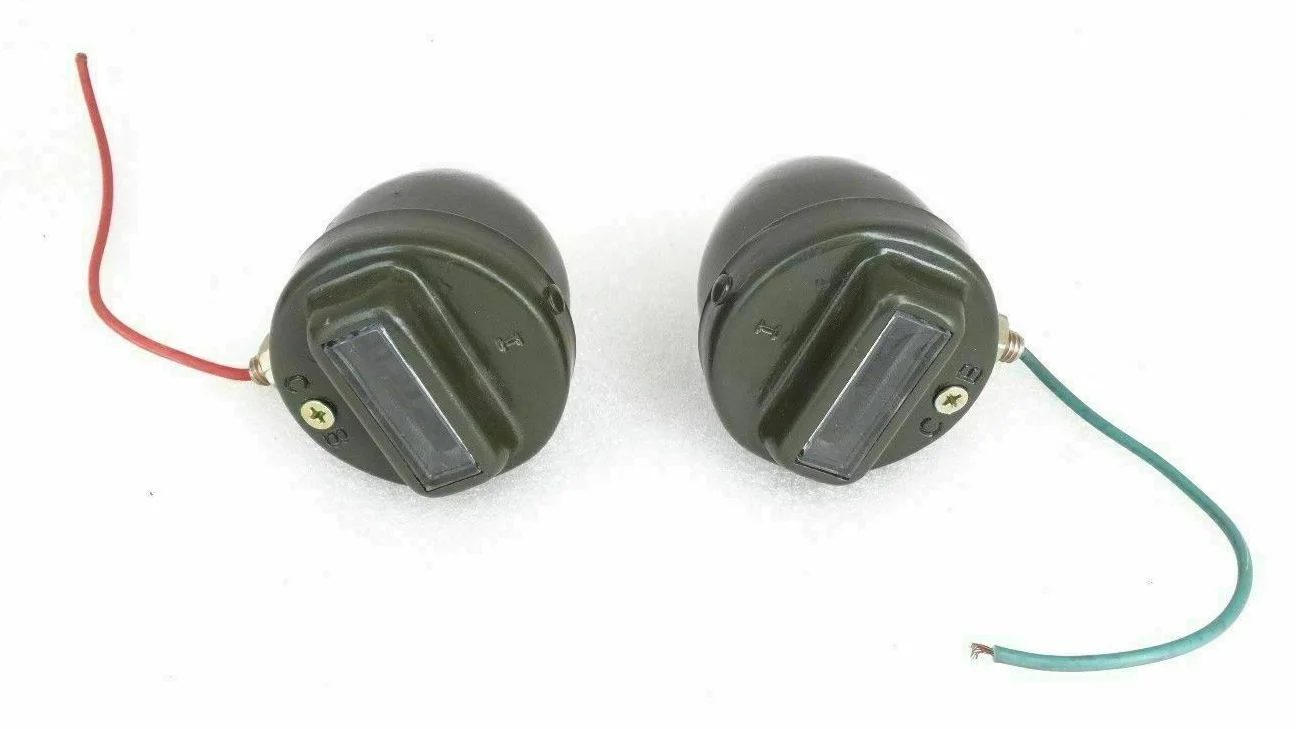
I've been working on an MB/GPW-style grille for the TJ and I wanted to reproduce the original marker lights, which look like this:
I decided to use modern LEDs and make a bezel for them to duplicate the look of the originals. The first step was to make "mold masters", this photo shows one of the LEDs and the masters for the bezels:
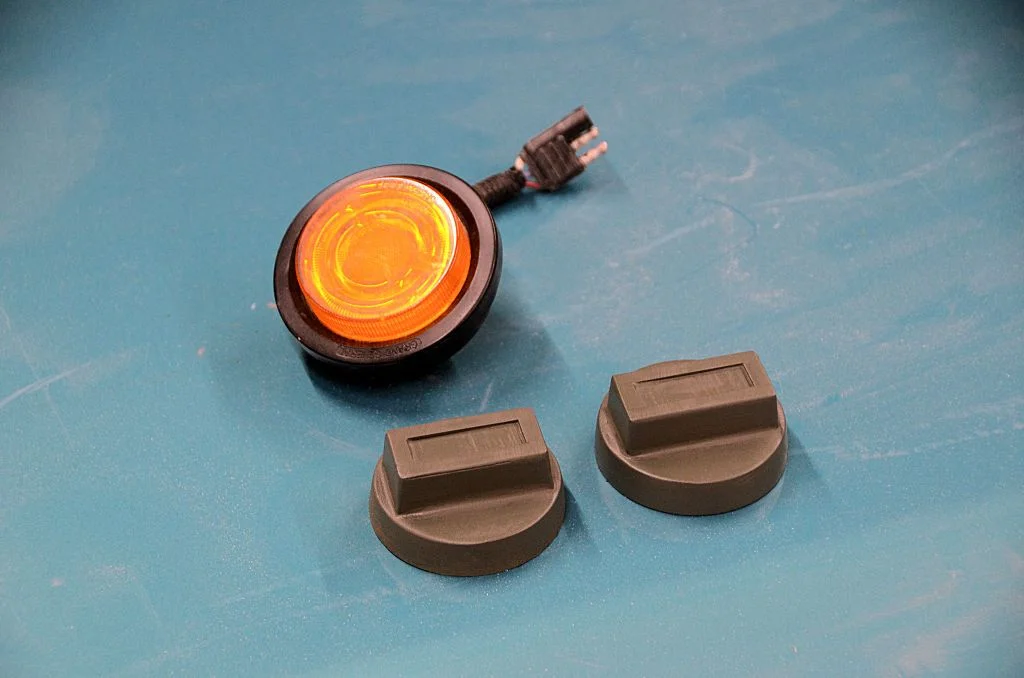
The final bezel will fit over the LED like a cap. I made two masters so I could mold two at once in the final mold.
Then I made a mold from those masters.
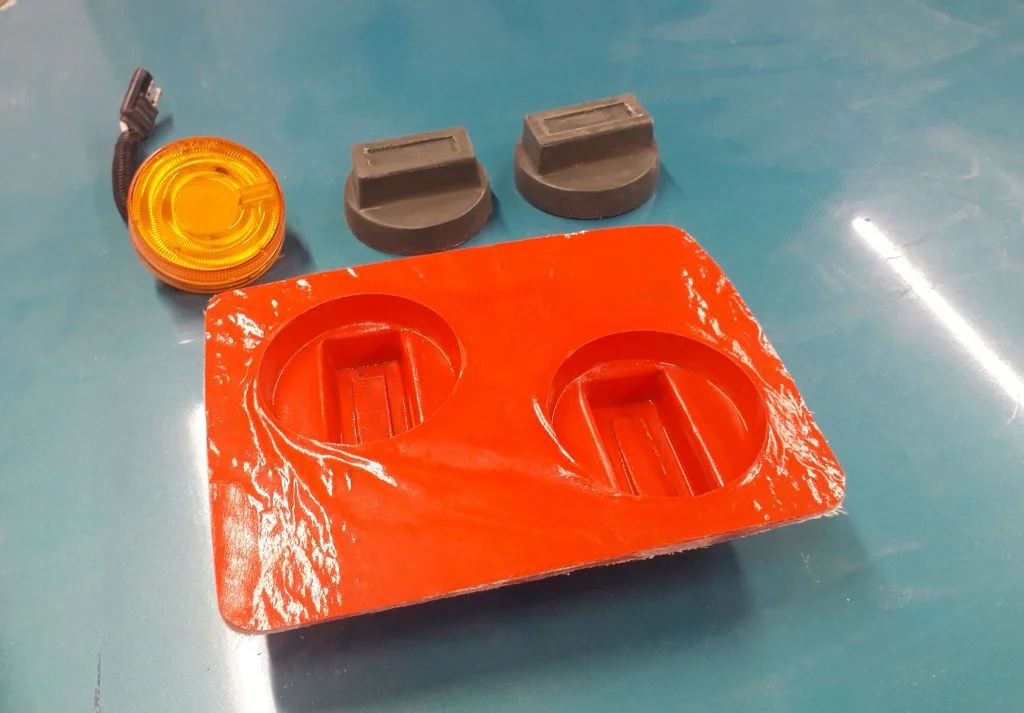
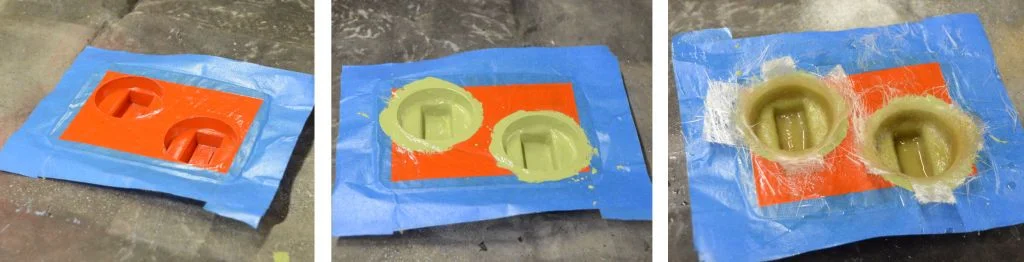
The molding process:
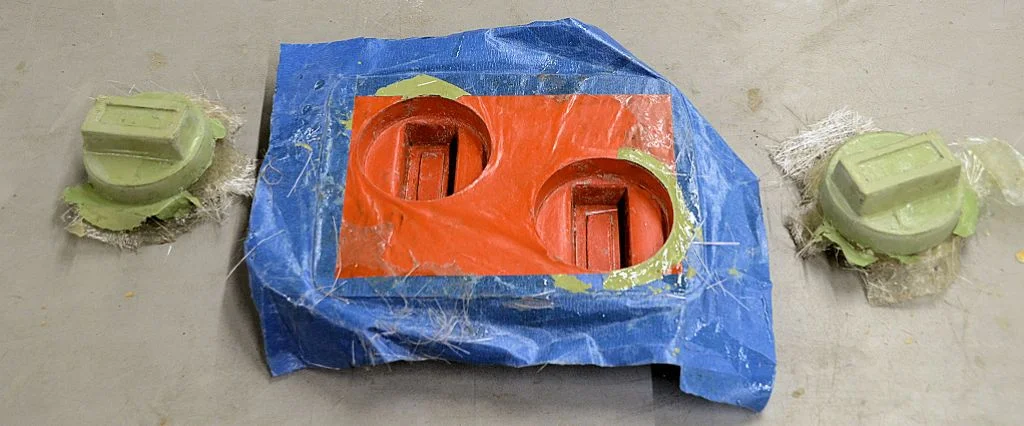
Popped out of the mold:
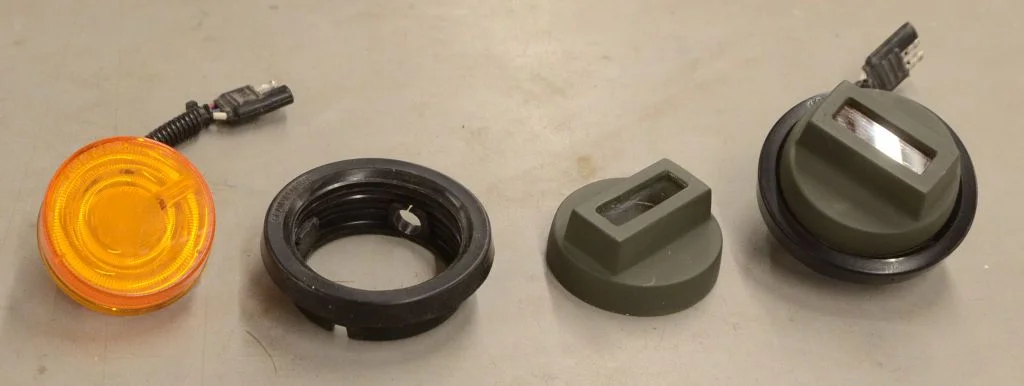
Done. On the left are a set of parts: LED, mounting ring, fiberglass bezel, and on the right the parts are assembled.
Total cost was only a few dollars for the fiberglass materials.
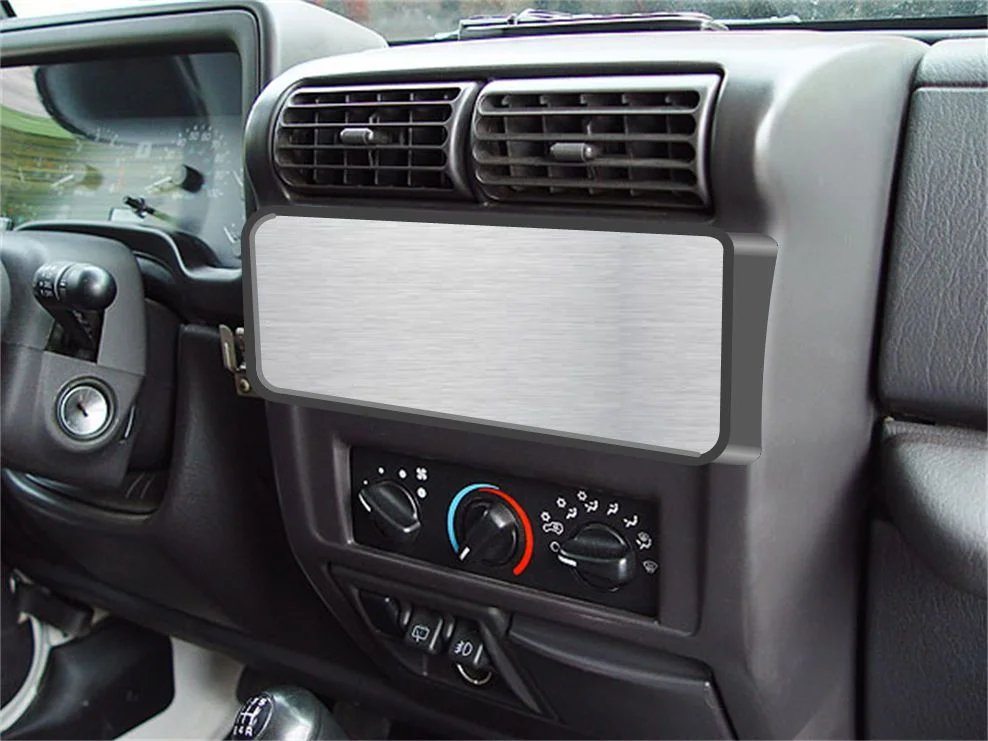
I've done small parts like this many times. My latest fiberglass small-part project is a TJ switch panel design. Here are a few concept sketches of the panel, which would permit the installation of multiple switched or gauges plus a single-DIN radio. This would be a console that overlays the factory center stack and protrudes a bit. This quarter side view illustrates that; I've drawn this one with an aluminum panel:
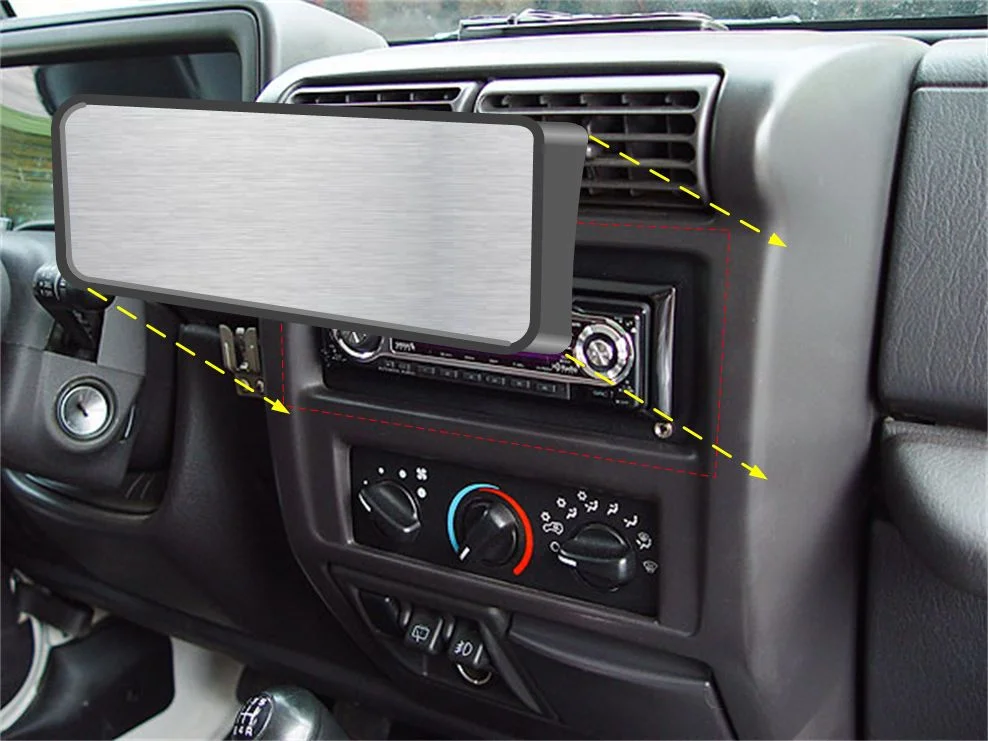
Here's how it would work - the factory plastic gets cut out at the red dashed line and the new panel goes over the hole.
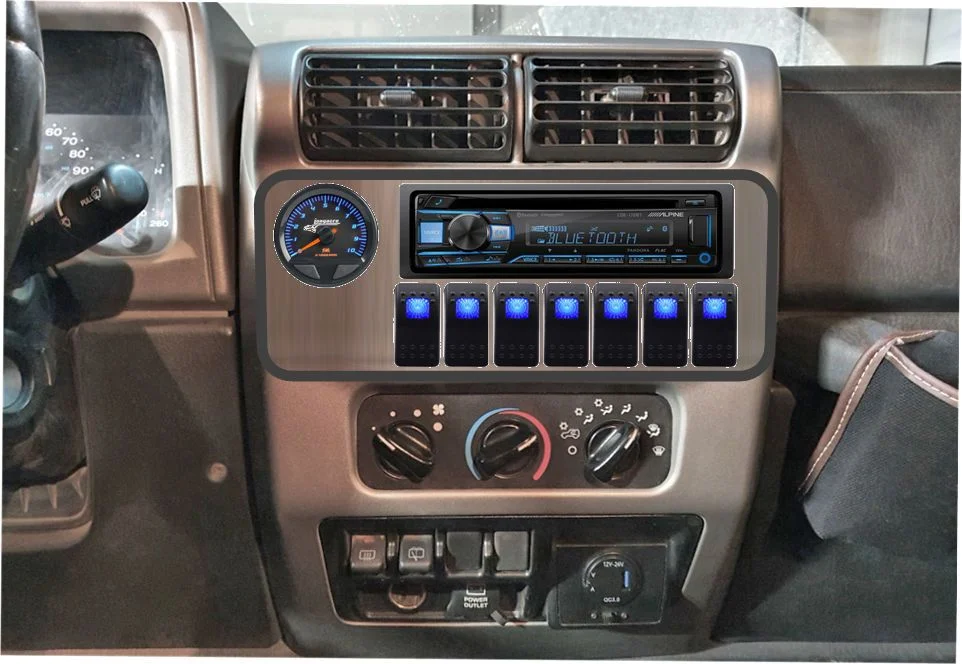
A concept view with a single-DIN radio, a gauge and some switches:
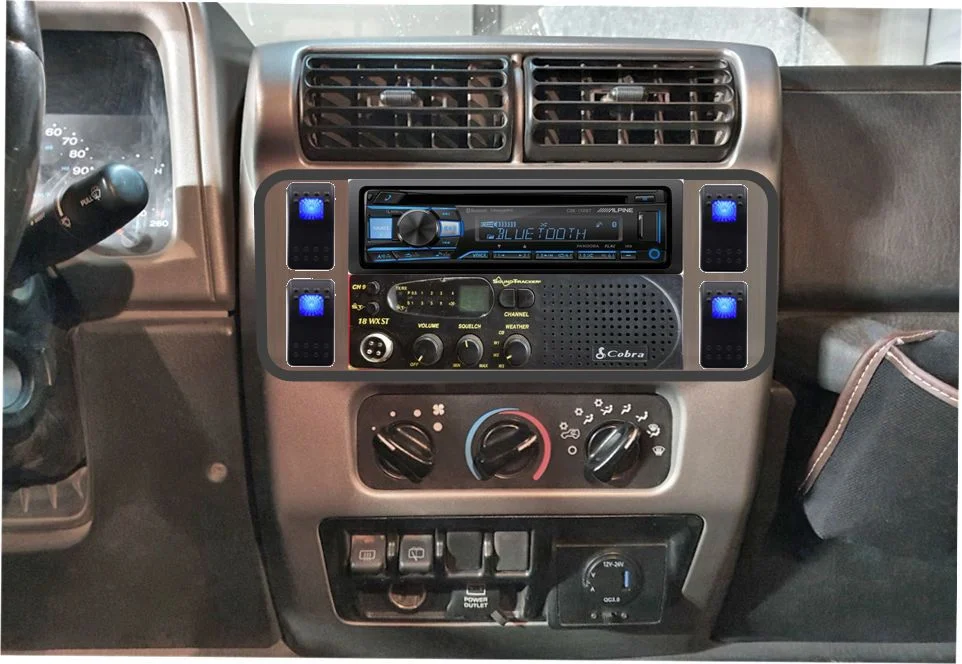
Another straight-ahead view. Might be able to fit two single DIN devices in there, this concept shows a radio, a CB and some switches.
It could also be a way to install a double DIN device along with some switches.
The panel could be cut out for any combinations of things - a single DIN radio, or maybe multiple gauges or lots of switches, or a single double DIN or whatever combination needed that could fit in the available space.
The panel could be aluminum as shown, or it could be painted metal or it could be plastic, it really doesn't matter since it's just a flat piece of material. The housing would need to be form-fitted to the factory shape so it looks like it belongs there.
This is a fairly simple fiberglass project and very inexpensive - no expensive 3-d printer required, or expensive injection mold. Cost of molding each part will be a few dollars. And once finished and installed you'd never know it was fiberglass.
I've been working on an MB/GPW-style grille for the TJ and I wanted to reproduce the original marker lights, which look like this:
I decided to use modern LEDs and make a bezel for them to duplicate the look of the originals. The first step was to make "mold masters", this photo shows one of the LEDs and the masters for the bezels:
The final bezel will fit over the LED like a cap. I made two masters so I could mold two at once in the final mold.
Then I made a mold from those masters.
The molding process:
Popped out of the mold:
Done. On the left are a set of parts: LED, mounting ring, fiberglass bezel, and on the right the parts are assembled.
Total cost was only a few dollars for the fiberglass materials.
I've done small parts like this many times. My latest fiberglass small-part project is a TJ switch panel design. Here are a few concept sketches of the panel, which would permit the installation of multiple switched or gauges plus a single-DIN radio. This would be a console that overlays the factory center stack and protrudes a bit. This quarter side view illustrates that; I've drawn this one with an aluminum panel:
Here's how it would work - the factory plastic gets cut out at the red dashed line and the new panel goes over the hole.
A concept view with a single-DIN radio, a gauge and some switches:
Another straight-ahead view. Might be able to fit two single DIN devices in there, this concept shows a radio, a CB and some switches.
It could also be a way to install a double DIN device along with some switches.
The panel could be cut out for any combinations of things - a single DIN radio, or maybe multiple gauges or lots of switches, or a single double DIN or whatever combination needed that could fit in the available space.
The panel could be aluminum as shown, or it could be painted metal or it could be plastic, it really doesn't matter since it's just a flat piece of material. The housing would need to be form-fitted to the factory shape so it looks like it belongs there.
This is a fairly simple fiberglass project and very inexpensive - no expensive 3-d printer required, or expensive injection mold. Cost of molding each part will be a few dollars. And once finished and installed you'd never know it was fiberglass.
Sam Ryan
New Member
Having a lot of experience is the biggest decider on how good your prints are. Sure a high end printer is likely to net you better results, but only if you know all the tricks of the trade. For $600 I could pick up an Ender 5+ and get a nearly 14" build cube, which is huge for most printers, and Ender is known for being a solid printer choice. That paired with some sneaky snap fit designs and bondo can get really impressive surface finishes. That paired with tech like 3D scanning using an Xbox Kinect, fiberglass mold making experience, and good attention to detail and you could make factory quality parts if you were so inclined.
Similar threads

- Replies
- 4
- Views
- 4,198
- Replies
- 4
- Views
- 1,012


- Replies
- 9
- Views
- 2,883

- Replies
- 2
- Views
- 1,665
- Replies
- 10
- Views
- 1,647

