

Black Magic Brakes Big Brake Kit Install and Review

hosejockey61

FAFO
Original poster
Supporting Member
Ride of the Month Winner
Joined
Apr 9, 2020
Messages
5,057
Location
Parker, CO
Installation and Review of the Black Magic Brakes Big Brake Kit

I finally decided to get the Black Magic Brakes big brake kit. Before installing it, I honestly didn't know what I was missing. I had gotten used to the way my TJ drove and braked, and I didn't realize how much of a difference better brakes could make the driving experience. You don’t know what you don’t know until you experience it. I decided to put this write-up together for two reasons: first, to document the installation foranyone else considering the kit (along with the others who have already done so), and second, to give a real-world review of how it performs once it's on the Jeep.The biggest reason I decided to make the change was that I have always lacked proper braking performance on the road (it was “good enough”), but after my auto transmission swap I immediately experienced braking issues off road. With my deep gears and 4-1 transfer case, my Jeep was driving through the brakes. I was constantly having to shift into neutral if I wanted to pause on an obstacle. That is very nerve racking when you are off camber or dropping down a ledge where you need some control.

That was the problem I wanted to solve, and The Black Magic Brakes kit was the solution.

So What Makes the Big Brake Kit Different?


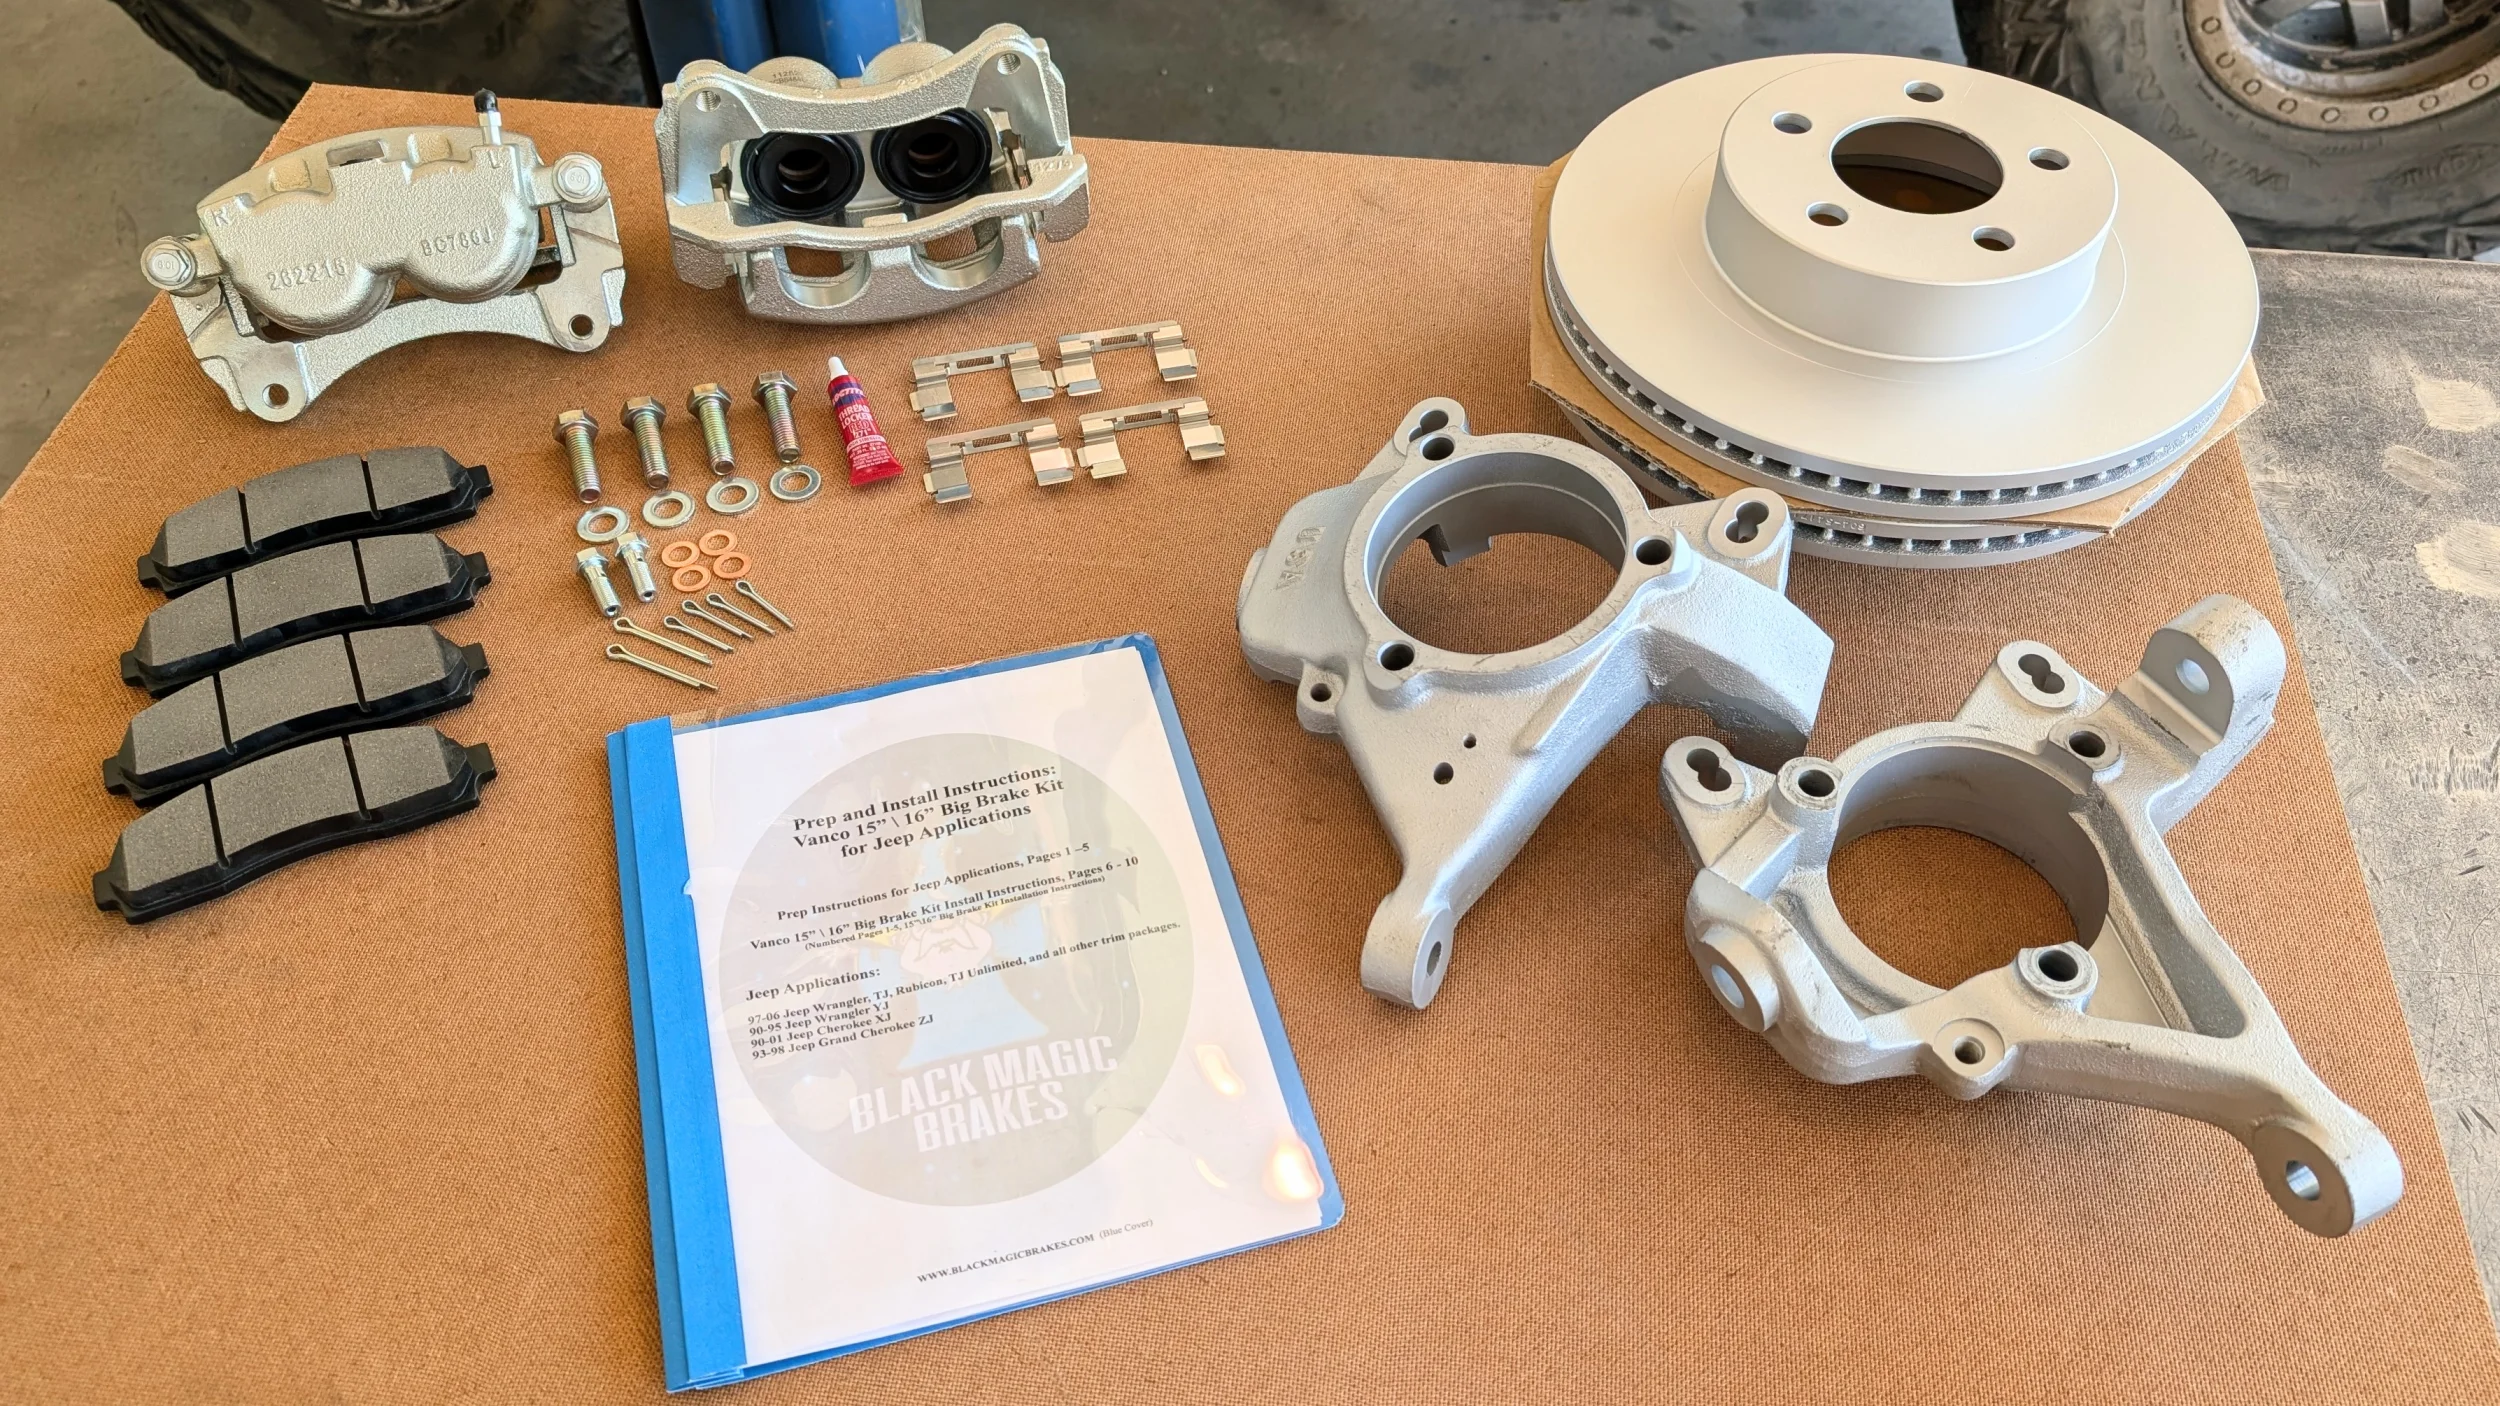
Most members on this forum already know that the stock TJ uses a single-piston front caliper and an 11" rotor. That combination works, but when you start adding weight, larger tires, and other modifications to a TJ, the limitations of the factory braking system become more noticeable.The Black Magic Brakes big brake kit steps things up to a dual-piston caliper and a 12" rotor. The larger rotor increases the effective braking radius, while the dual-piston caliper provides more effective clamping force across the brake pads. The end result is a significant increase in the braking system's ability to generate stopping torque at the front wheels. And when I say significant, I mean significant. With the BBK installed, there is enough braking capability that you can actually lock up the brakes at speed. Obviously, locking up the brakes isn't the goal. The goal is to have enough braking capacity that you can make a hard, controlled stop while staying just short of actual lockup.
1789228741304.webp
 
Last edited:
Before Beginning the Installation

Before beginning any work, read through the complete installation instructions from start to finish. You should also continue reading and referring to the instructions throughout the installation. When in doubt, stop and reread the instructions before continuing. I really can’t say enough about that.

Before beginning any work, open all of the boxes and make sure you have everything you're supposed to have. Take a few minutes to inspect every part for any damage that may have occurred during shipping. With the way Blaine packages things, it’s not likely, but you never know when a carrier is having a bad day. There is nothing worse than getting halfway through a job, only to discover that something is missing or damaged—especially when the Jeep is your daily driver. This is also a great opportunity to lay everything out and familiarize yourself with the parts. Identify the components that are specific to the left or right side of the Jeep (knuckles and calipers), match those up now. It will make things much easier once you start taking the Jeep apart.


1789222716207.webp


Here is a video supplement to the write up


View: %5BURL%5D%5BURL%5Dhttps://youtu.be/Oc8hdbwaqyI?si=FI85xieIIdYLVv2Q[/URL][/URL]
 
Last edited:
Getting Started- Removing the OEM Components

I want to stress, this job does not need to be done on a lift. I did mine on a lift simply to make it easier to shoot the video and take pictures for this write-up. A set of jack stands under the front axle will work just fine. Start by getting the front axle safely supported on jack stands and remove the front wheels. Before installing anything from the BBK, the OEM brake and steering components need to come off. The first thing we're going to do is to remove the steering. In order to do so, we need to remove the cotter pins from both sides first.

1789222468647.webp


With the cotter pins out of the way, we're going to loosen up the castellated nuts, and we're going to drop them all the way to the bottom but leave them on a few threads. To release the tierod end, you want to take a small pry bar and give some- in my case- upward pressure here since I have a tie rod flip. If you're on a stock TJ where the tie rod stud comes up from the bottom, there’s may not be a need for the prybar. You want to take your hammer, and strike the knuckle right next to the tapered pin. It may take a few whacks but it pops right up. YOU DON'T NEED TO HIT IT HARD, JUST ENOUGH UNTIL IT POPS FREE.

1789222600527.webp


1789222647110.webp


Use a bungee cord or something similar to hold the tie rod and drag link out of the way.

1789222783843.webp
 
Last edited:
Now we're going to remove the calipers. Do not remove or disconnect your brake line yet as you don't want brake fluid getting everywhere as well as drain the master cylinder. Simply remove your caliper and hang it up out of the way. With the caliper out of the way, remove the rotor and set it to the side.

1789222860077.webp


1789222930852.webp


1789222931052.webp
 
Last edited:
If you do regular maintenance on your Jeep, then this next part should be easy. But for those of you who haven't and are doing this for the first time, you are probably going to experience some difficulty with this. The problem is that the unit bearing seat that fits in the rotor will corrode and get stuck inside the knuckle. If yours is stuck, try taking a deadblow hammer to knock it loose. If it’s seized in there, it will take extra effort to get it out. There are a couple of tricks, but I’ll leave that for another write up. To remove the unit bearing, there are three 12 point ,13mm bolts on the backside you need to remove. This is a great opportunity to get in there, clean the seating surface and apply anti seize. You will thank yourself in the future!

1789223243375.webp


1789223271882.webp
 
When you're pulling the axle shaft out, you're going to pull it out as an entire unit. You want to get your hand underneath the shaft and support the axle shaft as you're pulling it out. That helps to prevent it from tearing the inner seal. Pull the axle shaft out and set it to the side.

1789223421725.webp
 
With the shafts out, the next thing to remove is the knuckles. You have your upper ball joint and your bottom ball joint. First, get the cotter pins out and discard them. Just like the TRE’s, loosen the castellated nuts leaving the bottom one on a few threads. This will capture the knuckle and keep it from falling to the ground. On the top of the knuckle, you're going to see a little flat spot. Take your BFH, and give it a couple good whacks, and then it will free itself from the ball joints. Now simply unthread the nut, and your knuckle comes right off.

1789223543334.webp


1789223565795.webp


1789223600015.webp


1789223627272.webp
 
Now, if your ball joints or your unit bearings are shot, and need to be replaced, this is a perfect time to get that done.

With the knuckles off the axle now, let's do a little comparison of them side by side. On the left is the OEM knuckle and the new big brake knuckle is on the right. First of all, the BBK knuckle is made of a different alloy, which is stronger than the OEM knuckle. The BBK caliper has a bracket that will bolt directly to the knuckle using 10.9 bolts, instead of using the knuckle as the bracket like the OEM brakes. On the BBK you’ll see two different holes. One's for the 15 inch kit, and the other for the 16 inch kit. The really nice thing about Black Magic Brakes is, if you're like me and you have a tie rod flip, you can request to have your knuckle taper from the top side instead of the bottom. Or if you are still using your standard steering setup, they can put the taper from the bottom side. Either way works. Just make sure you reach out and communicate what your needs are for that.

1789223834916.webp


1789223876592.webp


1789223905823.webp


1789223938482.webp


1789223978843.webp


1789224010456.webp
 
Last edited:
Installing the new BBK Components

The first part to install is the new knuckles. Slide the ball joint tapered pins into the knuckle holes and thread on the nuts. Pay attention to cotter pin hole orientation for ease of cotter pin installation. Torque the nuts to spec. You may need to tighten them just a little bit more than spec in order to get your cotter pin holes to line up. Insert the cotter pins and bend the tails over.

1789224128121.webp


1789224151456.webp


1789224174779.webp


1789224201088.webp
 
Last edited:
With the knuckles installed, it's time to move on to the unit bearings and the rotors.

Remember at the beginning of the write up when I wrote “you want to pay attention to these instructions”? This is one area that you really need to pay attention! What it's going to cover is the unit bearing fitment with the rotor because the unit bearing by itself is not going to fit in the rotor hat. They didn't send you the wrong parts. It's a requirement to make this work. What you need to do is take off a little material from the outside of the unit bearing. You need to bring it down just a little bit. It doesn't take machining. A simple angle grinder is going to get the job done. If you're installing new unit bearings, remove the material before installing it on your axle shaft. If you're using your existing unit bearings, then it's just easier to remove the unit bearing from the axleshaft to do the required work. Place the unit bearing into a vise as shown in the picture.

1789224357411.webp


It doesn't take much pressure to hold it in place. Take care to not damage it. That allows the bearing to turn freely while being held by the vise. This will allow you to turn the bearing with one hand while using the grinder with the other. This will give a clean and consistent finished result. When using this method, take care as to not damage the stud threads with the grinder.

1789224441717.webp


You will have to test fit as you go and you want to make sure the unit bearing fits in the rotor without interference. When you feel confident in your results, you need to finish up the process by grinding a small 45 degree chamfer on the outside face. This will make sure it sits flat against the rotor.

1789224553428.webp
 
Once the unit bearings are modified correctly, it’s time to re-install the axle shafts. Take and insert the three 13mm 12 point bolts through the holes. Hang the dust shield on them. This will keep it oriented correctly while inserting the shaft.

1789224733353.webp


Support the shaft the same way when you removed it, and slide it in through the seal until the unit bearing seats in the knuckle. Finger tighten all three bolts. Torque them to 75 ft/lbs.

1789224794626.webp


1789224821296.webp
 
The brakes come shipped with the caliper saddle attached to the caliper. You need to separate the two for installation.

1789224987399.webp


Add red loc-tite to the saddle bolts and attach the saddle to the knuckle. Torque the saddle bolts to 75 ft.lbs.

1789225040120.webp


Next, install the anti-rattle clips. One on the bottom and one up top.

1789225155499.webp
 
Last edited:
Making sure you have the correct caliper for the side you are working on (bleeder screw should be above the brake line hole), gently slide the caliper over the pads until you can insert the caliper bolt. Put some blue loc-tite on the threads and tighten them to 15 ft/lbs.

1789225346683.webp


1789225370560.webp


1789225435289.webp
 
Now is the time to remove the brake line from the OEM caliper and install it on the new caliper. If you are still using stock brake lines, or perhaps YJ brake lines, you will need to modify it so it can seat properly with the caliper. This picture is right out of Blaine’s instruction manual showing how the shoulder needs to be removed. My aftermarket lines needed no modification.

1789225508525.webp


First off, you want to clean around the fitting to prevent contamination from getting into the system. Remove the black plug from the new caliper.

1789225576259.webp


1789225603913.webp
 
Making sure you have the banjo bolt and crush washers ready to go, remove the brake line from the OEM caliper. Take your new parts and install them in this order: Banjo bolt-washer-brakeline fitting-washer and then screw that into the caliper. Tighten the bolt to about 30 ft/lbs. If it is still leaking, tighten it up just enough until it stops. Be sure to account for any twists or routing of your brake line before installing the banjo bolt.

1789225704079.webp


1789225733427.webp
 
With all of the brake components in place, you can re-connect your steering linkage. Get your TRE’s in the knuckles and torque to 55 ft/lbs. and plus a little more to align the cotter pin hole with the nut. Insert the cotter pins and bend the tails over.

1789225800583.webp


1789225821744.webp


1789225904160.webp


IMPORTANT!

If you didn’t do it when the knuckles were on the bench, now is the time to remove your steering stops from your old knuckles and install them on the new knuckles.

1789225952376.webp


1789225984537.webp
