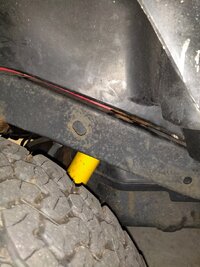
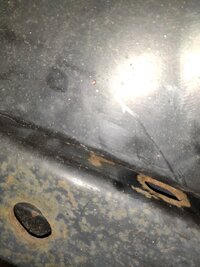
Where or how did you get access to the welded nut? Also, how did you get wrench on the new nut?
Lou
I used a lock nut and lock washer but you can get a wrench in it.
See this video for more info.
Where or how did you get access to the welded nut? Also, how did you get wrench on the new nut?
Lou
OK I bit the bullet today. Drill a 2” hole in the tub just behind the seat bracket. Used a hole saw with my Milwaukee Hole Hog and damn near busted a finger. Once the hole was cut I used the cut off wheel on my Dremel to cut the nut off. Had to use the BFH to whack the nut and break it loose. Then I had to use a punch and the BFH to knock out the remainder of the bolt. Reamed out the hole so I could fit a 5/16 bolt. Painted the raw metal. I also ordered all new bolts for the top and bottom. Once the new bolts arrive I will install the new shocks and patch the hole in my girl.
Just a helpful hints if you are going to drilling out bolts splurge for a set of Cobalt drill bits. Not the Lowe's brand but bit made out of Cobalt. Makes life a lot easier and they go thru the bolts pretty easy if you take the time to start small and work your way up. If you live in a rust belt state you will be doing more drilling than you would think.Totally forgot to mention that I used a BFH and chisel set in combination with dremeling the welded nut.
I’m bringing back this old thread.
I managed to get 3 of the 4 bolts out cleanly, but the last one snapped right off. I rather avoid having to cut a hole in the tub or raise it up (so sick of undoing rusty bolts). So what are my options?
1 - Drill out the bolt and tap it for a new one. Tapping it for the same / smaller size doesn’t seem safe, and larger one doesn’t seem like it would fit on the shock itself.
2 - Punch the bolt out. Most people seem to report that their bolt is fully welded in, rather than tack, meaning it doesn’t seem possible to knock it loose from the bottom.
3 - Cut the bolt from the top. I’ve seen videos of people doing this from the top down, but is there any reason why I couldn’t get a small dremmel disk up through the shock hole and cut it that way, just prying the other half of the nut?
Once the bolt is out, short of welding in a new one (not comfortable doing myself) any other way to secure the nut? I’ve seen nut sets that replace both bolts, but I don’t see much sense in removing the other one when it’s perfectly fine.
This is a great video to watch. I copied him with the exception of lifting the tub off the frame, no need to do that step, it certainly helps, but not necessary.
How did you access the nut without lifting the tub?
If you can that be super helpful. I don’t have a body lift and I poked around a bit and couldn’t really find a good way to get at that bolt.With that Dremel attachment, it fit right in there. I can take a picture in a little bit to show you.
If you can that be super helpful. I don’t have a body lift and I poked around a bit and couldn’t really find a good way to get at that bolt.


That method needs a "pin boss", a pipe welded thru the frame that supports the bolt all along it's axis.This method is a bit sketchy for several reasons.
1: bolt is single shear so you are counting on the strength of the bolt to not bend or snap. That's not what they are designed for.
2: most SS is about grade 2 or possibly grade 5... Don't do that, use grade 8
3: no sleeve in the frame so proper torture for that bolt could crush the frame rails (not sure what I mean? Look at how your steering box is mounted)
4: also related to no sleeve, any looseness on that bolt later on will wollow out the holes in the frame rail because it's only supposed at a very small point (the thickness of the steel on the frame side walls)
5: the tension holding that bolt in place on the frame rail is limited by the rubber bushing in the shock, no way in hell has it got the correct clamping force to stay straight in the frame long term.
6: the threaded part of the bolt is inside the shock bushing sleeve, this will alow the threads to eat into the mild steel sleeve essentially threading it and making it difficult to remove later. A few years down the road with some winter's added in for good measure, that bolt will not come out without cutting the head off and taking it through the frame with the shock.
7: did I mention how bad an idea having that bolt in single shear with no way to properly torque it is? Ok good.
8: no really, mounting a bolt that way is asking for it.
I bet if you look at the Tacoma he's talking about you will find that while a bolt does go through the frame it's got a sleeve inside so you can torque it without crushing the frame, I also bet there is a way to get correct torque on the bolt before the shock ever touches it. Even further, there may be a bracket that goes off the frame to the other side of the bolt as well to keep the tip supported.
—
There must have been a time
when we could have said no.
OEM could have used a larger bolt, and a flag nut, like the one that secures the axle end of your front track bar.I’m bringing back this old thread.
I managed to get 3 of the 4 bolts out cleanly, but the last one snapped right off. I rather avoid having to cut a hole in the tub or raise it up (so sick of undoing rusty bolts). So what are my options?
1 - Drill out the bolt and tap it for a new one. Tapping it for the same / smaller size doesn’t seem safe, and larger one doesn’t seem like it would fit on the shock itself.
2 - Punch the bolt out. Most people seem to report that their bolt is fully welded in, rather than tack, meaning it doesn’t seem possible to knock it loose from the bottom.
3 - Cut the bolt from the top. I’ve seen videos of people doing this from the top down, but is there any reason why I couldn’t get a small dremmel disk up through the shock hole and cut it that way, just prying the other half of the nut?
Once the bolt is out, short of welding in a new one (not comfortable doing myself) any other way to secure the nut? I’ve seen nut sets that replace both bolts, but I don’t see much sense in removing the other one when it’s perfectly fine.
Just wondering, did they improve the rear shock mounting in the JK or JL?OEM could have used a larger bolt, and a flag nut, like the one that secures the axle end of your front track bar.
Here are some pics of my repair.
View attachment 110137
View attachment 110138
View attachment 110139
Will post a picture of the repair a little later, but used a piece of 16 gauge steel sealed with polyurethane roof se sealant. The hole is only 2” in diameter.How did you repair that monster size hole?
Will post a picture of the repair a little later, but used a piece of 16 gauge steel sealed with polyurethane roof se sealant. The hole is only 2” in diameter.
This is why I have not replaced mine yet! I've been squirting them every so often with Kroil in hopes not to have them snap.
I didn’t tighten anything up yet because it almost looks as if the upper and lower brackets are a different angles.Lower shock mount appears to be tweaked. I imagine that the bolt was intentionally loose in the picture.

