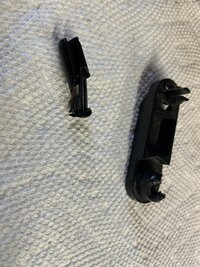
Heat blend door actuator plastic piece broken

Tinnitus_Z

New Member
Joined
Sep 30, 2022
Messages
15
Location
Memphis TN, USA
Hello, sorry if this is similar to my previous post, but I decided to take some pictures of what I am talking about with the heat blend door. I have verified that all the actuators and electrical motors work, all the vacuum lines are good and there are no leaks, but I cannot get defrost working. I can get heat blowing out but once I switch it over to defrost, it still blows out of the main air vents and will not redirect to the defrost vents.

At first, I thought the actuator that controls that was broken, so I tested all the actuators and I noticed one of them was sticking, so I bought a new one and replaced it. All the other actuators work properly. When I replaced the actuator, shown in the photos below, I found out that the plastic piece that connects the actuator to the blend door was broken inside and wasn't turning the door.

Here are some photos:
IMG_3007.png
This is the bottom driver-side actuator that controls the large blend door directly behind the center dashboard

IMG_3009.png
Here is another angle

IMG_3012.png
. Here is the black L-shaped plastic piece that I am trying to find. It appeared to be sitting properly, but it wouldn't turn the door inside since it was crumbled.


Sorry if the images are too small or too big, I was not sure how to format it. I tried looking online for a replacement, but I can only find a different black piece that doesn't have the same connection for the blend door. I tried looking at the parts list for the 2002 Jeep TJ, but the part does not have an item number. Would the other black pieces used on the other actuators work for this one? Any help is appreciated, thanks.
 
Have you been able to solve this? I am having the same issue and would like to find out also what and if replacement plastic “arms” are available for the 02 since the two parts for sale don’t mention 02 . My inadequate but functional solution was sticking a screwdriver in the place where the plastic arm is broken and turning it to half defrost / half floor, but wish to have it working correctly.
 
Have you been able to solve this? I am having the same issue and would like to find out also what and if replacement plastic “arms” are available for the 02 since the two parts for sale don’t mention 02 . My inadequate but functional solution was sticking a screwdriver in the place where the plastic arm is broken and turning it to half defrost / half floor, but wish to have it working correctly.

I have not fixed it yet. I’ve contacted the Jeep dealerships part specialist on October 5th and still haven’t gotten a reply. Probably isn’t even worth trying to talk to the dealership though.

I’m currently away from home at college and when I get back for thanksgiving break, I’ll grab the pieces and see if someone can 3D print it.
 
This happened to me awhile back. The "peg" of the plastic piece separated from the "bar". I had seen a suggestion somewhere to run a coarse threaded screw through the hole in the plastic piece so that the two pieces would join back together. Obviously there's no guarantee that it works, but since the arm is already broken, i figured it was worth a shot. Has been working great for about 2 years now. The hardest part was getting the screwdriver lined up in there. Very close quarters
 
This happened to me awhile back. The "peg" of the plastic piece separated from the "bar". I had seen a suggestion somewhere to run a coarse threaded screw through the hole in the plastic piece so that the two pieces would join back together. Obviously there's no guarantee that it works, but since the arm is already broken, i figured it was worth a shot. Has been working great for about 2 years now. The hardest part was getting the screwdriver lined up in there. Very close quarters


I found an old photo of when I got the pieces out. The part on the left breaks into 2 pieces, and I've lost some tiny fragments that were holding everything together.
I'll have to wait until I bring it back to where I currently live before I can Jerry rig it. Would you recommend just a coarse threaded screw or like a self tapping screw?
IMG_3054.JPG
 
Hmmmm, i cant remember exactly which one. Since its out of the dash that should be easier. Self tapping would make more sense, just being careful not to split anymore off. I do think i just used a regular screw very slow with lots of pushing so that it would cut into the plastic, but only because it was the first screw i grabbed out of the shelf.
However, since its out of the car something like super glue or plastic weld may be worth a shot
 
I wonder if anyone has ever checked to see if the OMIX parts that are listed for 97-01 upper and lower blender doors also fit the 02. If not, I may need to be the guinea pig so as to rule those out. 3D printing sounds like a very excellent idea also.

IMG_9919.png


IMG_9918.png
 
I've tried my best to recreate the bracket/arm in Sketchup from scratch and 3D printed it. Here are the pictures of the actual piece with a ton of glue, and the 3D printed piece. This did take a while and the file is the best resulting 3D print. Here is the STL file, although it may need to be adjusted slightly for the clip that goes into the heat blend door.
 

Attachments

  • HeatBlendDoorClip.stl
    29.8 KB · Views: 65
Update:

I have installed the bracket/arm piece and it fully works and turns the door when changing the air control between blower and defrost. That STL file that I posted, and if you 3D printed it, will work in place of that arm piece if it was broken like mine.

It did have trouble at first and heard some popping, but the bracket didn’t break so I’m assuming something is inside of the box where the door is. I did find a bolt in there the last time I took apart my dash during the summer. That or it was just a bit stuck after not moving for nearly 6 months.

IMG_3362.jpeg
 
  • Like
Reactions: SSTJ
What plastic did you use and I'm wondering how it'll handle higher temperatures...nice work!

-Mac

The only filament allowed to use at the 3D printers at my library is corn based PLA. Online it says it starts to melt around 170 and the temp of the printer has to be 190 before printing. I don’t know how hot it will get in there since my heat doesn’t fully work anyways. Temperature coming out of vents usually stays around 95-100 Fahrenheit, and I will be flushing my heater core once I get back home to make sure the system is not clogged up with junk or metal.
 
  • Like
Reactions: macleanflood