Sab-a-dab-a-doo! The back-country LJ build has officially started

Woo hoo! I got some work done on the LJ again this weekend. Yesterday, I removed the rear turn signals to get ready to pull the corner off and install the nutserts for the tub rub rails and the rear valance armor. When I did so, I decided to fix a shortcoming of the Genright corners I used. That being that the oblong slots for the tailight wire pigtails are undersized (small than the tub holes). As a result, you can't pass the connector through to unplug it. Instead, I have to reach up the inside of the corner with one arm and blindly push the release button while pulling the other side of the connector off from the outside. On the left side, it's not so bad, but with the EVAP system on the right side, it's cumbersome.

To remedy that, I used my trusty ball-end carbide burr to widen the slot, then I used touch-up primer, paint, and clear to protect the edges. No pictures were taken, though. :cool:

Today, I worked on wiring mods, of which I have a long list. I started it back in September by installing a Weather-Pack bulkhead fitting (go back to Post #729 to see that, if you desire.) Today, I wired two components to the engine side of that connector: the SpeedoHealer and the SwitchPro control wires.

For the SpeedoHealer, I originally used their wiring harness that has a male and female connector at the Vehicle Speed Sensor (VSS) on the transfer case and then ran it up into the engine bay. I didn't like the cumbersomeness of that setup and I really wanted to get the control box inside the cabin since the engine compartment is so hot, so I decided to tie directly into the harness for those wires and penetrate the firewall.

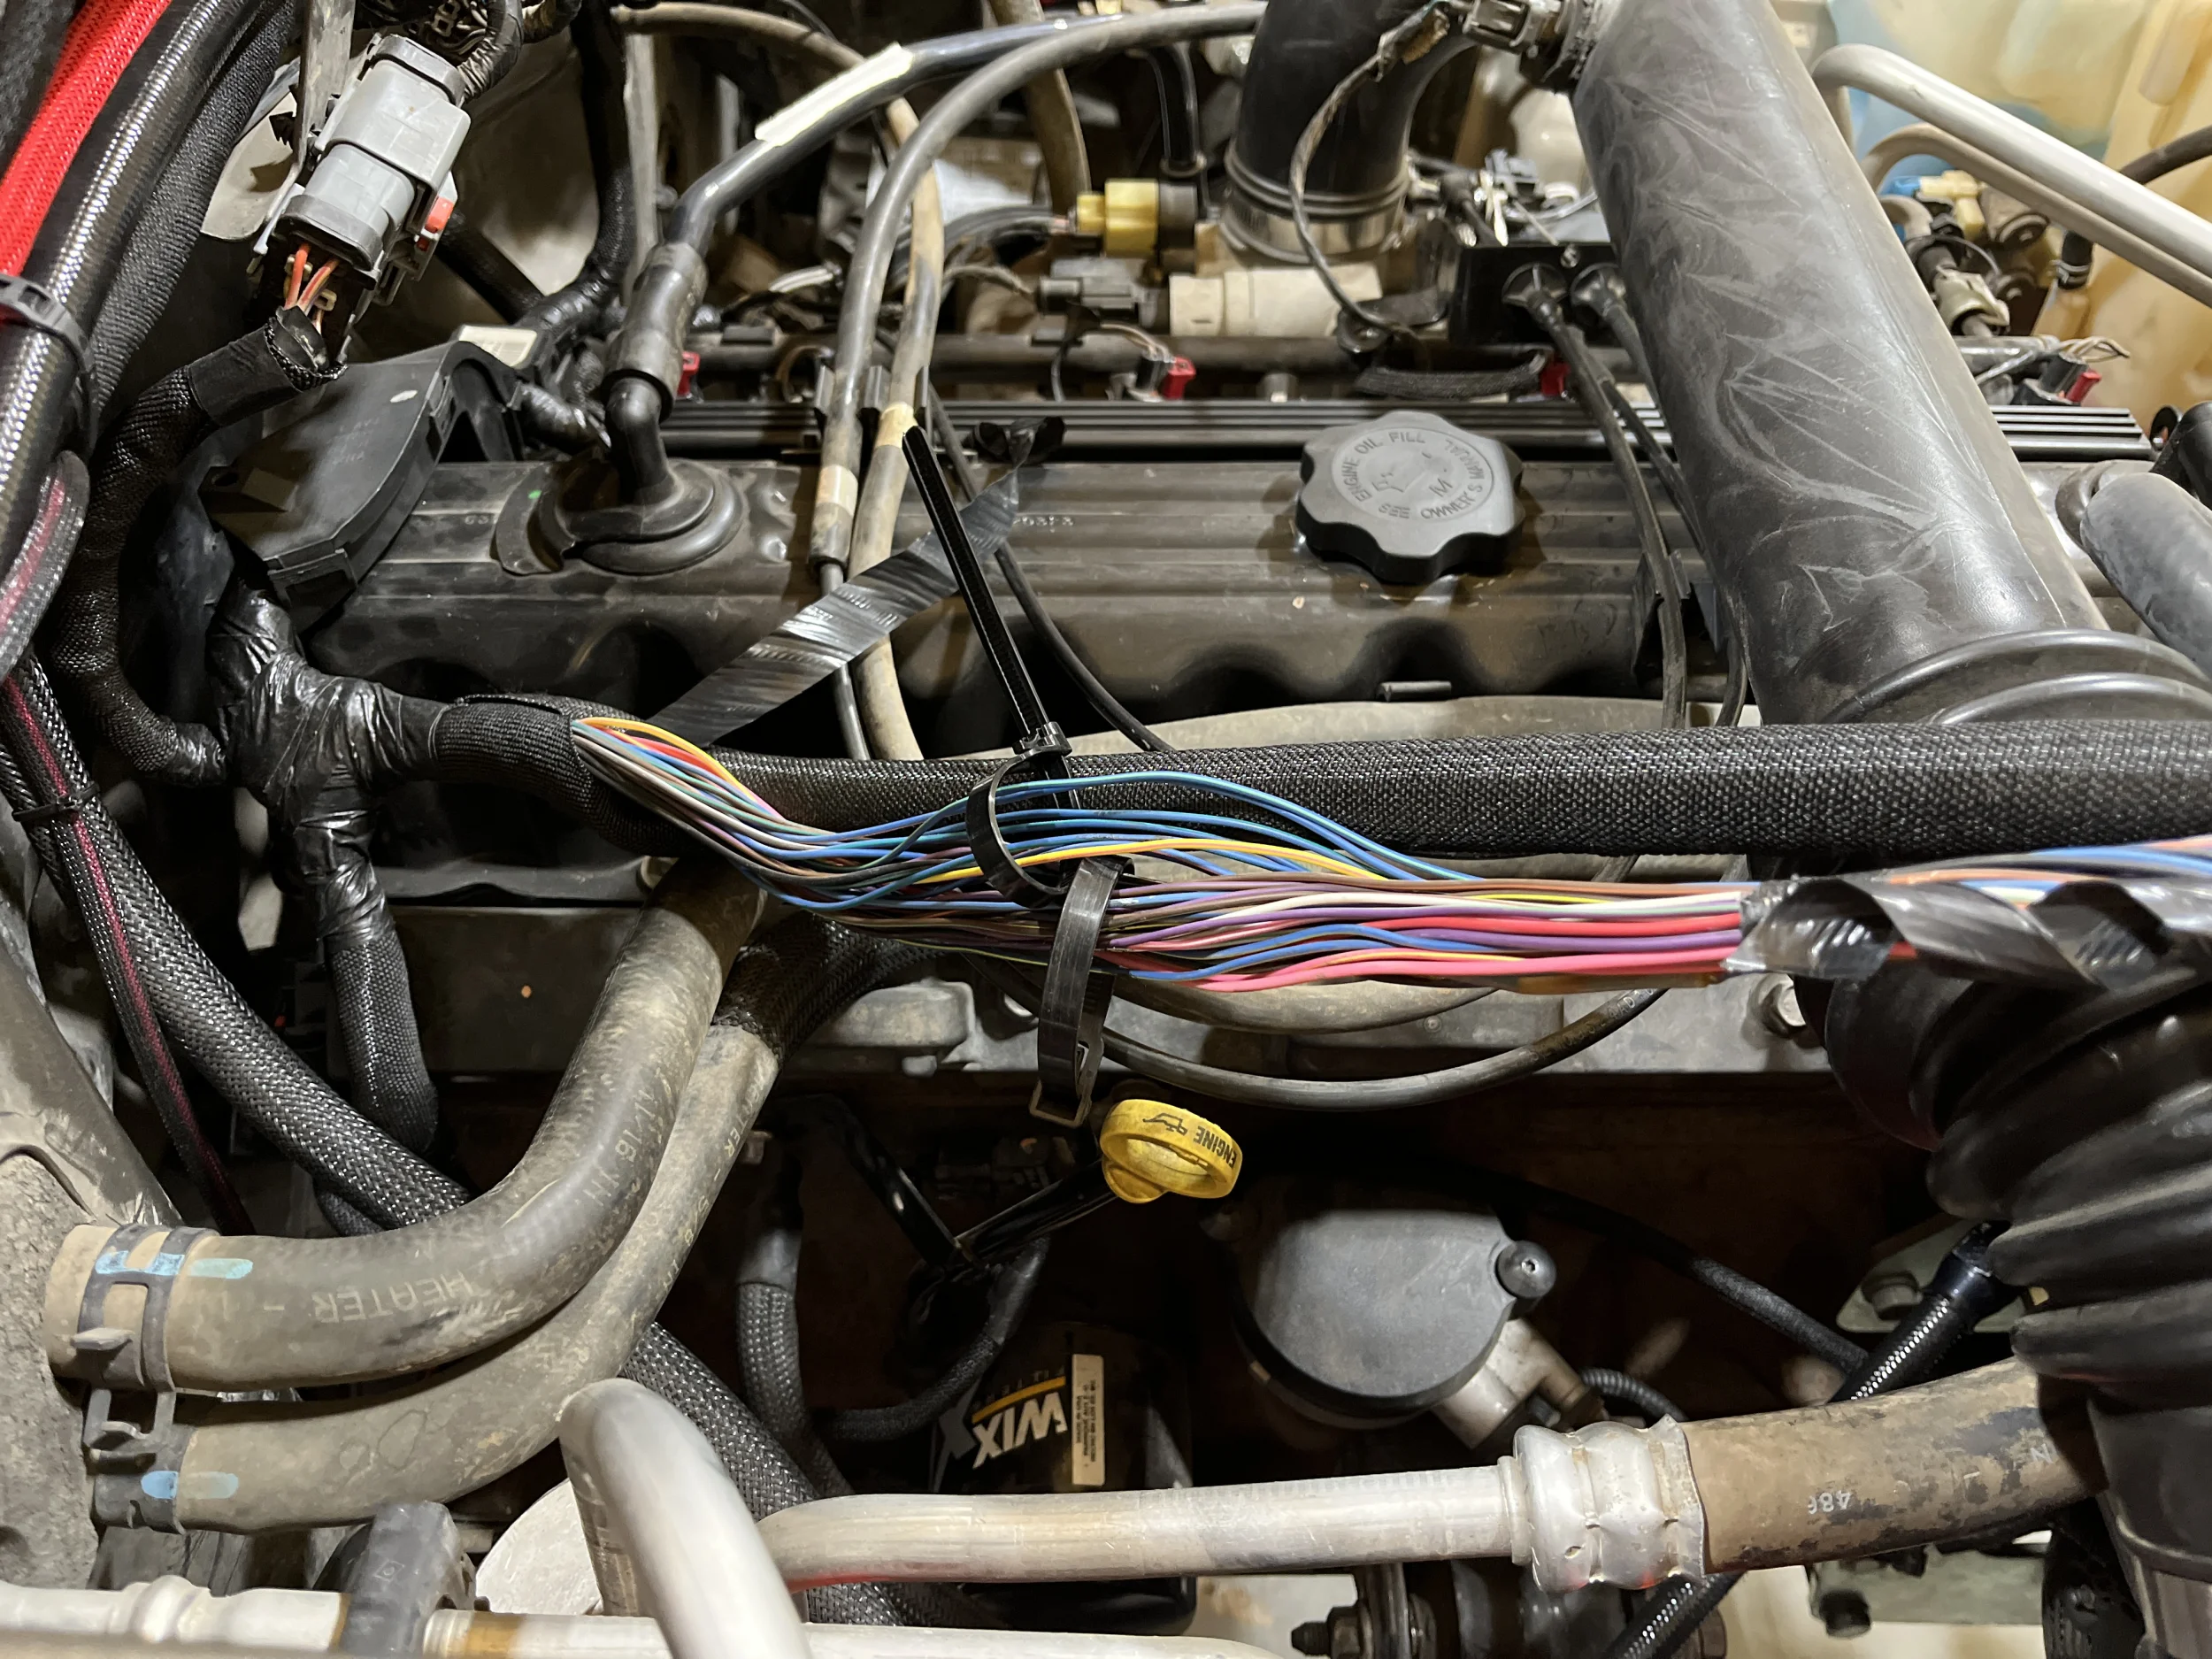
I disconnected C1 and C2 from the PCM, pulled that short section of harness up next to the valve cover (for working room) and removed the loom. Then, I located all the wires with the color-coding I needed, put a removable cable tie around that bundle, and then put a second removable cable tie around the rest of the bundle to keep things separated:
IMG_8835.webp


The wires I needed were:

Sensor Ground - a 20g wire colored Dark Blue with a Dark Green stripe
Sensor +5V - a 20g wire colored Yellow with a Pink stripe
VSS Signal - an 18g wire colored Dark Blue with an Orange stripe

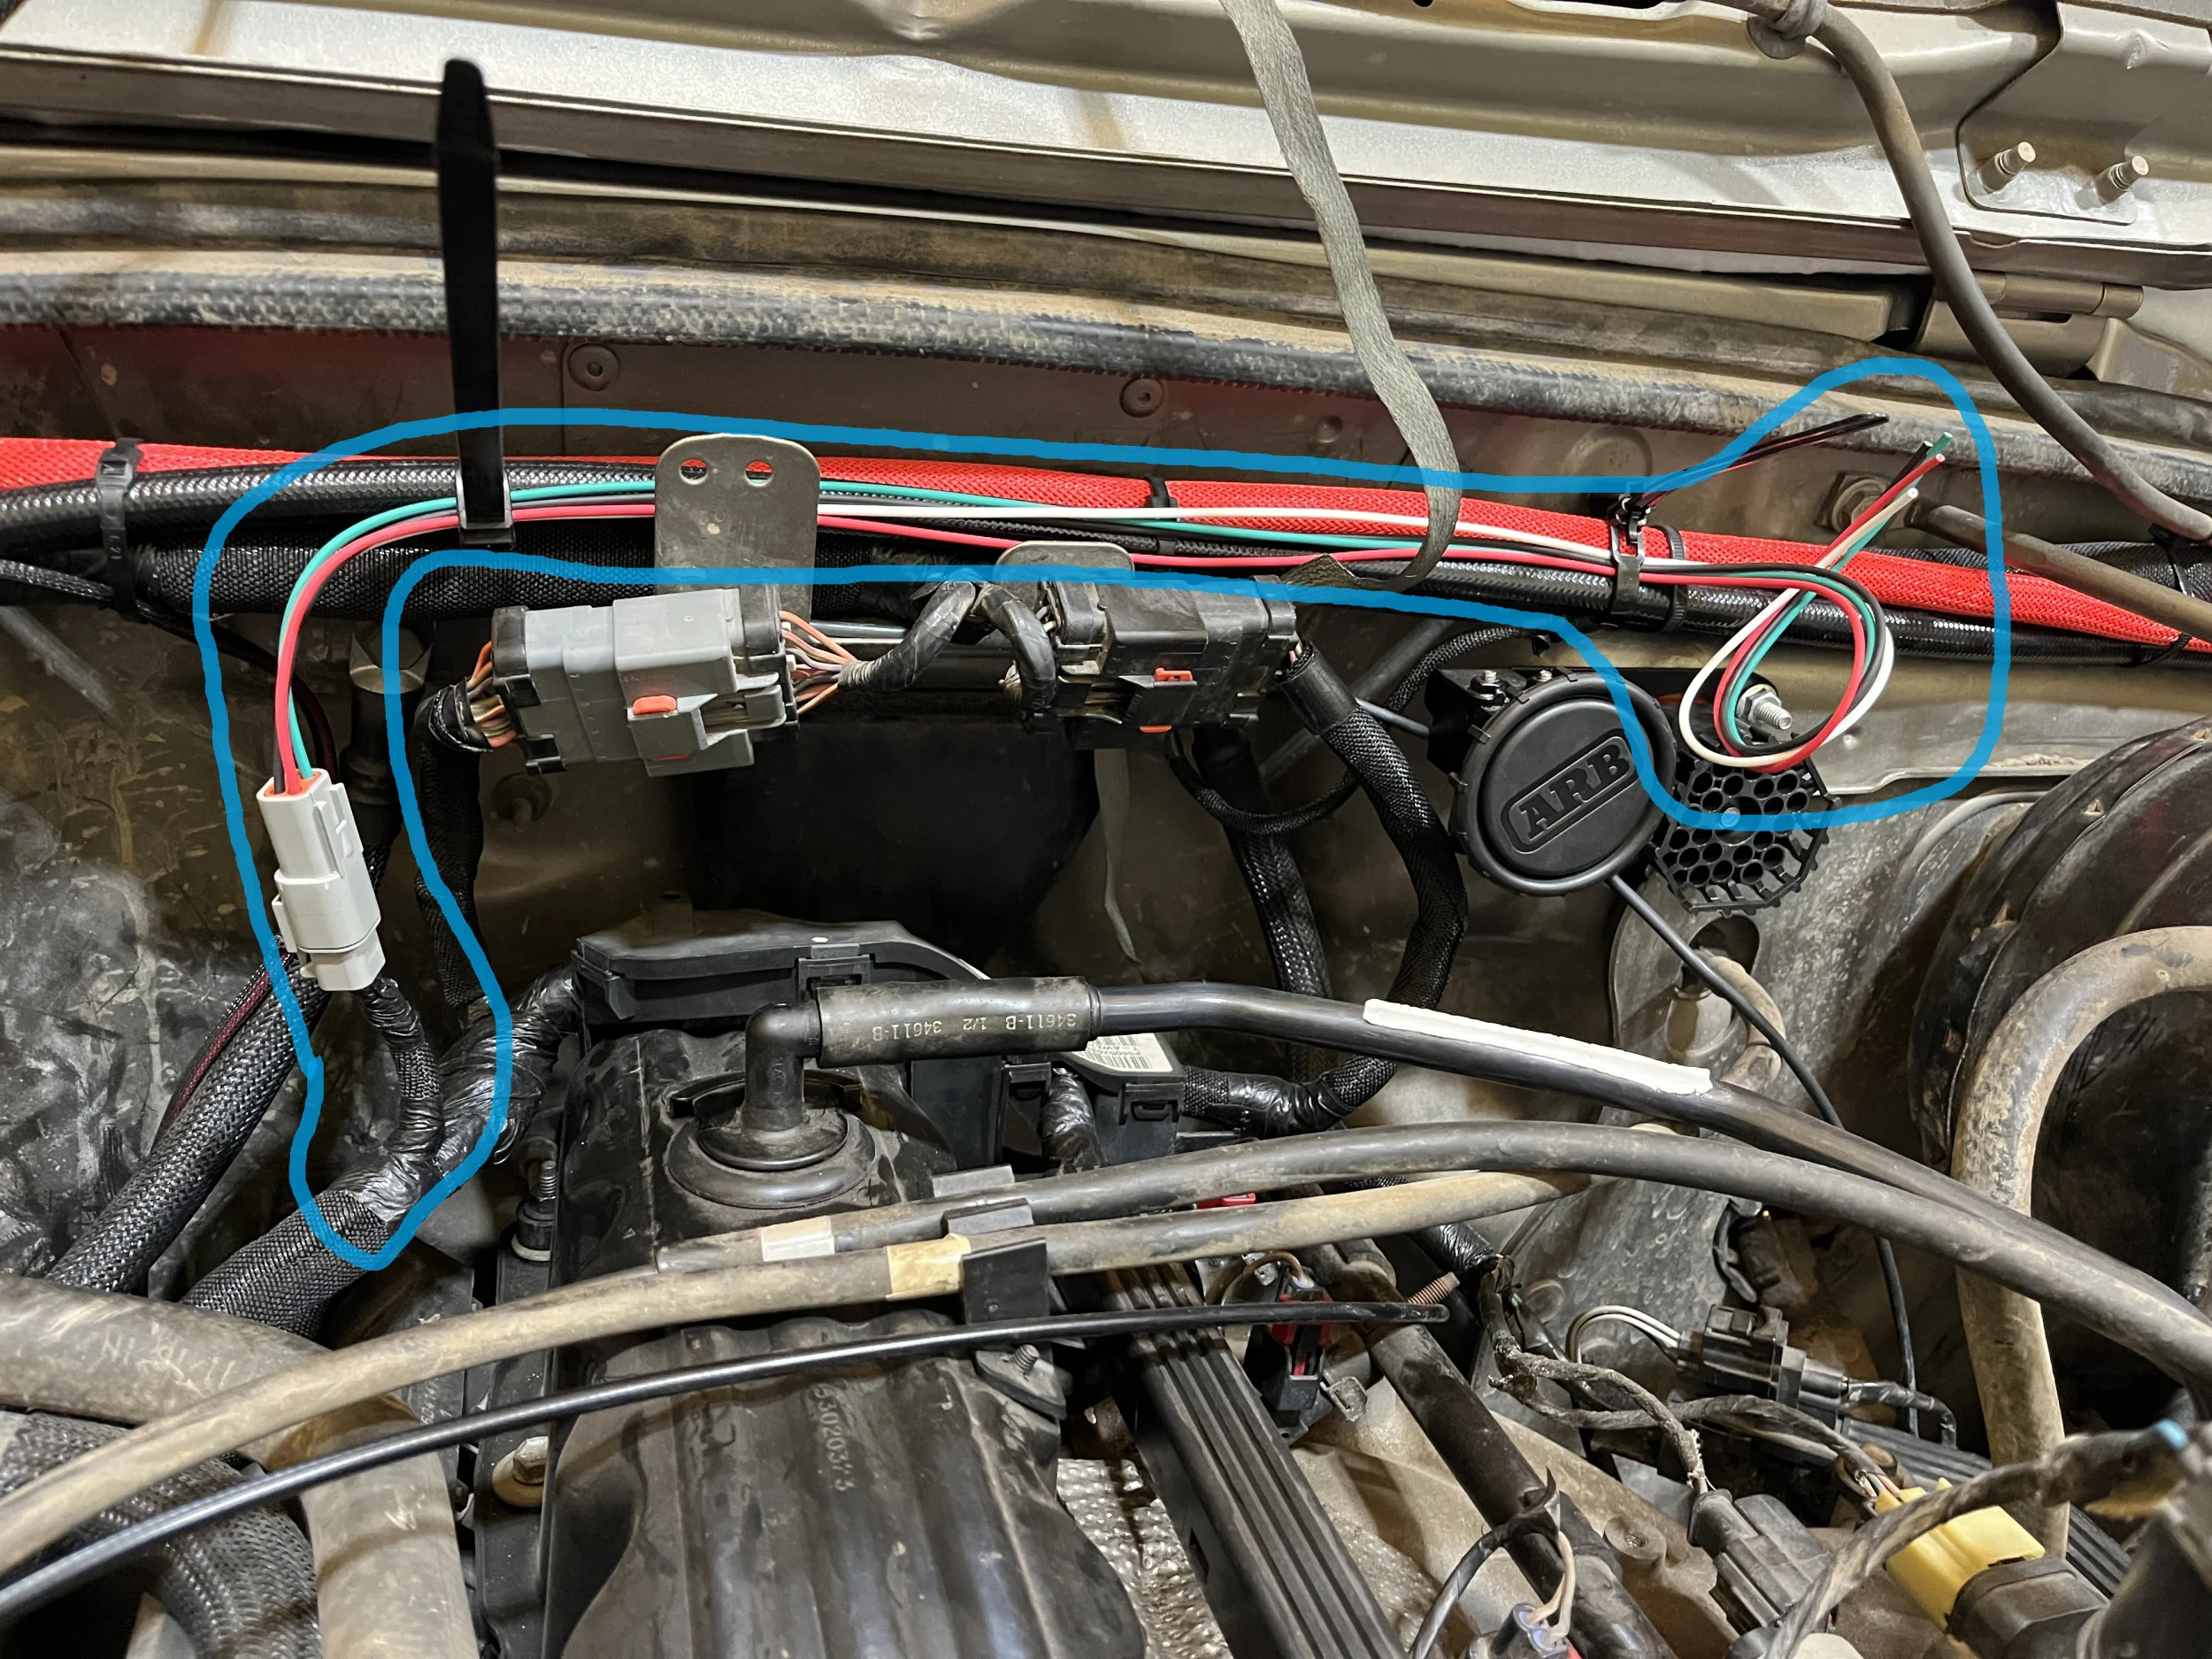
There were multiples of each of those wire colors in the bundle, so I used an ohmmeter to identify the right ones. Once I found them, I wired in a short pigtail with a 4-pin Deutsch connector. That way, if I ever get rid of the SpeedoHealer, all I have to do to go back to stock wiring is make a mating connector with a simple jumper from green to white in it.

The sensor ground and +5V were take-offs (meaning I connected the SpeedoHealer red and black wires in parallel to those existing wires), but the VSS signal had to be split, with the sensor side going to the white wire and the PCM side going to the green wire on the SpeedoHealer (the SpeedoHealer takes the input signal from the VSS on the white wire, changes the frequency, and outputs it to the PCM via the green wire.)

Once I had the Deutsch connector coming off the harness, I made a short pigtail harness with the mating Deutsch connector on one end and ran the other end to the bulkhead connector:
IMG_8836.webp


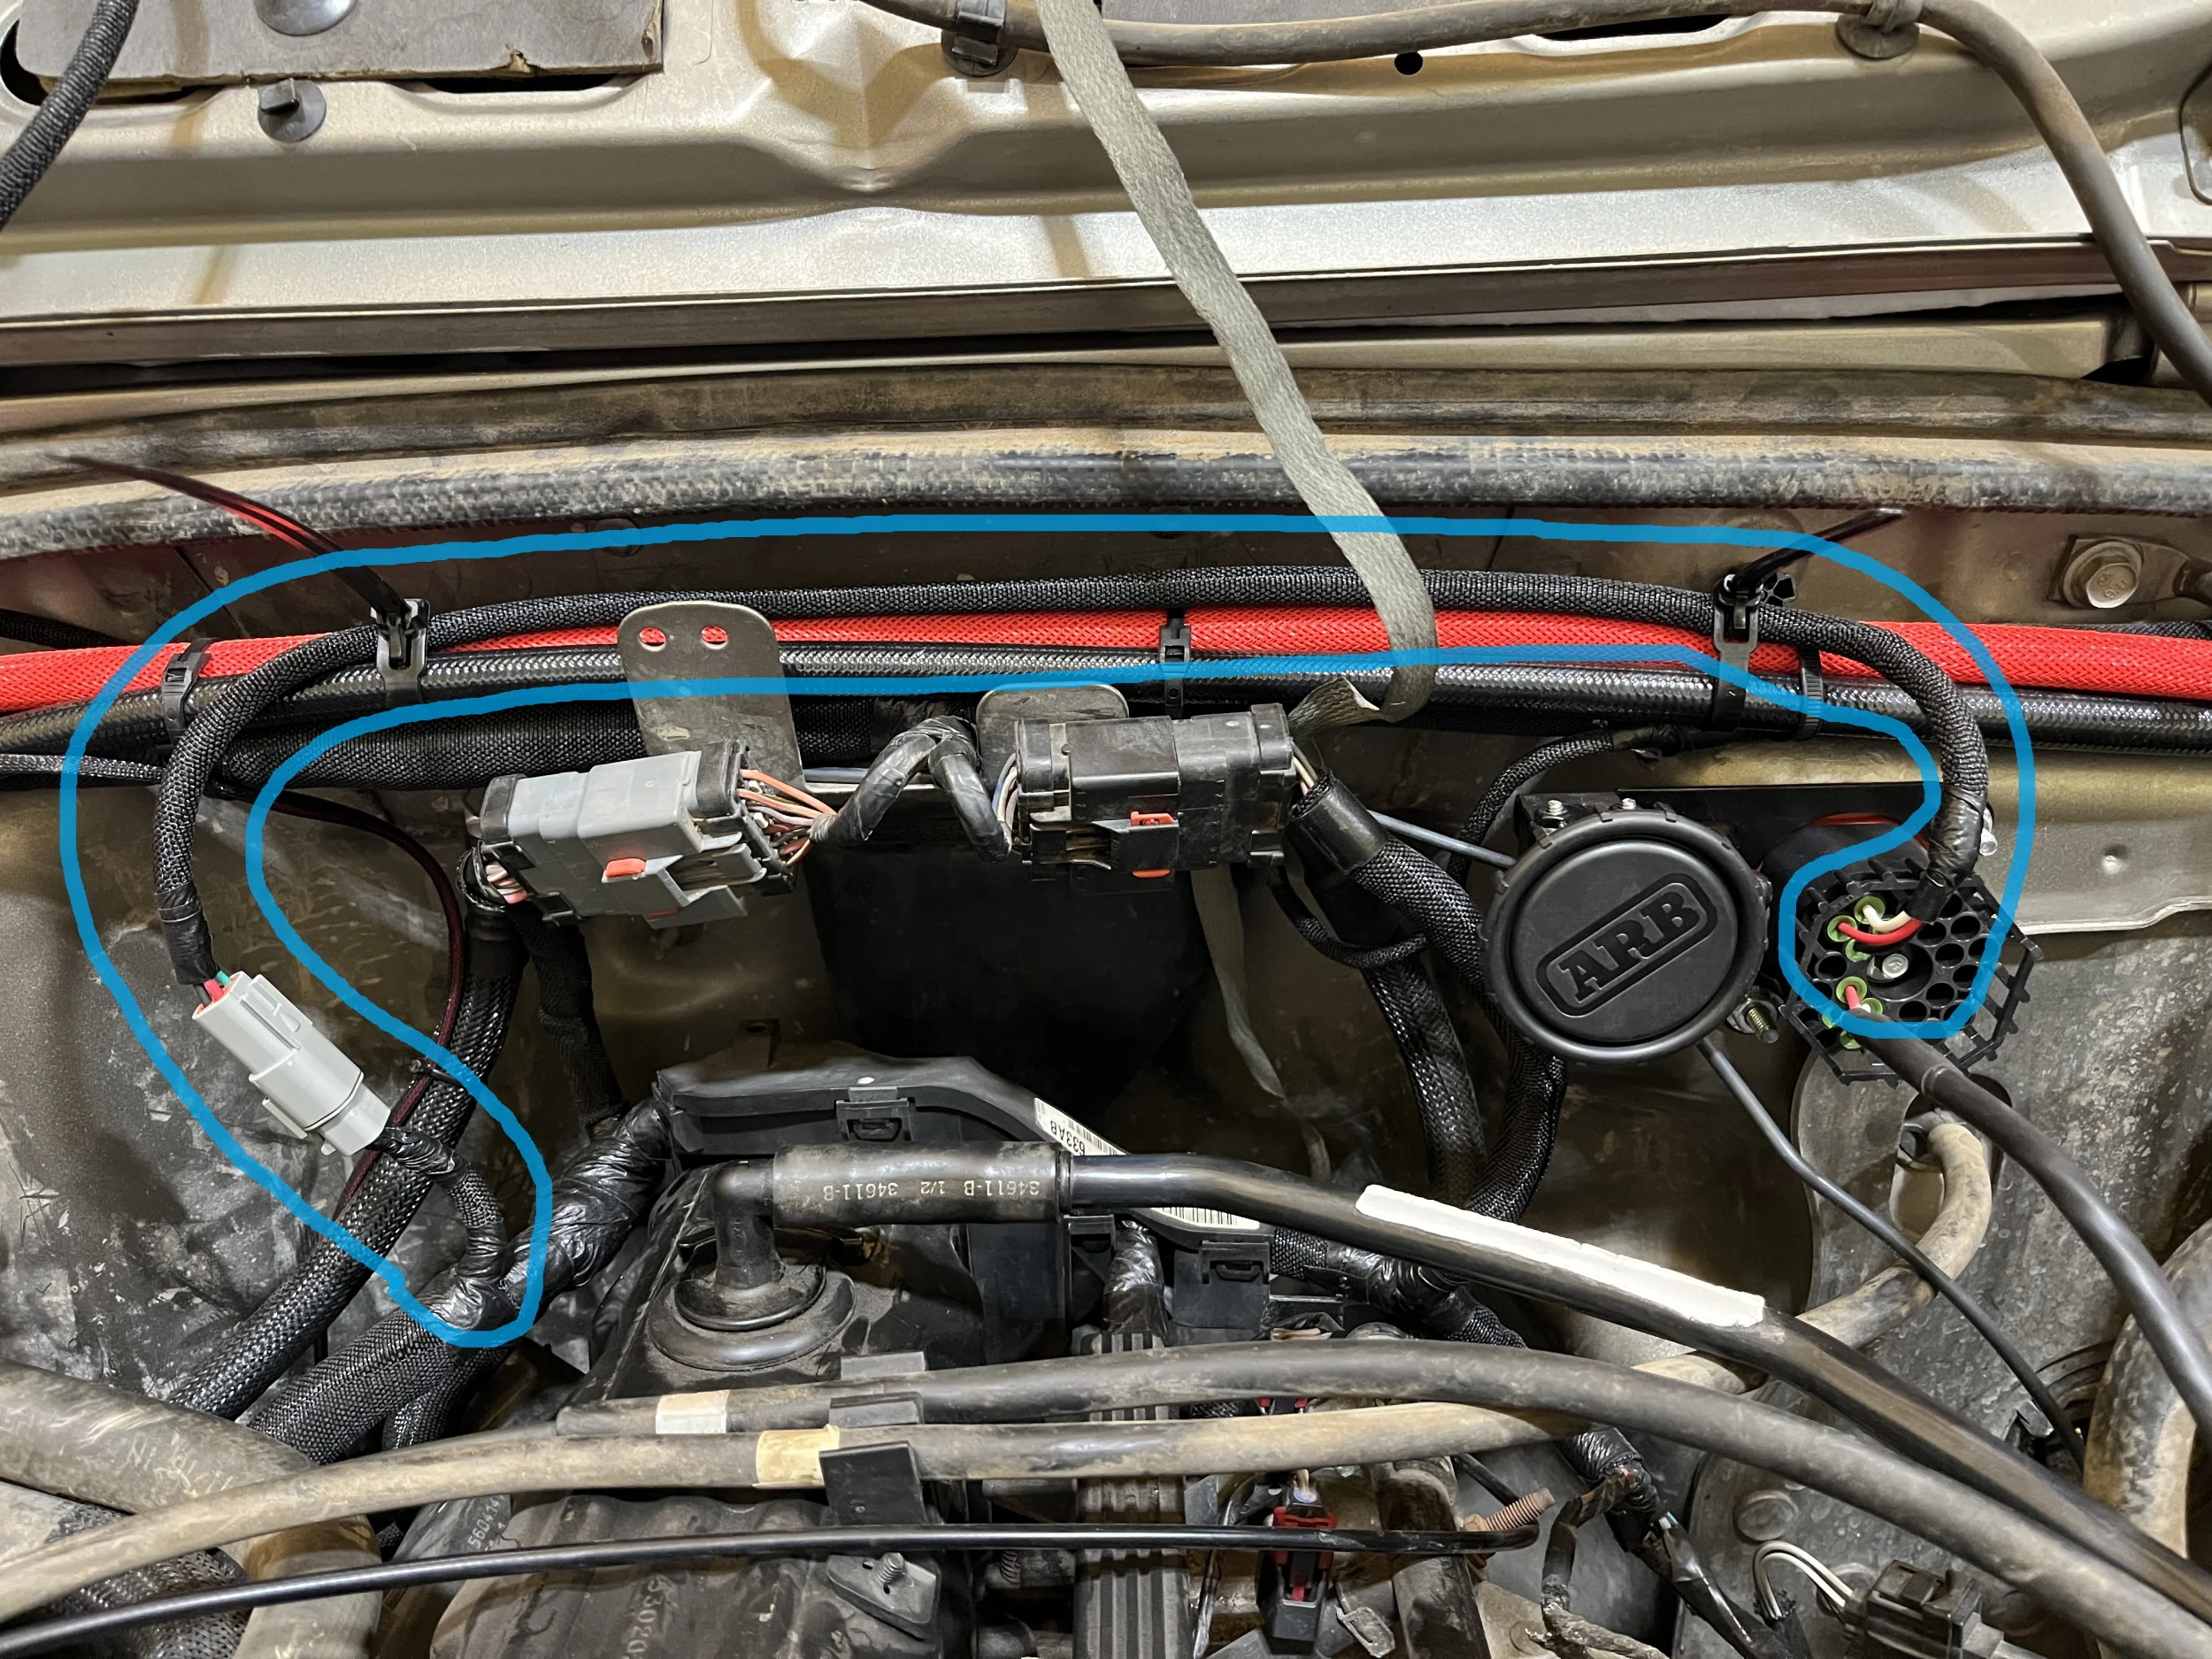
Then I cut the leads to length, installed terminals and set them in the bulkhead connector, and put some loom on the new harness:
IMG_8838.webp


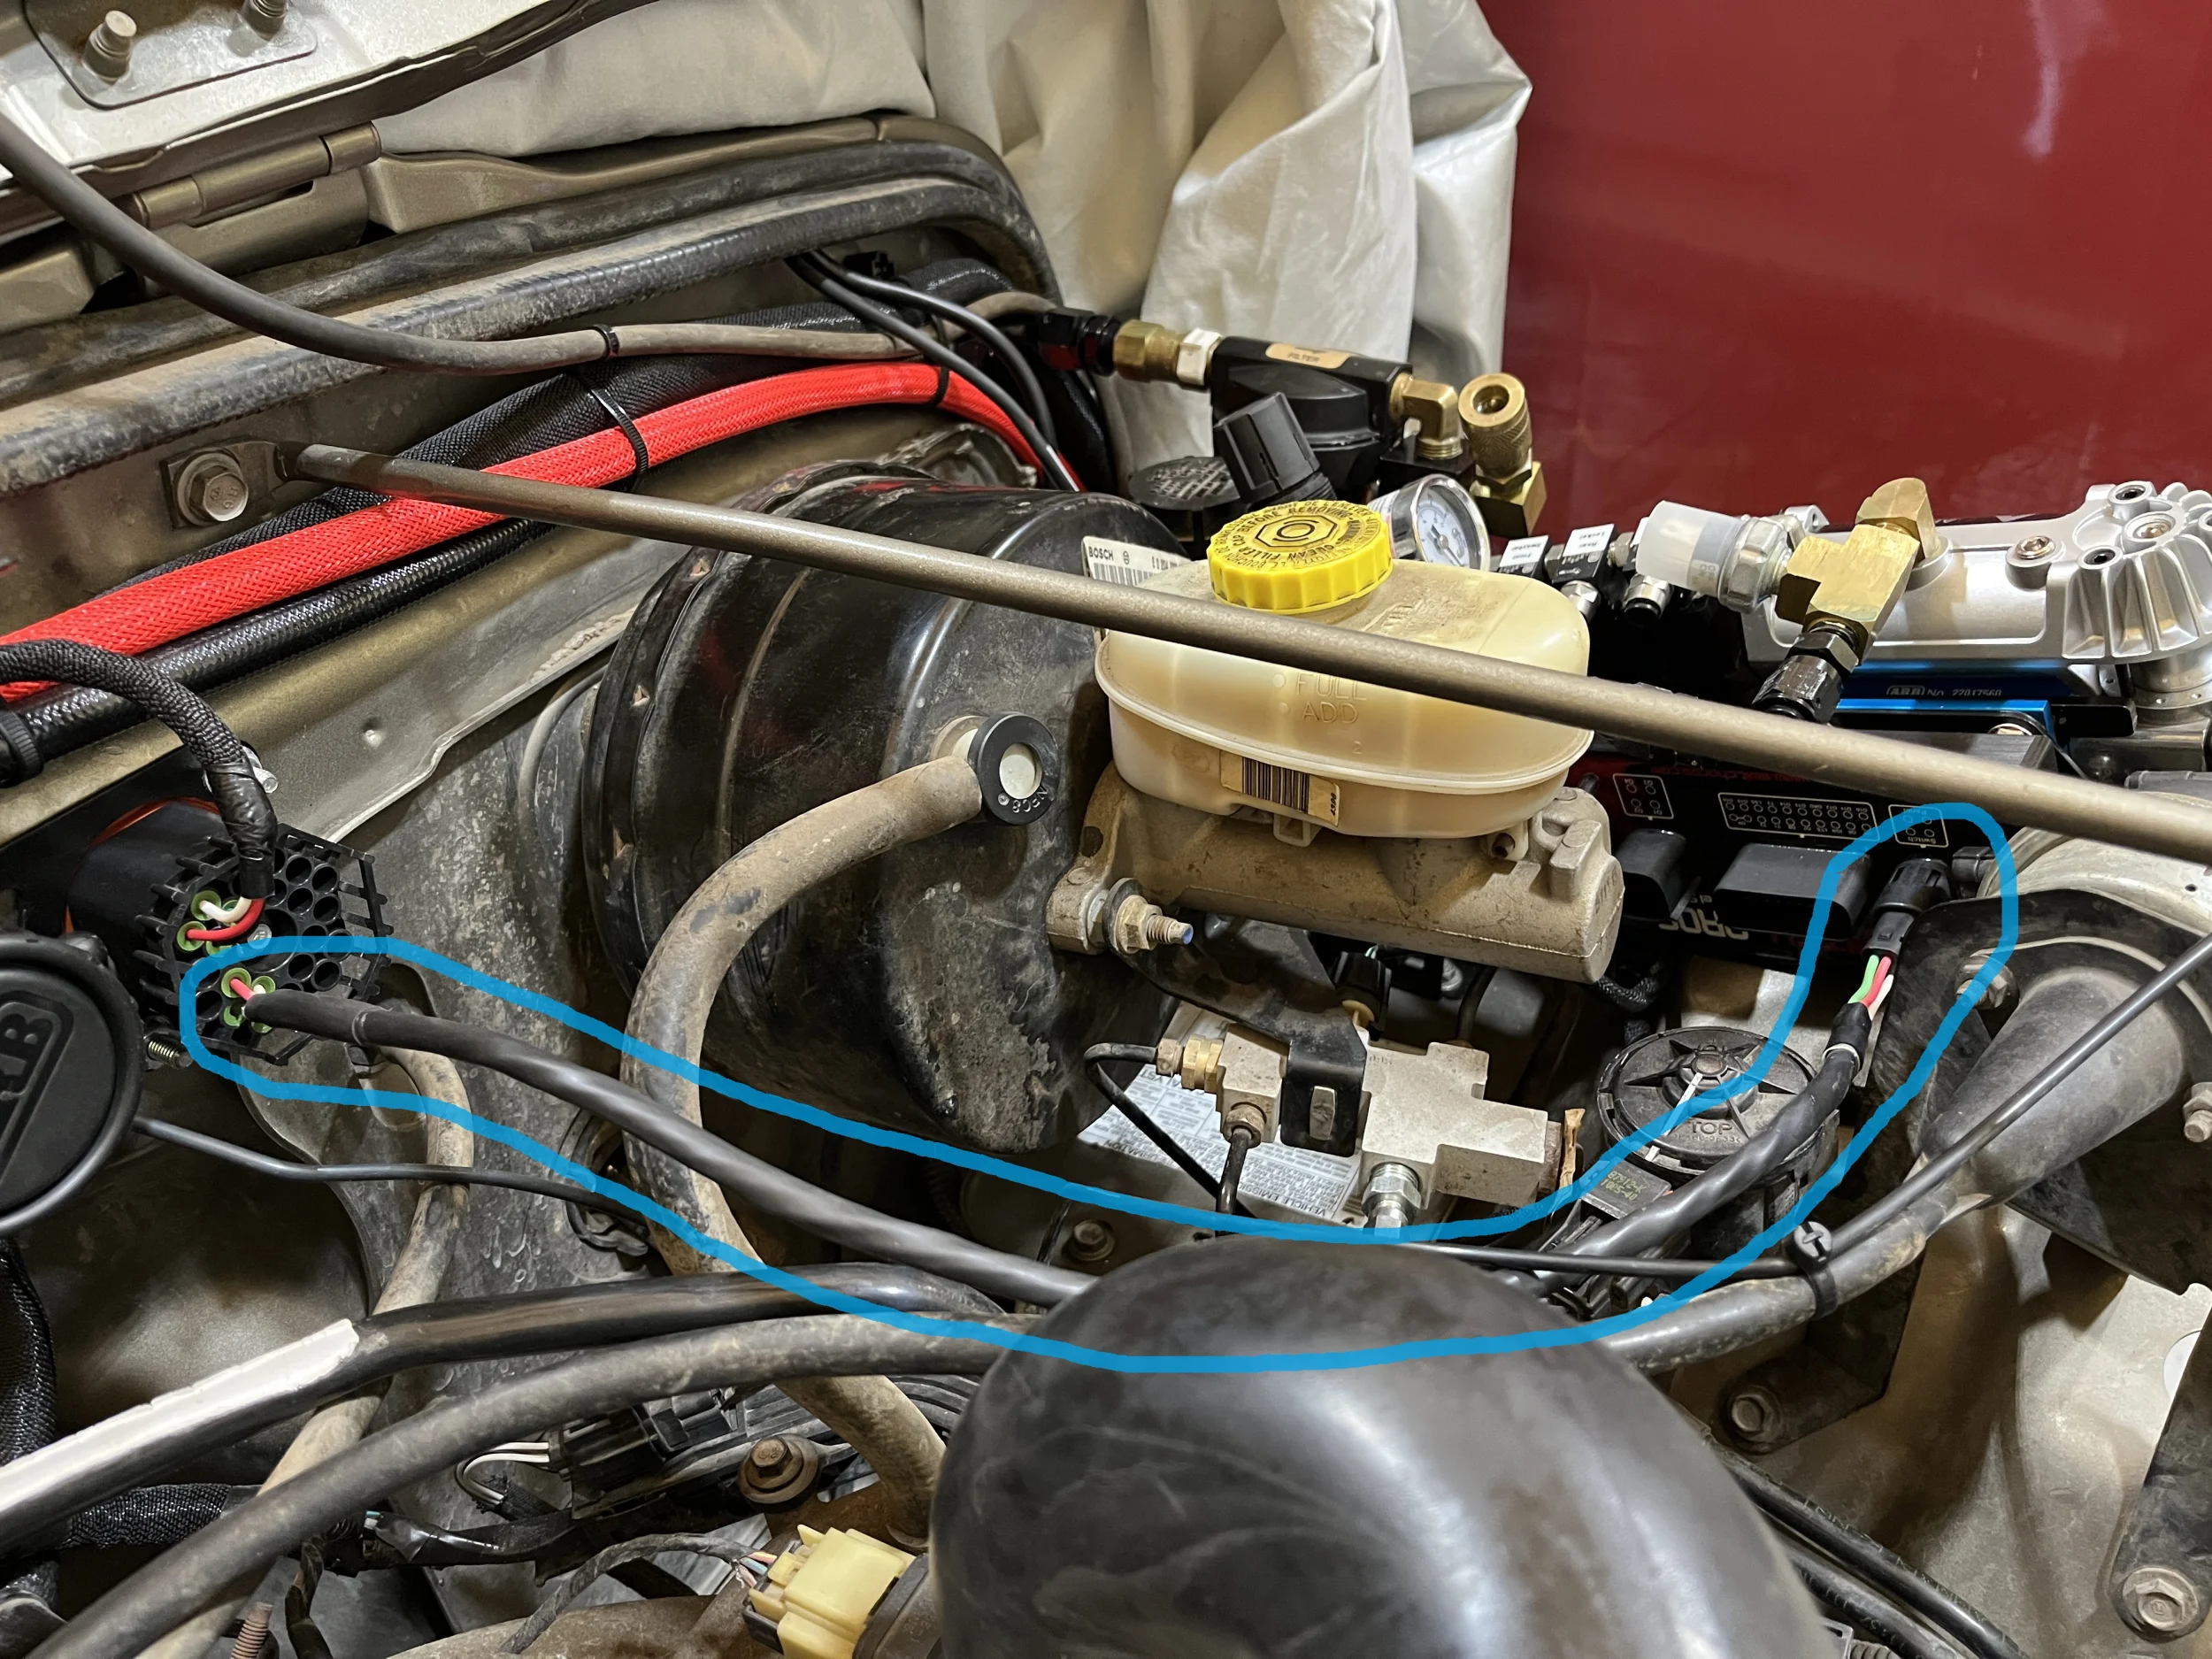
The SwitchPro control wires were a much quicker, easier task because SwitchPro provides a harness. All I had to do was cut it to the right length and install the terminals for the bulkhead connector on it. That only took a few minutes:
IMG_8837.webp


And that's as far as I got this weekend. Stay tuned!
 
Today's an "other homestead duties" day. We've been blessed with a LOT of rain here, and the cukes in the garden went nuts. We're canning pickles today.

Since this is a build thread, and not a "what did you do on the homestead today" thread, here's the relevant update: I did more wiring yesterday, but it's pretty boring work to do and see, so I only have one picture to post, and it's only wiring-adjacent. My step sliders need a 14g power wire, so I used JCASE socket #7 in the PDC through the ABS Relay socket (#33 in the PDC), since my Rubicon didn't come with ABS. The relay is triggered by a dash-mounted switch. So, in addition to the modifications in the PDC, I ran two red wires (20g for the relay trigger and 14g for the power) from the PDC to my bulkhead connector. I ended up de-looming the SpeedoHealer wiring noted in the post above because I realized that I'll have a bunch of other wires in that location, and I'd prefer less individual looms there. I'll put loom on when all my wiring is complete.

The only picture I took is of the inside of the PDC cover, where I added labels for the JCASE fuse in socket #7 and the relay in socket #33:
IMG_8853.webp


In the engine compartment, I still have to wire up the SwitchPro-controlled accessories and the step slider motors and LEDs. In the cabin, I need to wire everything up. Stay tuned!
 
Scott -

The point size for the font on your custom labels is not correct.

View attachment 692863

Sincerely,

Captain OCD

;)
Dear Captain OCD, please see my response to your previous comment on that subject because it's still applicable:


:ROFLMAO:
 
Dear Captain OCD, please see my response to your previous comment on that subject because it's still applicable:


:ROFLMAO:

Well, I'm nothing if not consistent...

:cool:
 
  • Haha
Reactions: Wildman and sab
This weekend's lesson: Complacency hurts.

I hadn't planned on any LJ build activity this weekend. Rather, it's the first weekend in two months with no rain just before, or during, the weekend, so I had planned to finally pour the footings for the big water tank stand I made for the garden water tank. On Friday, I knocked off work early, and when I got home, I stopped at the shop first to gather up my tools for the project.

I found a five-gallon bucket to put the tools in, and then I started gathering them up. First, I found my collection of finishing trowels and dropped them in the bucket. Then, I set the bucket down and went searching for my float and edger. I found them, walked back to the bucket of trowels, and that's where complacency got me. I went to put those tools into the bucket, and I wasn't paying attention. I forgot how sharp the corner of a hardened-steel trowel is. As I placed the tools inside the bucket, the back of my hand brushed the corner of a trowel. Immediately, I felt it slice the skin, and blood immediately started running out of my hand like water from a faucet. I haven't cut myself this bad in a very long time.

I grabbed some clean shop towels to cover the cut and walked to the house for assistance from Mrs. sab. When I walked in, she asked how my day was and looked up to see one hand covering a bloody towel over the other hand. I said, "It was going well until a minute ago. I may need stitches." The cut was through all layers of skin, and it's about 1-1/2 inches long. Stitches would definitely be a normal fix for this type of cut, and I do have a suture kit to sew myself up, but butterfly strips can do wonders, too. We cleaned up the wound, applied hydrogen peroxide and iodine, then used five butterfly strips to hold the cut together. Finally, we put three large band-aids over it. So that was that. In two seconds, my weekend plans completely changed. It would simply not be wise to try pouring concrete with this bad an open wound.

I spent all day Saturday designing my wiring harness for the Switch-Pros system. After creating several spreadsheets to calculate wire sizes and pick connectors to use, along with a bunch of connector research, I drew up my schematic:
1781459980975.webp


All day yesterday, the cut was sore, but this morning, it felt a lot better. After removing the bandages and cleaning the wound, new butterfly bandages and band-aids were placed, and I mentioned to Mrs. sab that I intended to start on the wiring harness. She said, "That's a bad idea. You're going to tear that cut open again." I told her that making a wire harness isn't hard on the hands, and it'll be fine (she was right, by the way...)

I installed the harnesses on the Switch-Pros box and started separating the pigtails into groups that would form the beginning of a wire harness:
IMG_8892.webp


You can see that the harness is stuffed in a busy area, with many areas difficult to reach. With my hand in a contorted position while snaking wires around, I felt the cut on my hand pull apart. Immediately, I pulled my hand out of the engine bay and saw blood pouring out from the bandage. Uh oh. Back to the house for cleanup and new bandages...

So, here's the little cut that screwed up my entire weekend:
IMG_8889.webp
This is after I re-injured it. It was still mostly fused back together, but that little bloody spot was pouring blood. It appears to be a cut in one of the main blood vessels on the back of the hand.

This time, we used something a bit more structural to hold it together, and per Mrs. sab's strict orders, I'm not allowed in the shop until next weekend: 😩
IMG_8890.webp

Stay tuned!

For a continuation of the wiring project, see the bottom of Post #975.
 
Last edited:
This weekend's lesson: Complacency hurts.

I hadn't planned on any LJ build activity this weekend. Rather, it's the first weekend in two months with no rain just before, or during, the weekend, so I had planned to finally pour the footings for the big water tank stand I made for the garden water tank. On Friday, I knocked off work early, and when I got home, I stopped at the shop first to gather up my tools for the project.

I found a five-gallon bucket to put the tools in, and then I started gathering them up. First, I found my collection of finishing trowels and dropped them in the bucket. Then, I set the bucket down and went searching for my float and edger. I found them, walked back to the bucket of trowels, and that's where complacency got me. I went to put those tools into the bucket, and I wasn't paying attention. I forgot how sharp the corner of a hardened-steel trowel is. As I placed the tools inside the bucket, the back of my hand brushed the corner of a trowel. Immediately, I felt it slice the skin, and blood immediately started running out of my hand like water from a faucet. I haven't cut myself this bad in a very long time.

I grabbed some clean shop towels to cover the cut and walked to the house for assistance from Mrs. sab. When I walked in, she asked how my day was and looked up to see one hand covering a bloody towel over the other hand. I said, "It was going well until a minute ago. I may need stitches." The cut was through all layers of skin, and it's about 1-1/2 inches long. Stitches would definitely be a normal fix for this type of cut, and I do have a suture kit to sew myself up, but butterfly strips can do wonders, too. We cleaned up the wound, applied hydrogen peroxide and iodine, then used five butterfly strips to hold the cut together. Finally, we put three large band-aids over it. So that was that. In two seconds, my weekend plans completely changed. It would simply not be wise to try pouring concrete with this bad an open wound.

I spent all day Saturday designing my wiring harness for the Switch-Pros system. After creating several spreadsheets to calculate wire sizes and pick connectors to use, along with a bunch of connector research, I drew up my schematic:
View attachment 693999

All day yesterday, the cut was sore, but this morning, it felt a lot better. After removing the bandages and cleaning the wound, new butterfly bandages and band-aids were placed, and I mentioned to Mrs. sab that I intended to start on the wiring harness. She said, "That's a bad idea. You're going to tear that cut open again." I told her that making a wire harness isn't hard on the hands, and it'll be fine (she was right, by the way...)

I installed the harnesses on the Switch-Pros box and started separating the pigtails into groups that would form the beginning of a wire harness:
View attachment 694000

You can see that the harness is stuffed in a busy area, with many areas difficult to reach. With my hand in a contorted position while snaking wires around, I felt the cut on my hand pull apart. Immediately, I pulled my hand out of the engine bay and saw blood pouring out from the bandage. Uh oh. Back to the house for cleanup and new bandages...

So, here's the little cut that screwed up my entire weekend:
View attachment 694002This is after I re-injured it. It was still mostly fused back together, but that little bloody spot was pouring blood. It appears to be a cut in one of the main blood vessels on the back of the hand.

This time, we used something a bit more structural to hold it together, and per Mrs. sab's strict orders, I'm not allowed in the shop until next weekend: 😩

Stay tuned!

It’s amazing how hard it is to get anything done with a hand that won’t stop bleeding🤣

Your repair will definitely work but a single stitch (at most 2) often makes those more easily manageable. To be clear, at this point I’d clean it regularly and leave it as is. What ever you do, never stitch something like that up tight. That’s asking for an infection.
 
It’s amazing how hard it is to get anything done with a hand that won’t stop bleeding🤣
100%! This one was a gusher!

Your repair will definitely work but a single stitch (at most 2) often makes those more easily manageable. To be clear, at this point I’d clean it regularly and leave it as is. What ever you do, never stitch something like that up tight. That’s asking for an infection.
Thanks, Mike! It's nice to get an expert opinion on this. I figured stitches were justified, but I also was looking for the "easy button." I just plan on cleaning and re-bandaging daily, and if there's any sign of infection, I'll have my doctor take a look at it.
 
That sucks!!! It's wild how often that thought (of injuring myself on the days ahead of or early on in the project) goes through my mind on the weekdays leading up a big weekend project...

Every day AMERICAN you were to fix it yourself! That's praise-worthy. Hope it stays sealed and heals quick!

All day yesterday, the cut was sore, but this morning, it felt a lot better. After removing the bandages and cleaning the wound, new butterfly bandages and band-aids were placed, and I mentioned to Mrs. sab that I intended to start on the wiring harness. She said, "That's a bad idea. You're going to tear that cut open again." I told her that making a wire harness isn't hard on the hands, and it'll be fine (she was right, by the way...)

She was right and you were crazy! My fingers never hurt so much the day or two after running, stripping, crimping, etc. Tips and joints of my fingers feel that deep when running more than a circuit or two...

roseanne what is wrong with you GIF
 
This weekend's lesson: Complacency hurts.

I hadn't planned on any LJ build activity this weekend. Rather, it's the first weekend in two months with no rain just before, or during, the weekend, so I had planned to finally pour the footings for the big water tank stand I made for the garden water tank. On Friday, I knocked off work early, and when I got home, I stopped at the shop first to gather up my tools for the project.

I found a five-gallon bucket to put the tools in, and then I started gathering them up. First, I found my collection of finishing trowels and dropped them in the bucket. Then, I set the bucket down and went searching for my float and edger. I found them, walked back to the bucket of trowels, and that's where complacency got me. I went to put those tools into the bucket, and I wasn't paying attention. I forgot how sharp the corner of a hardened-steel trowel is. As I placed the tools inside the bucket, the back of my hand brushed the corner of a trowel. Immediately, I felt it slice the skin, and blood immediately started running out of my hand like water from a faucet. I haven't cut myself this bad in a very long time.

I grabbed some clean shop towels to cover the cut and walked to the house for assistance from Mrs. sab. When I walked in, she asked how my day was and looked up to see one hand covering a bloody towel over the other hand. I said, "It was going well until a minute ago. I may need stitches." The cut was through all layers of skin, and it's about 1-1/2 inches long. Stitches would definitely be a normal fix for this type of cut, and I do have a suture kit to sew myself up, but butterfly strips can do wonders, too. We cleaned up the wound, applied hydrogen peroxide and iodine, then used five butterfly strips to hold the cut together. Finally, we put three large band-aids over it. So that was that. In two seconds, my weekend plans completely changed. It would simply not be wise to try pouring concrete with this bad an open wound.

I spent all day Saturday designing my wiring harness for the Switch-Pros system. After creating several spreadsheets to calculate wire sizes and pick connectors to use, along with a bunch of connector research, I drew up my schematic:
View attachment 693999

All day yesterday, the cut was sore, but this morning, it felt a lot better. After removing the bandages and cleaning the wound, new butterfly bandages and band-aids were placed, and I mentioned to Mrs. sab that I intended to start on the wiring harness. She said, "That's a bad idea. You're going to tear that cut open again." I told her that making a wire harness isn't hard on the hands, and it'll be fine (she was right, by the way...)

I installed the harnesses on the Switch-Pros box and started separating the pigtails into groups that would form the beginning of a wire harness:
View attachment 694000

You can see that the harness is stuffed in a busy area, with many areas difficult to reach. With my hand in a contorted position while snaking wires around, I felt the cut on my hand pull apart. Immediately, I pulled my hand out of the engine bay and saw blood pouring out from the bandage. Uh oh. Back to the house for cleanup and new bandages...

So, here's the little cut that screwed up my entire weekend:
View attachment 694002This is after I re-injured it. It was still mostly fused back together, but that little bloody spot was pouring blood. It appears to be a cut in one of the main blood vessels on the back of the hand.

This time, we used something a bit more structural to hold it together, and per Mrs. sab's strict orders, I'm not allowed in the shop until next weekend: 😩

Stay tuned!

Stuff happens fast. Complacency has caught me more than I like to admit. Once such instance was trying to move a barrel full of scrap metal. The top had been removed by one of those can opener type of openers. They leave a ridiculous edge. I had heavy leather gloves on and figured I'd just roll that barrel around. Well, my hand slipped a little, and that leather (and my thumb) were peeled open quicker than you can imagine. Just like you, I knew it was bad Immediately. I was out and about (at the scrap yard) vs at home and thankfully they allowed me to wrap it with some paper towel and tape...That kept it closed up enough to get to my PCP and they applied the superglue type of wound closure.

It was also a reminder that not every company trains for emergencies like that. I have some very basic training, and we have a "response team" at work. At the scrap yard, there were a bunch of people running around that didn't know what to do. Kinda weird to be the one bleeding, but also trying to keep everyone calm and organize what needs to happen.

Good on ya for being prepared. Its also a good reminder that if you're going to be remote, first aid takes on a different meaning. I really need to invest in more first aid stuff for our remote piece of land. Its at least a 20 minute drive to anywhere (so not super remote)...and I'm running lots of different limb removing or skin opening equipment up there. The medical attention I would have access to is not great either (The Hospital's name is Portage View, and Locals have nicknamed it Portage last View).
 
Sorry for the injury, Scott. But, it would have been very cool to see you go all Rambo and stitch it up yourself...

It's always amazed me (OK, bothered me...) how soft my skin has become as I get older. I use more ban aids now than I ever did in the past.
 
  • Like
Reactions: ColoJeep and sab
Kinda weird to be the one bleeding, but also trying to keep everyone calm and organize what needs to happen.
That's happened to me more than once. The last time I cut myself this badly was in the early 1990s. I was taking a basic manual lathe class at a local high school shop (back when shop classes still existed) through a technical college, just to learn more about turning operations. I cut my wrist, through all layers of skin and exposing tendons, when it brushed up against the tool while removing a dial indicator. Same deal as this one - instant blood pouring out. I walked up to the instructor and said that I needed help with a cut. When I showed him the wound, he nearly passed out. I ended up organizing others to help get the bleeding stopped enough to get a ride to the hospital.

Good on ya for being prepared. Its also a good reminder that if you're going to be remote, first aid takes on a different meaning.
Thanks. I got serious about being prepared for medical emergencies during my backpack hunting days. Being 10 miles away from civilization in the backcountry means dealing with things that can happen. That mentality carried through to living remotely like we do. My homestead medical supplies kit fills a back pack that would be too big for checked luggage on a flight. "Be prepared" is an awesome motto!

Sorry for the injury, Scott. But, it would have been very cool to see you go all Rambo and stitch it up yourself...
:ROFLMAO: Fortunately, I've not had to use the suture kit, but I do know how to do it (nowhere near as well as Woodrow, though!) The alternatives that are available nowadays work very well, and in my experience, they leave less of a scar (not dots around the scar from the stitches.) In the case of this wound, Mrs. sab would have had to do the stitching because the cut is on the back of my dominant hand. One-handed, non-dominant-hand, stitching is not for me.
 
It's always amazed me (OK, bothered me...) how soft my skin has become as I get older. I use more ban aids now than I ever did in the past.
Yeah, when we get to be our age, the only way to say we have thick skin is figuratively! :ROFLMAO:
 
...

:ROFLMAO: Fortunately, I've not had to use the suture kit, but I do know how to do it (nowhere near as well as Woodrow, though!) ...

Well, don't feel bad about that. Mikey can only do that well when he has four surgical nurses handing him the suture material, and the recipient is anesthetized...

;)
 
  • Haha
  • Like
Reactions: Woodrow and sab
I made a bunch of progress on a bunch of miscellaneous tasks this weekend. On Thursday, I picked up Fluxor's valance and my GMRS antenna brackets from the machine shop. They both needed some tweaking, and since my friend with the mill and lathe suffered a total loss when his shop burned to the ground :(, I had to pay a machine shop $350 to do what I could have done in about an hour, if I only had access to a machine shop.

Despite paying a machine shop to cut the relief in the antenna bracket, I still had to chamfer an edge in order to get the antenna mount installed:
IMG_8914.webp


With that final modification, I was able to install the antenna mount:
IMG_8918.webp


With that done, I mounted the bracket with the tailgate hinge screw and transferred the hole pattern to the top hinge and the passenger rub rail for the flathead cap screws:
1782089427031.webp


Then, I removed everything, countersunk the two holes in the antenna bracket (no pics) and drilled and tapped the top hinge and the passenger rub rail for the 1/4-20 flatheads:
IMG_8924.webp


IMG_8925.webp


Then, I bead-blasted and painted the antenna bracket (no pics, again), screw heads, and hinges:
IMG_8930.webp


IMG_8931.webp


Finally, I did a bit of wiring. First, I wired up the Switch-Pros switch panel to the cabin side of the bulkhead connector, programmed the switches, and put decals on the switches:
IMG_8928.webp


Then I used Velcro to mount the SpeedoHealer inside the glove box where it will be easy to make changes to it, and wired it to the bulkhead connector:
IMG_8929.webp


Like I said - a bunch of miscellaneous tasks completed. Stay tuned!
 
I had today off, so I continued wiring the Switch-Pros stuff. I didn't take pictures because pictures of electrical wiring are quite boring. But fear not. I can still post a relevant photo. Here's what I accomplished today:
1782775156814.webp


I'm still sick, so my brain's a bit foggier than usual. I ended up having to re-do the bumper light wiring because I used the wrong color wire. Yes, I could have switched the outputs in the Switch-Pros controller, but I'm a firm believer in going through the pain of re-work to learn a lesson. I have no idea what that lesson is, though. And I'm sure I didn't learn it, anyway. :ROFLMAO: I also cut several pieces of wire of the wrong gauge, so I have a pile of "extra" wires.

For the continuation of the wiring project, skip ahead to Post #987.
 
Last edited:
I had today off, so I continued wiring the Switch-Pros stuff. I didn't take pictures because pictures of electrical wiring are quite boring. But fear not. I can still post a relevant photo. Here's what I accomplished today:
View attachment 697102

I'm still sick, so my brain's a bit foggier than usual. I ended up having to re-do the bumper light wiring because I used the wrong color wire. Yes, I could have switched the outputs in the Switch-Pros controller, but I'm a firm believer in going through the pain of re-work to learn a lesson. I have no idea what that lesson is, though. And I'm sure I didn't learn it, anyway. :ROFLMAO: I also cut several pieces of wire of the wrong gauge, so I have a pile of "extra" wires.

If you mean learning to never make mistakes, that hasn’t worked for me so far.
You have front/rear swaylocs with the air/electric discos?
Also your panel reminds me I need rock lights.
 
  • Like
Reactions: NashvilleTJ
You have front/rear swaylocs with the air/electric discos?
That is the plan, yes. I have the front SwayLOC now (in a box). The rear will obviously have to be custom-fit, since ORO doesn't make a rear one for the TJ. That's a bit down the list, though. At least it'll be wired up so that I only have to run the air line later.
 
Great progress of the Jeep, and wiring! I've got a fair amount of wiring cleanup that needs to be done and I'm dragging my feet! :(
 
  • Like
Reactions: ColoJeep and sab