

You are using an out of date browser. It may not display this or other websites correctly.
You should upgrade or use an alternative browser.
You should upgrade or use an alternative browser.

Cooling fan upgrade comparison: Explorer 11-blade fan and HD clutch versus SPAL 19" 850-watt electric brushless fan
- Thread starter Steel City 06
- Start date

i am trying a different approach to A/C. When A/C is on, a relay will cut out the sensor and go through a potentiometer, that way i can select A/C fan speed when engine cold / no fan input from lingenfelter. When temperature goes above the selected A/C fan speed, I use a temperature gauge with an external alarm function that will disconnect the relay and put the sensor back in the system. on the bench it works fine, will now install and see
How many watts & who manufacturers it?
Based on other comparables from that Chrysler era, I'd wager VDO.
The label on Mac's fan says Johnson Gate (Gate is a brand of Johnson Electric).

Advantage us is it has a manual so we can remove that bit of additional heat burden from the cooling system.
Never thought about that. Do auxillary transmission coolers make any actual difference to the coolant temperature going through the engine?

Never thought about that. Do auxillary transmission coolers make any actual difference to the coolant temperature going through the engine?
That's not how the thermostat works.
Only if you put the cooler before the radiator or are bypassing the radiator, which would provide less net cooling to the transmission. I'm not real familiar with auto transmissions, but the heat load from the engine is much bigger.
The benefit of the electric fan design here is that the fan reads the outlet temp of the radiator, so if the auto trans is dumping enough extra heat to matter, the fan can overcool the engine coolant before it meets the internal trans cooler. At least at low speeds. At high speeds, airflow through the radiator is governed by speed and the (bad) underhood aerodynamics.
The benefit of the electric fan design here is that the fan reads the outlet temp of the radiator, so if the auto trans is dumping enough extra heat to matter, the fan can overcool the engine coolant before it meets the internal trans cooler. At least at low speeds. At high speeds, airflow through the radiator is governed by speed and the (bad) underhood aerodynamics.
That's not how the thermostat works.
Only if you put the cooler before the radiator or are bypassing the radiator, which would provide less net cooling to the transmission. I'm not real familiar with auto transmissions, but the heat load from the engine is much bigger.
The benefit of the electric fan design here is that the fan reads the outlet temp of the radiator, so if the auto trans is dumping enough extra heat to matter, the fan can overcool the engine coolant before it meets the internal trans cooler. At least at low speeds. At high speeds, airflow through the radiator is governed by speed and the (bad) underhood aerodynamics.
Thanks!
Not really. If you were to run the Setrab we use as a stand-alone trans cooler, it would still cool the auto very similarly. We don't run the AUX through the radiator heat exchanger to help cool the trans, we do it to help warm it up. For them that live where it is cooler with lower demand on the system, we add a thermostatic bypass valve to keep the minimum temp where we want it.Only if you put the cooler before the radiator or are bypassing the radiator, which would provide less net cooling to the transmission. I'm not real familiar with auto transmissions, but the heat load from the engine is much bigger.
The benefit of the electric fan design here is that the fan reads the outlet temp of the radiator, so if the auto trans is dumping enough extra heat to matter, the fan can overcool the engine coolant before it meets the internal trans cooler. At least at low speeds. At high speeds, airflow through the radiator is governed by speed and the (bad) underhood aerodynamics.
Figured since I have tried both with success, I would post a brief overview and review/comparison of these cooling fan options for anyone looking for something bigger than stock.
Option 1: Explorer 11-blade fan and HD Clutch
This option consists of swapping the stock mechanical fan and clutch with one out of a Ford Explorer. Like the OEM fan, it simply spins onto the water pump, and the clutch acts just like an OEM clutch, though it is more sensitive. For this you only need two parts:
- HD Fan Clutch: I used Hayden 2794; any "heavy duty" clutch from a 2001 Ford Explorer will do.
- 11-blade fan assembly: I used the Motorcraft part, but there are aftermarket options that are pretty good as well, such as this Dorman part.
To install, simply remove the OEM fan and clutch, and install the new fan and clutch. Note that the Motorcraft fan will NOT bolt onto a TJ fan clutch, as the bolt pattern is different. However, the water pump stud thread is the same, hence why you can swap the fan clutches.
Generally, no modifications are needed on the fan shroud. If you have a body lift, check for clearance. The fan is the same diameter as the OEM fan (and I think a bit lower profile) so if your OEM fan works, the Explorer fan will probably work as well. Since the Explorer fan is plastic, it's actually easier to remove and re-install since it is a bit flexible. I've found I can fish the fan and clutch assembly out from between the fan shroud and engine without removing anything else.
Option 2: 19" SPAL OEM Brushless fan, rated at 850 watts / 4,000 CFM (~3,000 CFM installed)
This option involves taking the OEM cooling fan out of a late model Chevrolet Camaro (~2018-ish) and installing it in the OEM fan shroud in place of the stock clutch fan and wiring up a control system to run it. For this you will need a number of parts:
Installation:
- GM Genuine 158927 Cooling Fan, from a 6.2L V8 Supercharged 2016-2020 Camaro. (Note: Don't get the newer part number 85516898 from the 2021+ Camaro - it is exactly the same but has a different control system I could not figure out.) This fan is brushless and has an integral controller. It simply wires to the battery (with an 80 amp fuse and 8ga wire), and will operate at whatever speed a controller tells it at, anywhere from ~5% to 100%.
- Lingenfelter VSFM-002 PWM Fan Controller. This is one of the only fan controllers outside of a ECM that can operate an OEM SPAL fan to its full capabilities. Basically, you wire it to a coolant temperature sensor, set min/max temperatures, and it sends a PWM signal to the fan telling it to run at a particular speed between roughly 5-100%. Unlike a thermostat, this controller is continuously variable and will tell the SPAL fan to run at exactly the speed commanded based on the temperature value between the min and max temperature you set. At the max temperature, the fan runs at 100%. At the min temperature, the fan runs at 5%. If you are 1/3rd the way to the max temperature for the min, it will run the fan at 33%.
- GM 213-928 Temperature sensor and PT1798 Pigtail. This temperature sensor will drive the PWM fan controller. It might be possible to run the fan on the ECT sensor already installed; however, for maximum efficiency it is much better to install a separate sensor on the radiator coolant outlet, since it will measure the efficiency of the radiator at any given time.
- Coolant hose adapter for temperature sensors - Must be 1.5" barb and have a 3/8" NPT fitting for the GM temperature sensor.
- 8 AWG marine wire or welding wire, 105C rated (6 AWG if only 90C rated)
- ~18 AWG wire (for fused power supply to controller and ground) (use larger if switched circuit used to turn on controller exceeds 10A fused)
- ~20 AWG wire (for coolant sensor, PWM control wire)
- Optional: 1N6006B Zener Diode for alternative control method (recommended, see this post for details)
- Remove your OEM fan and clutch. Remove the shroud as well and retain for the next step.
- Cut the GM OEM shroud down to the diameter of the TJ OEM shroud, and secure the fan shroud inside the TJ's shroud. The GM fan supports should be about flush with the OEM TJ shroud. Be VERY careful not to nick the fan. Any interference or imbalance will cause major issues. I chose to unbolt the fan and pull it out of the GM shroud while I cut just to be safe. Note if you do this, the three bolts holding the fan into the shroud can fall back inside the fan hat and are VERY hard to re-insert.
- Install the modified fan/shroud assembly back in. Verify clearance to the water pump stud.
- Install the coolant temperature sensor and adapter into the radiator outlet hose. Note you specifically want the radiator outlet, aka the lower hose. The reason for this is that you want the sensor to measure when more airflow is needed for cooling, and not simply measure the amount of heat being rejected. When you're driving at freeway speeds, you're already putting 8,000 or more CFM through the radiator, so there is no point in burning gas to spin a fan that can only push 4,000 CFM.
- Wire the sensor and fan control wire to the Lingenfelter controller. Follow the instructions for setting the dials and dip switches. I recommend starting the "Min" temperature at about 130F and the "max" at 190F.
- 190F is a good target for the max, because if the thermostat is fully open, at full throttle steady state conditions, you will have 20-25F of temperature rise across the engine, thus you will need 20-25F of temperature drop across the radiator. Assuming the thermostat is fully open at 210F, you you would ideally want a target outlet temperature of no more than 195 degrees on the return. Set this value any lower, and you will simply waste energy overcooling the coolant, and the thermostat will close a bit, so no additional heat will be rejected. So there is no gain whatsoever in setting this below 180F.
- 130F is my recommended target for the min, but you can (and should) play with this. The goal (at least in regards to efficiency) is to set this to the highest temperature you can without resulting in the fan and thermostat cycling as they fight one another. I found at 150F, the fan controller would result in oscillations in the fan speed and coolant temperature at idle, but at 130F, these oscillations were minimal if non-existent. 140F also seems to be a decent balance, and might work well in hotter climates. Note that your coolant temperature at the radiator outlet will naturally be far lower than the engine operating temperature when the thermostat is partially open, especially when you have massive airflow like you would at freeway speeds. So if set correctly, your cooling fan should not turn on above about 40 mph during steady-state conditions.
- I also recommend wiring the controller to two switches. One switch is for your ignition wire that tells the unit to turn on. I put this on a switch with a green LED, and this switch is generally on all the time. Thus, when the ignition is switched on, the fan controller switches on (as long as this switch is on). The fan will not come on until it sees hot coolant flowing through the radiator, so it will not run unless the engine is on and fully warmed up. When you shut the engine off but leave the ignition on, the fan may run for a short period until it cools the radiator long enough to shut down. This switch is optional, but recommended as you can disable the fan entirely.
- The second switch is a "max speed enable" for the fan, that you will normally leave off. If the controller is on (ignition on and other switch on) and you turn on this switch the controller ramps up the fan speed to the max, ignoring the temperature sensor data altogether. This is useful for testing, and for select use cases like wanting maximum A/C at idle or wanting to cool off the engine bay.
My thoughts:
Overall, two good options. The SPAL fan is certainly a lot more work, but I recommend it if you have the time.
- The SPAL OEM fan moves a LOT more air at max speed than the Explorer fan moves at idle (clutch engaged). However, I would qualitatively guess that the thoroughput is similar at about 1,500 engine RPM. The SPAL fan is rated at around 4,000 CFM with the static pressure of a typical radiator/condenser at full fan speed (2,800 RPM). So at idle, the SPAL fan certainly has more airflow, probably more than is needed. Above about 2,000 RPM, the Explorer fan seems to dominate when engaged, though it is pretty rare the clutch is engaged at 2,000+ engine RPM for more than a few seconds.
- The SPAL fan is certainly way less of a drag on the engine when it is running compared to when the Explorer fan is engaged. When the Explorer fan is engaged, the differences above 3,000 RPM are quite noticeable, and at 5,000 RPM, the difference of engaged vs disengaged is drastic. The drag from the SPAL fan is far less, and generally not noticeable. Given that the SPAL fan consumes about 850 watts at full power, you're looking at about a 2 HP loss through the alternator (assuming ~55% efficiency) when the fan is at full power, which is almost never the case. If we assume that the power draw of the Explorer fan is about 1 horsepower at 1,500 RPM (~750 watts mechanical), using the fan affinity laws, this would mean a loss of 8 HP at 3,000 RPM and 27 HP at 4,500 RPM (extremely rough numbers, but you get the point). However, the fan clutch is normally rarely engaged at normal road speeds for more than a few seconds after starting from a stopped state.
- The Explorer fan always has some power draw when the clutch is not engaged (20% RPM is a good assumption), and most (~80%) of this energy is converted to heat in the fan clutch. When the clutch is engaged (~80% water pump RPM), 80% of the energy goes into moving air, and only 20% is lost as heat. However, in accordance with the fan affinity laws, the fan blades consume 64x the energy since the shaft speed has quadrupled. Thus, the power consumption of the Explorer fan/clutch combination is about 16x the value when engaged vs disengaged.
- The SPAL fan has near-zero power draw when not turned on. Probably on the order of 10 watts is all that is needed to idle the controller and fan electronics. At power off, the current is generally nearly non-existent. As the fan ramps up, the current does not follow a linear curve, but instead a seemingly parabolic curve. So even at low to mid speeds, then fan is only using a small portion of its max wattage. The SPAL fan also has much more efficient blade design, but also moves less air per revolution, and thus has to spin a bit faster than the Explorer fan. However, to move the same amount of air, the overall energy consumption (from a fuel standpoint) is pretty much the same. The big advantage of the SPAL fan is that it only spins when needed, and only as much as needed.
- The Explorer fan is certainly way less complex and cheaper upfront. However, the long-term fuel costs associated with the Explorer fan will more than certainly cause the overall lifetime cost to exceed the SPAL fan lifetime cost.
- Both make a big difference in A/C performance. The SPAL fan is better for this since it can be engaged manually, and moves more airflow at idle.
- Even when not engaged, the Explorer fan/clutch does seem to slow down how quickly the engine can rev up.
cOMPREHENSICE WIRTE-U
Figured since I have tried both with success, I would post a brief overview and review/comparison of these cooling fan options for anyone looking for something bigger than stock.
Option 1: Explorer 11-blade fan and HD Clutch
This option consists of swapping the stock mechanical fan and clutch with one out of a Ford Explorer. Like the OEM fan, it simply spins onto the water pump, and the clutch acts just like an OEM clutch, though it is more sensitive. For this you only need two parts:
- HD Fan Clutch: I used Hayden 2794; any "heavy duty" clutch from a 2001 Ford Explorer will do.
- 11-blade fan assembly: I used the Motorcraft part, but there are aftermarket options that are pretty good as well, such as this Dorman part.
To install, simply remove the OEM fan and clutch, and install the new fan and clutch. Note that the Motorcraft fan will NOT bolt onto a TJ fan clutch, as the bolt pattern is different. However, the water pump stud thread is the same, hence why you can swap the fan clutches.
Generally, no modifications are needed on the fan shroud. If you have a body lift, check for clearance. The fan is the same diameter as the OEM fan (and I think a bit lower profile) so if your OEM fan works, the Explorer fan will probably work as well. Since the Explorer fan is plastic, it's actually easier to remove and re-install since it is a bit flexible. I've found I can fish the fan and clutch assembly out from between the fan shroud and engine without removing anything else.
Option 2: 19" SPAL OEM Brushless fan, rated at 850 watts / 4,000 CFM (~3,000 CFM installed)
This option involves taking the OEM cooling fan out of a late model Chevrolet Camaro (~2018-ish) and installing it in the OEM fan shroud in place of the stock clutch fan and wiring up a control system to run it. For this you will need a number of parts:
Installation:
- GM Genuine 158927 Cooling Fan, from a 6.2L V8 Supercharged 2016-2020 Camaro. (Note: Don't get the newer part number 85516898 from the 2021+ Camaro - it is exactly the same but has a different control system I could not figure out.) This fan is brushless and has an integral controller. It simply wires to the battery (with an 80 amp fuse and 8ga wire), and will operate at whatever speed a controller tells it at, anywhere from ~5% to 100%.
- Lingenfelter VSFM-002 PWM Fan Controller. This is one of the only fan controllers outside of a ECM that can operate an OEM SPAL fan to its full capabilities. Basically, you wire it to a coolant temperature sensor, set min/max temperatures, and it sends a PWM signal to the fan telling it to run at a particular speed between roughly 5-100%. Unlike a thermostat, this controller is continuously variable and will tell the SPAL fan to run at exactly the speed commanded based on the temperature value between the min and max temperature you set. At the max temperature, the fan runs at 100%. At the min temperature, the fan runs at 5%. If you are 1/3rd the way to the max temperature for the min, it will run the fan at 33%.
- GM 213-928 Temperature sensor and PT1798 Pigtail. This temperature sensor will drive the PWM fan controller. It might be possible to run the fan on the ECT sensor already installed; however, for maximum efficiency it is much better to install a separate sensor on the radiator coolant outlet, since it will measure the efficiency of the radiator at any given time.
- Coolant hose adapter for temperature sensors - Must be 1.5" barb and have a 3/8" NPT fitting for the GM temperature sensor.
- 8 AWG marine wire or welding wire, 105C rated (6 AWG if only 90C rated)
- ~18 AWG wire (for fused power supply to controller and ground) (use larger if switched circuit used to turn on controller exceeds 10A fused)
- ~20 AWG wire (for coolant sensor, PWM control wire)
- Optional: 1N6006B Zener Diode for alternative control method (recommended, see this post for details)
- Remove your OEM fan and clutch. Remove the shroud as well and retain for the next step.
- Cut the GM OEM shroud down to the diameter of the TJ OEM shroud, and secure the fan shroud inside the TJ's shroud. The GM fan supports should be about flush with the OEM TJ shroud. Be VERY careful not to nick the fan. Any interference or imbalance will cause major issues. I chose to unbolt the fan and pull it out of the GM shroud while I cut just to be safe. Note if you do this, the three bolts holding the fan into the shroud can fall back inside the fan hat and are VERY hard to re-insert.
- Install the modified fan/shroud assembly back in. Verify clearance to the water pump stud.
- Install the coolant temperature sensor and adapter into the radiator outlet hose. Note you specifically want the radiator outlet, aka the lower hose. The reason for this is that you want the sensor to measure when more airflow is needed for cooling, and not simply measure the amount of heat being rejected. When you're driving at freeway speeds, you're already putting 8,000 or more CFM through the radiator, so there is no point in burning gas to spin a fan that can only push 4,000 CFM.
- Wire the sensor and fan control wire to the Lingenfelter controller. Follow the instructions for setting the dials and dip switches. I recommend starting the "Min" temperature at about 130F and the "max" at 190F.
- 190F is a good target for the max, because if the thermostat is fully open, at full throttle steady state conditions, you will have 20-25F of temperature rise across the engine, thus you will need 20-25F of temperature drop across the radiator. Assuming the thermostat is fully open at 210F, you you would ideally want a target outlet temperature of no more than 195 degrees on the return. Set this value any lower, and you will simply waste energy overcooling the coolant, and the thermostat will close a bit, so no additional heat will be rejected. So there is no gain whatsoever in setting this below 180F.
- 130F is my recommended target for the min, but you can (and should) play with this. The goal (at least in regards to efficiency) is to set this to the highest temperature you can without resulting in the fan and thermostat cycling as they fight one another. I found at 150F, the fan controller would result in oscillations in the fan speed and coolant temperature at idle, but at 130F, these oscillations were minimal if non-existent. 140F also seems to be a decent balance, and might work well in hotter climates. Note that your coolant temperature at the radiator outlet will naturally be far lower than the engine operating temperature when the thermostat is partially open, especially when you have massive airflow like you would at freeway speeds. So if set correctly, your cooling fan should not turn on above about 40 mph during steady-state conditions.
- I also recommend wiring the controller to two switches. One switch is for your ignition wire that tells the unit to turn on. I put this on a switch with a green LED, and this switch is generally on all the time. Thus, when the ignition is switched on, the fan controller switches on (as long as this switch is on). The fan will not come on until it sees hot coolant flowing through the radiator, so it will not run unless the engine is on and fully warmed up. When you shut the engine off but leave the ignition on, the fan may run for a short period until it cools the radiator long enough to shut down. This switch is optional, but recommended as you can disable the fan entirely.
- The second switch is a "max speed enable" for the fan, that you will normally leave off. If the controller is on (ignition on and other switch on) and you turn on this switch the controller ramps up the fan speed to the max, ignoring the temperature sensor data altogether. This is useful for testing, and for select use cases like wanting maximum A/C at idle or wanting to cool off the engine bay.
My thoughts:
Overall, two good options. The SPAL fan is certainly a lot more work, but I recommend it if you have the time.
- The SPAL OEM fan moves a LOT more air at max speed than the Explorer fan moves at idle (clutch engaged). However, I would qualitatively guess that the thoroughput is similar at about 1,500 engine RPM. The SPAL fan is rated at around 4,000 CFM with the static pressure of a typical radiator/condenser at full fan speed (2,800 RPM). So at idle, the SPAL fan certainly has more airflow, probably more than is needed. Above about 2,000 RPM, the Explorer fan seems to dominate when engaged, though it is pretty rare the clutch is engaged at 2,000+ engine RPM for more than a few seconds.
- The SPAL fan is certainly way less of a drag on the engine when it is running compared to when the Explorer fan is engaged. When the Explorer fan is engaged, the differences above 3,000 RPM are quite noticeable, and at 5,000 RPM, the difference of engaged vs disengaged is drastic. The drag from the SPAL fan is far less, and generally not noticeable. Given that the SPAL fan consumes about 850 watts at full power, you're looking at about a 2 HP loss through the alternator (assuming ~55% efficiency) when the fan is at full power, which is almost never the case. If we assume that the power draw of the Explorer fan is about 1 horsepower at 1,500 RPM (~750 watts mechanical), using the fan affinity laws, this would mean a loss of 8 HP at 3,000 RPM and 27 HP at 4,500 RPM (extremely rough numbers, but you get the point). However, the fan clutch is normally rarely engaged at normal road speeds for more than a few seconds after starting from a stopped state.
- The Explorer fan always has some power draw when the clutch is not engaged (20% RPM is a good assumption), and most (~80%) of this energy is converted to heat in the fan clutch. When the clutch is engaged (~80% water pump RPM), 80% of the energy goes into moving air, and only 20% is lost as heat. However, in accordance with the fan affinity laws, the fan blades consume 64x the energy since the shaft speed has quadrupled. Thus, the power consumption of the Explorer fan/clutch combination is about 16x the value when engaged vs disengaged.
- The SPAL fan has near-zero power draw when not turned on. Probably on the order of 10 watts is all that is needed to idle the controller and fan electronics. At power off, the current is generally nearly non-existent. As the fan ramps up, the current does not follow a linear curve, but instead a seemingly parabolic curve. So even at low to mid speeds, then fan is only using a small portion of its max wattage. The SPAL fan also has much more efficient blade design, but also moves less air per revolution, and thus has to spin a bit faster than the Explorer fan. However, to move the same amount of air, the overall energy consumption (from a fuel standpoint) is pretty much the same. The big advantage of the SPAL fan is that it only spins when needed, and only as much as needed.
- The Explorer fan is certainly way less complex and cheaper upfront. However, the long-term fuel costs associated with the Explorer fan will more than certainly cause the overall lifetime cost to exceed the SPAL fan lifetime cost.
- Both make a big difference in A/C performance. The SPAL fan is better for this since it can be engaged manually, and moves more airflow at idle.
- Even when not engaged, the Explorer fan/clutch does seem to slow down how quickly the engine can rev up.
Comprehensive write-up, Dude. Well done.
FWIW:
A few years ago my OEM radiator finally died after 18+ years in the surface-of-the-sun heat of South Florida. Surprised it lasted that long — regular flushings and TLC always helps extend the life. I popped in a Champion 2-row.
Since I was moving to New Mexico, I performed some preventative maintenance and replaced the stock fan with a SPAL 16" 2,500 cfm puller and added the Champion aluminum shroud — H-U-G-E difference!
Standing in front of the grill with a loose tee, you can literally feel it pulling the tee from your body.
Champion 2-Row - https://championradiators.com/products/ec2101?_pos=1&_sid=fa6c1b4d1&_ss=r
SPAL 16" 2,500 cfm puller - https://www.summitracing.com/parts/spu-ix-30102113#overview
cOMPREHENSICE WIRTE-U
Comprehensive write-up, Dude. Well done.
FWIW:
A few years ago my OEM radiator finally died after 18+ years in the surface-of-the-sun heat of South Florida. Surprised it lasted that long — regular flushings and TLC always helps extend the life. I popped in a Champion 2-row.
Since I was moving to New Mexico, I performed some preventative maintenance and replaced the stock fan with a SPAL 16" 2,500 cfm puller and added the Champion aluminum shroud — H-U-G-E difference!
Standing in front of the grill with a loose tee, you can literally feel it pulling the tee from your body.
Champion 2-Row - https://championradiators.com/products/ec2101?_pos=1&_sid=fa6c1b4d1&_ss=r
SPAL 16" 2,500 cfm puller - https://www.summitracing.com/parts/spu-ix-30102113#overview
View attachment 698480
View attachment 698481
Nice install!
I'll note for anyone that finds this post, note that the control system for the SPAL brushed fans is entirely different than the brushless fans (both the OEM and aftermarket brushless fans) and to get variable speed you'll need to use a solid state relay plus a PWM controller like the Lingenfelter. Otherwise you're limited to one or two speeds depending on the fan.
Also kind of interesting regarding the warning stating it is for race use and not for more than 60 minutes continuous duration on. The majority of the brushed fans are suitable for continuous duty; perhaps this one is simply putting a larger fan blade on a motor originally designed for a smaller fan.
Brushed fans tend to have a shorter lifespan in general since they have parts that wear unlike brushless. Though some motors can be rebuilt by replacing the brushes after they wear out. Brushed fans are also more prone to arcing, but it shouldn't matter in this application, outside of possibly a small amount of RFI as the fan ages.
Brushless fans are generally designed for a high duty cycle and long life. It is not uncommon to see ratings in excess of 40,000 hours of operation, or around 1,600,000 miles for the typical car. The fact that they generally run low speed most of their life probably helps extend that lifespan further. Some sources claim that lifespan rating is at 100% power, but even if lower, it should still outlast the car at 100% power.
Granted, almost any SPAL aftermarket or OEM fan should outlast the radiator it is put behind unless the fan is abused somehow.
I have some high speed driving data to share that probably isn't very helpful to you, but might be interesting. Since I've got the diode setup on a switch, I can shut it off and get real temp output from the lower radiator hose.
I'm running 9.5:1 compression with an Edlebrock head and still at 4.0L displacement with larger than stock for 04 - 24lb Mustang 5.0 injectors which will be remapped when I put int the stroker assembly.
Vehicle is warmed up with outside temp 86F at the start, and 83F at the turn around. Highlighted the outlet coolant temp (176F) and Jeep's ECT (207F).
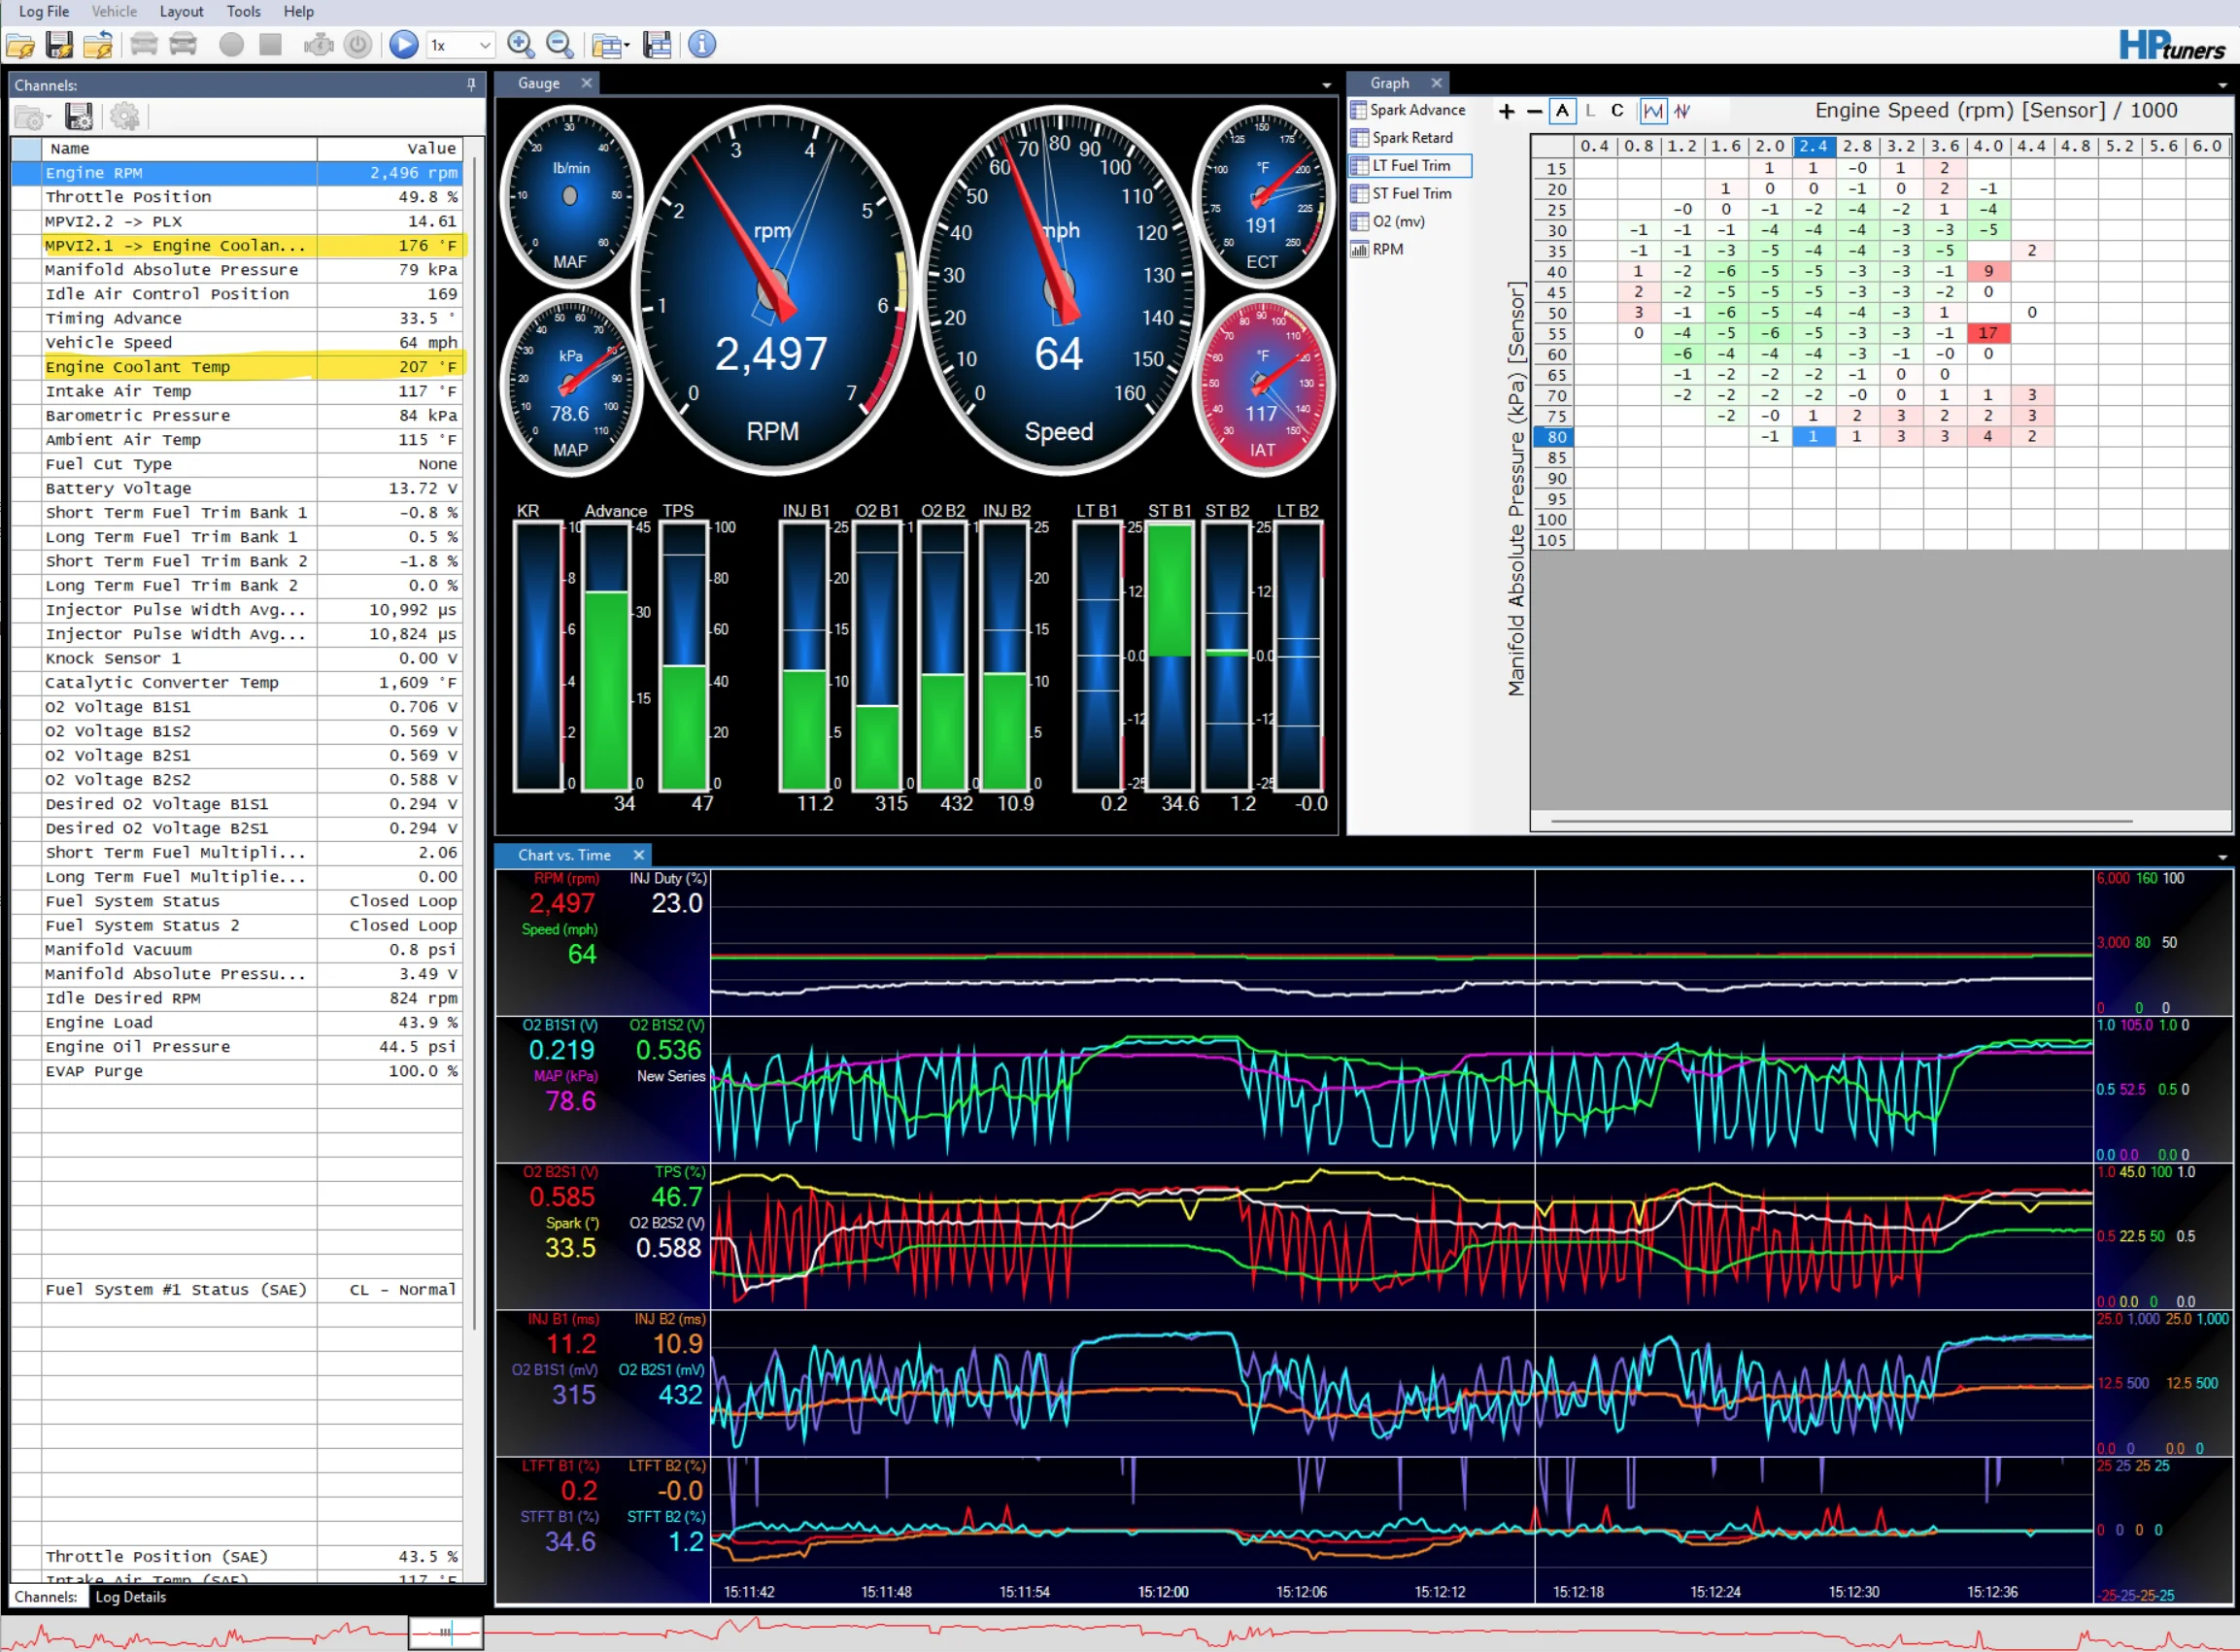
Top of a big climb up I-70 at 65mph in 4th gear. 5min of continuous load like this. Fan sounded like it was at max here when I exited a moment later and should have been per my setup. Not loud with my sound deadening, but I could faintly hear it as I came to a stop.
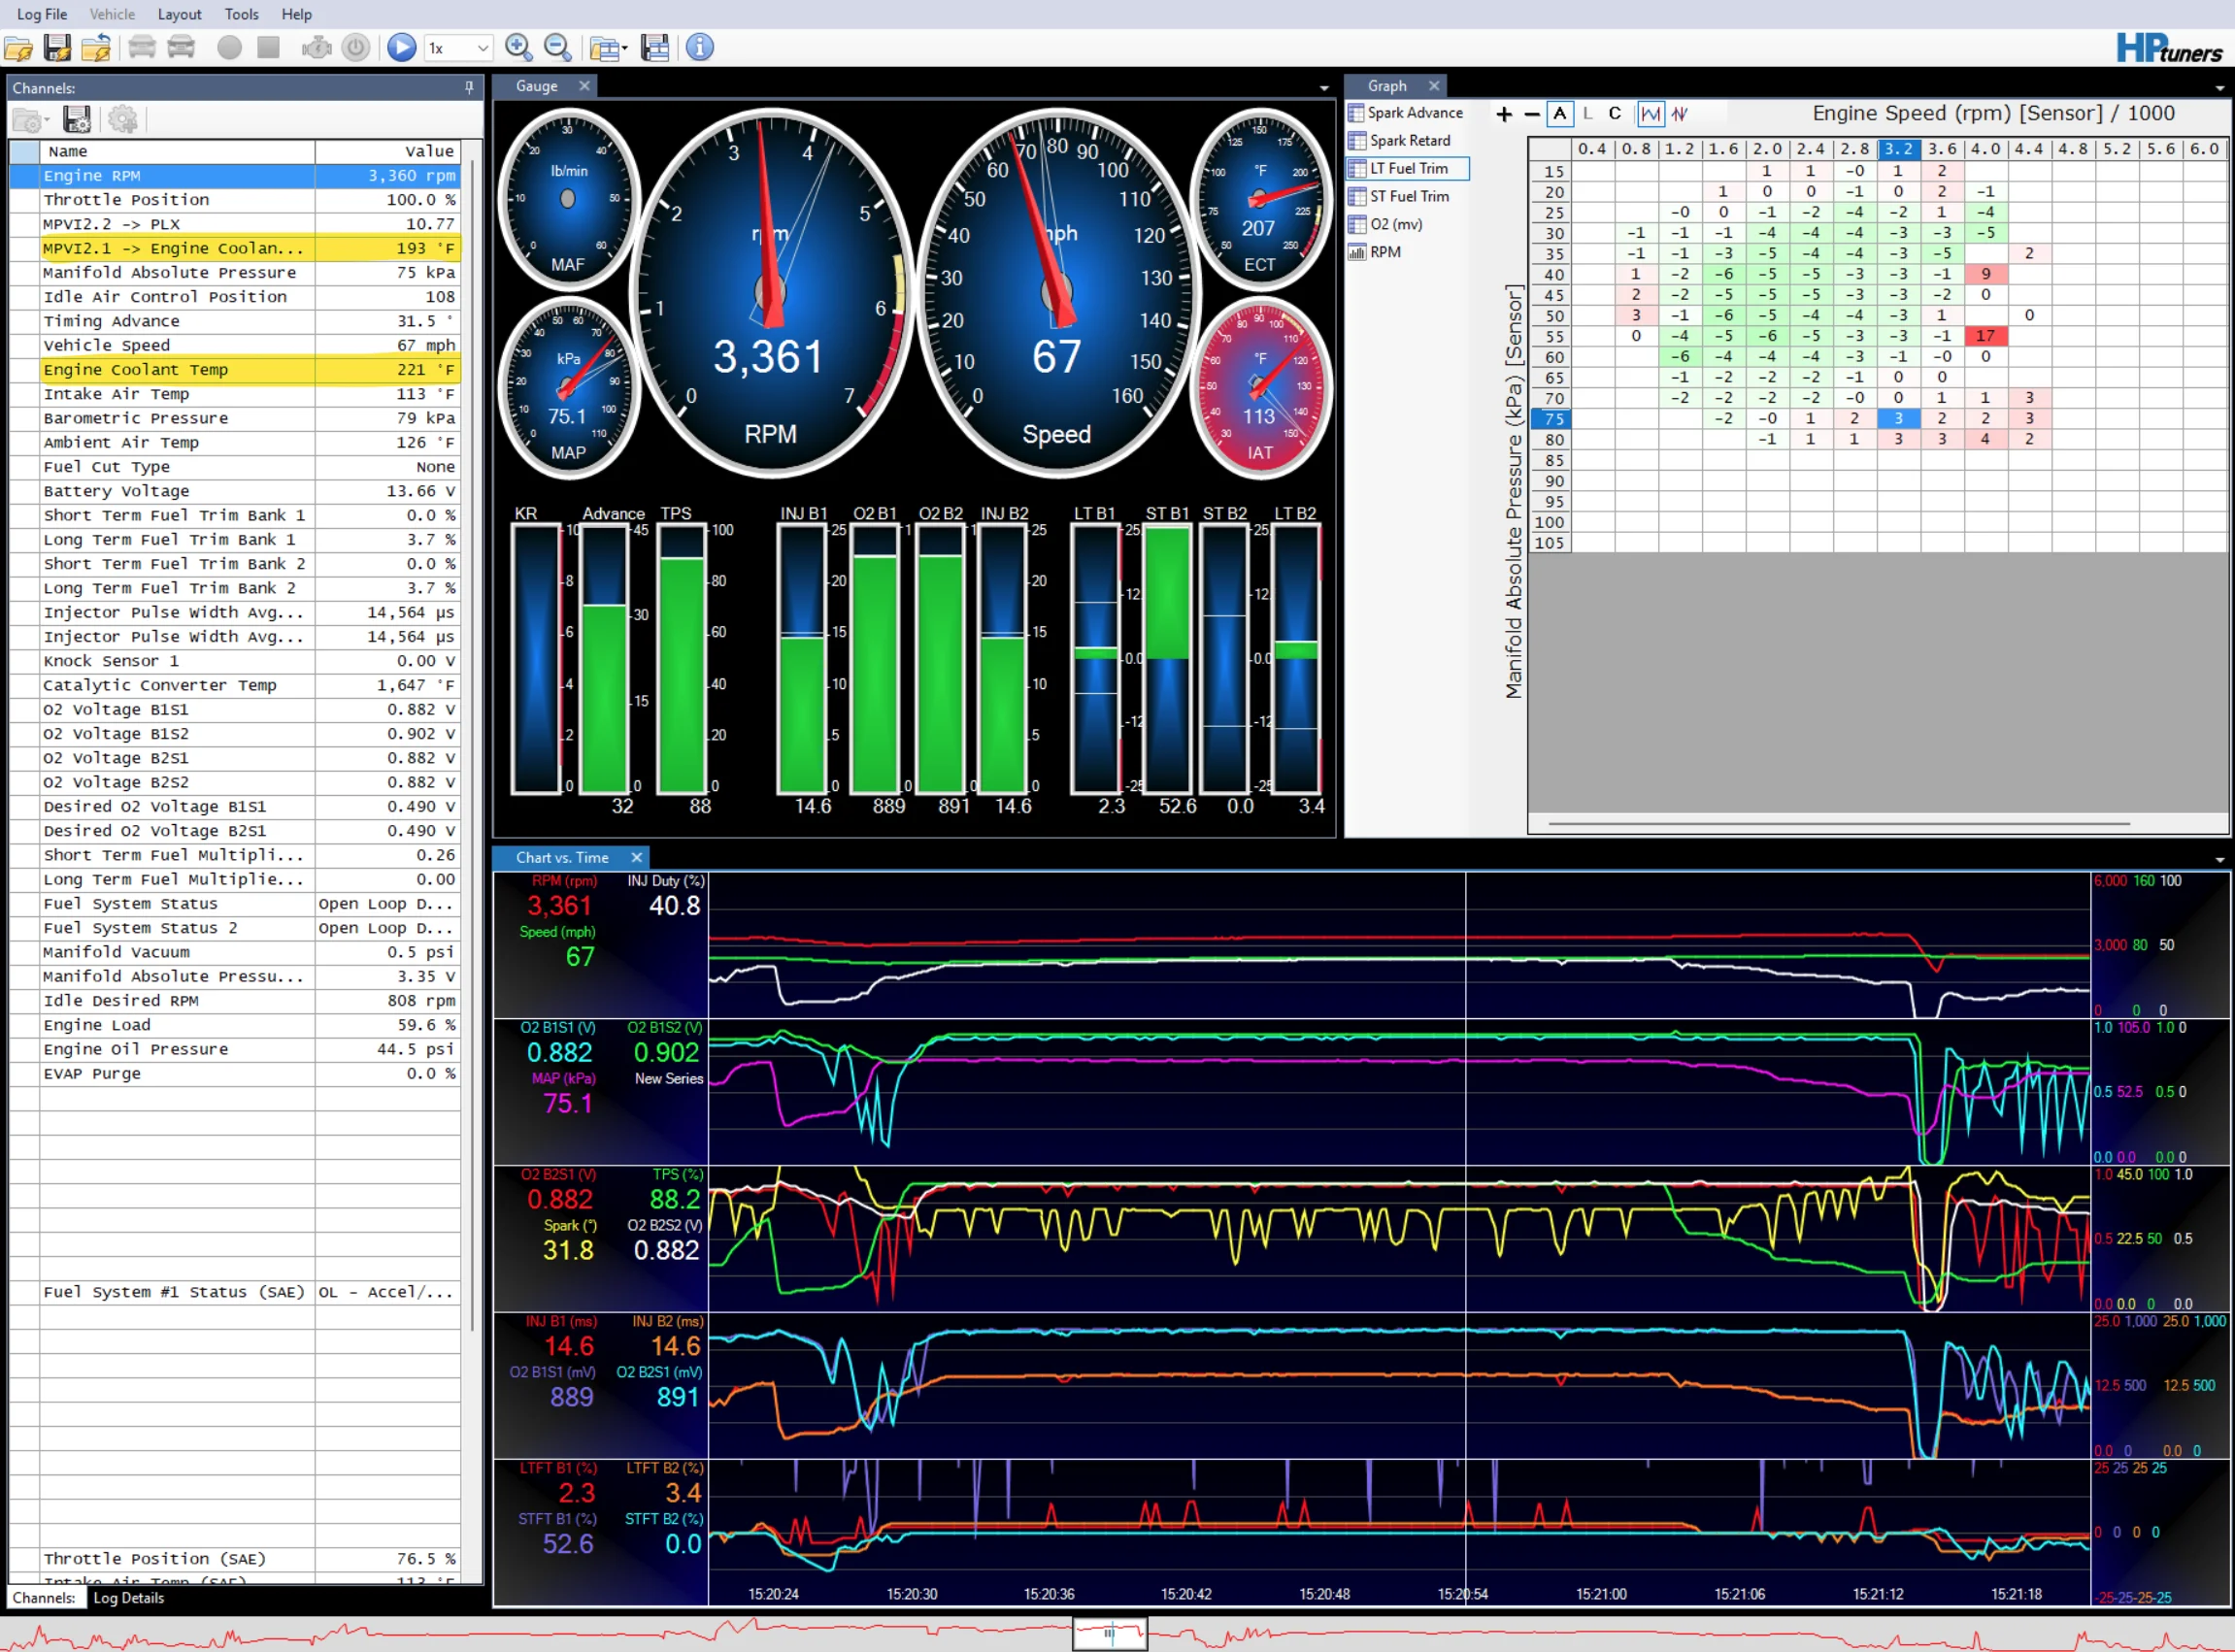
Turned around and headed back downhill, just 2 minutes later. Top ECT already down 14 degrees. By the bottom of the hill, the radiator outlet temp had dropped to 153F for a bit before coming back up to 168F. IAT climbs as the throttle is less open.
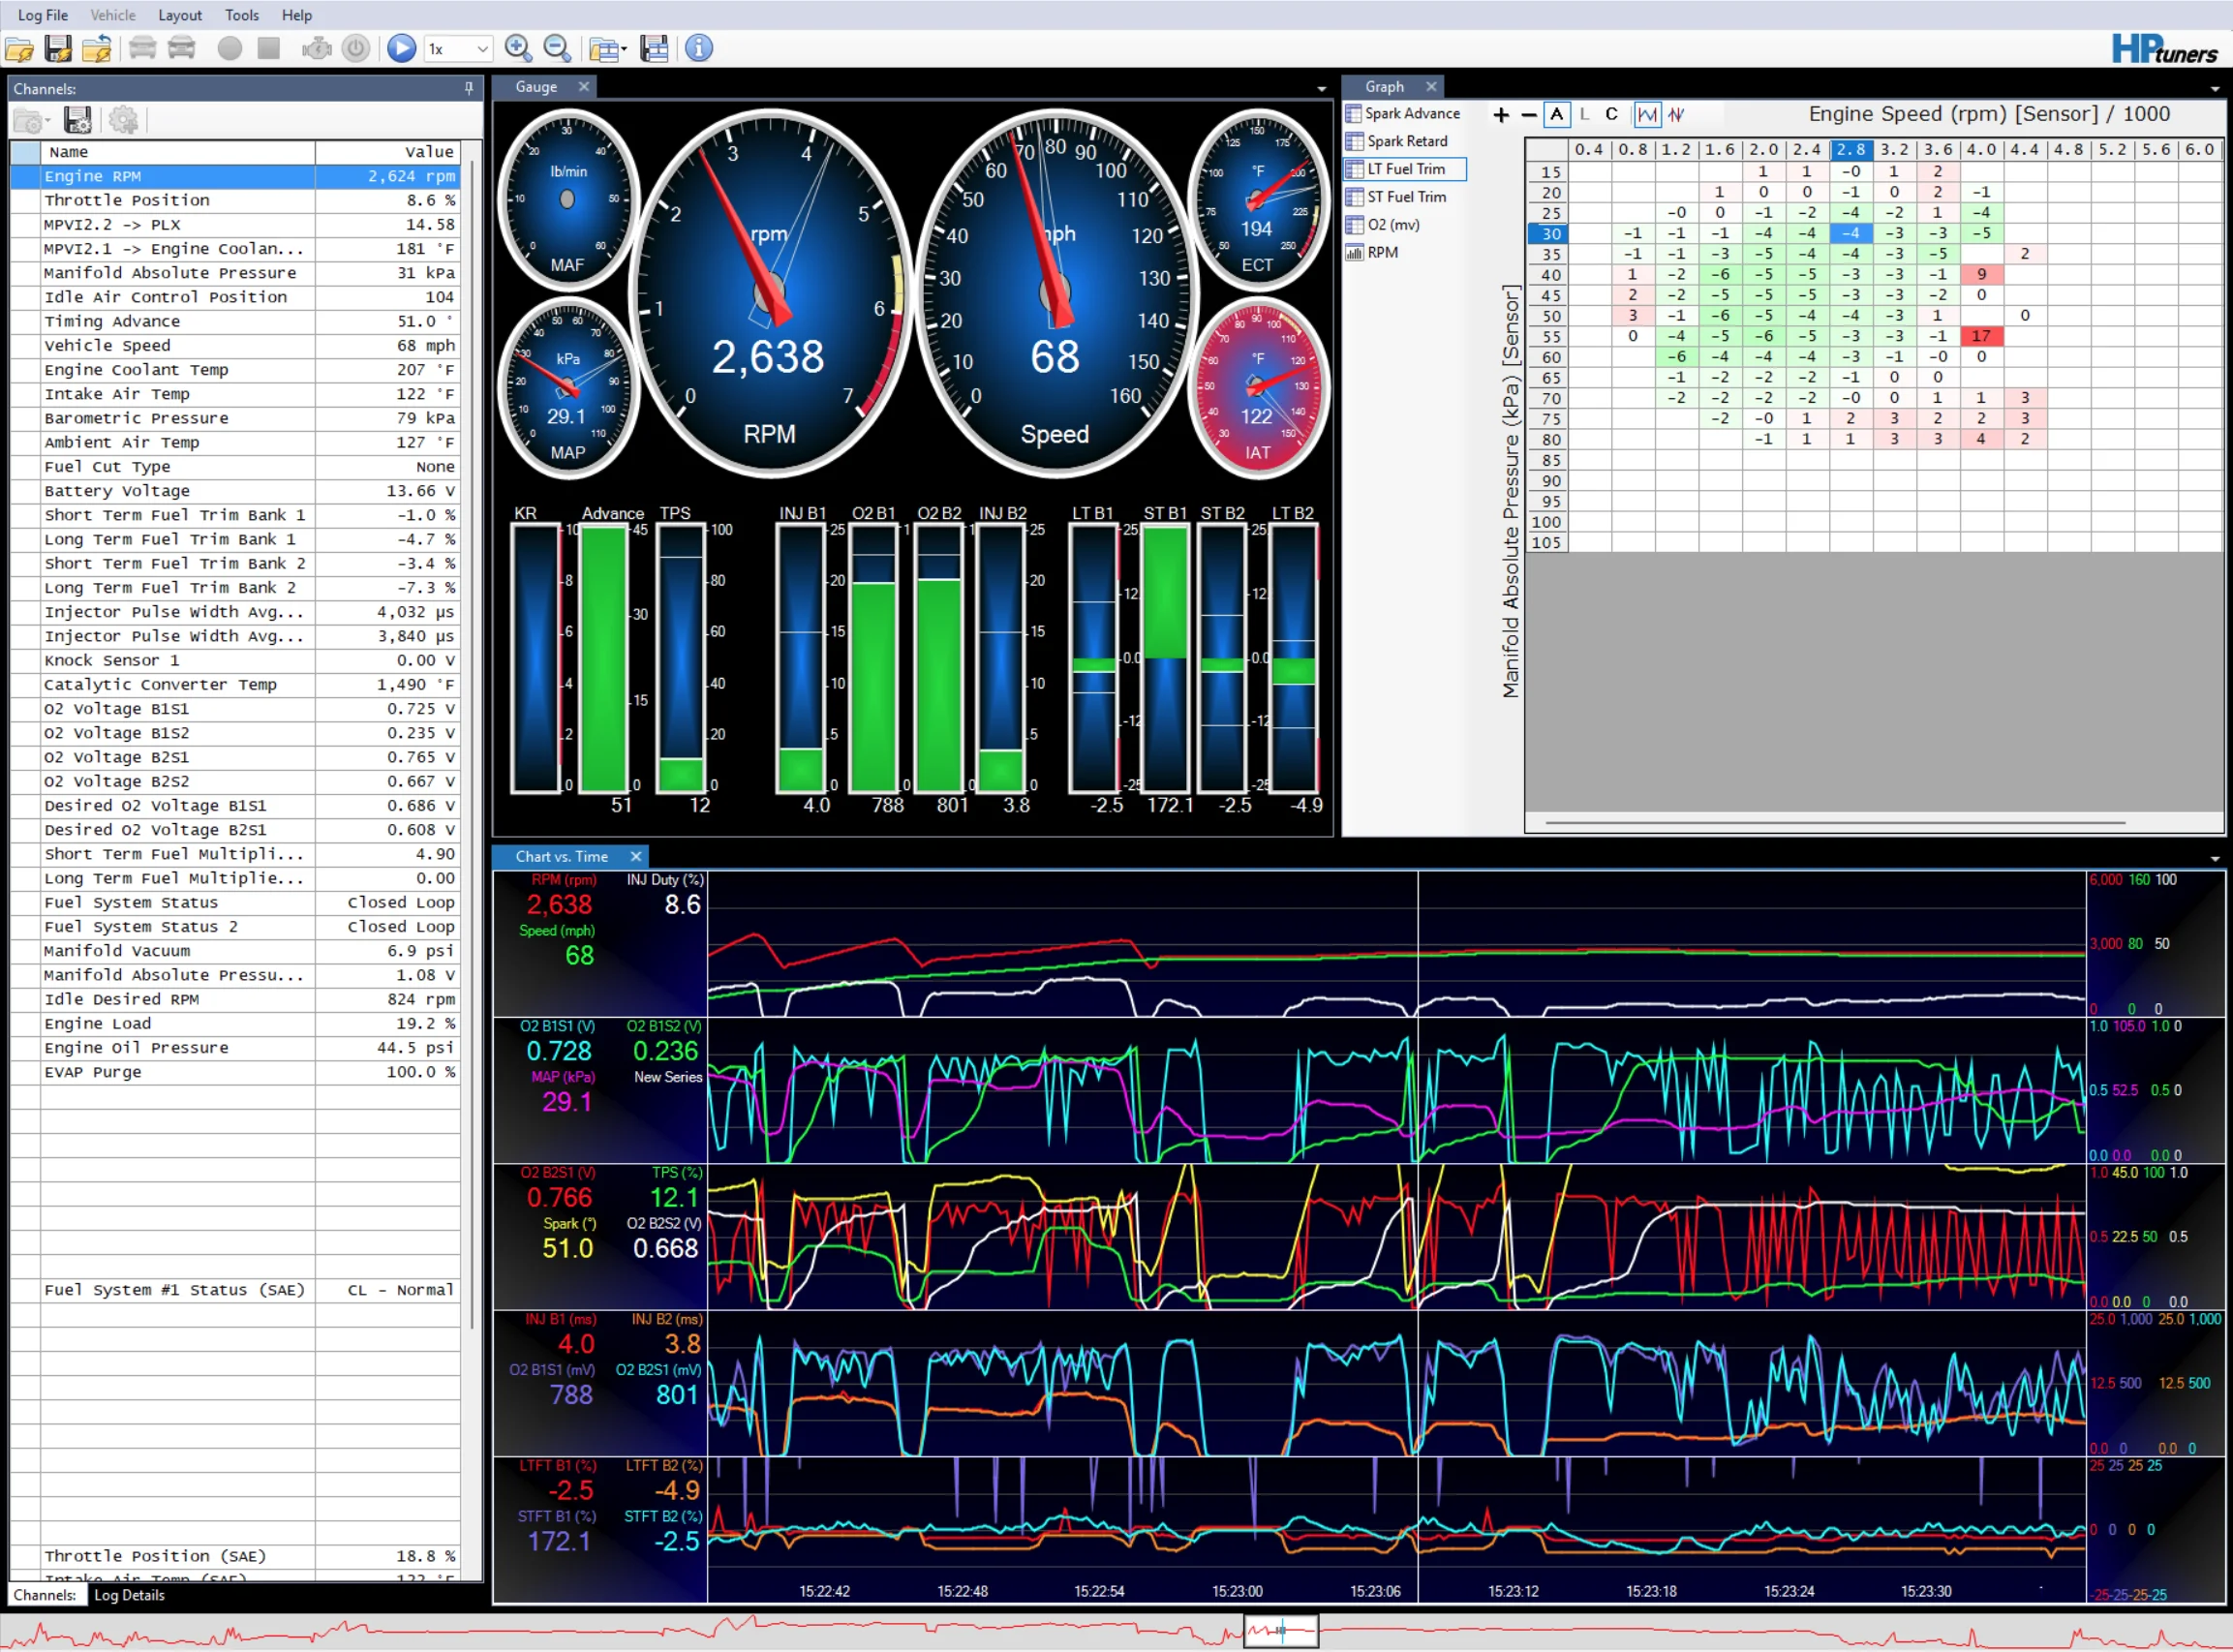
If you're looking at the AFR and LTFT - I know. I'd been playing with some part throttle power enrichment settings to understand what would kick it into open loop in part throttle conditions. I still need to dial in some conditions for the larger 24lb injectors I'm running currently in other settings.
I'll try to grab some low speed data soon after doing some updates to the PCM. At low speeds I never see the ECT move past 201-203F.
I'm running 9.5:1 compression with an Edlebrock head and still at 4.0L displacement with larger than stock for 04 - 24lb Mustang 5.0 injectors which will be remapped when I put int the stroker assembly.
Vehicle is warmed up with outside temp 86F at the start, and 83F at the turn around. Highlighted the outlet coolant temp (176F) and Jeep's ECT (207F).
Top of a big climb up I-70 at 65mph in 4th gear. 5min of continuous load like this. Fan sounded like it was at max here when I exited a moment later and should have been per my setup. Not loud with my sound deadening, but I could faintly hear it as I came to a stop.
Turned around and headed back downhill, just 2 minutes later. Top ECT already down 14 degrees. By the bottom of the hill, the radiator outlet temp had dropped to 153F for a bit before coming back up to 168F. IAT climbs as the throttle is less open.
If you're looking at the AFR and LTFT - I know. I'd been playing with some part throttle power enrichment settings to understand what would kick it into open loop in part throttle conditions. I still need to dial in some conditions for the larger 24lb injectors I'm running currently in other settings.
I'll try to grab some low speed data soon after doing some updates to the PCM. At low speeds I never see the ECT move past 201-203F.
Last edited:
Jcrubicon
Member
Figured I’d throw my setup into the mix. I’m running a 18in delta pag brushless setup rated for 4200cfm and 1000watts shroud is custom out of 1/8in aluminum there controller does pwm modulation for 8 different fan speed. You can set a low speed on, high speed on and off temp. Fan ramps up as temps climb by itself. It also features an auxiliary input that is ment to be wired to your high side ac pressure switch but it must be a trinary switch not the factory one I used a Four Seasons 36581 it is a direct fit with the correct pressures and only need a ground input to activate the controller, mine is just connected to my intake manifold on the fuel rail. It also has a soft start and only pulls about 25-30amps at full tilt so far so good with it but I’ve only had it together for a few weeks. One thing I’d like to point out is even though the motor is rated for 1000watts realistically it using basic math it can’t actually pull more than 364 watts at 14 v at its rated 26amps. It’s highly efficient though and really moves a lot of air for its size. Also the electronics are mounted on the side of the fan and not in the motor allowing it to be serviceable of the ecm dies you just replace it (140$) the motor is has a 50,000hr life supposedly while ecms are around 10,000. The motor is only 3in diameter and the fan is 2.8 in depth.
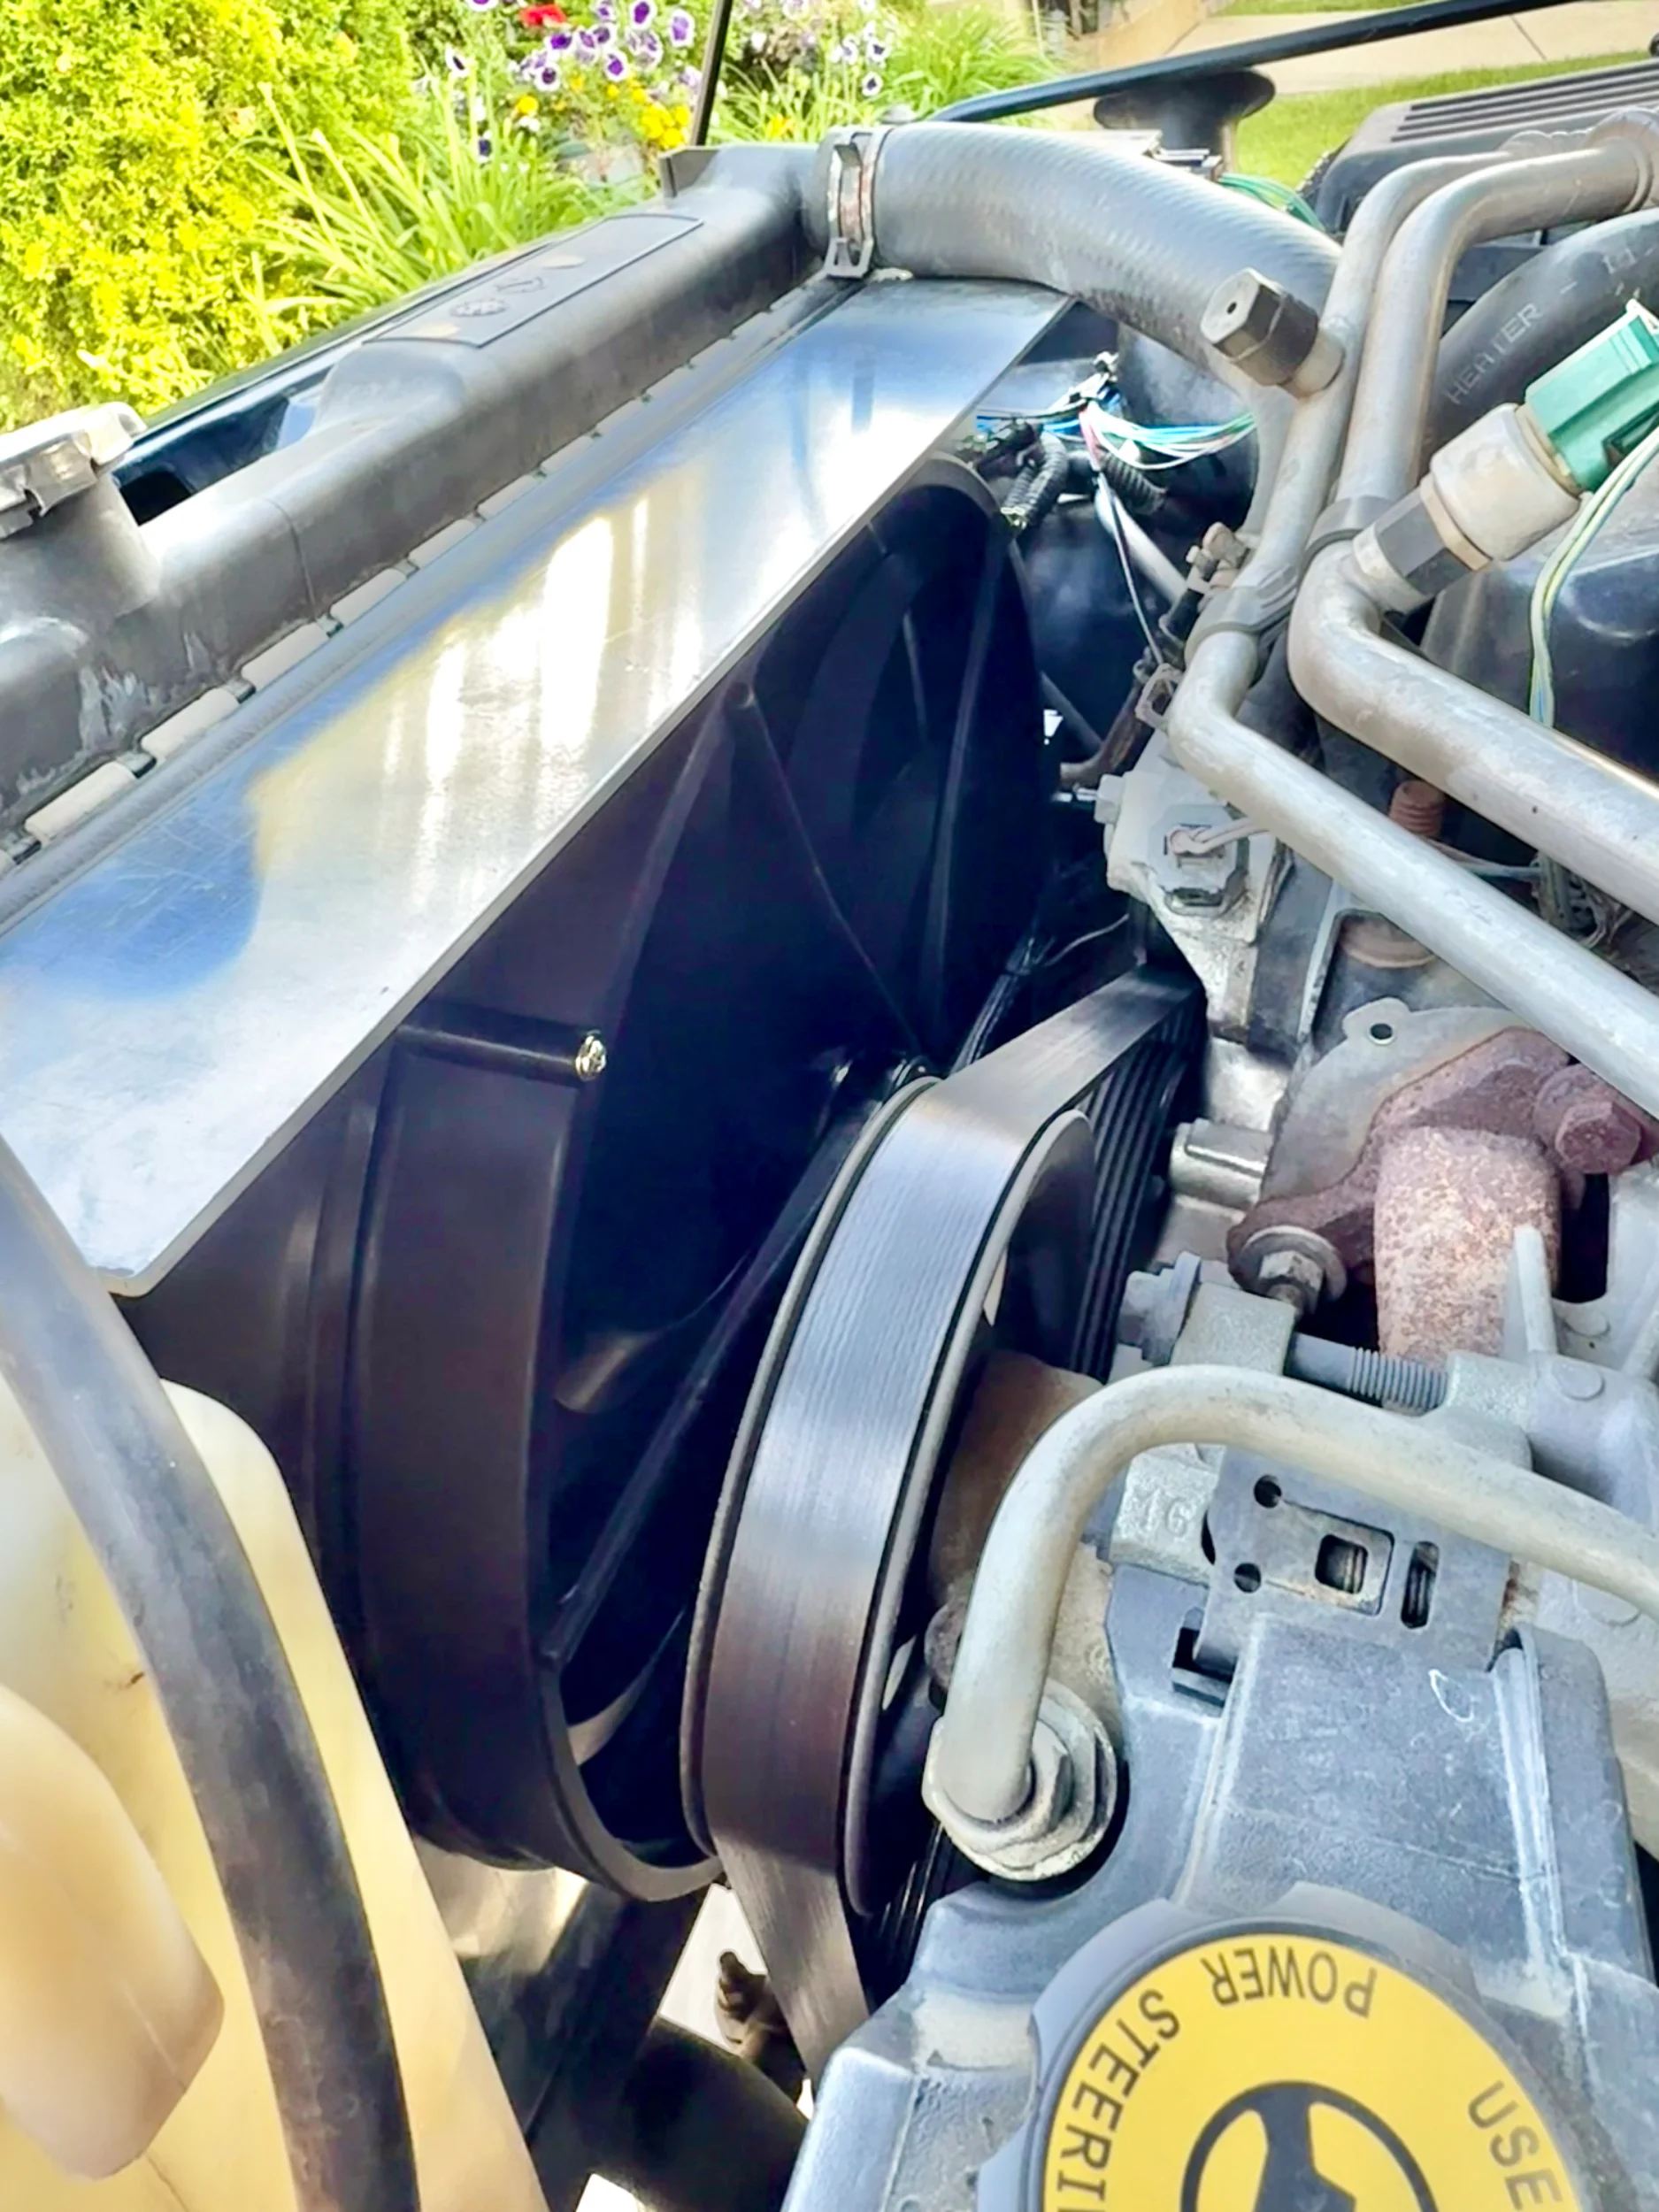
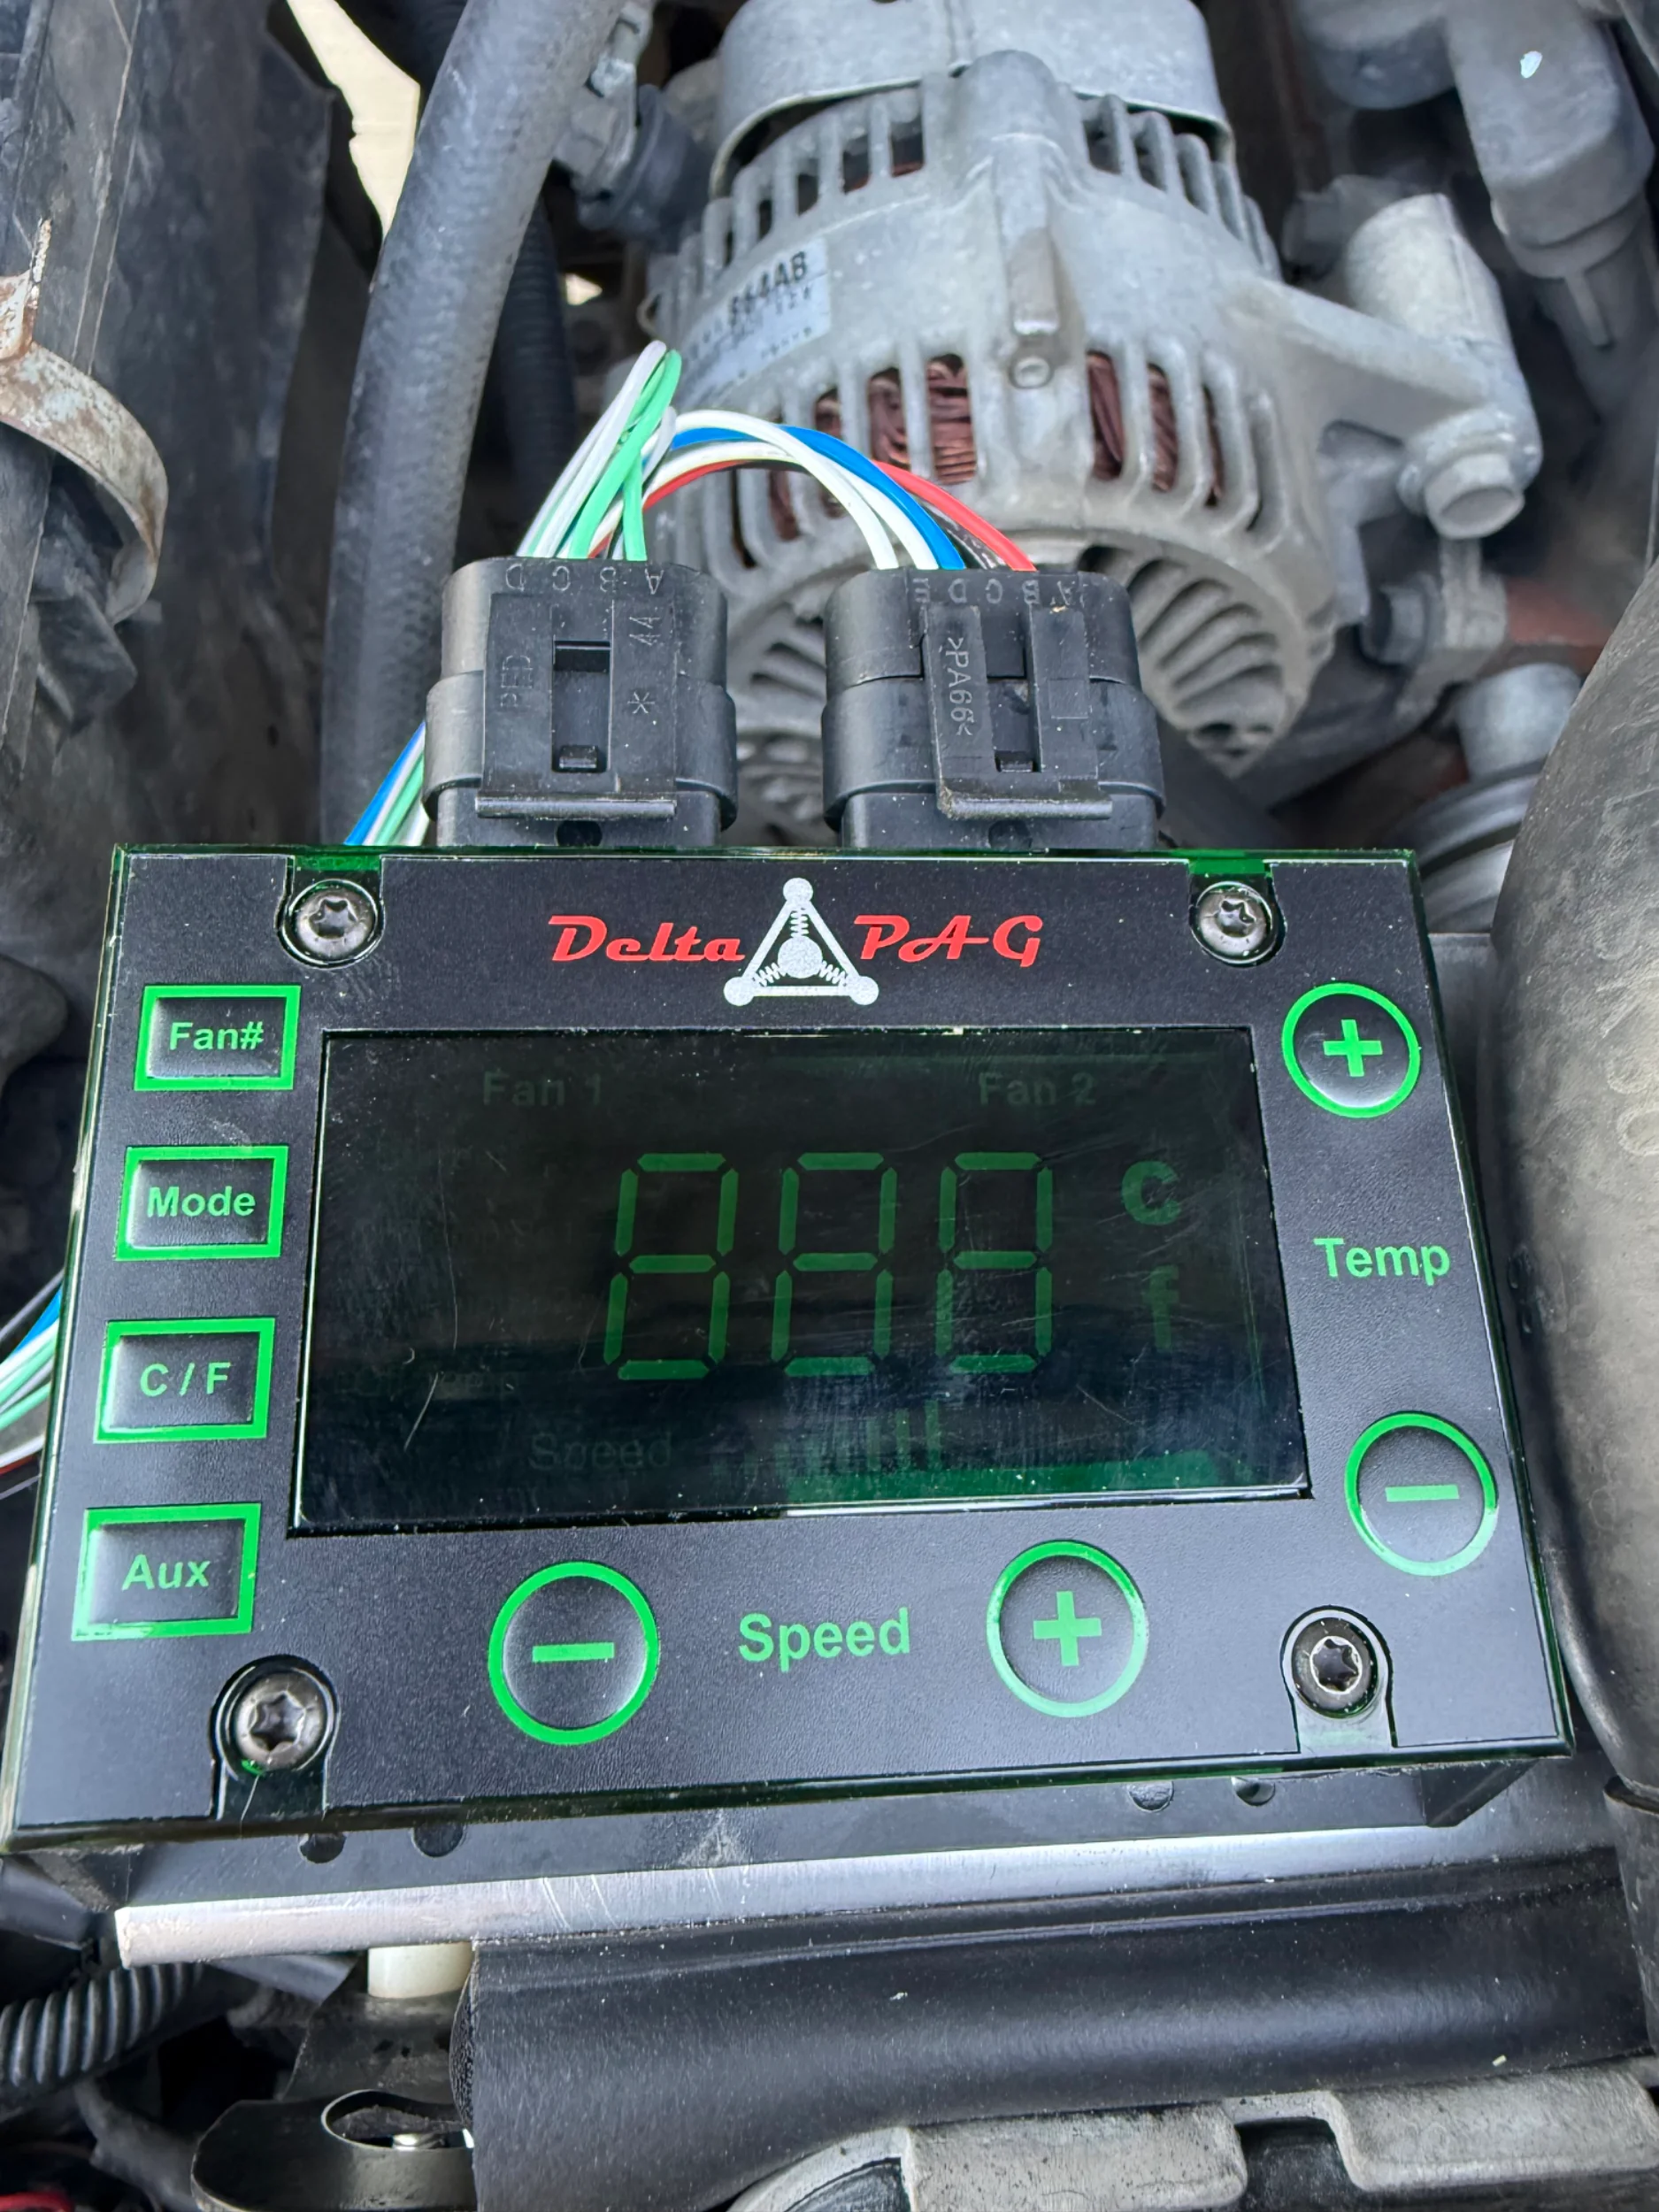
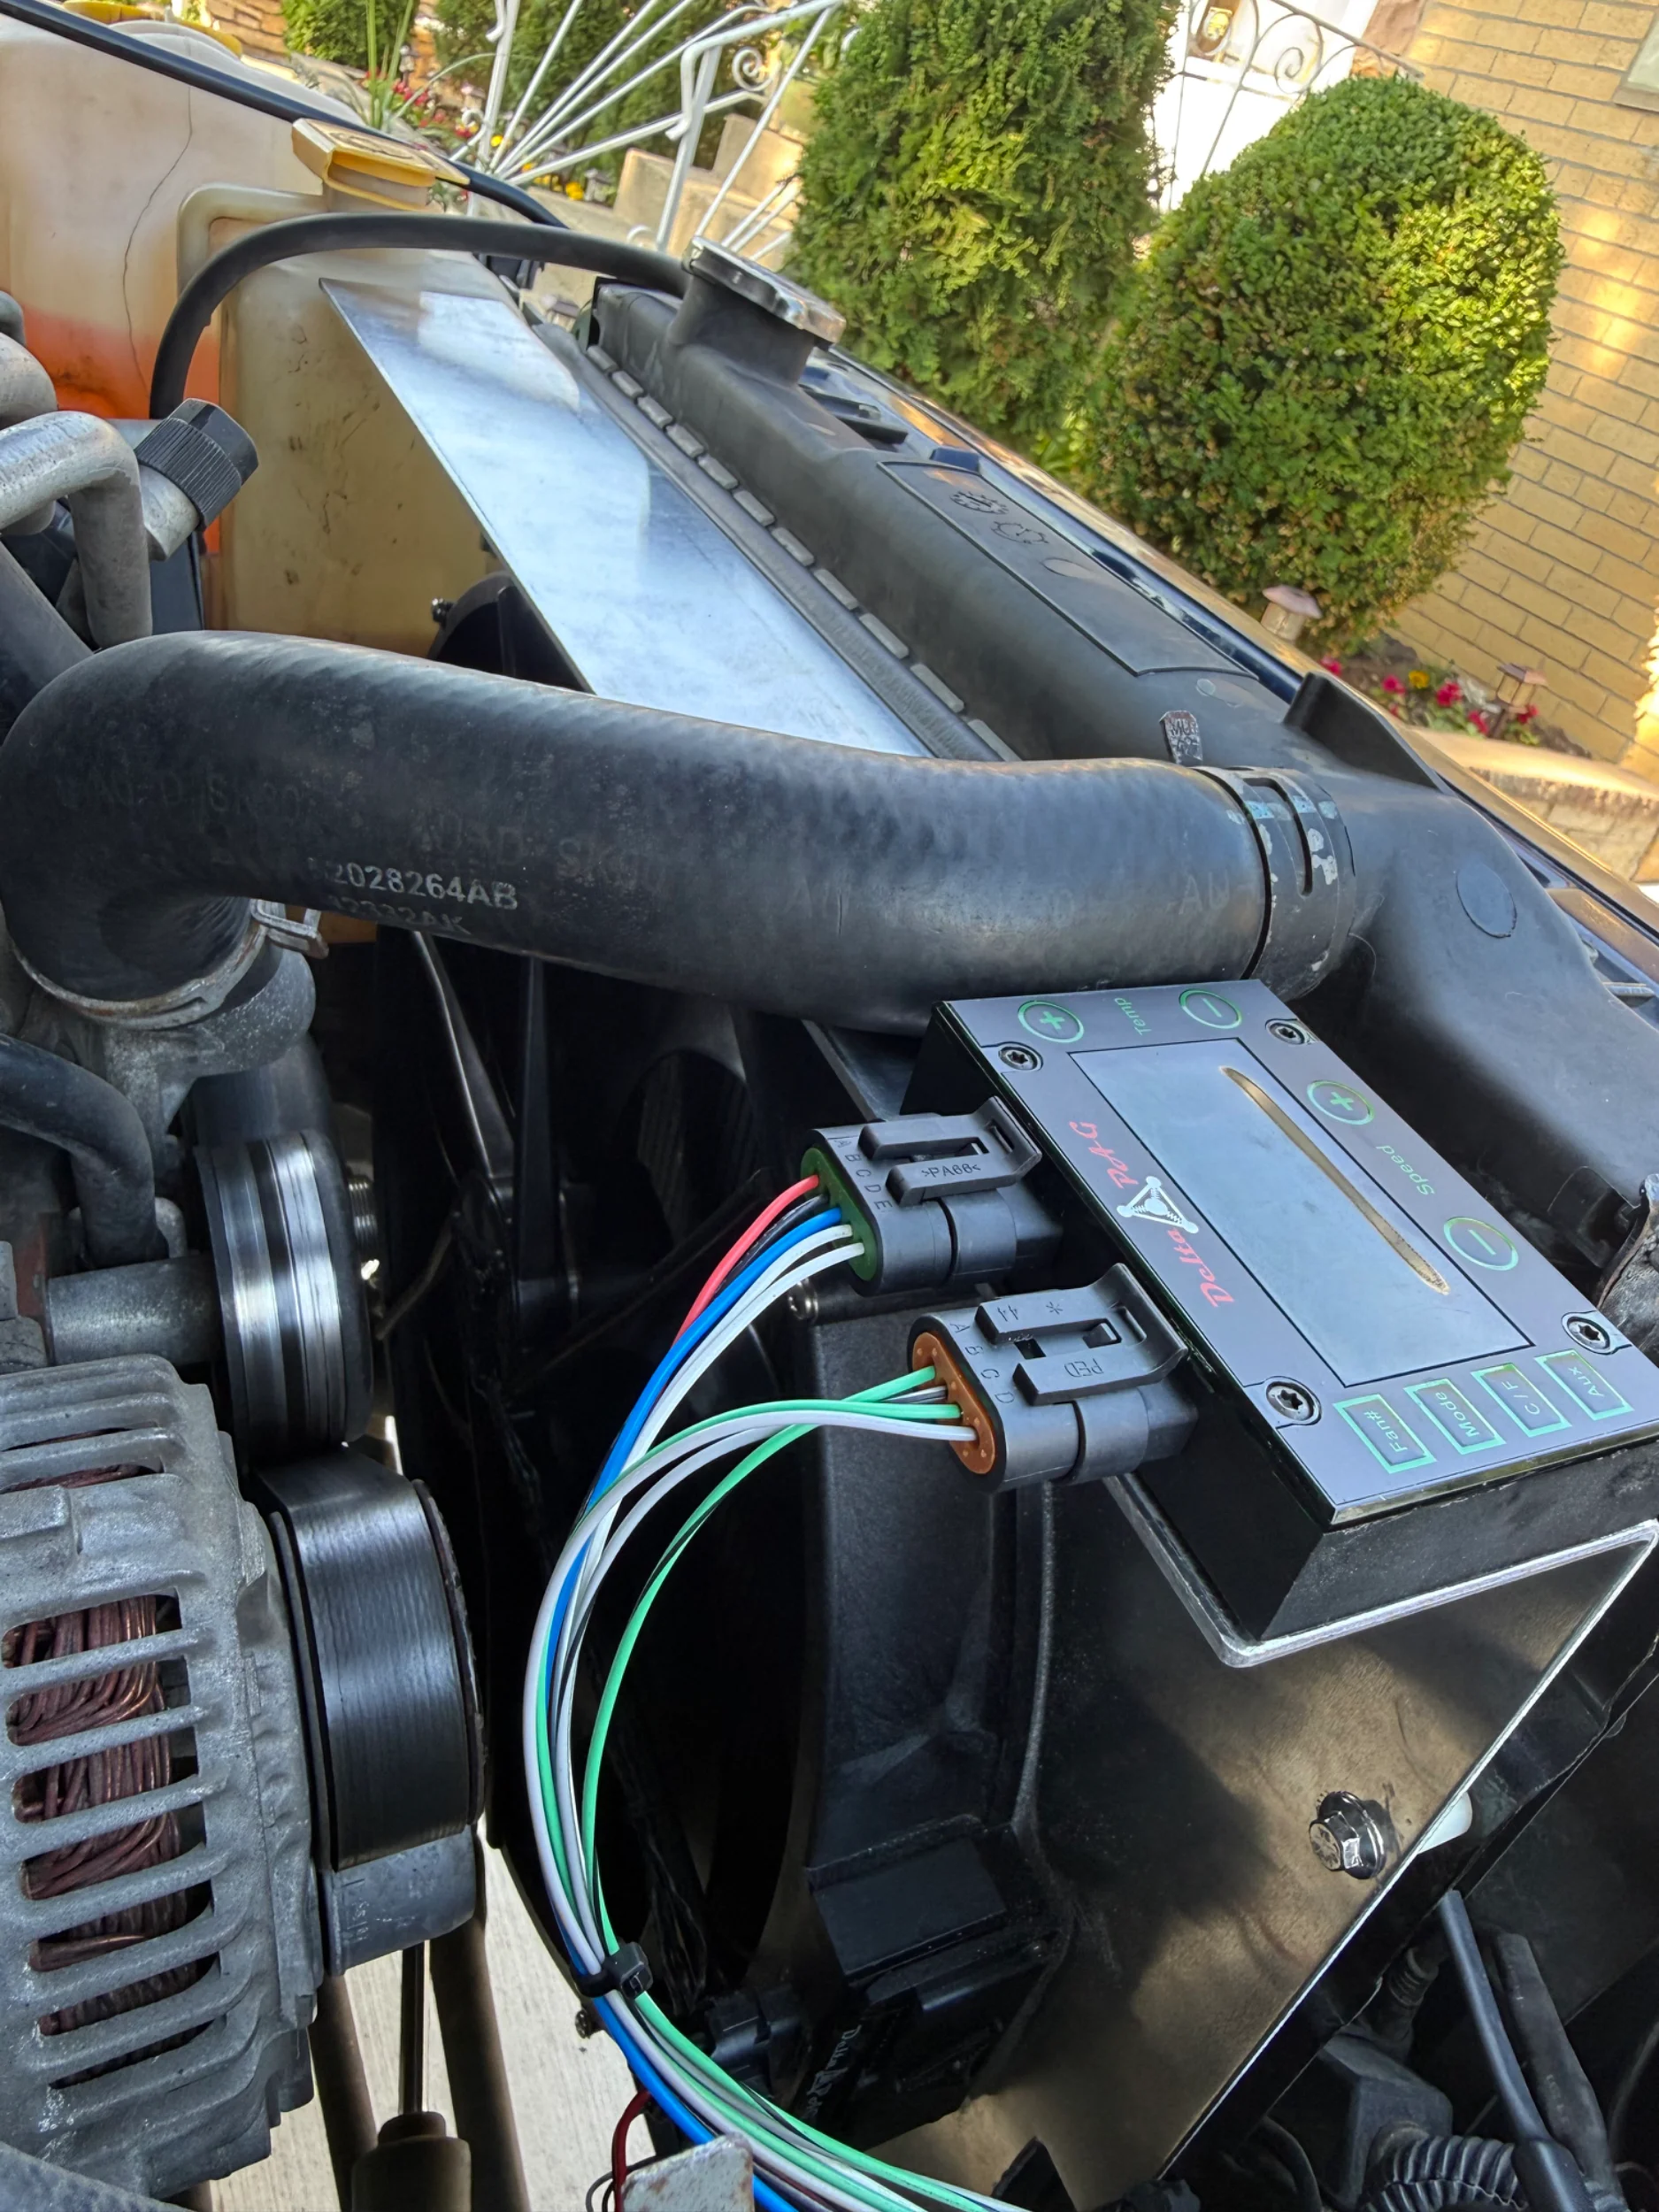
Last edited:
Jcrubicon
Member
Nice mounting setup. Clean
Thanks! Those are older photos I’ve since wire loomed everything and mounted the relay under the controller. I also have 3m taped 1in weather strips on back of the shroud with 3/4in standoff spacers on the mounting bolts to get an effective 1/4in of squish and a full seal. Also I change to silicone hoses and my upper hose is no longer contacting the shroud (I had to shorten the oem hose due to a leak). I also put in a 160amp denso Durango alternator to keep up with the new power draw.
Jcrubicon
Member
After reading through a bit of this thread, I see a lot of issues with fan speed with the AC on one of the cool things with the Delta controller if you can actually select the speed that you want your auxiliary input to be at I have mindset at four bars for 50% once the pressures in the cooling system reach the trinary switch threshold. The fan will turn on to that set speed, I wonder if it’s possible to adapt the delta fan controller to control the small fan. It would add a lot of simplicity to the set up. I’m not sure if if it’s possible considering there was some mention that the spal fan works backwards from other aftermarkets I’m not familiar with how the Delta fan is set up but I would imagine it’s the conventional way of all the rest of aftermarkets. That being said, I find the logic of the Delta controller to be very intuitive with a nice digital read out easy to use interface easily adjustable on the fly. You could always mount it in the cab if you wanted to actively monitor temps that its sensor is providing you can either do a push and probe sensor in the radiator or a 3/8 NPT coolant sensor. I opted for the push in probe because it gives me a second data point of whether or not my thermostat is open and coolant is flowing. The other nice thing about having the sensor in the radiator is even if I set my coolant temp too low for the turn off eventually, the fan will cool the radiator enough and shut off because the thermostat is closed and it isn’t actively flowing into the sensor, although that’s more of a improper setup issue.
Jcrubicon
Member
@GoldenGorilla do you have any cfm measurements at the front of the condenser/grill with the 850w spal running full tilt? Id like to see the difference in flow between that and my delta fan through the cores. Also what radiator are you using?
Little update on the performance of the cooling in a different area. Again like @Steel City 06 mine wasn't installed in a vacuum. But over the weekend I ran a tank home through the mountains 266 miles and hit 18.9 mpg! This included 20 miles of 4 Hi on Cumberland pass and crossing 3 more mountain passes on the way home. Ran the 33" tires at 16psi on the trail, 35 psi on the highway and I'm on 4.56 gears and the 5 speed. Again, not in a vacuum. Head, higher compression, headers, tuned, refined tune for fuel injectors to stay out of power enrichment on part throttle as much as possible, dialed in WOT power enrichment. Performance was great. Cruised up Monarch Pass eastbound mostly in 4th gear and was able to easily run faster than 50 mph.
I mentioned a while back that I hit 16mpg on my way to the Maze district heavily loaded down. I've been fighting to get the header-precat connection to stay sealed. These small leaks were causing the fuel to read lean on the upstream sensor and run rich. I'd get more in the 14-15mpg range. Finally temporarily got that fully sealed. I'm going to have them switched over to v-band clamps with a flex section for a very permanent solution sometime this fall. But it's a reminder of how much an exhaust leak can cast you in wasted fuel and efficiency.
I don't and don't see anything concrete. My only anemometer is bolted to my roof. I believe SPAL states 4200CFM. But they're Italian, so it might be like Italian ponies, rather than German horses. Ya know.
I'm running a MOPAR rad. One of the last of the NOS.
I mentioned a while back that I hit 16mpg on my way to the Maze district heavily loaded down. I've been fighting to get the header-precat connection to stay sealed. These small leaks were causing the fuel to read lean on the upstream sensor and run rich. I'd get more in the 14-15mpg range. Finally temporarily got that fully sealed. I'm going to have them switched over to v-band clamps with a flex section for a very permanent solution sometime this fall. But it's a reminder of how much an exhaust leak can cast you in wasted fuel and efficiency.
@GoldenGorilla do you have any cfm measurements at the front of the condenser/grill with the 850w spal running full tilt? Id like to see the difference in flow between that and my delta fan through the cores. Also what radiator are you using?
I don't and don't see anything concrete. My only anemometer is bolted to my roof. I believe SPAL states 4200CFM. But they're Italian, so it might be like Italian ponies, rather than German horses. Ya know.
I'm running a MOPAR rad. One of the last of the NOS.
Last edited:
Installed CFM will be way less than the actual free-air CFM advertised by the fan manufacturers.
Really for a good comparison, we'd need to know the air watts.
Peak efficiency for the SPAL fan is around 40% per the literature and that is when the fan is power-limited to about 800 or so watts. So 320 air watts is a reasonable estimate.
Assuming the Delta PAG is the 18" fan I'm thinking of, it pulls about 364 watts. Assuming the same 40% efficiency (which might be generous), you'd be around 146 air watts.
Really for a good comparison, we'd need to know the air watts.
Peak efficiency for the SPAL fan is around 40% per the literature and that is when the fan is power-limited to about 800 or so watts. So 320 air watts is a reasonable estimate.
Assuming the Delta PAG is the 18" fan I'm thinking of, it pulls about 364 watts. Assuming the same 40% efficiency (which might be generous), you'd be around 146 air watts.
Finally finished my camaro fan install
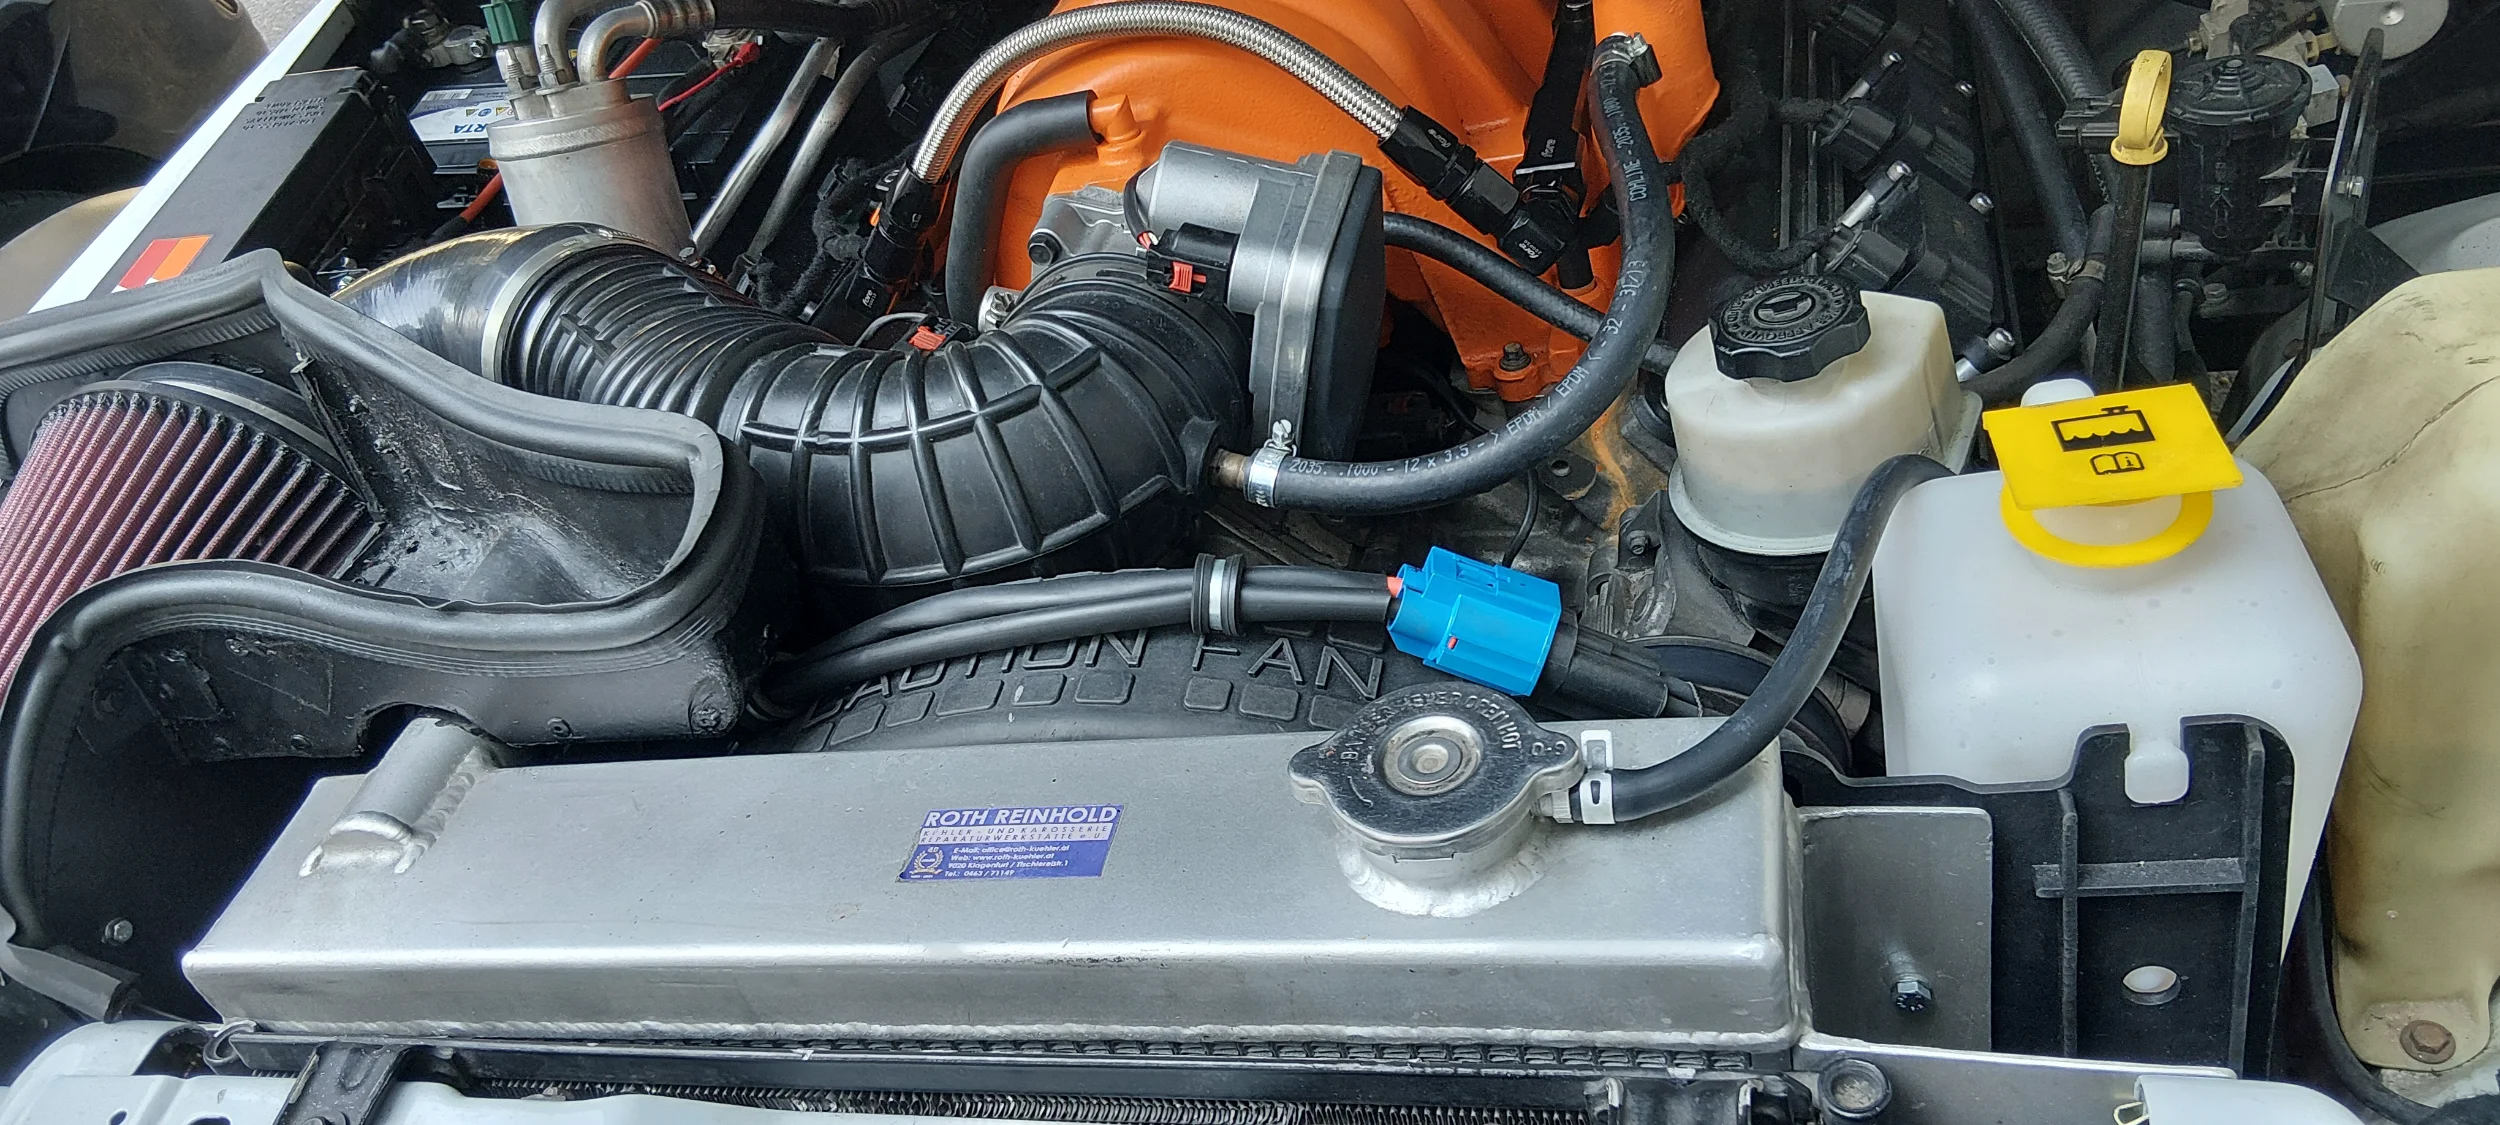
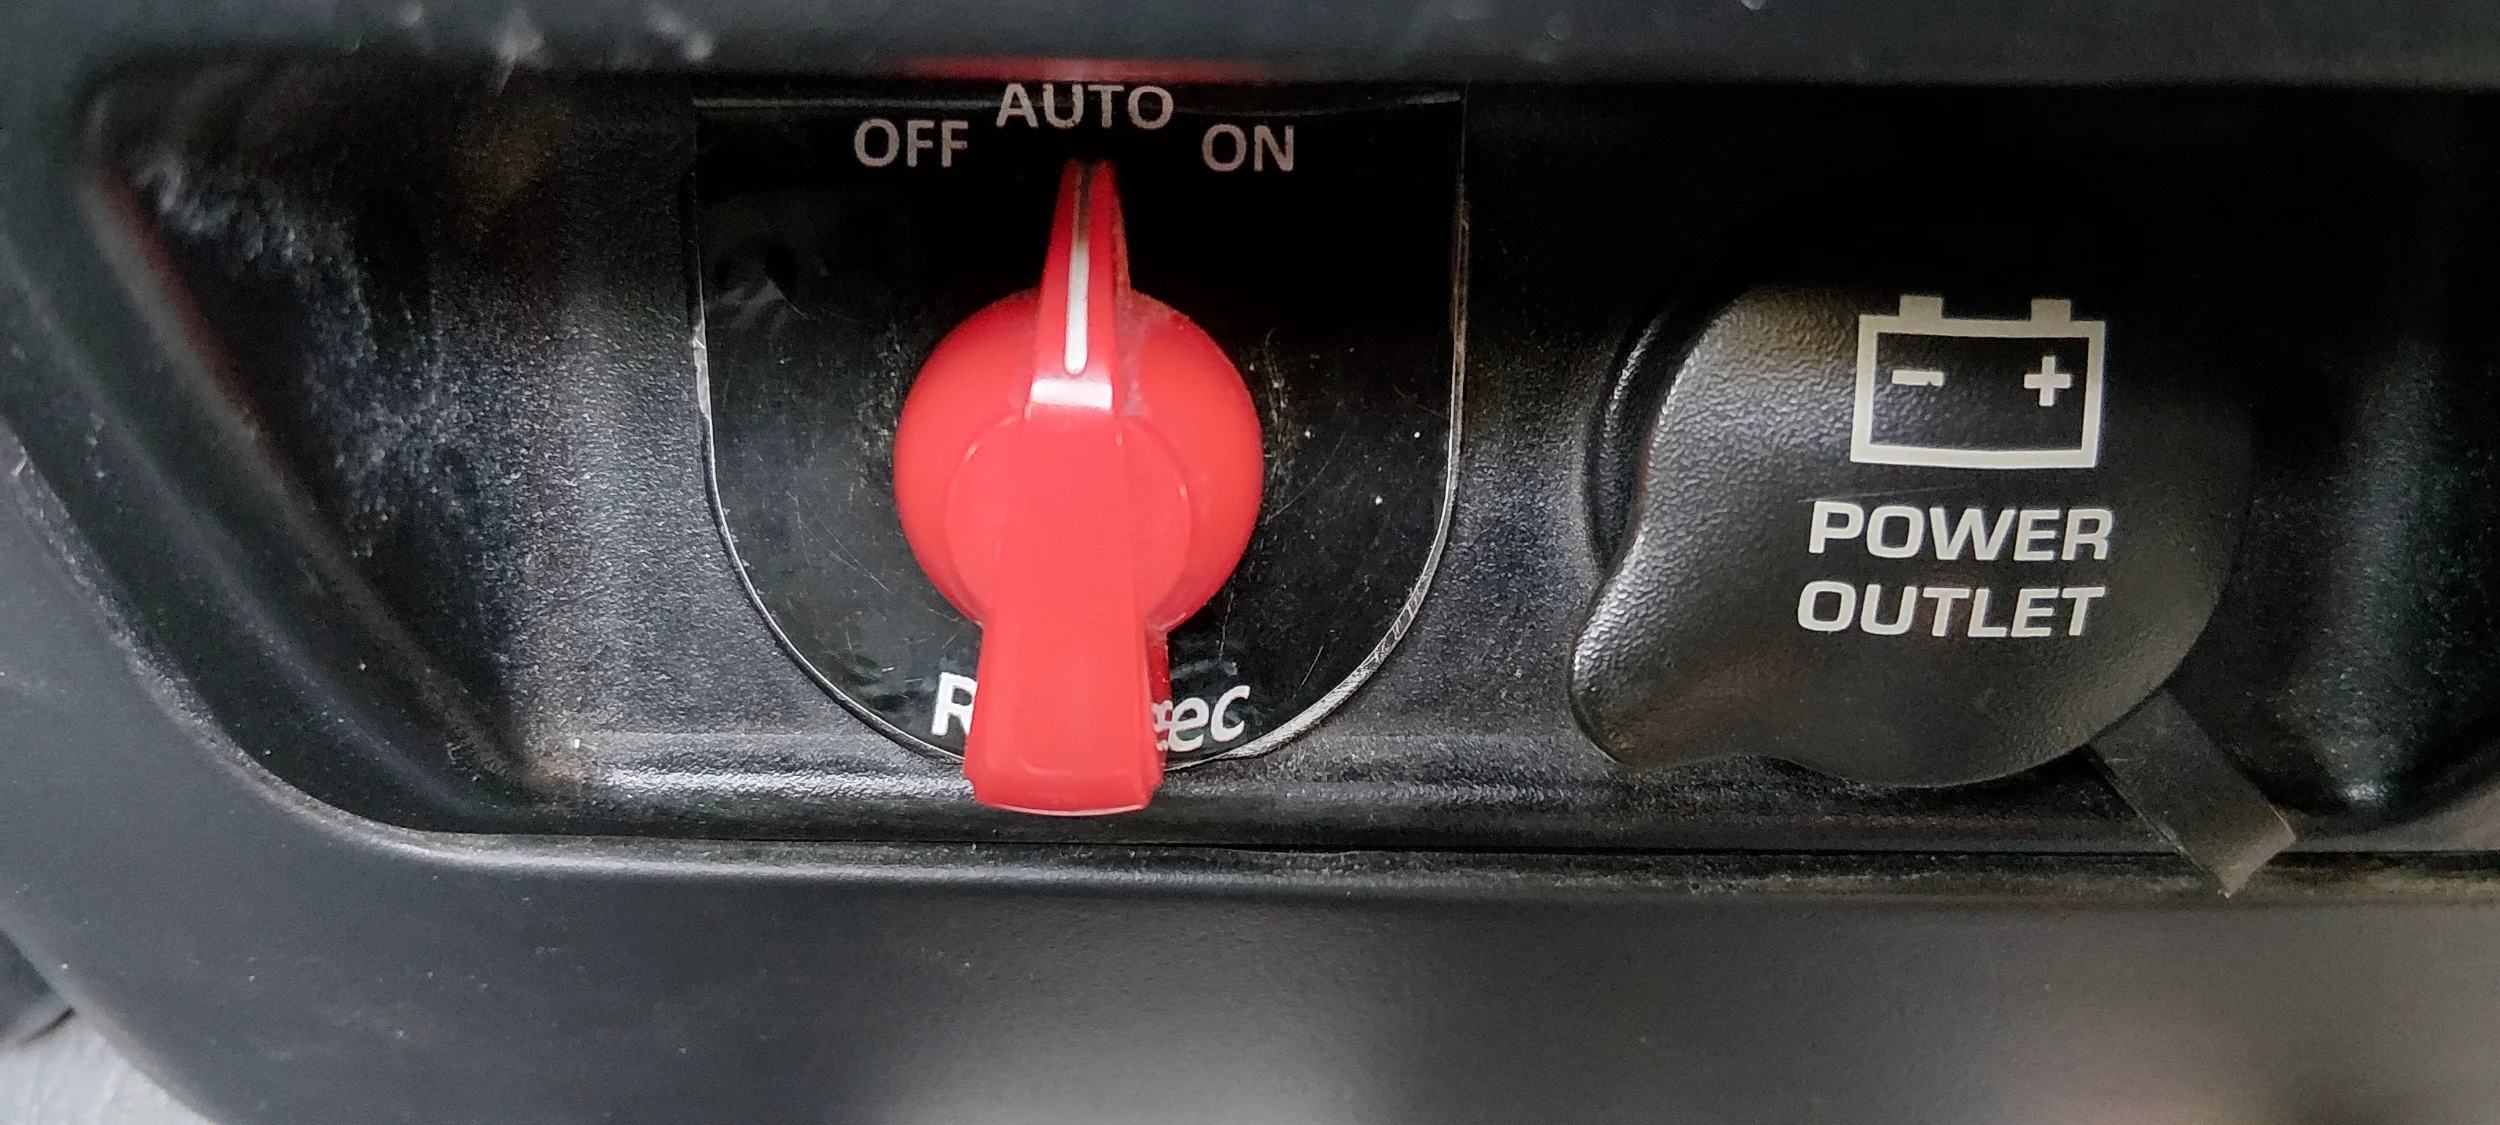
I used a revotec switch to set the fan to 'off', 'auto' or 'on' On provides a 12V signal to the lingenfelter override input, and the fan will run max speed. Auto, the fan will be driven by the lingenfelter, off the fan won't activate
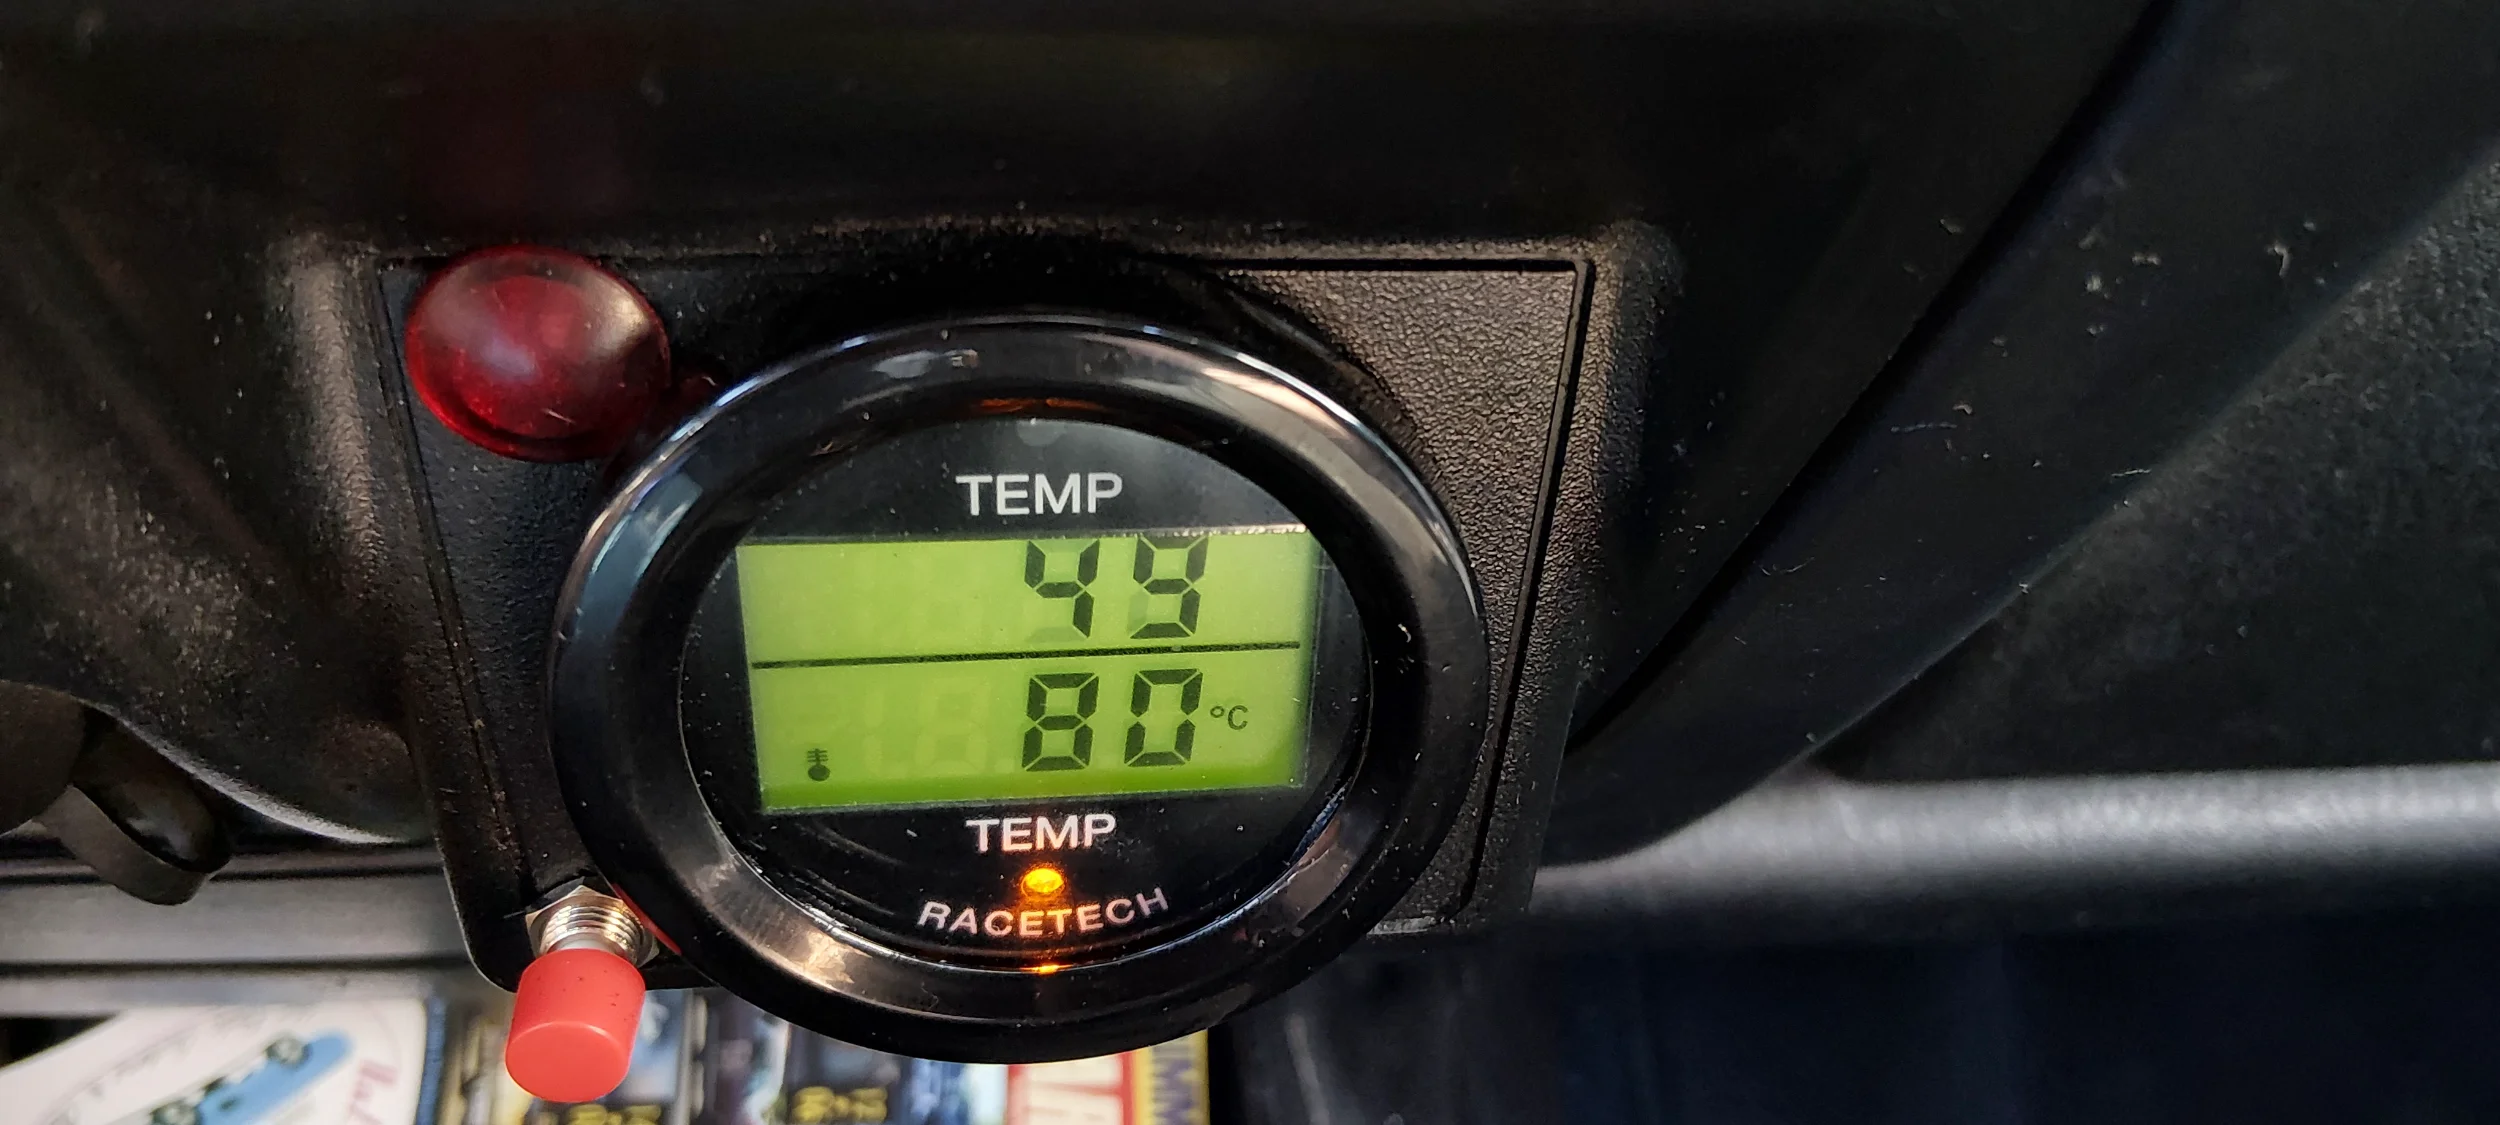
The Racetch Dual temp gauge shows radiator outlet temperature on the bottom (in this case Celsius not Fahrenheit). The sensor for the racetech gauge is next to sensor driving the Lingenfelter. The top gauge is set so that it shows fan speed in percentage. It is fed by the lingenfelter Analog Out Signal - set to fan speed. I used a widget man UVM and set the top gauge on the racetech so that 0v on the Analog output shows 0 on the gauge and 5V output shows 100.
In the following picture radiator outlet temperature is at 80C celsius (176 Fahrenheit) and Fan is running at 49%
I have routed the sensor cable from the lingenfelter over a relay. when A/C is on the sensor signal is routed over a resistor of 300 Ohm which will result in 36% Fan Speed. When radiator outlet temperature rises above 77C celsius (170 F), the sensor circuit will switch back to the temperature sensor and fan speed will be driven by the Lingenfelter. Once radiator outlet temperature falls below 77C celcius, it will go back over the resistor and the fan runs at 36%
When A/C off, the signal will be always routed over the sensor
Set up works well, the fan keeps the HEMI nice and cool even with A/C on with outside temps of 100F.
I used a revotec switch to set the fan to 'off', 'auto' or 'on' On provides a 12V signal to the lingenfelter override input, and the fan will run max speed. Auto, the fan will be driven by the lingenfelter, off the fan won't activate
The Racetch Dual temp gauge shows radiator outlet temperature on the bottom (in this case Celsius not Fahrenheit). The sensor for the racetech gauge is next to sensor driving the Lingenfelter. The top gauge is set so that it shows fan speed in percentage. It is fed by the lingenfelter Analog Out Signal - set to fan speed. I used a widget man UVM and set the top gauge on the racetech so that 0v on the Analog output shows 0 on the gauge and 5V output shows 100.
In the following picture radiator outlet temperature is at 80C celsius (176 Fahrenheit) and Fan is running at 49%
I have routed the sensor cable from the lingenfelter over a relay. when A/C is on the sensor signal is routed over a resistor of 300 Ohm which will result in 36% Fan Speed. When radiator outlet temperature rises above 77C celsius (170 F), the sensor circuit will switch back to the temperature sensor and fan speed will be driven by the Lingenfelter. Once radiator outlet temperature falls below 77C celcius, it will go back over the resistor and the fan runs at 36%
When A/C off, the signal will be always routed over the sensor
Set up works well, the fan keeps the HEMI nice and cool even with A/C on with outside temps of 100F.
Last edited:

Finally finished my camaro fan install
View attachment 703103
I used a revotec switch to set the fan to 'off', 'auto' or 'on' On provides a 12V signal to the lingenfelter override input, and the fan will run max speed. Auto, the fan will be driven by the lingenfelter, off the fan won't activate
View attachment 703097
The Racetch Dual temp gauge shows radiator outlet temperature on the bottom (in this case Celsius not Fahrenheit). The sensor for the racetech gauge is next to sensor driving the Lingenfelter. The top gauge is set so that it shows fan speed in percentage. It is fed by the lingenfelter Analog Out Signal - set to fan speed. I used a widget man UVM and set the top gauge on the racetech so that 0v on the Analog output shows 0 on the gauge and 5V output shows 100.
In the following picture radiator outlet temperature is at 80C celsius (176 Fahrenheit) and Fan is running at 49%
View attachment 703098
I have routed the sensor cable from the lingenfelter over a relay. when A/C is on the sensor signal is routed over a resistor of 300 Ohm which will result in 36% Fan Speed. When radiator outlet temperature rises above 77C celcius, the sensor circuit will switch back to the temperature sensor and fan speed will be driven by the Lingenfelter. Once radiator outlet temperature falls below 77C celcius, it will go back over the resistor and the fan runs at 36%
When A/C off, the signal will be always routed over the sensor
Set up works well, the fan keeps the HEMI nice and cool even with A/C on with outside temps of 100F.
Nice work.
Any challenges with the size of the fan in your setup? Is the shroud stock, or from the camaro setup?
Similar threads

- Replies
- 7
- Views
- 2,466
- Replies
- 19
- Views
- 4,117


- Replies
- 15
- Views
- 10,754

- Replies
- 9
- Views
- 1,410


- Replies
- 8
- Views
- 1,174

