How to add a Sound Ordnance B-8PTD subwoofer and amp under the non-tumble drivers seat

Irun

A vicious cycle of doing, undoing, and re-doing!
Supporting Member
Joined
Oct 31, 2019
Messages
8,061
Location
Virginia
For those who don't have a the luxury of a factory subwoofer, finding a place to put an aftermarket one can be a challenge. If you happen to be someone that has driver's seat with a fixed base (non-tumble), you're in luck. As it turns out, the Sound Ordnance B-8PTD fits perfectly under the no-tumble seat . This is just one way to tackle the installation, but here's what I did to complete the job. The parts used were the following, keeping the cost to just a little over $200:

https://www.crutchfield.com/p_777B8PTD/Sound-Ordnance-B-8PTD.html?omnews=11545295
https://www.crutchfield.com/p_007CK10/Crutchfield-CK10.html?omnews=11545295
https://www.crutchfield.com/p_007CP...RCA-Patch-Cables-12-foot.html?omnews=11545295
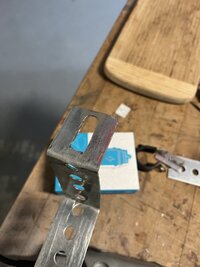
The first task is obviously to remove the driver's seat. With the seat out, an anchor bracket needs to be made that can be used to secure the housing. For this, I opted to use a 4' piece of 16 gauge punched flat bar, which can be picked up at Home Depot. The idea was to create a bracket that would use the seat bolts to tighten and lock the housing in place. Taking a few measurements, I used the vice to make my bends, then cut the flat bar, after my last bend.
20220529_172753-jpg.333694


20220530_104705.jpg


20220530_104633.jpg


20220530_114240.jpg


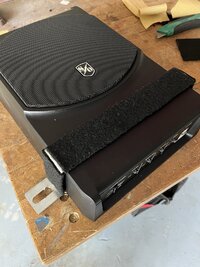
After the bracket was made, I rounded off the corners of the bar. This was done so that I could slide a 26" bicycle inner tube, purchased at Walmart, over the bracket, creating a nice rubber cushion against the housing. Getting the tube over the bar was no small feat. I used a heat gun to help soften and make it more pliable. A slightly bigger tube would have been better, but it's what I had.
20220530_114854.jpg


20220530_121438.jpg


20220530_121550.jpg


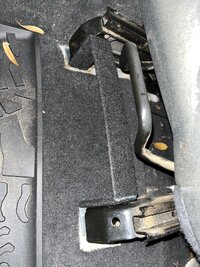
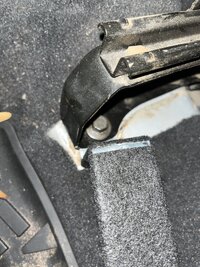
With the bracket finished, I did a test fit and was ready to do the final installation. This turned out to be a real PIA, because the created bracket blocked access to the front right seat bolt. After some trial and error, here's what I figured out:

- with the subwoofer out, reaching in from behind and underneath the seat, install the front right bolt first (tightening it all the way)
- using a small block of wood on the left seat base bracket, or something similar, prop up the seat about 2"
- slide the subwoofer in from the rear, then remove the prop and lower the seat and bracket (Note: You must raise up the left seat bracket in order to slide the subwoofer housing through the manufactured anchor bracket)
- fight with the other 3 bolts until you get them installed
20220530_123601.jpg


20220530_191947.jpg


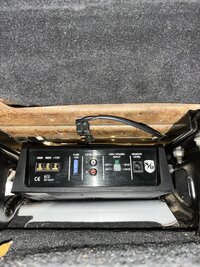
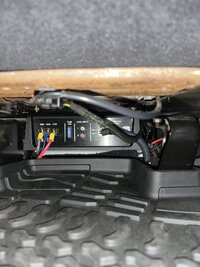
Next came the wiring. Here, I used the Crutchfield 10 gauge wiring kit. It was money well spent and had everything needed, except the RCA patch cable. The wiring was basically this:

- power wire came straight from the battery (Make sure to use a heavy gauge wire (I used the 10 gauge in the kit) and a fuse block (also in the kit)
- ground went to the left rear seat bolt
- blue remote wire went to the blue amplifier wire on the Insane Audio receiver (This is the power feed to trigger the subwoofer amplifier, i.e. when the receiver is turned on, power is supplied to the amplifier)
- RCA cable went to the subwoofer out (green RCA plug) on the Insane Audio (Note: If you've never done a subwoofer install, you only need either the right or left channel for the sub-woofer, I used the right)
- subwoofer remote level (for remotely increasing or decreasing bass) went to a place on the console where I could reach it
20220530_191643.jpg


20220530_192508.jpg


Overall impressions:

The B-8PTD puts out an impressive amount of bass compared to the stock subwoofer. Having it mounted under the driver seat does direct bass to your backside though. It's not horrible, you just know you're sitting on it, if you're the type that cranks up the bass. Having the addition of the "Remote Level" bass tuning at your fingertips is a big plus!

Offloading the bass to the amp/subwoofer also helps take the load off the other existing speakers and improves the overall sound quality output noticeably. It's certainly not the same output as a separate amplifier, but for the cost, and effort, it's a great improvement over what I previously had. If you're looking to upgrade the sound system and wanting to add a separate subwoofer, this is one of the best bang for the buck additions you can make. (y) (y)
 
Last edited:
For those who don't have a the luxury of a factory subwoofer, finding a place to put an aftermarket one can be a challenge. If you happen to be someone that has driver's seat with a fixed base (non-tumble), you're in luck. As it turns out, the Sound Ordnance B-8PTD fits perfectly under the no-tumble seat . This is just one way to tackle the installation, but here's what I did to complete the job. The parts used were the following, keeping the cost to just a little over $200:

[URL][URL]https://www.crutchfield.com/p_777B8PTD/Sound-Ordnance-B-8PTD.html?omnews=11545295[/URL][/URL]

[URL][URL]https://www.crutchfield.com/p_007CK10/Crutchfield-CK10.html?omnews=11545295[/URL][/URL]

[URL][URL]https://www.crutchfield.c...RCA-Patch-Cables-12-foot.html?omnews=11545295[/URL][/URL]

The first task is obviously to remove the driver's seat. With the seat out, an anchor bracket needs to be made that can be used to secure the housing. For this, I opted to use a 4' piece of 16 gauge punched flat bar, which can be picked up at Home Depot. The idea was to create a bracket that would use the seat bolts to tighten and lock the housing in place. Taking a few measurements, I used the vice to make my bends, then cut the flat bar, after my last bend.
20220529_172753-jpg.333694


20220530_104705.jpg


20220530_104633.jpg


20220530_114240.jpg


After the bracket was made, I rounded off the corners of the bar. This was done so that I could slide a 26" bicycle inner tube, purchased at Walmart, over the bracket, creating a nice rubber cushion against the housing. Getting the tube over the bar was no small feat. I used a heat gun to help soften and make it more pliable. A slightly bigger tube would have been better, but it's what I had.
20220530_114854.jpg


20220530_121438.jpg


20220530_121550.jpg


With the bracket finished, I did a test fit and was ready to do the final installation. This turned out to be a real PIA, because the created bracket blocked access to the front right seat bolt. After some trial and error, here's what I figured out:

- with the subwoofer out, reaching in from behind and underneath the seat, install the front right bolt first (tightening it all the way)
- using a small block of wood on the left seat base bracket, or something similar, prop up the seat about 2"
- slide the subwoofer in from the rear, then remove the prop and lower the seat and bracket (Note: You must raise up the left seat bracket in order to slide the subwoofer housing through the manufactured anchor bracket)
- fight with the other 3 bolts until you get them installed
20220530_123601.jpg


20220530_191947.jpg


Next came the wiring. Here, I used the Crutchfield 10 gauge wiring kit. It was money well spent and had everything needed, except the RCA patch cable. The wiring was basically this:

- power wire came straight from the battery (Make sure to use a heavy gauge wire (I used the 10 gauge in the kit) and a fuse block (also in the kit)
- ground went to the left rear seat bolt
- blue remote wire went to the blue amplifier wire on the Insane Audio receiver (This is the power feed to trigger the subwoofer amplifier, i.e. when the receiver is turned on, power is supplied to the amplifier)
- RCA cable went to the subwoofer out (green RCA plug) on the Insane Audio (Note: If you've never done a subwoofer install, you only need either the right or left channel for the sub-woofer, I used the right)
- subwoofer remote level (for remotely increasing or decreasing bass) went to a place on the console where I could reach it
20220530_191643.jpg


20220530_192508.jpg


Overall impressions:

The B-8PTD puts out an impressive amount of bass compared to the stock subwoofer. Having it mounted under the driver seat does direct bass to your backside though. It's not horrible, you just know you're sitting on it, if you're the type that cranks up the bass. Having the addition of the "Remote Level" bass tuning at your fingertips is a big plus!

Offloading the bass to the amp/subwoofer also helps take the load off the other existing speakers and improves the overall sound quality output noticeably. It's certainly not the same output as a separate amplifier, but for the cost, and effort, it's a great improvement over what I previously had. If you're looking to upgrade the sound system and wanting to add a separate subwoofer, this is one of the best bang for the buck additions you can make. (y) (y)

Nice job! This is one situation where the tumble seat is against me. If we lived closer I could have given you as many bike tubes as you wanted!

EDIT: now I’m wondering if my seat risers create enough vertical space to install mine under the seat, or if the limitation is the width or length. 🤨
 
Nice job! This is one situation where the tumble seat is against me. If we lived closer I could have given you as many bike tubes as you wanted!

EDIT: now I’m wondering if my seat risers create enough vertical space to install mine under the seat, or if the limitation is the width or length. 🤨

Width isn't the issue. The fold and tumble seat has a bar that runs across the seat, connecting the two seat bases. The seat pivots on that bar. The non-tumble seat has no bar and is wide open.
 
  • Like
Reactions: JMT
First off - credit to OP.

Here is how my install is going.

Bracket built - I modified mounting hole to be a slot.

1676682311960.jpeg

Instead of inner tube, I went with adhesive carpet.

1676682386920.jpeg

Once you remove bolts you can test fit the bracket.
1676682472660.jpeg

Like OP said, the front bolt nearest console can't be accessed once sub woofer is in place. Tighten it first.
1676682593369.jpeg
Also, it is hard to see, but I cut the rug back and removed a fastener that would be sitting under the sub woofer. In the place of where I cut the carpet, I put a piece the thinner adhesive carpet. This is what the subwoofer will rest on.

Slide the unit from the rear, and lift the seat up. The 3 other bolts are not in, so you can move the seat a few inches while you wiggle the unit into place. Watch out for the seat sensor wires.

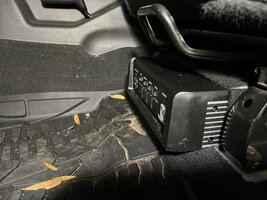
The unit slides into its place where the bracket will just touch the beginning of the speaker round. It is a perfect fit and will not obstruct seat movement. Replace all the other bolts.

1676683016973.jpeg

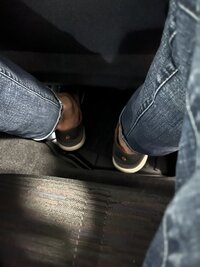
Rear has normal foot room and full floor mat fits fine.
1676683111841.jpeg

View from rear show no contact sitting fully on "hump"

1676683187300.jpeg

Things went so well with unit install, I didn't have wiring ready to go. Will hookup tomorrow.
 
  • Like
Reactions: Irun

Finished install.

IMG_5807.JPG

Definitely need to run turn on 12v connection. Although it has an auto sense option for high level inputs, I could not get consistent performance.

I wanted keep the factory head unit at this point b/c I leave it open most of the time. It fills in the sound nicely.
 
For those who don't have a the luxury of a factory subwoofer, finding a place to put an aftermarket one can be a challenge. If you happen to be someone that has driver's seat with a fixed base (non-tumble), you're in luck. As it turns out, the Sound Ordnance B-8PTD fits perfectly under the no-tumble seat . This is just one way to tackle the installation, but here's what I did to complete the job. The parts used were the following, keeping the cost to just a little over $200:

[URL]https://www.crutchfield.com/p_777B8PTD/Sound-Ordnance-B-8PTD.html?omnews=11545295[/URL]

[URL]https://www.crutchfield.com/p_007CK10/Crutchfield-CK10.html?omnews=11545295[/URL]

[URL]https://www.crutchfield.com/p_...RCA-Patch-Cables-12-foot.html?omnews=11545295[/URL]

The first task is obviously to remove the driver's seat. With the seat out, an anchor bracket needs to be made that can be used to secure the housing. For this, I opted to use a 4' piece of 16 gauge punched flat bar, which can be picked up at Home Depot. The idea was to create a bracket that would use the seat bolts to tighten and lock the housing in place. Taking a few measurements, I used the vice to make my bends, then cut the flat bar, after my last bend.
20220529_172753-jpg.333694


20220530_104705-jpg.jpg


20220530_104633-jpg.jpg


20220530_114240-jpg.jpg


After the bracket was made, I rounded off the corners of the bar. This was done so that I could slide a 26" bicycle inner tube, purchased at Walmart, over the bracket, creating a nice rubber cushion against the housing. Getting the tube over the bar was no small feat. I used a heat gun to help soften and make it more pliable. A slightly bigger tube would have been better, but it's what I had.
20220530_114854-jpg.jpg


20220530_121438-jpg.jpg


20220530_121550-jpg.jpg


With the bracket finished, I did a test fit and was ready to do the final installation. This turned out to be a real PIA, because the created bracket blocked access to the front right seat bolt. After some trial and error, here's what I figured out:

- with the subwoofer out, reaching in from behind and underneath the seat, install the front right bolt first (tightening it all the way)
- using a small block of wood on the left seat base bracket, or something similar, prop up the seat about 2"
- slide the subwoofer in from the rear, then remove the prop and lower the seat and bracket (Note: You must raise up the left seat bracket in order to slide the subwoofer housing through the manufactured anchor bracket)
- fight with the other 3 bolts until you get them installed
20220530_123601-jpg.jpg


20220530_191947-jpg.jpg


Next came the wiring. Here, I used the Crutchfield 10 gauge wiring kit. It was money well spent and had everything needed, except the RCA patch cable. The wiring was basically this:

- power wire came straight from the battery (Make sure to use a heavy gauge wire (I used the 10 gauge in the kit) and a fuse block (also in the kit)
- ground went to the left rear seat bolt
- blue remote wire went to the blue amplifier wire on the Insane Audio receiver (This is the power feed to trigger the subwoofer amplifier, i.e. when the receiver is turned on, power is supplied to the amplifier)
- RCA cable went to the subwoofer out (green RCA plug) on the Insane Audio (Note: If you've never done a subwoofer install, you only need either the right or left channel for the sub-woofer, I used the right)
- subwoofer remote level (for remotely increasing or decreasing bass) went to a place on the console where I could reach it
20220530_191643-jpg.jpg


20220530_192508-jpg.jpg


Overall impressions:

The B-8PTD puts out an impressive amount of bass compared to the stock subwoofer. Having it mounted under the driver seat does direct bass to your backside though. It's not horrible, you just know you're sitting on it, if you're the type that cranks up the bass. Having the addition of the "Remote Level" bass tuning at your fingertips is a big plus!

Offloading the bass to the amp/subwoofer also helps take the load off the other existing speakers and improves the overall sound quality output noticeably. It's certainly not the same output as a separate amplifier, but for the cost, and effort, it's a great improvement over what I previously had. If you're looking to upgrade the sound system and wanting to add a separate subwoofer, this is one of the best bang for the buck additions you can make. (y) (y)

Wow, excellent write-up with nice pics, great work
 
Thanks for the write- up. I installed mine yesterday. However, I'm also having the same issue as @b622r where it isn't auto powering up using the line-in since my junky BOSS head unit doesn't have sub-outs. I did connect the 12V power since my unit DOES have that output, but It's still very inconsistent in powering up. That, and did doesn't seem to turn off. When I got out last night the power light was still on - it is connected directly to battery. Any ideas?
 
Thanks for the write- up. I installed mine yesterday. However, I'm also having the same issue as @b622r where it isn't auto powering up using the line-in since my junky BOSS head unit doesn't have sub-outs. I did connect the 12V power since my unit DOES have that output, but It's still very inconsistent in powering up. That, and did doesn't seem to turn off. When I got out last night the power light was still on - it is connected directly to battery. Any ideas?

Do you have the blue remote wire connected from the powered sub to the blue remote wire on your Boss head unit? That is what will give both head unit and sub power only when you turn your key to on or accessory position
 
Do you have the blue remote wire connected from the powered sub to the blue remote wire on your Boss head unit? That is what will give both head unit and sub power only when you turn your key to on or accessory position

Yes, but that doesn't seem to be working.
 
Thanks for the write- up. I installed mine yesterday. However, I'm also having the same issue as @b622r where it isn't auto powering up using the line-in since my junky BOSS head unit doesn't have sub-outs. I did connect the 12V power since my unit DOES have that output, but It's still very inconsistent in powering up. That, and did doesn't seem to turn off. When I got out last night the power light was still on - it is connected directly to battery. Any ideas?

Is your head unit connected to switched power? The power connections should be:

+12V - Connected directly to battery
REM - Connected to switched power
GND - Connected to ground
 
Last edited:
Surprised that I missed this write-up when it was posted.

FWIW, I put my Rockford Fosgate PS-8 under my non-tumble driver's seat. Only had to make room by pulling back some of the carpet. Pics are on my build thread in my signature.
 
Is your head unit connected to switched power? The power connections should be:

+12V - Connected directly to battery
REM - Connected to switched power
GND - Connected to ground

Yup. It started working when I disconnected the REM. It's "supposed" to auto detect signal from the speakers. However, it hasn't worked since then. I'm going to reconnect the REM and take my voltmeter to the wires in the back of the stereo.
 
Yup. It started working when I disconnected the REM. It's "supposed" to auto detect signal from the speakers. However, it hasn't worked since then. I'm going to reconnect the REM and take my voltmeter to the wires in the back of the stereo.

welp... I reconnected the REM (remote power) back to the unit and it's working. We'll see for how long. I have to say that I LOVE this unit. I'm able to take ALL the bass out of the dash and sound bar speakers and just use the sub to fill in the lows. As was previously mentioned, this allows me to turn the volume up considerably without distortion. This is really beneficial when I'm driving at highway speeds with the top off.
 
  • Like
Reactions: Irun
Width isn't the issue. The fold and tumble seat has a bar that runs across the seat, connecting the two seat bases. The seat pivots on that bar. The non-tumble seat has no bar and is wide open.

Has anyone successfully put a small sub of some kind under a fold and tumble seat?