What did you do to your TJ today?

Added rear sway bar bushings (greaseable) and bar clamps.

Wasn't happy with the bushings that came with the Energy Suspension set (they weren't split and didn't want to have to disconnect the sway bar end links) — replaced them with MOOGs.

Drilled a small grease hole in each bushing half and countersunk it to fit the zerk end.

Finished up by adding 16mm-bore bar clamps, manufactured by Ruland (Marlborough, MA).

– Energy Suspension 2.5111G 16mm Rear Sway Bar Set - https://tinyurl.com/9exjhpf3
– MOOG K3160 Suspension Stabilizer Bar Bushing Kit - https://tinyurl.com/55w55bju
– Ruland MSP-16-F, 16mm Two-Piece Shaft Collar - https://tinyurl.com/ye2ab76b

1.jpeg


2.jpeg
 
Last edited:
Fenders dry fit

CD9D1F07-8F51-4E12-A3E6-51E8243CF64C.jpeg
-

9FED15F0-C7DC-45B9-9AB1-47C39600C033.jpeg


Then we wire brushed at any seams and cleaned and gound/deburred edges-

Then POR 15 on all bare metal

AC02FAFB-C5BC-4F1D-821A-D96BF7500381.jpeg

Next we will strategically use urethane as we assemble to reduce noise, mud and at the same time allow water to egress where needed-

Then wire in the lights and plug in the led relay, then put on the 12.5 x 33” wheels and beadlocks

Then front bedrug after the tub is cleaned
 
Love those fenders ever since I saw pictures of Plumber1’s Jeep!

Exactly- he inspired this. I even have a pic saved as a reference -

He killed it and wheeled it.

Just always seemed he had vision, and I respect accomplished tradesmen immensely.

07BEF251-DAF5-4F46-8A11-CC9EDE43EEE6.png
 
  • Like
Reactions: GPK03X
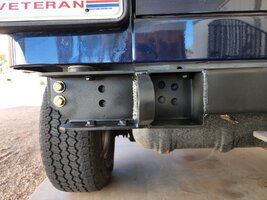
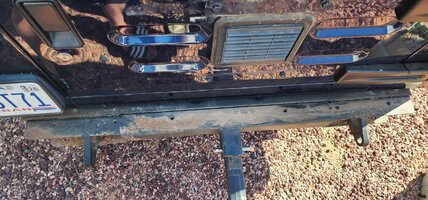
Lowered my small travel trailer onto my hitch and noticed I almost tore my bumper clean off.

When installing the UCF aluminum bumper, I inquired about why the holes on the rear crossmember don't seem to line up, and that 4 of them need to be drilled through. I was told that most just drill them through, and that I ought to if the bumper would be used for any serious duty, ie recovery or towing. I decided that was another days work and just mounted the bumper with 4 outside bolts, slapped on the aluminum guard and called it a day.

20220702_152223.jpg

Fast forward a year, and I've moved into a new house with a tricky RV gate blocked by a green internet box. "I can squeeze that in with the TJ" Art says, confident he's not an idiot. Alas...

20230909_150756.jpg

Luckily I opted to remove the aluminum guard for clearance around the cities pesky green box. I might not have noticed the bend! I think another issue is the extended shank I have on my weight distribution hitch paired with the shallow receiver was putting a particular wrenching on the entire assembly.

Unfortunately it looks like I'll be drilling my crossmember this weekend! Lol
 
I was working on the Jeep today and misplaced my 6" extension for the 3/8" socket. Damnit.

I started a separate thread, but I got my shocks swapped and confirmed that there is something else going on with my rear passenger suspension that causes it to be really bouncy.

I got the rear sway bar end links installed. Got the drum brakes adjusted again. The passenger automatic adjuster was wonky. Whenever it was out of the brake, you could screw it in and out, but you could feel it slightly catch a bit. Whenever it was in the brake and under tension, that catch would make it very difficult to turn the automatic adjuster. I decided to replace it now instead of having problems down the road. I drove it around a bit. Pulled up the parking brake with the button pressed in. Drove it in reverse and braked several times. Hopefully everything is seated well on the rear drum brakes because I absolutely do not want to get back in there again. I also adjusted the parking brake so it is tighter and engages sooner whenever I pull up on the hand brake.

I wanted to replace the front sway bar end links and front brakes but just didn't get to it.
 
  • Like
Reactions: Kiwi TJ and pbeach
Lowered my small travel trailer onto my hitch and noticed I almost tore my bumper clean off.

When installing the UCF aluminum bumper, I inquired about why the holes on the rear crossmember don't seem to line up, and that 4 of them need to be drilled through. I was told that most just drill them through, and that I ought to if the bumper would be used for any serious duty, ie recovery or towing. I decided that was another days work and just mounted the bumper with 4 outside bolts, slapped on the aluminum guard and called it a day.

View attachment 456412

Fast forward a year, and I've moved into a new house with a tricky RV gate blocked by a green internet box. "I can squeeze that in with the TJ" Art says, confident he's not an idiot. Alas...

View attachment 456413

Luckily I opted to remove the aluminum guard for clearance around the cities pesky green box. I might not have noticed the bend! I think another issue is the extended shank I have on my weight distribution hitch paired with the shallow receiver was putting a particular wrenching on the entire assembly.

Unfortunately it looks like I'll be drilling my crossmember this weekend! Lol

Be sure to use frame tie in brackets for more strength. That thin crossmember you bolted into won't hold up on its own.
 
I’ve been after a fast doorless mirror idea for a long time- something that would go in the glove box-

Finally figured out a combo- adjustable stick on blind spot mirror and an L bracket.

Works well.

68AFA9AE-7212-442C-B1FA-4BE8654165B5.jpeg
 
Last edited:
So, I had white bedliner installed in my Jeep a while ago. The plugs above the wheel wells were pretty much rotted out after all these years of having my '97 Wrangler, so I removed them, leaving an unsightly hole in my Wheel Well. Insects started crawling in through there, so I needed a solution. So today, I had Armorlite plugs installed in the two wheel holes inside the Jeep. They are purple, my camera just didn't get the color quite right.
purpleArmorlite plug.jpg


wellpic before2.jpg


Armor lite Drain2.jpg


Drain Plug open.jpg


Armorlite Drain Plug.jpg
 
Last edited:
The radiator arrived just as I was leaving for the afternoon, so first thing in the morning it's going in the LJ along with new hoses. While I was waiting for it to arrive today, I put the re-furbished fog light back on it and got a start on installing a dual USB 3.0 outlet for charging phones etcetera. I got it mounted in the lower electric panel just below the heater controls. I'm hoping that I'll be able to drive it around tomorrow afternoon.