
You are using an out of date browser. It may not display this or other websites correctly.
You should upgrade or use an alternative browser.
You should upgrade or use an alternative browser.

Mid-arm LJ Rubicon
- Thread starter sunnysideup_lj
- Start date
Is this all the spline engagement that a 392 has?
View attachment 702584
That is where the FAD collar locks the long side shaft together.
That is where the FAD collar locks the long side shaft together.
I realize that. My concern was the lack of spline engagement on the outer shaft. Appears to be ~ 1/2 of an inch. I would think you’d want much more than that.


Assuming this is a JL axle? My friend Rich used a RCV inner and bronze collar (to replace plastic collar). with a Dana Spicer outers, since he didn't want a RCV joint. The Dana passenger shaft needed some simple machining to mate to the RCV. He was able to buy the pieces individually instead of whole sets.Finally got around to tearing into this front axle...
You can read all about here. Not his thread, but where he learned what to do...
https://www.jlwranglerforums.com/fo...-axle-shaft-project-retaining-the-fad.101510/
I realize that. My concern was the lack of spline engagement on the outer shaft. Appears to be ~ 1/2 of an inch. I would think you’d want much more than that.
Maybe that’s an indicator that the connection between the 2 shafts isn’t the weak point in the front axle.
Last edited:
Maybe that’s an indicator that the connection between the 2 shafts isn’t the weak point in the front axle.
I am not familiar with the JL axle shafts, what are they made of (are they more splines, thicker, other things?)? My only benchmark is seeing some failures in Dana 44/Dana 30 axle shafts at the splines with deeper engagement, though in the carrier.
I realize that. My concern was the lack of spline engagement on the outer shaft. Appears to be ~ 1/2 of an inch. I would think you’d want much more than that.
Not sure. If I was going to be running these shafts I might be more curious about it. I don’t like it, and these shafts won’t be used. This shaft will be replaced with a one piece shaft.
Not sure. If I was going to be running these shafts I might be more curious about it. I don’t like it, and these shafts won’t be used. This shaft will be replaced with a one piece shaft.
With the torque of a 392 and if that little of engagement is okay I’ll have to rethink what’s acceptable.
With the torque of a 392 and if that little of engagement is okay I’ll have to rethink what’s acceptable.
edit:
The Rubicon 392 does not use a functional FAD. Because it has a full-time Selec-Trac transfer case (never pure 2WD), Jeep omitted the disconnect mechanism and fitted a block-off plate instead. The front axle stays connected at all times. So the FAD failure modes and short-spline concerns do not apply to the 392.
It retains a two-piece passenger-side inner axle shaft secured by a fixed collar inside that housing to keep the shafts permanently locked together.
Many owners swap out the factory two-piece shaft for a stronger one-piece aftermarket axle shaft when upgrading
Last edited:
Gotcha! yeah rcvs like to sling grease around too since the boots can only do so much. Hence the often greasing they need!
That's why im gonna stick with a full float front,I was digging the idea of doing a JL/JT axle swap and use a dynatrac housing to eliminate the fad. but for dailying id like to switch off the front via the locking hubs
And for the rear welp....I wanted a full float JL rear axle but I went another route with a full floater fabricated 9"

I’ve looked into aftermarket housing to eliminate the fad. Dynatrac and other manufacturers use JK diffs instead of the new generation.
Ultimate Dana 44 is the only aftermarket housing that use the “AdvanTEK” gear technology. Which claims to be stronger.
By modifying this factory front housing I will still be able to use the new gen gears.
Last edited:
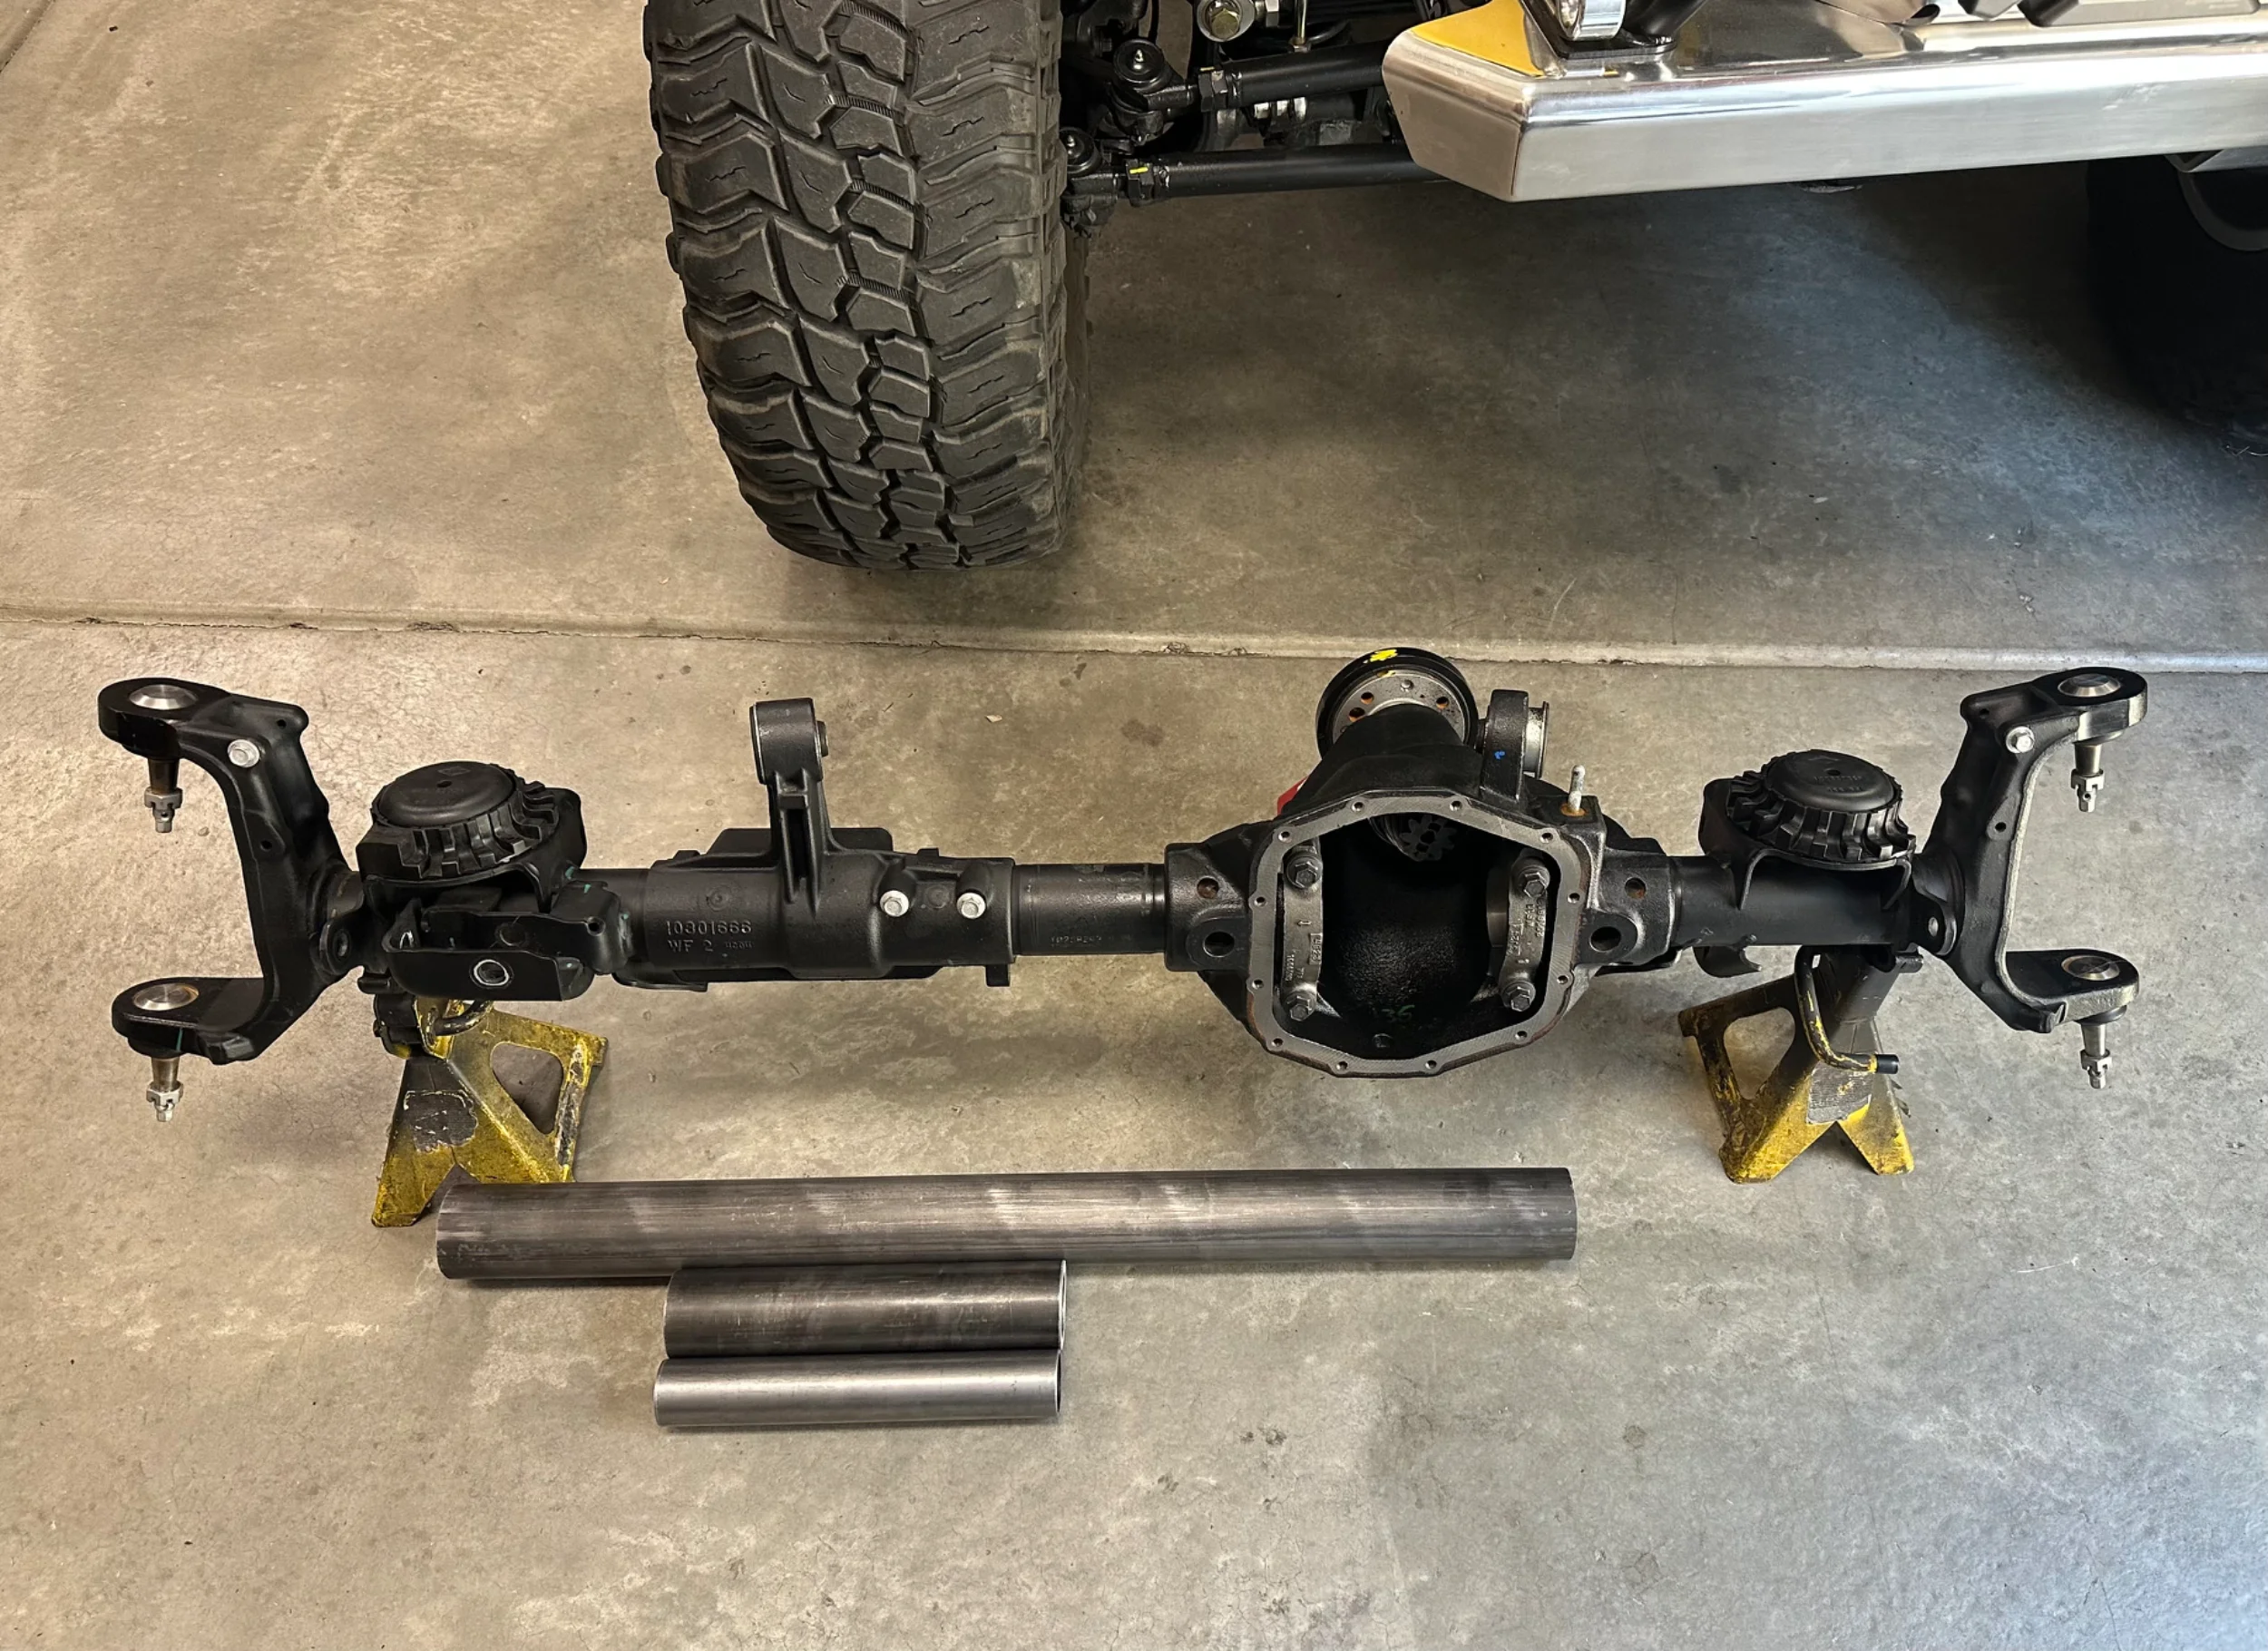
Housing is torn down ready to cut. I have taken lots of control measurements so I can get it back together the same as before. Here’s my game plan.
I’ll strip housing of all brackets. The fad housing is pressed on and has plug welds. I’m going to try drilling the plug welds and pulling off the casting, worst case I will cut the casting off the tubes.
The new DOM tubing will be combined together as outlined below.
2”x .120 - will be an alignment sleeve that presses into the ID of the existing tubes. (where FAD is) ends needs to be turned to be a tight fit inside the OE tubes as this is what will align the tubes back together.
2.75”x .375 - will be cut down to fill in the void where the fad casting was. Beveled ends so I can get a good weld all around. Will be about 3.5” long when in the axle.
3”x.120 - cut length wise. To clamshell over the whole length of the tube. Both the short and long side to make it consistent.
I’ll strip housing of all brackets. The fad housing is pressed on and has plug welds. I’m going to try drilling the plug welds and pulling off the casting, worst case I will cut the casting off the tubes.
The new DOM tubing will be combined together as outlined below.
2”x .120 - will be an alignment sleeve that presses into the ID of the existing tubes. (where FAD is) ends needs to be turned to be a tight fit inside the OE tubes as this is what will align the tubes back together.
2.75”x .375 - will be cut down to fill in the void where the fad casting was. Beveled ends so I can get a good weld all around. Will be about 3.5” long when in the axle.
3”x.120 - cut length wise. To clamshell over the whole length of the tube. Both the short and long side to make it consistent.
The plan for this axle is coming together. After a few late nights of cutting/grinding brackets, the axle was stripped. I took measurements until I was confident I could put it back at the right width and caster angle before cutting out the fad.
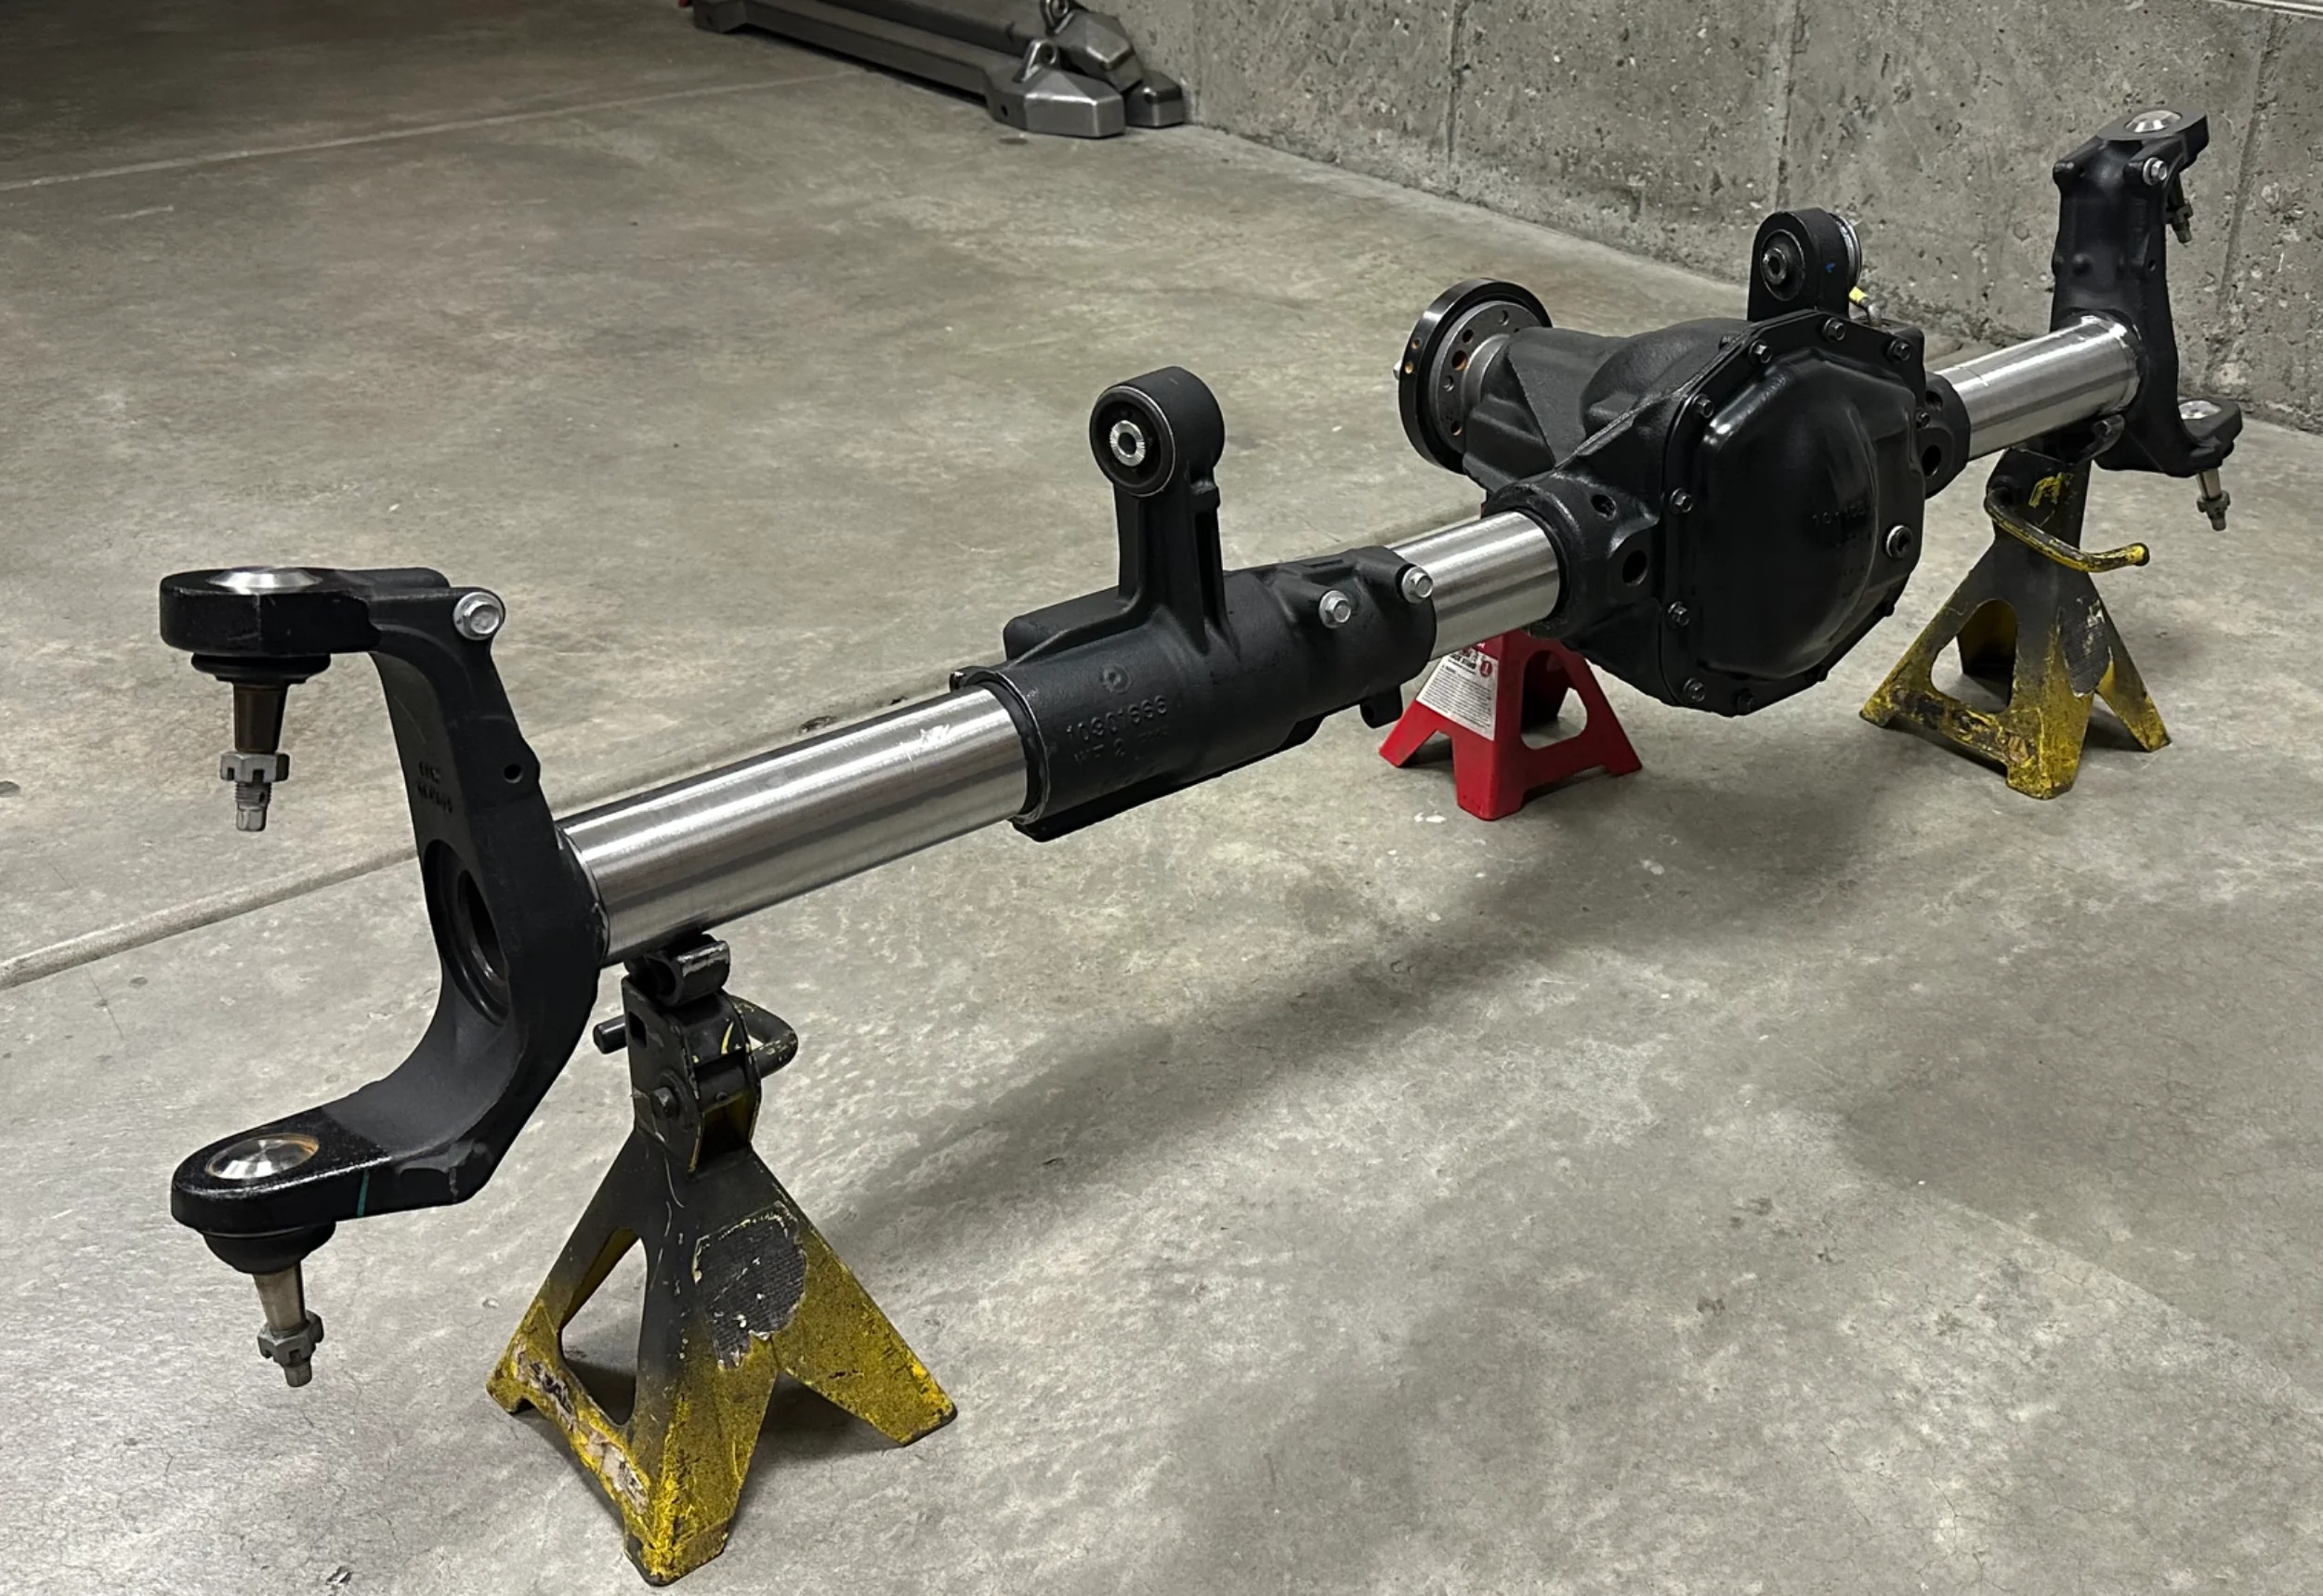
I used a trick I saw @NashvilleTJ use to check an axle for straightness. I 3D printed some pucks that fit tightly in the ends of the axle tubes and where the carrier bearings sit. Using a sting that fits tightly into the center hole of the axle tube ends, I was able to confirm that the axle was straight before cutting it apart. This gave me a good understanding of what it needed to look like when it’s welded back together.
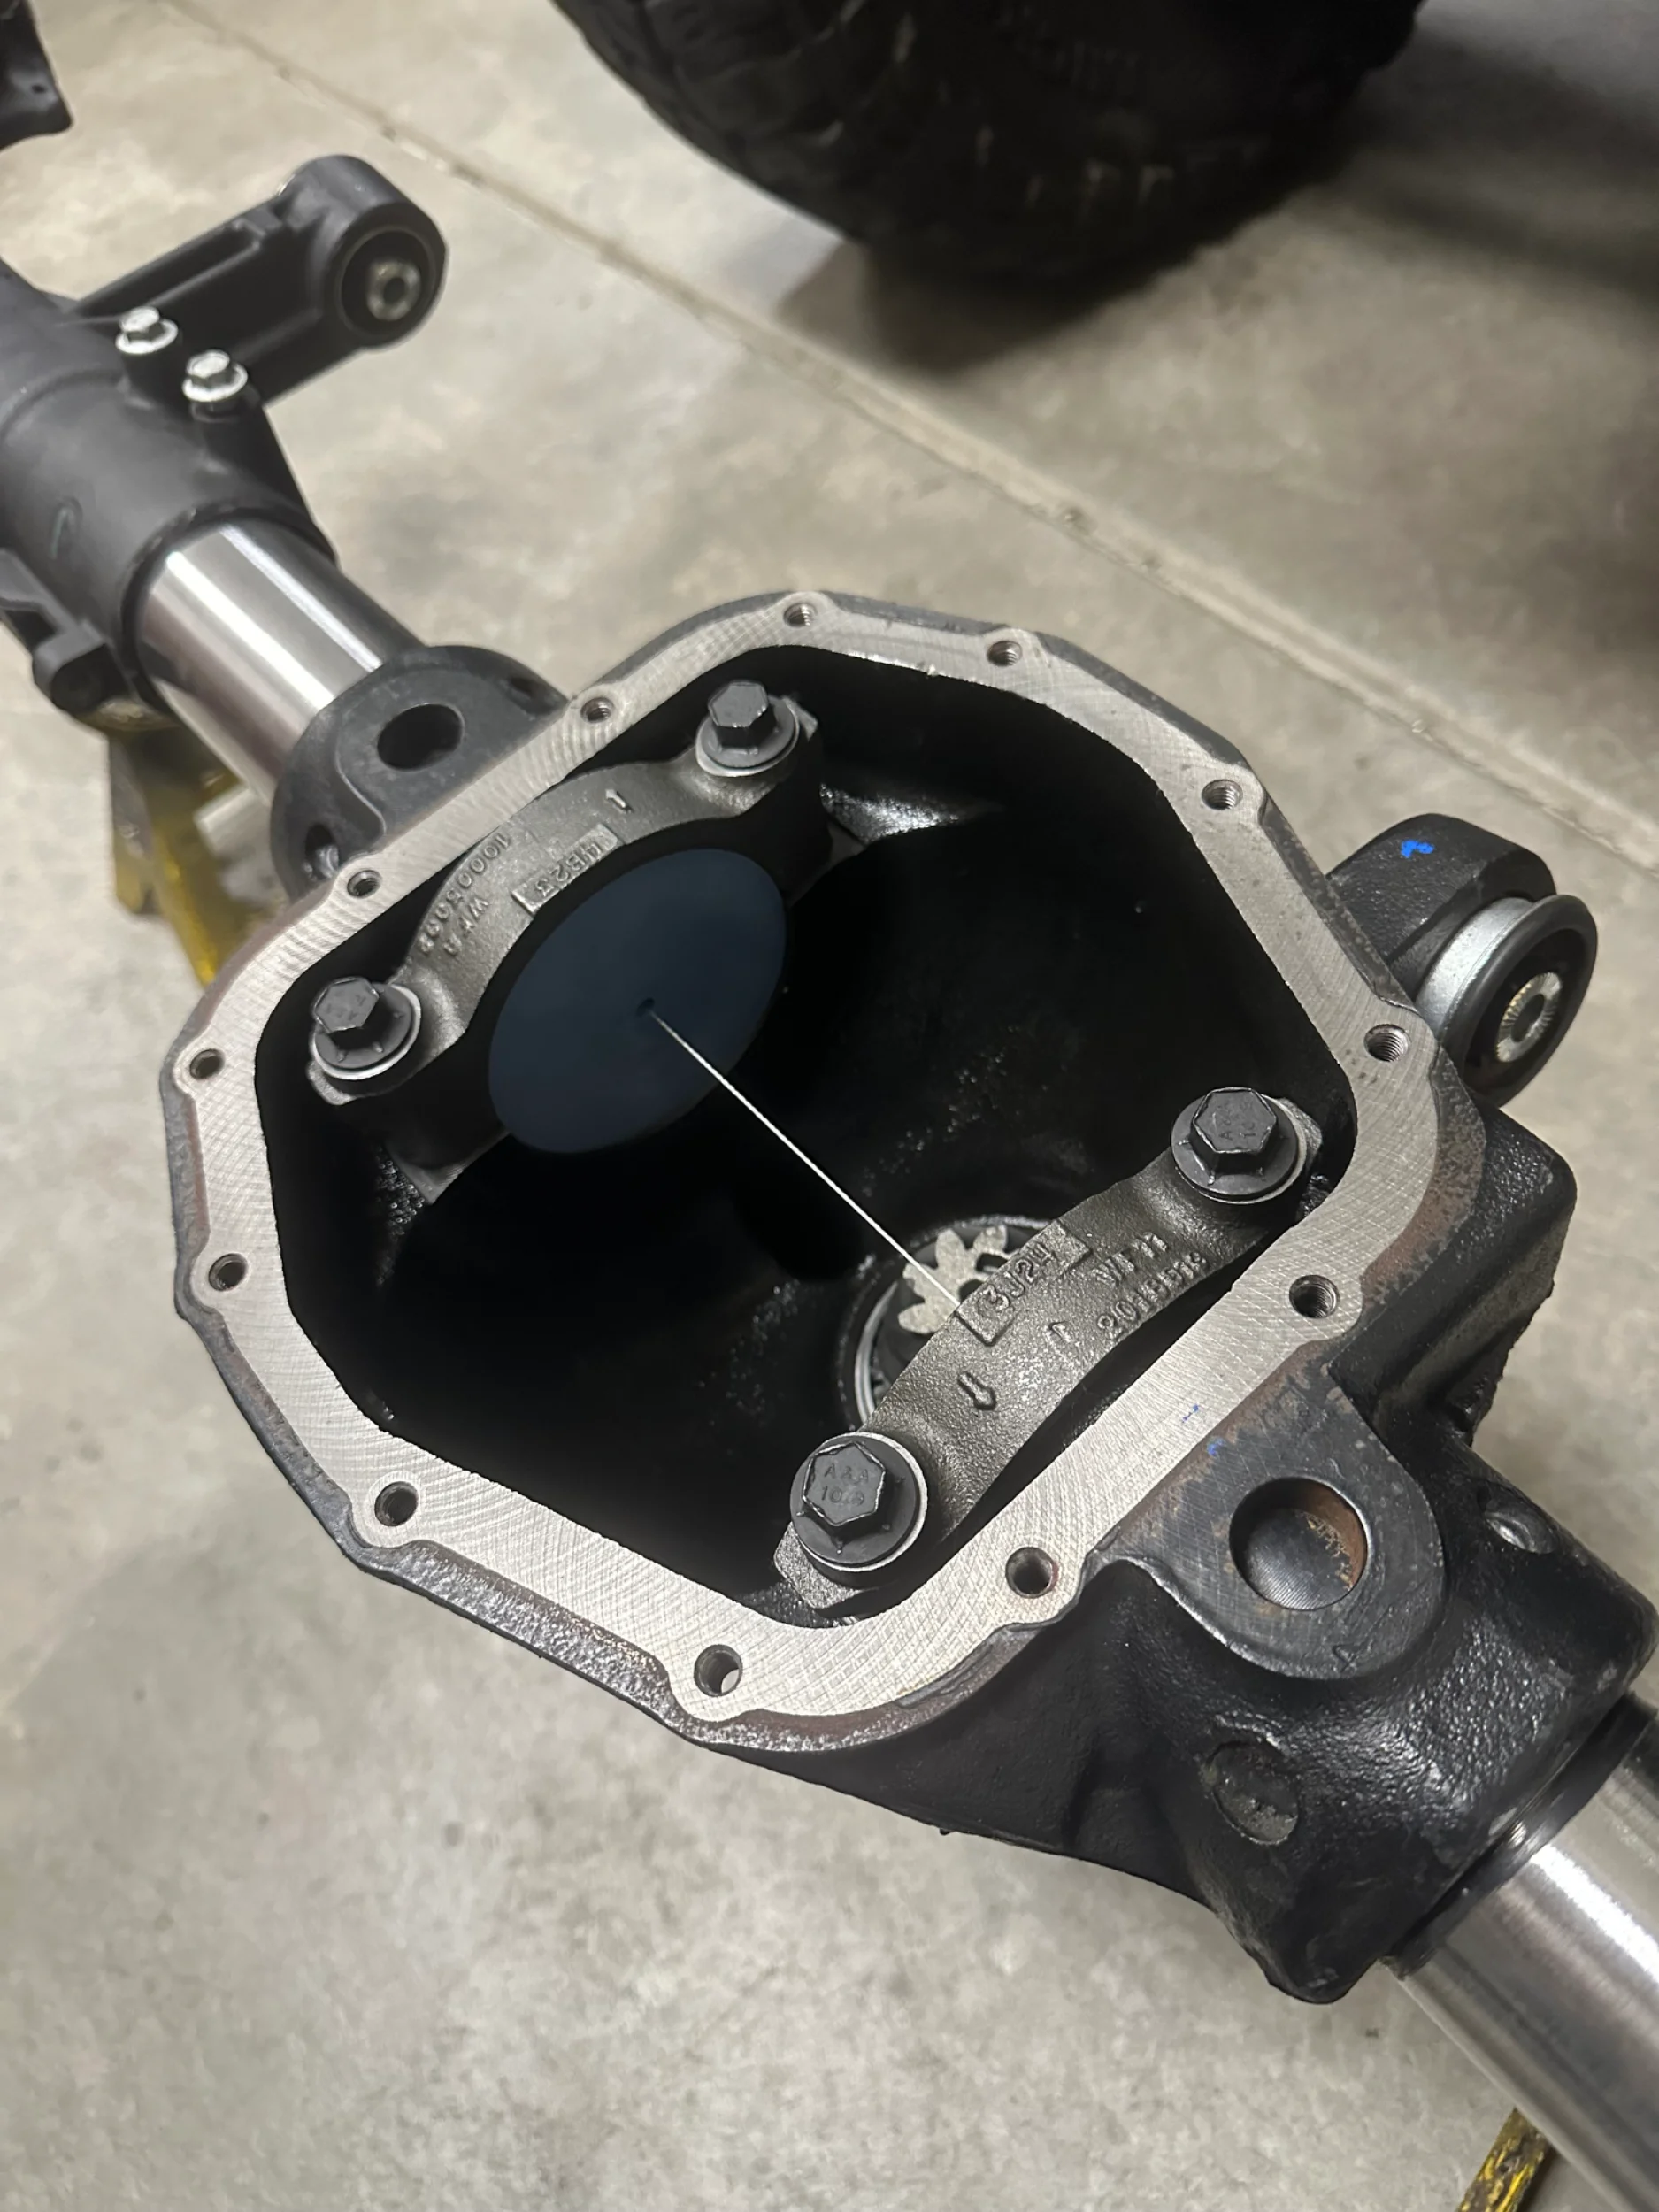
FAD delete. Cutting this casting was easier than I anticipated. Here I was at the point of no return…
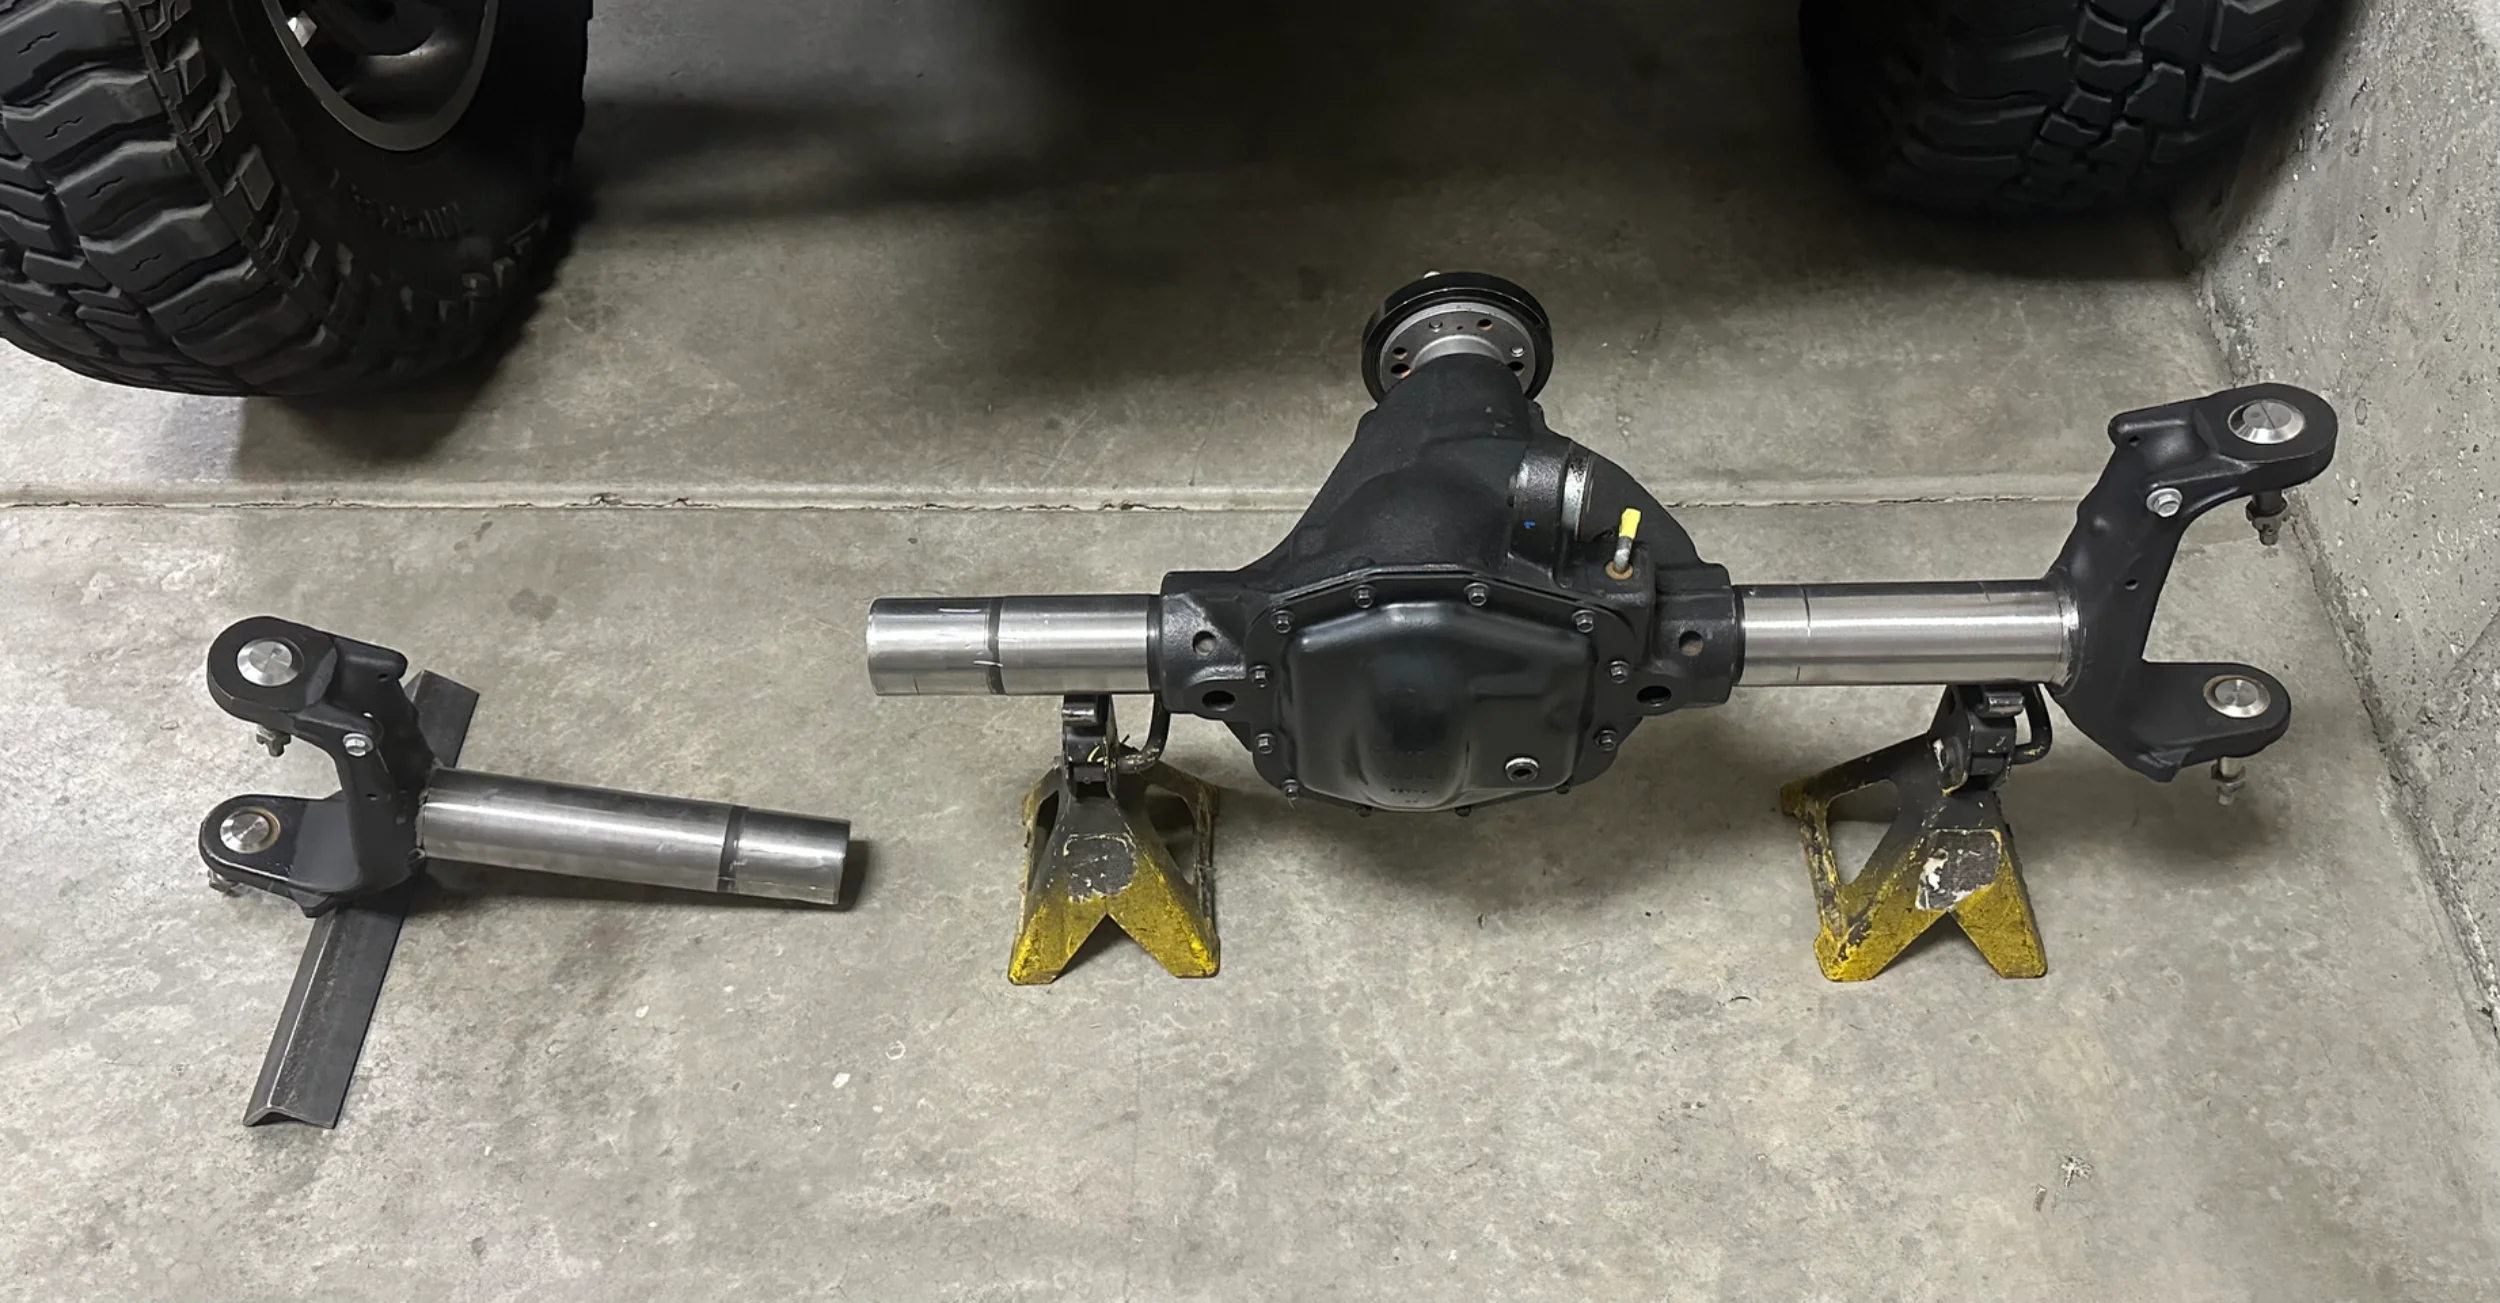
My plan went as outline in the previous post. I had a buddy turn down the “Alignment sleeve” to fit inside the ID of the existing axle tubes. It is a very tight fit into the diff side…took a good amount of convincing to get this sleeve in. A nice snug slip fit on the inner C side, makes caster and width adjustments easy.
The void is filled with a piece of DOM closely matching the OE tube.
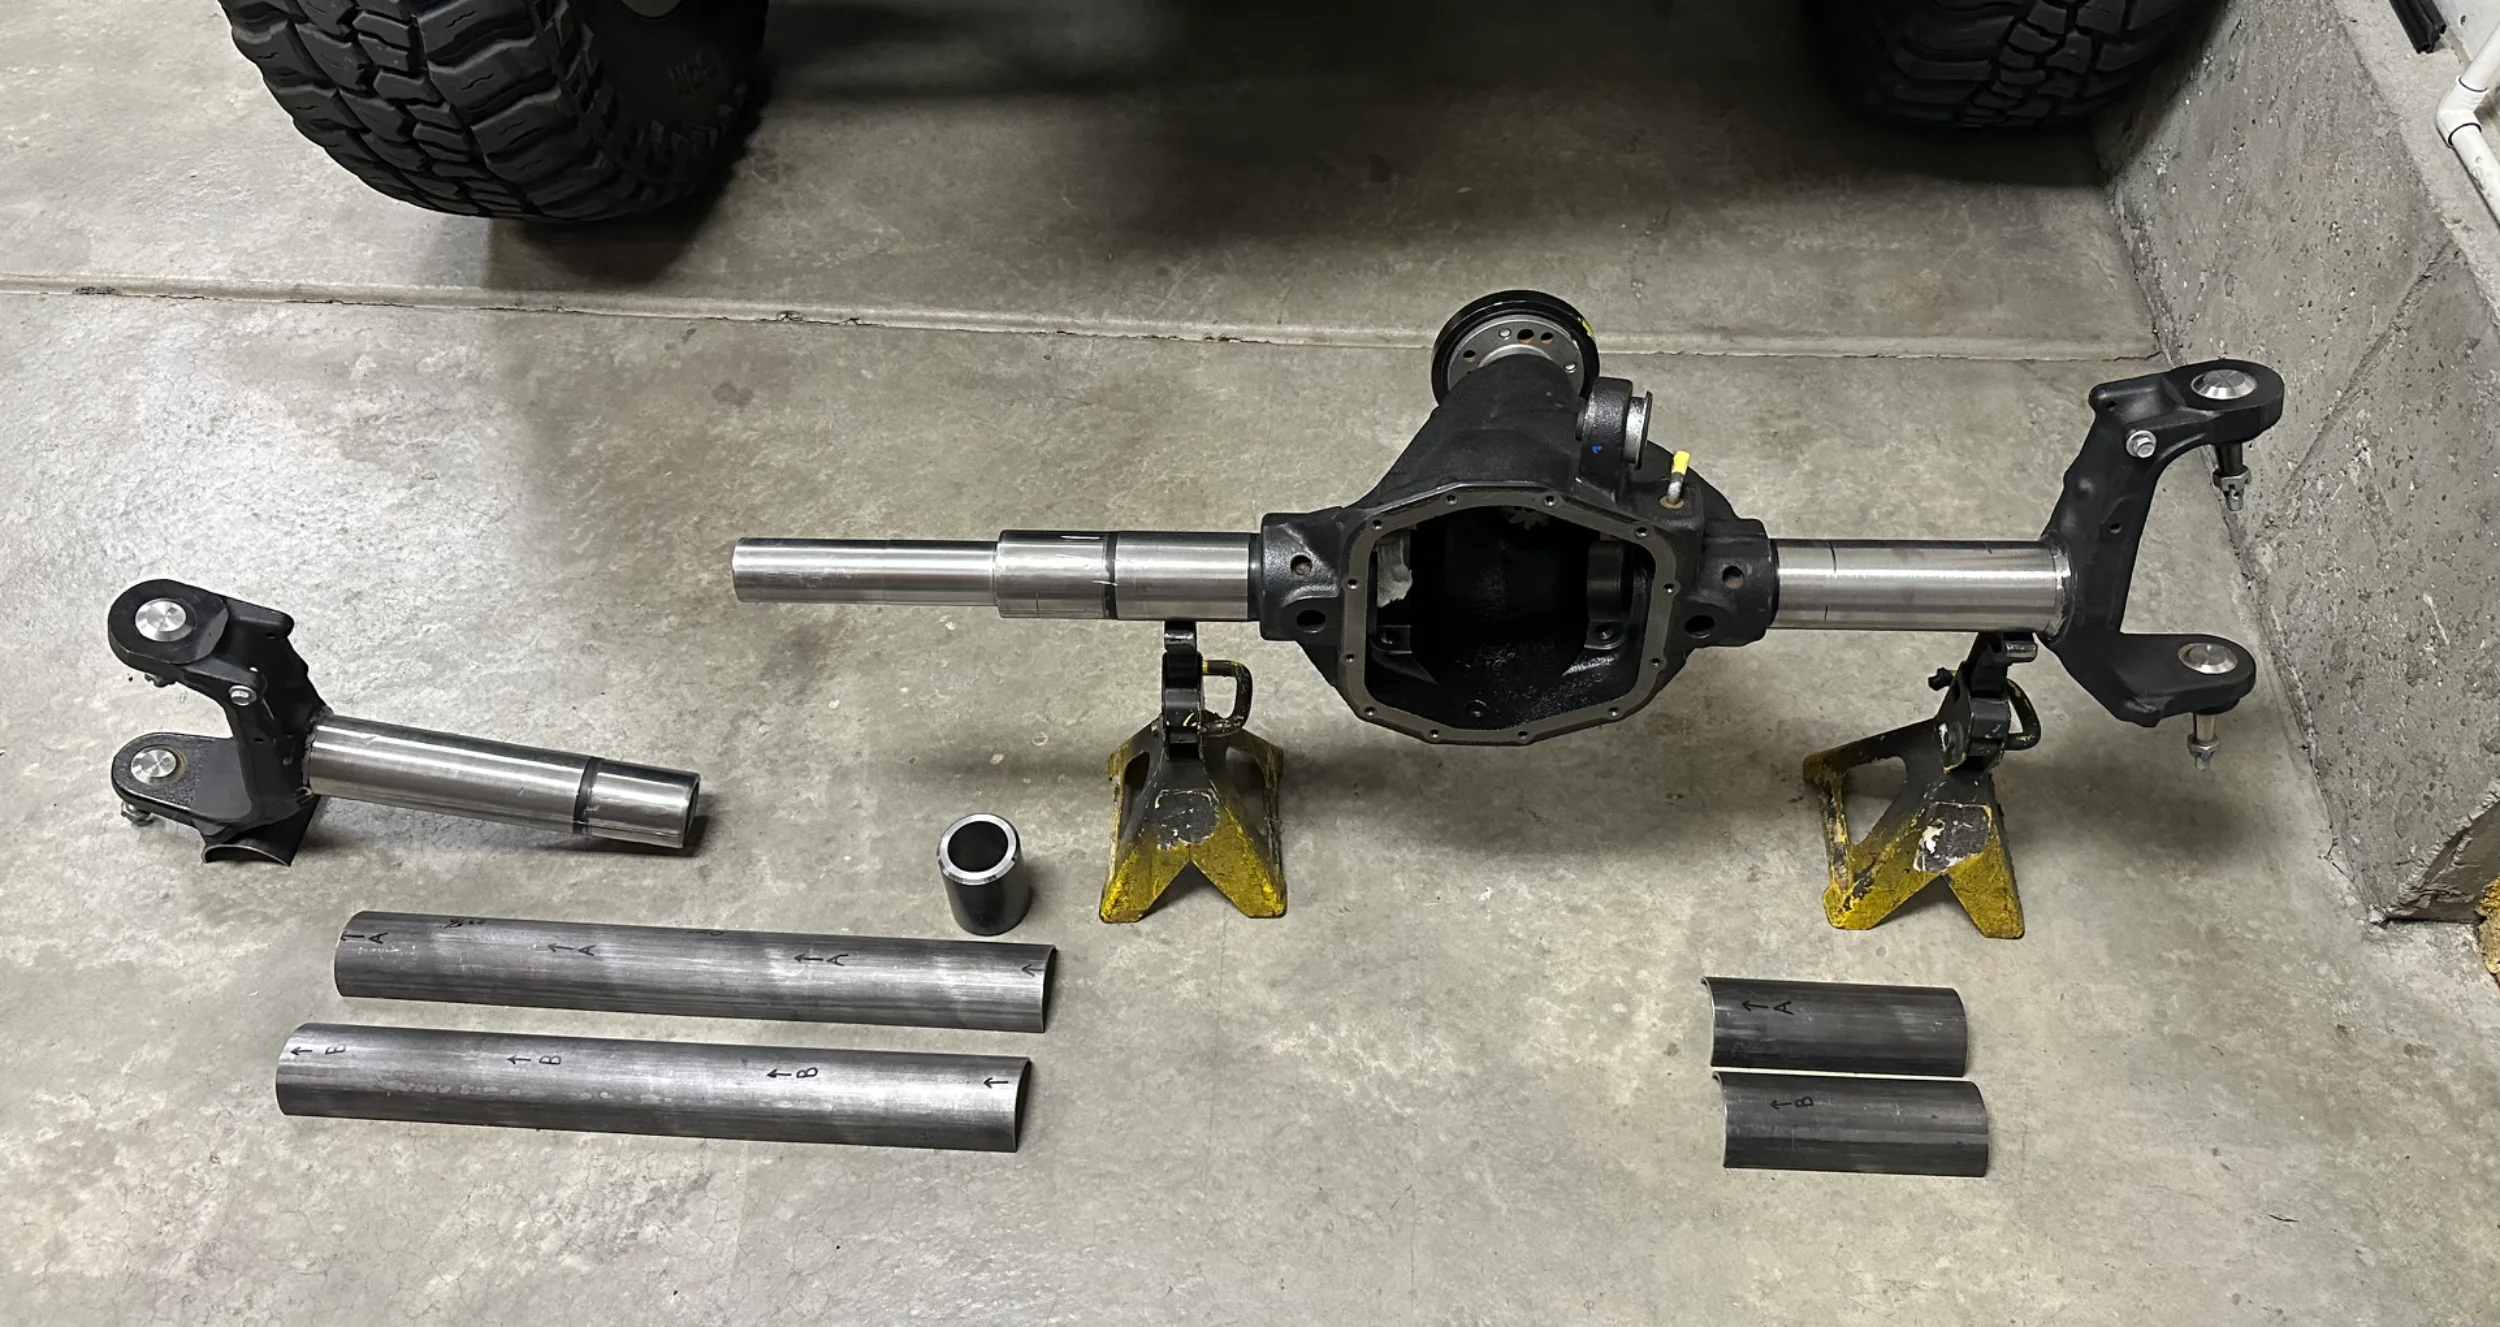
The DOM “clamshells” fit nicely over the axle tubes. I plan to add some holes for plug welds. I’m thinking to coat the tubes with steel it to fight against corrosion between the layers.
Does anyone have tips for welding axle tubes to the center section?
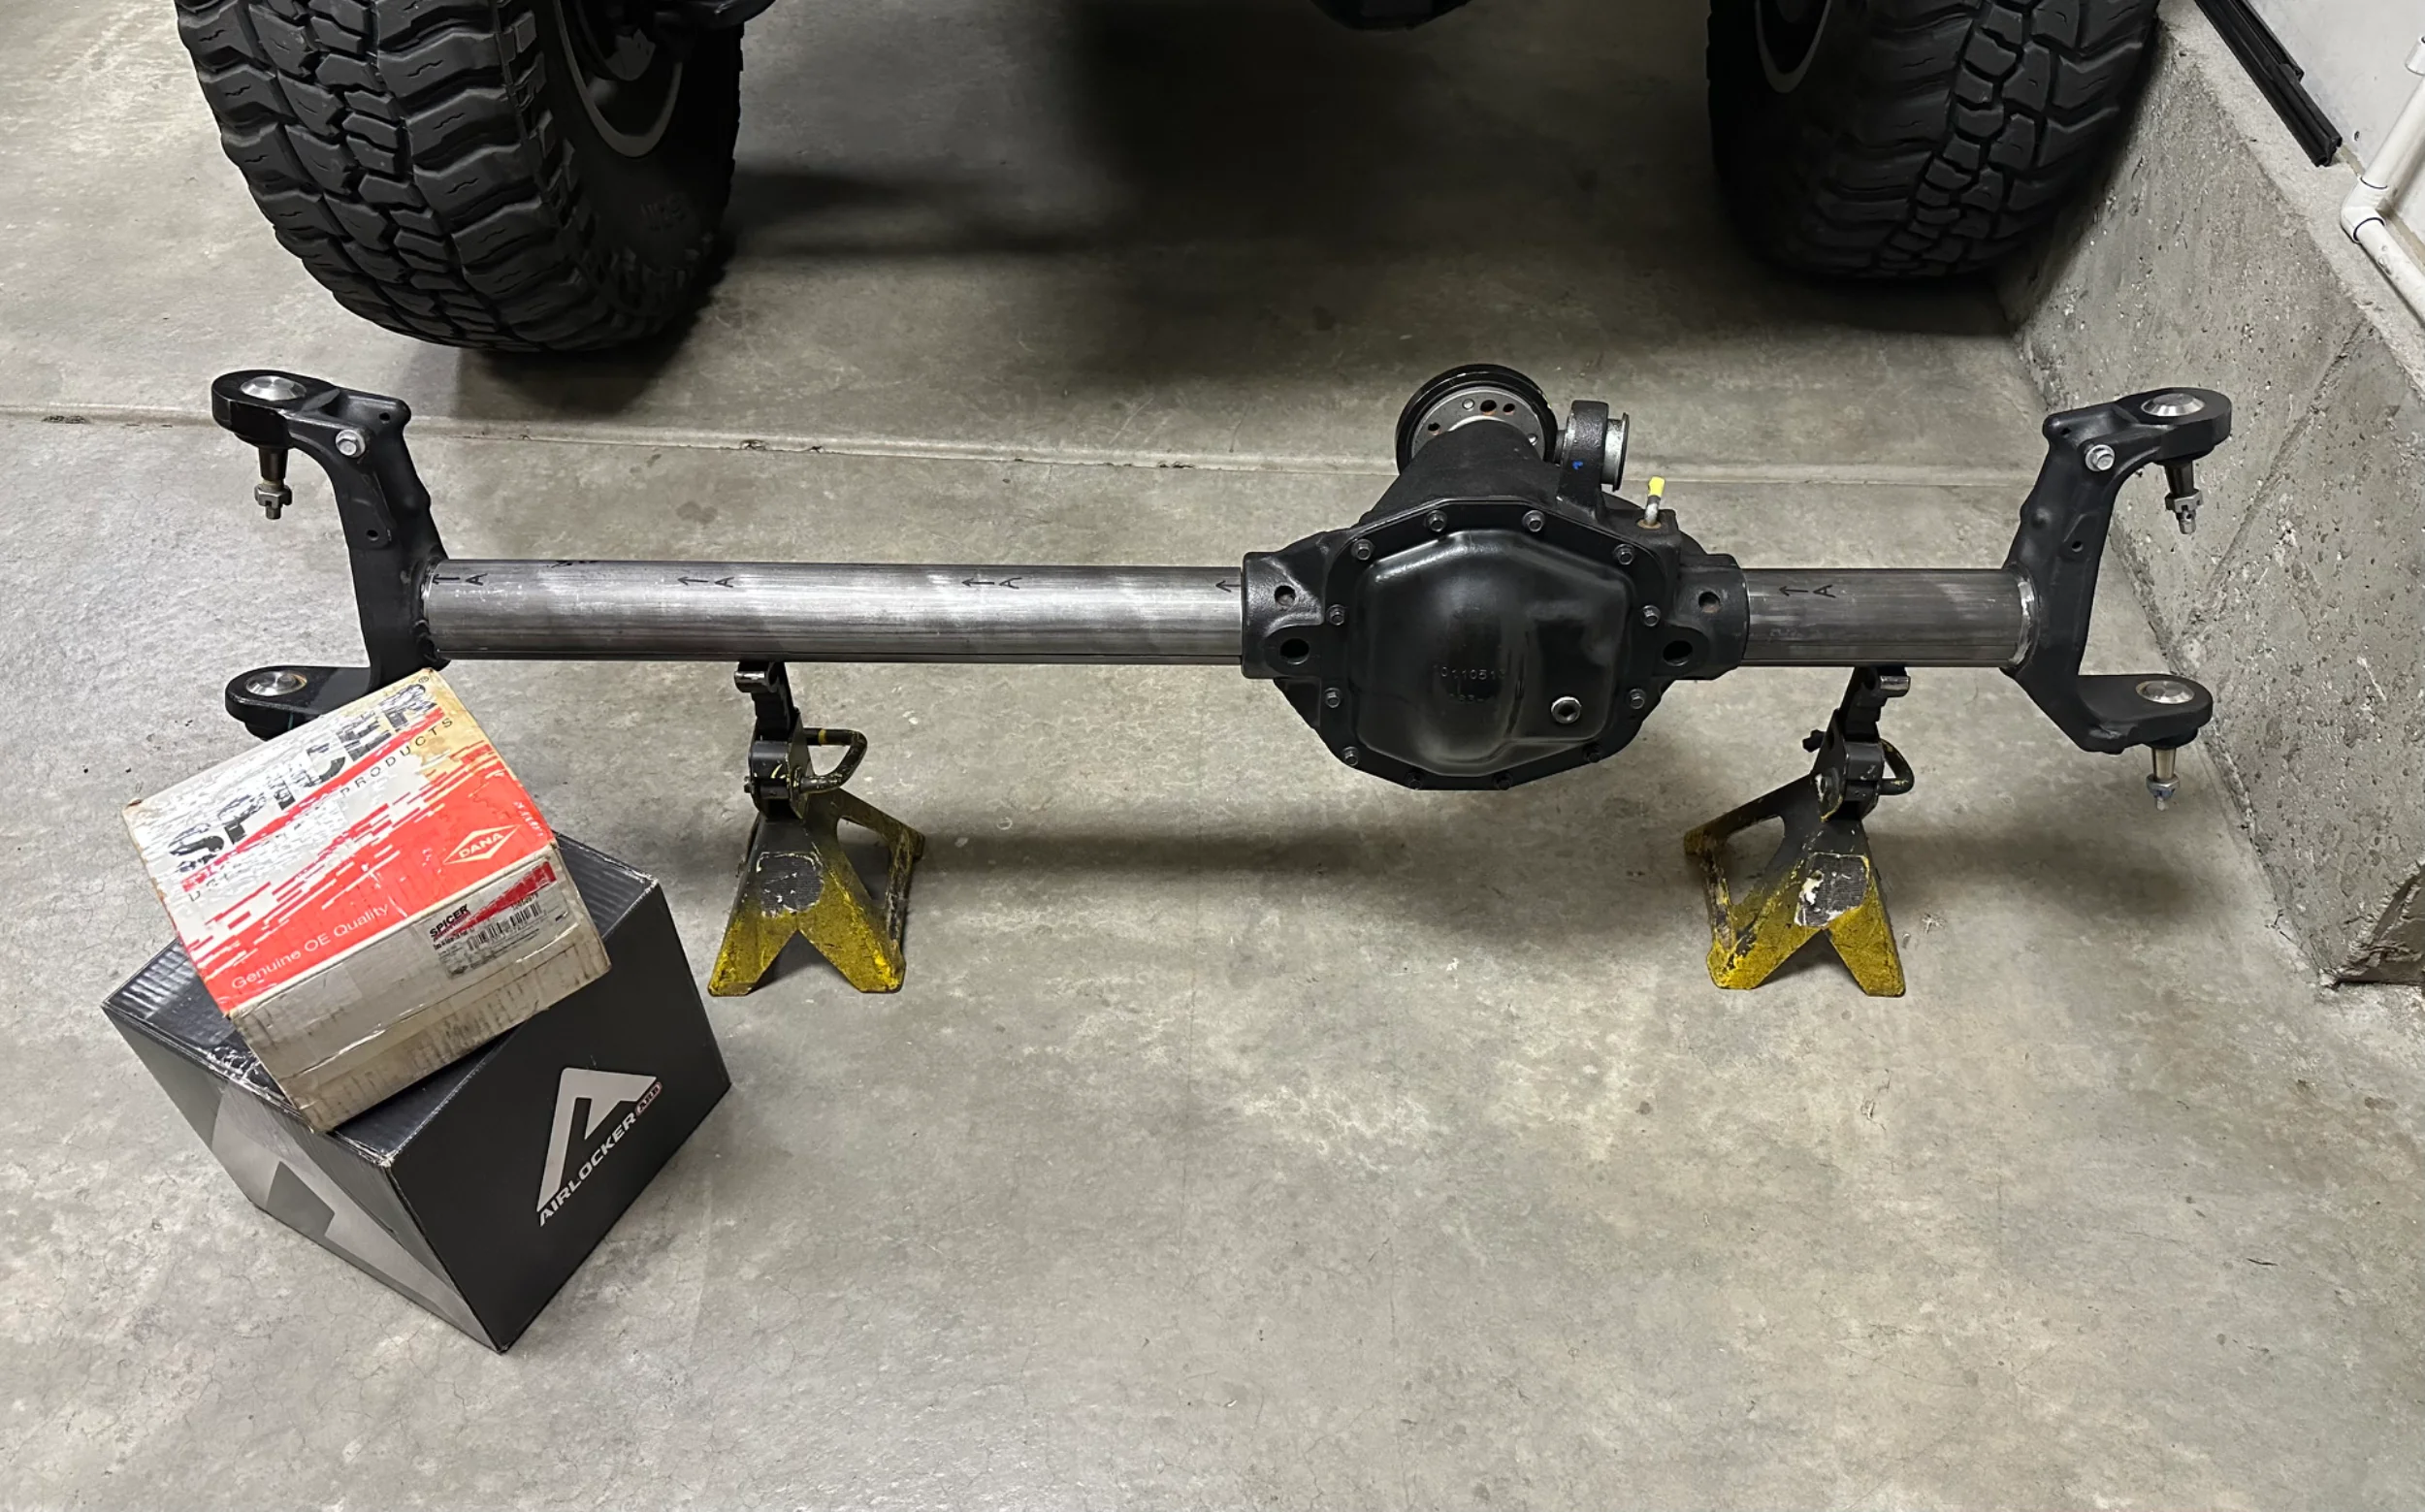
A good amount of welding is left, but everything is coming together as I had hoped. I picked up a set of Spicer 5.38’s along with a 35 spline ARB. Shafts will be ordered soon!
I used a trick I saw @NashvilleTJ use to check an axle for straightness. I 3D printed some pucks that fit tightly in the ends of the axle tubes and where the carrier bearings sit. Using a sting that fits tightly into the center hole of the axle tube ends, I was able to confirm that the axle was straight before cutting it apart. This gave me a good understanding of what it needed to look like when it’s welded back together.
FAD delete. Cutting this casting was easier than I anticipated. Here I was at the point of no return…
My plan went as outline in the previous post. I had a buddy turn down the “Alignment sleeve” to fit inside the ID of the existing axle tubes. It is a very tight fit into the diff side…took a good amount of convincing to get this sleeve in. A nice snug slip fit on the inner C side, makes caster and width adjustments easy.
The void is filled with a piece of DOM closely matching the OE tube.
The DOM “clamshells” fit nicely over the axle tubes. I plan to add some holes for plug welds. I’m thinking to coat the tubes with steel it to fight against corrosion between the layers.
Does anyone have tips for welding axle tubes to the center section?
A good amount of welding is left, but everything is coming together as I had hoped. I picked up a set of Spicer 5.38’s along with a 35 spline ARB. Shafts will be ordered soon!


Really nice job cleaning up the stock tubes. I figured you would use a solid tube to slip over the 2 pieces of stock tube. Why clamshells? Any concern about getting the alignment rod out when you’re done welding?The plan for this axle is coming together. After a few late nights of cutting/grinding brackets, the axle was stripped. I took measurements until I was confident I could put it back at the right width and caster angle before cutting out the fad.
View attachment 706827
I used a trick I saw @NashvilleTJ use to check an axle for straightness. I 3D printed some pucks that fit tightly in the ends of the axle tubes and where the carrier bearings sit. Using a sting that fits tightly into the center hole of the axle tube ends, I was able to confirm that the axle was straight before cutting it apart. This gave me a good understanding of what it needed to look like when it’s welded back together.
View attachment 706828
FAD delete. Cutting this casting was easier than I anticipated. Here I was at the point of no return…
View attachment 706829
My plan went as outline in the previous post. I had a buddy turn down the “Alignment sleeve” to fit inside the ID of the existing axle tubes. It is a very tight fit into the diff side…took a good amount of convincing to get this sleeve in. A nice snug slip fit on the inner C side, makes caster and width adjustments easy.
The void is filled with a piece of DOM closely matching the OE tube.
The DOM “clamshells” fit nicely over the axle tubes. I plan to add some holes for plug welds. I’m thinking to coat the tubes with steel it to fight against corrosion between the layers.
Does anyone have tips for welding axle tubes to the center section?
View attachment 706833
A good amount of welding is left, but everything is coming together as I had hoped. I picked up a set of Spicer 5.38’s along with a 35 spline ARB. Shafts will be ordered soon!
View attachment 706830
Really nice job cleaning up the stock tubes. I figured you would use a solid tube to slip over the 2 pieces of stock tube. Why clamshells? Any concern about getting the alignment rod out when you’re done welding?
The alignment sleeve is there to stay. It will be welded in with the piece that fills the void from the casting. I confirmed there won’t be interference with the shafts if left in place.
Once welded together, I wouldn’t be able to slide a solid tube over the existing tubes unless I removed the knuckles. Clamshells are there to clean up the whole mess and be an additional brace.
OK. I’ve got it now. Thx.The alignment sleeve is there to stay. It will be welded in with the piece that fills the void from the casting. I confirmed there won’t be interference with the shafts if left in place.
Once welded together, I wouldn’t be able to slide a solid tube over the existing tubes unless I removed the knuckles. Clamshells are there to clean up the whole mess and be an additional brace.

I thought so, too. Cole, do you mind sharing your process for that? I'll be doing mine soon. I was thinking bandfile, but maybe there's a better way...Really nice job cleaning up the stock tubes.
I thought so, too. Cole, do you mind sharing your process for that? I'll be doing mine soon. I was thinking bandfile, but maybe there's a better way...
The majority of the brackets were cut off with a sawzall and cutoff discs. A grinding stone cleaned up what was left of the welds. Then finished using this belt sander attachment that I picked up off Amazon. (Link below) The quality of this tool isn’t the best, but for the price and results it was worth it.
https://www.amazon.com/dp/B0F4KBWLW2?tag=wranglerorg-20
It’s a very big bandfile - cool! Thanks!The majority of the brackets were cut off with a sawzall and cutoff discs. A grinding stone cleaned up what was left of the welds. Then finished using this belt sander attachment that I picked up off Amazon. (Link below) The quality of this tool isn’t the best, but for the price and results it was worth it.
https://www.amazon.com/dp/B0F4KBWLW2?tag=wranglerorg-20
The steel it doesn't sound bad! I was thinking of Upol Cooper weld primer when I get to welding my rear link brackets to the frame!I’m thinking to coat the tubes with steel it to fight against corrosion between the layers.
Does anyone have tips for welding axle tubes to the center section?
What I did on my HP30 center section was pre heat it to about 400 degrees or so,Right up to the point where water rolls right off. Or spitting on it......that's what I did

With my everlast Mig/Multiprocess welder I used the pulse setting and it made for a hot weld ! I could see the cast sorta melt and the filler wire well....fill in the void, it was my 2nd time using that feature and it welds hot!
After welding the tubes to the cast,I still peened them for a good minute,I stayed there for about 10 minutes with the torch to post heat the metal. After that I just put it in a big ole fiber glass blanket and left it out in the Texas heat, no cracks till this day.
Also! There is stick welding rods that you can use for dissimilar welds. I'll try finding a picture of it since ive heard good stuff about it, maybe someone knows about it ? Its a white box with green lettering...That's about the only clue I got
There are several fillers available for dissimilar metal welding, but assuming the JL axle center sections are still nodular iron like the TJ centers, I'd recommend Nickel 55 wire (ENiFe-Cl). It's 55% nickel and 45% iron composition is the right one for welding steel to nodular iron. For shielding gas, don't use 75/25 because nickel has a high affinity for carbon and will pull it from the CO2, leading to porosity and cracking in the weld. Use 100% Argon (borrow it from a TIG machine.)Also! There is stick welding rods that you can use for dissimilar welds. I'll try finding a picture of it since ive heard good stuff about it, maybe someone knows about it ? Its a white box with green lettering...That's about the only clue I got
The iron in the filler gives you good fusion, and the nickel gives good strength. The biggest downside is hardness - machining the end result is not so easy, but you likely won't be doing that. The iron also helps with welding dirty (oily) cast parts that you can't fully clean prior to welding. Pre- and post- heat (at least 350°F) will ensure good crack resistance. Because nodular iron is ductile, peening is less critical, but still a good idea. Peen immediately after laying a bead, but don't let it cool below 350°F while peening. The best way to do that is to not wait until you are all finished before peening. Peen as you go...
Similar threads

- Replies
- 12
- Views
- 1,881


- Replies
- 46
- Views
- 26,564


- Replies
- 8
- Views
- 1,651


- Replies
- 0
- Views
- 2,538

- Replies
- 7
- Views
- 2,988

