
Those looks awesome!If you want some badass pins/latches check out Aerocatch latches.
https://www.aerocatch.com/


Those looks awesome!If you want some badass pins/latches check out Aerocatch latches.
https://www.aerocatch.com/
Hmm great point. Decisions decisions...I run both pins and latches, but if I only ran one or the other it would be the pins. For me, it’s not about looks at all - pins keep the hood closed in a roll, latches, not so much...
View attachment 238640
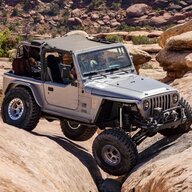
Bleeping jeep did an install on an XJ. The flush pins look nice.
Do the stock latches still fit pretty well with the highline? I haven’t looked into it yet, all my brain space has been focused on cutting the hood lolI run both pins and latches, but if I only ran one or the other it would be the pins. For me, it’s not about looks at all - pins keep the hood closed in a roll, latches, not so much...
View attachment 238640
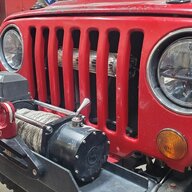
Maybe I should get a new hood and have you make one for me! Those look great. What are you plans for the white hood that was posted earlier?Here’s some potentially helpful photos. My fenders seemed to have about 1/4” bow in them. So I marked where my fender was on the grill and on the tub. Then made a mark 1/4” below each of those so I would have some cushion. I ran a laser from mark to mark and made first cut. After that I used a flap disc to contour the front and rear towards the center. The middle ended up being about perfect height.
Next I took a #2 pencil and ran it on its side down the hood. This gave me a 1/8” gap all the way down the hood line. Cut and grinder up to that line.
Then I took a sanding block and sanded the edge. I used some fine grit on the actual paint side to get any flaked paint off. I’ll use a touch up brush and brush paint on the edges. No weatherstrip for me.
View attachment 238537
View attachment 238538
View attachment 238539
View attachment 238540
View attachment 238541
View attachment 238542
View attachment 238543
Maybe I should get a new hood and have you make one for me! Those look great. What are you plans for the white hood that was posted earlier?
Thanks! Appreciate that. I spent a lot of days mulling over the steps and playing it out in my head. The key is to cut low because when the support is cut from the sides of the hood it makes the gap between the fender and hood line bigger.I am using hood pins. I didnt like the look of latches on the cut hood. It looks sleek being highlined then a bulky latch on the side. I am using Daystar hood pins. There are probably better pins out there though

They work OK, but since with the high line they are mounted higher on the hood creating an increased angle relative to the fender, I don’t think they are as effective as in the stock location. I left them on there when I originally did they high line because they worked OK. I added the pins later.Do the stock latches still fit pretty well with the highline? I haven’t looked into it yet, all my brain space has been focused on cutting the hood lol
Thanks, you are too kind. I’ve gotten very good at taking photos of the rig which cover up all it‘s flaws...I’m starting to think pins. After looking at some others highlines the latches look bulky on a cut hood. Nashville’s look good for some reason but I think it’s because he had big flares. And everything in his Jeep looks amazing so.


I'll second this. Lead acid batteries have liquid electrolyte in them. You may be ok, right now, but as that battery heats up and gets used (think winching) the fluid is going to expand. They call that a boil out...because you're at an angle, it will take less expansion than normal to flood. You don't want that...You think salt is corrosive? wait until you spill a bunch of sulfuric acid all over your frameI am not a big Optium battery fan but it might be suggested that you use one to replace the lead acid at an angle.

I'll second this. Lead acid batteries have liquid electrolyte in them. You may be ok, right now, but as that battery heats up and gets used (think winching) the fluid is going to expand. They call that a boil out...because you're at an angle, it will take less expansion than normal to flood. You don't want that...You think salt is corrosive? wait until you spill a bunch of hydrochloric acid all over your frame
Noted! Patrick has an AGM he’s going to trade me for mine. Thanks guys!I am not a big Optium battery fan but it might be suggested that you use one to replace the lead acid at an angle.

What is the right size connector for stock intake to the Windstar? I have a windstar intake sitting here been meaning to get it installed.For those wanting to know what everything looks like under the hood with genright highlines I’ll post some pics and walk through it.
I used a windstar intake but I chose not to run the windstar into the cowl because my trans dipstick is in the way of the best place to run it. I could bend the dipstick but to be honest if I fuck it up and kink it then I don’t know if I can readily find a new one. It was the hardest 32rh part to find.
View attachment 238958
Right now there are 2 couplers attaching the windstar to the tube. I will end up ordering the right size so I can go straight from the intake to the tube and eliminate one but this works for now. The windstar conveniently mounts to the grill support brace with some good ole fashion zip ties lol.
View attachment 238962
Drivers side:
View attachment 238960
I just bolted the horns close to factory location where I could easily plug them in to the harness. Nothing fancy.
The evap cansister bolts on in stockish location as well. Just cut the rear tab that hangs down off the bracket.
View attachment 238961
For the washer reservoir get a small universal one off Amazon and take the motor off your stock one and plug it in. I mounted on the rear of the inner fender.
View attachment 238965
Passenger side:
Here is the battery bracket. I know it doesn’t get a lot of love because there’s a lot of leverage on this thing. It seems solid to me since there are quite a few bolts holding it in but we will see.
View attachment 238966
View attachment 238967the relay box gets slapped down in it’s basically stock position. Bend the rear most tab back to be flat and you can mount it right on top. I carefully bent my AC line just a smidge to take pressure off of the relay box that it wraps around.
View attachment 238968
Then the vacuum reservoir mounts right on the rear of the inner fender under the battery. BE CAREFUL when removing the factory fender. Remove the vacuum line first. I forgot about it and snapped it. A quick run to autozone fixed it.
And that’s all there is too it besides cutting the hood! Hopefully that takes some of the mystery out of highlines for anyone wanting to do one.
4 to 2.5” from windstar to stock tubeWhat is the right size connector for stock intake to the Windstar? I have a windstar intake sitting here been meaning to get it installed.


I work in the afternoon and night! Mornings are for the JeepDo you have a job? Or is it just working on the Jeep?
It looks good!



