Cheetokps learning as I go build thread

Cheetokps

TJ Enthusiast
Supporting Member
Joined
Jul 23, 2020
Messages
591
Location
Wallingford, CT
Hi everyone, I decided to create my own build thread to keep everything organized in the same place. To start off, I had been wanting a jeep for a while before I bought mine, and had spent countless months searching through listings and researching on this forum as well as others and youtube, etc. I wanted a 4.0 with a manual in overall good condition with a good frame, and relatively stock.

After a long search, I finally found the perfect jeep last September. 2002 sienna pearl sport with 5 speed, soft and hardtop, a few minor mods, an amazing frame, and 98k miles. It came with 31" general grabber tires, a 2" budget boost, new headlights and head unit, etc. I also later found out it has a rear dana 44!
Stock jeep.jpeg

It had a few small issues, but nothing major and I didn't mind dealing with the small things. I had never driven a manual before this, so I learned as I went. I started out driving around the small streets near my house, and within a day or two I had the hang of it enough to take it anywhere.

Doors off.jpeg

The first things I did was take my doors off and put the top down, and I immediately knew I made the right decision.

Before this I had never done much work on cars, but I wanted to learn so I have been diving headfirst into everything possible with this. I flushed my coolant, replaced my oil, transmission fluid, and serpentine belt and rotated my tires. Then I just recently replaced my power steering fluid which may have been leaking as well as greasing everything and replacing sparkplugs. All of this was way easier than I had expected, and I fully intend to keep learning how to do everything myself (with the exception of a few things).

I decided to replace the almost rusted through stock style bumper with a new one

Before:
1614445063587.png


And after:
1614445082329.png

I eventually want to get a winch and some lights for it to complete the look, but I think that will wait until after I can get a lift, new wheels and tires, and a sye.

There are a few more things that I have added along the way, such as:

Once it gets warmer out I plan on doing a bunch more things I have been putting off, like painting the terrible fender flares and maybe the headlight bezels. I also plan on fixing the few small rust spots on the fenders and under the doors, and if that doesn't come out looking good I'll get some sliders to cover up the damage. I am also in the process of making a hoist system to lift my hardtop and store it in the summer.


My goal is 33's with maybe 3.5" suspension lift; since I am a college student working part time and I want to do everything the right way the first time, this might take some time. I don't off-road too often since there is not a lot around me, but I am always wanting to do more so I want to make sure I'm prepared. I also want to thank everyone on here for being so helpful, without this forum I would not have been able to do nearly as much as I have. I have spent way too much time reading through a lot of things here recently, but I am learning a lot.
 
Congratulations on the Jeep, it sounds like you found a good one. The TJ is a perfect platform to learn how to wrench on your own vehicle. Nice and easy. For 33” tires, if you get a quality 2” suspension lift and a solid 1 -1.25” body lift you should be good to go for awhile and potentially down the road re gear and add a SYE.
 
  • Like
Reactions: Cheetokps
I have been planning out my lift for when I have enough saved up, and am deciding between throwing together my own or getting the zone 4.25" combo.

Option A:
  • Rancho 3.5" Springs $111.23
  • Rancho RS5000x's $217.36
  • Metalcloak adjustable front trackbar $189.00 (or maybe jks, still undecided)
  • JKS rear trackbar angled relocation bracket $60.00
  • JKS Swaybar Quicker Disconnects $152.00
  • Metalcloak rear swaybar links $35
  • Bump stop (probably hockey pucks) $20.00
  • Rough country rear shock relocation kit $25
  • Maybe Yj extended brake lines, not sure if needed

Total: $764

Plus, if I go with this option I would need a sye
  • Advance adapters sye $242
  • Tom woods cv driveshaft $319
  • Currie double adjustable rear upper control arms $381

Total: $942


Option A total: $1706


Option B:


Or, I could go with the zone 4.25" combo lift which includes:
  • 3" springs
  • 1.25" body lift
  • Motor mount lift
  • Front sway bar disconnects
  • Rear swaybar links
  • Bump stops extensions
  • Rear trackbar bracket
All for $451. Then I would need to add
  • Rancho RS5000x's $217.36
  • Metalcloak adjustable front trackbar $189.00 (or jks)

With only a 3" lift, the motor mount lift, and my transfer case drop I do not think I would need a sye. (might not even need the transfer case drop if I'm lucky)

Option B total: $857


I will be going with 33x12.5" BfGoodrich KO2's on a 15" wheel with around 3.75" backspacing (still undecided on the wheels), does anyone have any input on which option I should go with? Or any input about the parts I plan on getting? I do not do much hard wheeling (yet at least) so the zone kit seems like it might be a good choice and the $850 I save could go towards other mods. However, I feel like it might be a better idea to get the sye and probably better parts even if it means saving up a little longer.
 
  • Like
Reactions: Tob
I think the most important difference is that option A will set you up for a tummy tuck down the road, while option B will leave you with a transfer case drop. Overall, good choices on parts. If you're not going to be wheeling often, I'd skip on the sway bar disconnects; they aren't really a necessity. There is nothing wrong with pulling out a T55 socket and just unbolting it for the occasional wheeling trip. 2 minutes tops, and you can do it while you air down. 🤷‍♂️
From all the discussions I've read through, I'd go for a JKS front track bar over a Metalcloak.
Everyone has their own specific taste in wheels, but 15"x8" with 3.75" BS is a good idea. KO2's are a great choice too.
 
  • Like
Reactions: Cheetokps
I think the most important difference is that option A will set you up for a tummy tuck down the road, while option B will leave you with a transfer case drop. Overall, good choices on parts. If you're not going to be wheeling often, I'd skip on the sway bar disconnects; they aren't really a necessity. There is nothing wrong with pulling out a T55 socket and just unbolting it for the occasional wheeling trip. 2 minutes tops, and you can do it while you air down. 🤷‍♂️
From all the discussions I've read through, I'd go for a JKS front track bar over a Metalcloak.
Everyone has their own specific taste in wheels, but 15"x8" with 3.75" BS is a good idea. KO2's are a great choice too.
I figured if I had to replace my sway bar links for the lift anyway I might as well get disconnects. Not sure if I will ever end up doing a tummy tuck (although I might change my mind down the line) but I would definitely prefer to not have the transfer case drop, I hate how it looks. Although I first would have to figure out how to get my skid plate off, all of the heads on my bolts are stripped and I haven't had luck with those bolt extractor kits
 
I figured if I had to replace my sway bar links for the lift anyway I might as well get disconnects. Not sure if I will ever end up doing a tummy tuck (although I might change my mind down the line) but I would definitely prefer to not have the transfer case drop, I hate how it looks. Although I first would have to figure out how to get my skid plate off, all of the heads on my bolts are stripped and I haven't had luck with those bolt extractor kits
Yikes. Sounds like fun! I think it depends on how high the lift is. I ran stock front sway bar links on a 3" suspension lift with no problems.
 
Yikes. Sounds like fun! I think it depends on how high the lift is. I ran stock front sway bar links on a 3" suspension lift with no problems.
Yeah, I bought some of this stuff that someone on here recommended that I plan on trying, if nothing works I might just take a cutting disc right to the transfer case drop bracket to cut through to the bolts; then maybe weld on a nut onto the exposed threads (would give me an excuse to buy a welder). And good to know about the sway bar links, maybe I'll try it with the stock ones at first and buy new ones if they don't fit
 
Last edited:
  • Like
Reactions: Tob
How do you like that bumper? Matching rear? Tow capacity?
I love it so far, although it does seem to have a little bit of rust forming on the inside like some of the reviews said. But it was $250 on amazon so definitely worth it, and seems good otherwise. Looks a little empty without a winch on it (but hopefully that can be fixed soon)

Still running the stock rear bumper for now, but I think I want to get a dirtworx rear eventually. Once I get my 33's I don't know if my spare will fit so I might have to get a bumper with a tire carrier, especially because one of the bolts snapped on my stock carrier
 
So I have decided on the zone 4.25" combo lift (with rs5000x shocks, 239/241). No upgrades to the kit, if I want sway bar disconnects in the future I will either make my own or buy the jks. I plan on purchasing the jks front trackbar separately as well. I may not get around to installing the lift for a while, but I want to get the body lift and motor mount lift installed first to get rid of my rusted skid plate drop (hopefully the mml is enough to prevent vibrations, if not I'll but the skid drop back on later)

I was looking at the install instructions, and it shows the bump stop spacers being installed above the jounce bumper and cup.
Screenshot (48).png


However, I have read posts on here explaining that the bump stop extensions should be on the bottom for the front, because extensions on the top could make the jounce bumper hit the spring. Is this right? I wouldn't think they would include something in their kit that is that much of a problem, but I could definitely see it being possible.

If so, when I install the lift should I just relocate the included spacers to the bottom instead?

Also just to double check, the optional cam bolt kit and pinion cam locks aren't worth including, right?
 
File_000 (9).jpeg

This showed up last night, god damn zone shipped it fast. Ordered then to my door in under 48 hours. My MORyde kit also came in (thanks @sloowhand).

Still need to order my shocks and trackbar as well as my wheels and tires. Might be a while before I get it all installed, work and classes eat up most of my free time. I think I might try to install just the body lift and motor mount lift soon, so I can get rid of my transfer case drop.
 
After having to look at my very faded flares for months, I was finally able to paint them! I decided to take them fully off so I could get rid of the rust on the fender and bondo/paint it, didn't come out as well as I planned but at least the rust is gone. Also I'm sure that not many people will notice, it's probably just me being a perfectionist. For the flares I cleaned with dawn dish soap and hot water, scuffed with gray scotchbrite pad, wiped with acetone, then did 3 coats of rustoleum textured black paint.

Here's how they looked before:
File_000 (12).jpeg


And after:
File_000 (13).jpeg


Next I gave her a wash with my new power washer and foam cannon, it's amazing
File_000 (14).jpeg


And here she is after the wash:
File_000 (15).jpeg


Now I just have to get my wheels and tires before I can do my lift, I am almost positive that I will be getting these (with 33x12.5 ko2's). I will be taking advantage of extreme terrain's current $50 coupon, so I have to wait until April 15 to order the wheels 😕. Still haven't decided where I will be getting my tires, probably a local place to make it easier with the balancing
 
It's always amazing to me how much better any Jeep looks once the fading flares are dealt with. Nice job, good luck, have fun and welcome to the only TJ Forum worth spending any time on...
 
  • Like
Reactions: Cheetokps
Finally got the morryde tailgate reinforcement kit installed!
Morryde.jpeg


Took me hours to grind down the stripped bolts (more on that here) but I finally got it done. I chose not to install the "optional" spacer brackets it came with for now, since I still have the stock tire on it. However, this meant that the third brake light piece would not fit, since it was making contact with the metal tip of the morryde plate and the bolt holes did not line up
Third brake light space.jpeg


So at least for now I decided to leave the third brake light off, might just wait until I get my new wheels/tires to install it. I also need to get a new tire carrier because mine is rusted and I broke off one of the three studs for the lugnuts. Thinking I can maybe find one on facebook marketplace or something.
 
  • Wow
  • Like
Reactions: Nickgsjeep and Tob
I currently have a cheap cigarette lighter compressor to top off my tires, but since I am hopefully going to get into harder trails soon it will not cut it.

The viair 400p just dropped in price on amazon, its at $173. Is the 400p model worth it, or would I be fine with a cheaper one like the 88p for $67? I will be getting 33x12.5r15 ko2's soon so nothing massive but I am not sure how slow the 88p is
 
Here's some data from Viair's website that may help you decide.

88P:
33″ X 12.5″​
FILL RATE​
0 to 30 PSI​
5 min. 45 sec. (± 15 sec.)​
15 to 40 PSI​
2 min. 56 sec. (± 05 sec.)​

Duty Cycle: 25 min. @ 30 PSI​
– Max. Working Pressure: 120 PSI​

400P:
33″ X 12.5″​
FILL RATE​
0 to 30 PSI​
4 min. 00 sec. (± 10 sec.)​
15 to 30 PSI​
2 min. 00 sec. (± 05 sec.)​

Duty Cycle: 33% @ 100 PSI​
– Max. Working Pressure: 150 PSI​

I'd say make your decision based on how often you will use it, the max tire size you will run, and what pressure you want to run in those tires.
 
  • Like
Reactions: Cheetokps
Here's some data from Viair's website that may help you decide.

88P:
33″ X 12.5″​
FILL RATE​
0 to 30 PSI​
5 min. 45 sec. (± 15 sec.)​
15 to 40 PSI​
2 min. 56 sec. (± 05 sec.)​

Duty Cycle: 25 min. @ 30 PSI​
– Max. Working Pressure: 120 PSI​

400P:
33″ X 12.5″​
FILL RATE​
0 to 30 PSI​
4 min. 00 sec. (± 10 sec.)​
15 to 30 PSI​
2 min. 00 sec. (± 05 sec.)​

Duty Cycle: 33% @ 100 PSI​
– Max. Working Pressure: 150 PSI​

I'd say make your decision based on how often you will use it, the max tire size you will run, and what pressure you want to run in those tires.
Wow that doesn't even seem that much slower. I'll probably run mine at around 26 psi based on recommendations here, and since I have heard ko2s are actually about 32" I think the 88p will be good enough for me
 
I am in the middle of changing my u joints and replacing rotors/pads/calipers and went to autozone for some brake fluid. I saw these and couldn't resist... the only ones they had were the exact same ones I have been wanting (a lot cheaper than amazon too)
IMG_0257.jpg


I was planning on finishing up the u joints tonight but I was so excited about these I had to take them out and play with them
IMG_0256.jpg
 
  • Like
Reactions: Nickgsjeep
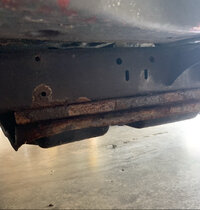
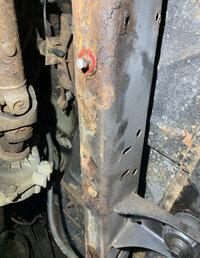
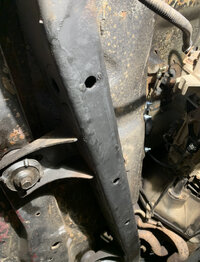
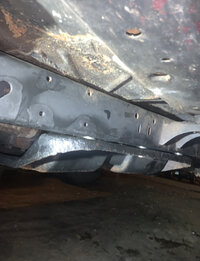
Finally got around to removing my skid plate to clean up the frame and getting rid of the old transfer case drop. All the Allen head bolts were stripped so I had to rent a 7” angle grinder to cut them through the drop bracket and then grind them down and hammer the nutserts through.

Before:
B54D4F2A-65D3-4C51-BB40-B8C6B8BFBACE.jpeg975AA885-F976-40F4-9BB6-DD7A1608CC77.jpeg

After cleaning up the rust and painting it:
6DAE71FA-0B86-42F9-B975-DE83EDDA8985.jpegCE579538-B369-4CA5-B955-845D96F8F95F.jpeg
Paint wasn’t perfect, I was at an awkward angle and sprayed too close but it’s definitely better than before.

While it was out I pulled my front driveshaft to see if it helps get rid of highway vibrations, changed my transfer case fluid and installed a savvy transfer case shifter cable.
CD6DA682-8C26-49B9-AF94-76B79D648725.jpeg

So much better! It was really difficult to shift before, and my 4 low wasn’t really usable because it didn’t fully engage I think and would just make grinding noises. Now it shifts with no effort and 4 low works perfectly
 
  • Like
Reactions: Vasq and Tob