Drivers Side Motor Mount Failure

Arthurius

Master Of Some
Original poster
Supporting Member
Joined
Dec 14, 2021
Messages
262
Location
Mesa, Arizona
Just wanted to see if anyone has had this happen to their motor mount, and wondered if it may be contributing to the endless cacophony of buzzing and vibrating that I experience in the cab? Above 65 it feels like the seats are vibrating. I would like to remove the front D/S to see if that's the culprit for the vibes, so this mount failure may be unrelated.

Appears the upper hoop has completely sheared, drivers side under the exhaust. I have some new mounts ready to be installed, just need to find the time.
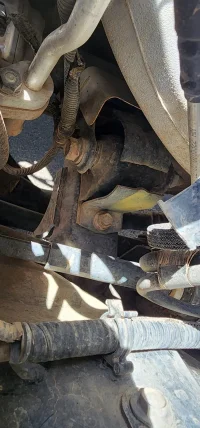
20230417_135747.jpg
 
  • Sad
Reactions: MikeE024
That's crazy! And, yes, that could certainly be causing some bad vibes!
 
I have some new mounts ready to be installed, just need to find the time.

I just put Savvy motor mount pads under my motor mounts yesterday. I have three tips for your mount replacement based on my experience:

  1. If you jack up the engine by the oil pan, be careful. I've jacked entire vehicles up by the oil pan without damage using a chunk of 2x6 to spread the load in the past. I used a 2x4 on mine, and it was about an inch narrower than the oil pan. It wasn't big enough. I now have a 1/2" deep dent in the pan that is the shape of the 2x4.
  2. For the driver's side mount, if you have A/C, you won't be able to remove the bolt going through the center of the rubber portion of the mount because the manifold on the compressor is too close. You either have to remove the compressor or remove the mount as an assembly with the bracket that attaches to the engine, then remove the mount from the bracket. I chose not to remove the A/C compressor. It was tight getting that mount/bracket assembly out (had to really jack the engine up high, which probably contributed to the dent in the pan), but I think it was easier than removing the A/C compressor. Also, when you reassemble, attach the bracket back to the engine first, then install the mount (see tip #3 below for more on that process), and then put the cross-bolt in from the rear instead of the front. I didn't even try to reinstall the mount and bracket as an assembly because it's pretty heavy and it seemed like lining everything up would be a frustrating experience.
  3. It took me several frustrating attempts on sequencing to figure out the best way (for me, anyhow) to get everything back together. I ended up setting the motor down low so that the ears on the engine brackets were below the ends of the rubber mount (almost resting on the frame pads for the mounts). This allowed me to move the mounts around to get their mounting holes lined up with the holes in the frame pads. I then tightened the nut and bolt on the ends of the mounts. Finally, I jacked the engine up to align the holes and drive the mounting bolts through. Two things helped get that final alignment accomplished. Using a taper punch through the hole and using a long, large flat-blade screwdriver to tap on the ends of the rubber mount down.
 
On the drivers side mount on mine, I chose to cut the bolt with a reciprocating saw as I had new bolts in hand. It was very easy
 
First glance, this sounds like a major PITA. Does anyone know if its possible to just replace the hoop? Just a thought.. lol
 
Easier to replace the whole mount. Jack up the engine on that side with a 2x4 on a floor jack with the top of the 2x4 placed under the flange of the oil pan where it bolts to the block. Make sure the replacement motor mount has a good quality rubber bushing, avoid polyurethane mounts. Personally I'd replace both motor mounts. When one has failed the other isn't far behind. Avoid store brand motor mounts!
 
First glance, this sounds like a major PITA. Does anyone know if its possible to just replace the hoop? Just a thought.. lol

It's not hard. You do have to remove the whole mount regardless, so repacing the whole thing makes the most sense.

I like to stand a 2x4 vertically on a jack and stick it under the harmonic balancer for lifting the engine. a 2x6 wider than the oil pan lying flat on the jack also works.

Store brand mounts suck (Anchor brand pretty much exclusively) and Mopar are hard to find. MORE rubber is probably the best option unless you can find some stock of Mopars.
 
  • Like
Reactions: Jerry Bransford
I just put Savvy motor mount pads under my motor mounts yesterday. I have three tips for your mount replacement based on my experience:
...
2. For the driver's side mount, if you have A/C, you won't be able to remove the bolt going through the center of the rubber portion of the mount because the manifold on the compressor is too close. You either have to remove the compressor or remove the mount as an assembly with the bracket that attaches to the engine, then remove the mount from the bracket. I chose not to remove the A/C compressor. It was tight getting that mount/bracket assembly out (had to really jack the engine up high, which probably contributed to the dent in the pan), but I think it was easier than removing the A/C compressor. Also, when you reassemble, attach the bracket back to the engine first, then install the mount (see tip #3 below for more on that process), and then put the cross-bolt in from the rear instead of the front. I didn't even try to reinstall the mount and bracket as an assembly because it's pretty heavy and it seemed like lining everything up would be a frustrating experience.
To get the big bolt out, you don't have to remove the engine bracket. Just loosen the 3 bolts in the engine bracket, and the bracket will shift enough to slide the big bolt out past the A/C compressor. Torque the 3 bolts back down (or replace them one at a time and torque them down).
 
To get the big bolt out, you don't have to remove the engine bracket. Just loosen the 3 bolts in the engine bracket, and the bracket will shift enough to slide the big bolt out past the A/C compressor. Torque the 3 bolts back down (or replace them one at a time and torque them down).

Now you tell me, OldBuzzard! I'm all crippled up from struggling with that damn bracket! :giggle:
 
Store brand mounts suck (Anchor brand pretty much exclusively) and Mopar are hard to find. MORE rubber is probably the best option unless you can find some stock of Mopars.
X2, this is the motor mount I'd go with if you can't find a Mopar. This is actually a better heavier-duty mount than the Mopar is. https://mountainoffroad.com/collections/wrangler-tj/products/bomb-proof-motor-mount-kit-yj-tj-lj-xj

But their 1" taller motor mounts will eliminate the need for a tcase drop if you have one or eliminate drivetrain vibrations from your 2" lift if present and give your oil pan 1" more ground clearance as well. Same price too, it's the way I'd go. https://mountainoffroad.com/collect...f-motor-mount-kit-for-1-lift-97-06-yj-tj-lj-1
 
  • Like
Reactions: JMT and GPK03X
Stick with mopar mounts if u want to minimize the chance of vibes. I returned the uninstalled bombproof set and went with Mopar mounts and mml blocks. At worst, it wouldn’t have made a difference. I prefer those odds.
 
Stick with mopar mounts if u want to minimize the chance of vibes. I returned the uninstalled bombproof set and went with Mopar mounts and mml blocks. At worst, it wouldn’t have made a difference. I prefer those odds.

Getting next to impossible to find.
 
I took Jerry’s advice and went with the M.O.R.E. 1” lift mounts. Cured the vibrations I was getting from the 2” lift. As long as you order the ones with the torsional rubber, you’ll get no added vibrations
 
I took Jerry’s advice and went with the M.O.R.E. 1” lift mounts. Cured the vibrations I was getting from the 2” lift. As long as you order the ones with the torsional rubber, you’ll get no added vibrations

There are a lot of people who notice vibes with MORE rubber over Mopar. It’s not really surprising, there’s a lot less rubber there. MORE uses a control arm bushing. However, they are one of the only remaining “decent” options. Better than brown dog by a long shot, and Mopar isn’t really available, so it is what it is.
 
Stick with mopar mounts if u want to minimize the chance of vibes. I returned the uninstalled bombproof set and went with Mopar mounts and mml blocks. At worst, it wouldn’t have made a difference. I prefer those odds.
When did you find and buy those Mopar mounts? Recently? If it was recent where did you find them?
 
For clarification, can these motor mount lift solutions be installed without a body lift? I currently am in line for the Savvy aluminum 1.25" when its available.

As for the replacement mounts, I purchased Omix-Ada ones from Amazon. That decision will probably bite me in the ass soon down the road but i would rather get the failed mount replaced than wait to save up for something like the MORE. I'll shoot for doing this this weekend, however its our first triple digit forecast so that's good motivation..
 
For clarification, can these motor mount lift solutions be installed without a body lift? I currently am in line for the Savvy aluminum 1.25" when its available.

There are others on here with much, much more experience than I, but having just done mine, the one thing you'll need to look out for that I can think of is radiator fan clearance. When you put the motor mount lift in, the fan, which is attached to the motor, rises, but the radiator and shroud, which are attached to the frame, stay put. I did the body lift first, and removed the four screws holding the radiator shroud before doing so. Then, after completing the body lift and the motor mount lift, I reattached the shroud. The clearance changed slightly, but there was still plenty of clearance axially and radially around the fan.

If you only do the body lift, I think the fan will hit the bottom of the shroud, and if you only do the motor mount lift, I think the fan will hit the top of the shroud. I know I've seen posts from owners who did just the body lift and simply drilled new holes in higher locations on the fan shroud, but I haven't seen any posts from owners who did just the motor mount lift, so I'm not sure if there's room on the shroud for holes in lower locations to raise the shroud.
 
I know I've seen posts from owners who did just the body lift and simply drilled new holes in higher locations on the fan shroud, but I haven't seen any posts from owners who did just the motor mount lift

This. On top of the cooling fan i also fear clearance issues under the tub in the trans tunnel area. For example, I've read that the Savvy 1.25" BL gives alot that a 1" BL lacks when tummy tucking. I would imagine a MML without a BL would do the same?
 
  • Like
Reactions: sab
This. On top of the cooling fan i also fear clearance issues under the tub in the trans tunnel area. For example, I've read that the Savvy 1.25" BL gives alot that a 1" BL lacks when tummy tucking. I would imagine a MML without a BL would do the same?

Hopefully some more experienced forum members will be able to add more clarity for you!