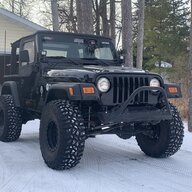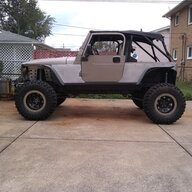
Someguys 04

Looking good!!! Do you know the angle you bent the a pillar at the windshield?
30* was the target, it went a little over at about 31*.

i'm not totally committed to the bent bar across the dash and may put a straight in. i'll be trying to fit an inverted V tomrw.

if you look under the dash you can see the tube is sectioned. i have a 7" stem that will mount to the floor up front and receive the A pillar making it removable from the tub (a footplate will never fit through the dash).
i've looked at internal tube clamps, and might go this route (80$). or i could use some 1.5" for an inside coupling and then a chunk of 2" for a sleeve clamp on the outside..
 
Last edited:
  • Like
Reactions: JMT
30* was the target, it went a little over at about 31*.

i'm not totally committed to the bent bar across the dash and may put a straight in. i'll be trying to fit an inverted V tomrw.

if you look under the dash you can see the tube is sectioned. i have a 7" stem that will mount to the floor up front and receive the A pillar making it removable from the tub (a footplate will never fit through the dash).
i've looked at internal tube clamps, and might go this route (80$). or i could use some 1.5" for an inside coupling and then a chunk of 2" for a sleeve clamp on the outside..
I used tube connectors on the lower a pillar for the same reason. Nice work - cage looks great so far.
 
30* was the target, it went a little over at about 31*.

i'm not totally committed to the bent bar across the dash and may put a straight in. i'll be trying to fit an inverted V tomrw.

if you look under the dash you can see the tube is sectioned. i have a 7" stem that will mount to the floor up front and receive the A pillar making it removable from the tub (a footplate will never fit through the dash).
i've looked at internal tube clamps, and might go this route (80$). or i could use some 1.5" for an inside coupling and then a chunk of 2" for a sleeve clamp on the outside..
Thanks for the info, this is on my long list of things to do, but would like to tackle it soon. I’ve beefed up my rear section of cage, now I’m looking at the a pillars. I don’t have a bender yet, but will get someone to make that bend for me. Like you I will somehow make it removable. More than likely use the tube couplers. Any tricks you learned along the way to get the tube to slip through the dash?

BTW, your rear wheel wells turned out really good!!! I like those lines a lot!
 
  • Like
Reactions: someguysjeep
i did break down and get a cheapo amazon tube notcher, it even came with a hole saw kit for like 89$, and it's been great so far. i did have to take it apart and clean it up so it'd run smooth, but it's doin fine so far.

i too want a bender but am so close to finishing it now seems like a misdirection of funds.
as far as benders the best i can find that's not 2k is a JD2 that claims it can handle .250 wall DOM while most others limit at .120 or even .095. the "affordable bender" looks sufficient, but is tough to get right now, at about 599$. biggest issue is dies are hard to get right now.

at the dash, i set the tube about a 1/2" from the back of the dash and just traced around it. i drilled that marking full of holes and hand trimmed it out with my razor knife. then i ran into the vents, so i hacked out a portion, being very careful not to snag wires. and i had to cut the diagnostic reader outlet loose to move it over.

and mrblaine just saved my ass on another post about needing to remove the dash vent cover b4 installing the dash bar or your gonna have an issue getting to the dash screws for the cluster and center bezel in the future.
 
I‘ve had the JD2 bender for years, and am very happy with it. I definitely recommend it. The dies are the expensive part.
if it can handle thick wall DOM it's worth the extra 60$ a die over the others. that takes it from just roll bars and nerf bars to custom TB's and link bending range.
 
  • Like
Reactions: Wildman
straight tube went in over the dash with enough room to sneak the cover out.
then i reworked that bent bar again and came up with this.

168055038_263575105411980_1504609265769327518_n.webp


168851966_970969296773250_5631725246463638373_n.webp


166647320_381897416745877_3083444317409622882_n.webp
 
something just didn't look right so i refit the V, and used a measuring tape this time.
got the rear brakes piped, just needs secured to the axle.
got the fuel line tied in at the rail, and down the frame.
got those last 2 screws in the rear armor.


ok so i removed the vacuum module the emissions hoses run to.
1 why don't we use 1 of those ports connected to our cell vents?
2 do they make plugs to cap off the engine spigots? or do i need to do something different?


and since i am likely gonna leave my aluminum armor raw, i'm considering doing the same for the cage. i'm thinkin instead of paint i maybe just run um clean with emery cloth and just give um a clear coat.

167824251_714984995864980_4102496579665684326_n (1).jpg
 
Last edited:
something just didn't look right so i refit the V, and used a measuring tape this time.
got the rear brakes piped, just needs secured to the axle.
got the fuel line tied in at the rail, and down the frame.
got those last 2 screws in the rear armor.


ok so i removed the vacuum module the emissions hoses run to.
1 why don't we use 1 of those ports connected to our cell vents?
2 do they make plugs to cap off the engine spigots? or do i need to do something different?


and since i am likely gonna leave my aluminum armor raw, i'm considering doing the same for the cage. i'm thinkin instead of paint i maybe just run um clean with emery cloth and just give um a clear coat.

View attachment 241610
Looking good!!! Did you set the A to B bars so you can use the factory door surrounds?
 
Looking good!!! Did you set the A to B bars so you can use the factory door surrounds?
The PS bars are etched for factory equipment if i choose to bother. Not sure if my A bar will jive , guess I should look. But as long as I can fit a small rain tarp I'm good.

i did wanna run a bar from A to B down under the door threshold, but it would have to connect to the floor stub of the A pillar and have an inline coupler tight on the B pillar.

fact is, i have to weigh what it is....................and it's not a real roll cage , but it doesn't have to be yet. i have accomplished a stronger flop top and that was the goal.
after i have tons and 40's, then we might be doin stupid shit to warrant finishing it into more.

so i'm gonna just add the brace at those back bends and the brace in the center up front between those dead legs at the center of the door header. and call it good for now.
 
Last edited:
  • Like
Reactions: Wildman
so i gave toximus a poke on his thread and he pointed out what should have been obvious to me. and pointed me to vacuum caps. i guess at this point i don't expect anything to be simple or cheap, but 3$ at autozone and that's done.

this eve i got the rear armor all tightened up and got the tail lights installed and wired.

been messin with the fit of the rear bumper and made up some mounting plates, i can't get as much weld as i'd like directly on the bumper, the plate will allow more weld access and then it'll bolt on like any other.

and i got my aluminum for the front fender stiffeners, looks like it'll do just fine and was only about 85$.
 
messed with the front fender pattern this morn.
then i got that bumper mounted, needs to come off for paint but it's on there. 3/4" gap between it and the tub.
should be into trimming rockers tomrw.

rear lights are lit but hard to tell...............pics or it never happened , ya.

169846647_295674105350502_6459177499290938058_n.jpg


171183662_3822813387809396_7654284352048905928_n.jpg

i ordered some OE khaki metallic touch up paint and clear coat today also. and i may order up another strip of aluminum to cover the lower gate valance.
 
so that piece of paper turned into this piece of aluminum.

175199494_1400458623672877_8154641706968010560_n.jpg


and i wanted to retain my vent. so it became this.

173097045_3781851531910886_5959026836828360609_n.jpg


i do wish it was 2" longer and i could point that front end over the flare. i may see if the guy at work can tig me a piece on there.
 
Last edited:
weather went to shit for a wk so didn't get much done..........and having the air let out of me from not having my shit together to make the Moab trip doesn't have me super motivated right now.
i need some good weather to finish. it's mostly small BS, but i need a lot of painting b4 assembly and i need milder temps (and no rain) for that.

i did get the rear locker all wired at the dash the ARB compressor is done but the connection to the aftermarket non ARB 3 pole switch has me second guessing what connections to use. (pic below) i think i need to go with blk, rd and yllw. 1 blk is redundant and the other (blu) is switch illumination if i'm not mistaken. working with switch 1 leads.

made up couple new brackets for the rear brake line, just need welded onto the axle.

got most of the cage done, just need to get 2 more tubes bent for my dead legs to the door headers and it's as far as it's going right now (still considering seat tie in's if i can do it quick and clean).
i did not really care for the windshield V as it was. the tubes not being inline messed with me the more i looked at it. so they were spread to be inline with those above on the windshield header. the placement of the bar is moot for sight, it's there no matter what. this spot or 1.5" over it's still there. and i even considered downsizing the tube but, don't think it'll make enough difference to matter.
i also got a B pillar tie fit to work for seat harnesses...... once i get there.

the fender cover i made up fits pretty good, but the driver side fender is shot and i can see the pass side beginning to get a few specs i don't feel like fighting, so b4 those go on i have to replace those. i'm ruling out finding more old crap and hacking it up, so it 's 300$ for new OE fenders to cut up, try and see if i can make my own or buy some real HL fenders. i know i could make um, but i;d have to pay for some tig work. or get good with a spool gun.

175709530_1419921988340152_1302081622854268926_n.webp
 
so i got this rotten fender i mentioned and had some time at lunch so i bent these up.
1" OD HREW pipe i found in the bin.
and i've had 2 big scraps of rear corner armor, and wonder if i can make up a hybrid fender, the tubes, grill plates and sides will be steel and the top would be aluminum.
the sides would be buried under the side armor, so it'd never be seen. i just have to find a clean way to fasten the plate to the tube with screws or rivets. i can mount small tabs along the tube.

dumb idea?

180148150_3089043301373645_6413835833189610859_n.webp


177528326_3671935706249234_4602439774716242195_n.webp
 
i been trying to get small things buttoned up. i keep finding hidden rust that previously cleaned and covered with POR15 that just got worse. i'm kinda really disappointed and this product did no better than a cheap undercoating. and actually hid the formation of it from me.

now some could say i did it wrong but i bet they didn't sand and wire wheel their whole frame, took acid to all the hard to dig and pitted spots, then wiped it down with acetone 2x b4 beginning the POR regiment that cost me a couple hundred $ when all was done.

where there was no rust present the finish doesn't adhere very well, even though it was all scruffed, it can be pulled off in pieces, kinda like peelin a bad sunburn. what adhered to the less than perfect surfaces just allowed rust to begin again but now hidden from view.

and i found a hole at the torque box under the driver door at the middle body mount crown. it's gonna have to be dealt with ( but not right now) i have some old formed 7ga channels that'll fit perfect over whats there now. i can trim the old box off right down the sides leaving a nice lip to get some welds on and have that thick floor lap (kinda like a saf t cap) to get some weld onto as well.
so next fall/winter i'll do that. at that point i can extend the box back some to aid in support of the extended side panel that covers the old wheel well arch.

gonna try and use the HF blaster and get some of this cleaned up and repainted today, i wanna get those dam rockers on.

i got my touch up paint, just need good weather to do it.
 
I'm SO glad I don't have to deal with the RUST like you guys do. There is other shit we deal with out here but the rust isn't one of them.

Your Jeep is still looking great.
 
and 1 more time i don't like the windshield V on the cage, so i got some 1" tubes to try out and i got my dead legs bent.
also got the last pieces of the cage from Summit today. no more excuses not to get welding soon.

2 Trail Gear interlocking couplers for the A to B bar and some clamps for the bottom of the A bars.
i figured out a way to get a bar from A to B and still have the cage removable.

so, up front on the floor is a 7" stem on a 3/16"plate with 3" of an inner slip joint exposed to capture the top piece. this piece is pretty permanent but could be removed (cause a foot pad won't go through the dash).
i'll weld 1/2 the allstar clamp to the bottom tube. once the A pillar is placed, i'll clamp the tubes and put a fat tack on the 2nd 1/2 to the top tube. for this to come apart, it'd have to bust my fat tack, snap 2 grade 8 3/8" bolts and then jump off the 3" stem.

now off that 7" tube i'm gonna run a horizontal bar from A to B, down low just clearing the seat hump. this is where the TG coupler comes in and i have a receiver stub coped to weld to the B bar.
so i can disco the TG coupler and 96% of that bar is part of the front stem/foot. this will allow it to all come out for hard to reach welding and paint. but i will weld all i can in place inside the tub 1st.
this lays the foundation to be able to tie the seats to the cage and to be able to add removable diagonal door bars.

179947617_133341375478026_1757872563043132117_n.jpg


179341081_748856165681988_2369010146029704315_n (1).webp
 
Last edited:
I wonder what it would take to swap the front stanchions to a thru the dash tubes? Or if I could do that?

Of course might be easier to get a whole new cage made. I like what you have done with that PS cage.
 
i'm getting practice at my pipe coping skills. the notcher sure does help.

i'm sure we could figure a way to replace stanchions, really depends on the line the door header comes into the windshield at, to show the line you can get down through.
if 1 committed to full time trail doors i think the A pillar could fit right beside the dash where the stanchion does.