What did you do to your TJ today?

I'm getting closer to pinpointing the source of the transmission leak. Found a puddle under the trans and then traced it up to this. This is where the fluid is pooling before dripping to the floor. Haven't found the actual source of it yet.

Looks like the output shaft seal, or the t-case input seal. I don't think there's anything higher up at the back of the case.
 
I'm getting closer to pinpointing the source of the transmission leak. Found a puddle under the trans and then traced it up to this. This is where the fluid is pooling before dripping to the floor. Haven't found the actual source of it yet.

View attachment 465107

I spent quite a bit of time chasing a leak coming from the same spot. You will need to remove the transfer case. Before you do, check the fluid level in the transfer case to verify that is low. Check the transmission too. It could be one of two seals. Either the input seal to the transfer case, or the seal at the transmission output shaft of the transmission at the far end of the adapter housing. While it's apart I would replace both. Check the input shaft of the transfer case for wear before replacing seal.
 
  • Like
Reactions: JasterMereel42
I spent quite a bit of time chasing a leak coming from the same spot. You will need to remove the transfer case. Before you do, check the fluid level in the transfer case to verify that is low. Check the transmission too. It could be one of two seals. Either the input seal to the transfer case, or the seal at the transmission output shaft of the transmission at the far end of the adapter housing. While it's apart I would replace both. Check the input shaft of the transfer case for wear before replacing seal.

I'm 90% sure it is the transmission seal. I replaced all the fluid a couple of months ago. This is for both the TC and the trans, and the trans dropped about a quart of oil in a month.

Right now, I'm trying to figure out when I want to do this. I can't do it the next 2 weekends. IT may have to wait until Thanksgiving which is when I also want to replace the heater core. Having no heater in the winter in Colorado is not ideal.
 
What unit did you go with?

Cheap Autozone for now. My daughter lives 4 hours away and didn't decide to tell me she was having issues until she visited for the weekend. I didn't have time to get one from RockAuto in time. I'll order a Mopar unit and replace that $15.00 Autozone unit when she comes home for Thanksgiving.
 
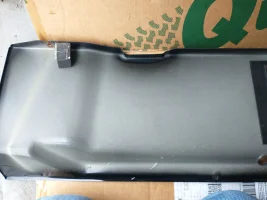
Started the process…. New oil pan will be going in & new gasket, plus a new rear main seal…. And, dropped the skid plate… (new one coming), dropped the front & rear driveshafts… (Tom Woods Drive Shaft replacements coming) and started to clean up the frame….

IMG_5566.webp


IMG_5565.webp


IMG_5562.webp


IMG_5521.webp


IMG_5549.webp


IMG_5564.webp
 
Care to sell me that front shaft?

Not sure if that was a joke but I have one if you need it, I replaced the u-joints and unit bearing about two years ago but the jeep sat for just over a year while I did an engine replacement. It does not have the rubber boot though

after my engine replacement I went with tom woods shafts.
 
Yep, the transmission is definitely still leaking.

Any tips on how to track down a transmission leak on a 32RH transmission?

Once you do what @MountaineerTom suggested about
When the auto transmission in my old 97 was leaking I found roll of paper towels was the best tool… clean the transmission up as good as possible, and then tear off wads of paper towels and stuff them all around the transmission… anywhere that will hold them and then let them sit overnight and the next morning you’ll be able to spot where the leak is coming from…

Alternatively you can give the case a good dusting with a powder, like Gold Bond. The powder will show where the leak is starting and it'll wipe/wash off easily.
 
  • Like
Reactions: 97JadeTJ
Once you do what @MountaineerTom suggested about


Alternatively you can give the case a good dusting with a powder, like Gold Bond. The powder will show where the leak is starting and it'll wipe/wash off easily.

At this point, i'm 90% sure the leak is coming from the weep hole at the back of the transmission which looks to be the transmission rear shaft output seal or the TC input seal. I'm going to do the powder test tomorrow to narrow it down 100%,

If it is one of these seals, then that will be a job for the week of Thanksgiving.
 
  • Like
Reactions: Fulton_Hogan
At this point, i'm 90% sure the leak is coming from the weep hole at the back of the transmission which looks to be the transmission rear shaft output seal or the TC input seal. I'm going to do the powder test tomorrow to narrow it down 100%,

If it is one of these seals, then that will be a job for the week of Thanksgiving.

Sorry, I was late to the thread and sharing that technique, hope you get it figured out.
 
Sorry, I was late to the thread and sharing that technique, hope you get it figured out.

no worries. i've posted a lot over the last few pages. I ended up taking off the skid plate and just seeing where the fluid drops down. A bit more work, but easier to really track it down. luckily I have a 2nd car while the Jeep is in the garage with a jack stand under the transmission.
 
  • Like
Reactions: Fulton_Hogan
Parts bonded and assembly installed. Now we dance! :D

View attachment 457049

View attachment 457050

Front loader was a good revision, I think.

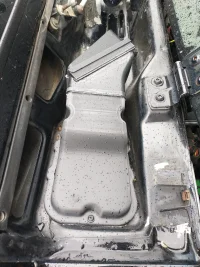
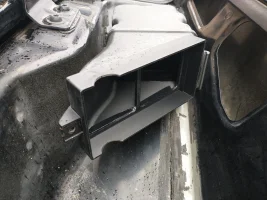
Quick one month functionality update on the cabin air intake duct/filter design. At least 500 miles logged since installation, and while I haven't run the AC for all of those miles, a number of 1-2 hour trips with the AC running at all fan settings. Temps ranging from 90+ to high 40's/low 50's. Mix of dry and wet weather over the month. Mostly road use but some dirt and gravel use as well.

Observations when opening the cowl this morning for a look-see:
  • ABS plastic prototype assembly shows no signs of damage due to exposure to temperatures and vibrations - appears "as installed"
  • All subcomponents appear to be functioning as intended, no cracking or splitting at joints or anywhere else
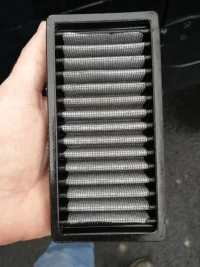
  • K&N VF1010 filter appears to be relatively clean and free of debris
  • Hint of rust on cartridge housing speed nut, no surprise and nothing I'm worried about. Factory speed nuts for the cowl panel look far worse.
  • Filter housing and duct beyond filter show no signs of air leakage inside (no trace dirt)
  • Foam seal seems to be doing it's job, no evidence of water infiltration between duct and sub cowl, no water in footwell from the cowl
  • No evidence of contact with underside of cowl panel, the design seems to give sufficient clearance to any existing physical features
Slight musty smell detected when running the system from cold, in particular after a stretch of wet weather. The odor dissipates after a few seconds. I believe this has nothing to do with the duct/filter and everything to do with the sub cowl being a bit of a breeding ground for funk since it tends to stay wet/damp long after the weather passes. For reference, I had an '07 BMW E90 and that thing smelled like a farm yard every time I used the system, even with a fresh filter and Lysol-disinfected ducting. Not too worried about the Jeep. ;)

I realize this isn't a long term test, but I think I'll leave that up to whoever might be interested in trying out the design for themselves. I've got a few minor modifications I'm making to some of the parts to improve the overall design. I may create a cartridge box that will accept standard filters as this one is specific to the VF1010 and I realize some might not want to spend the loot for the K&N. I'm also considering an optional cartridge box door/air horn design that may improve weather proofing even more (though this has not been an issue for me personally).

Beyond that, I'll likely upload all of the files here for anyone with a 3D printer to download and try out, along with some caveats and tips for printing, assembly and installation.

IMG_20231014_111744221.jpg

IMG_20231014_112228350.jpg

IMG_20231014_112244340.jpg

IMG_20231014_112712564.jpg
 
Last edited:
Quick one month functionality update on the cabin air intake duct/filter design. At least 500 miles logged since installation, and while I haven't run the AC for all of those miles, a number of 1-2 hour trips with the AC running at all fan settings. Temps ranging from 90+ to high 40's/low 50's. Mix of dry and wet weather over the month. Mostly road use but some dirt and gravel use as well.

Observations when opening the cowl this morning for a look-see:
  • ABS plastic prototype assembly shows no signs of damage due to exposure to temperatures and vibrations - appears "as installed"
  • All subcomponents appear to be functioning as intended, no cracking or splitting at joints or anywhere else
  • K&N VF1010 filter appears to be relatively clean and free of debris
  • Hint of rust on cartridge housing speed nut, no surprise and nothing I'm worried about. Factory speed nuts for the cowl panel look far worse.
  • Filter housing and duct beyond filter show no signs of air leakage inside (no trace dirt)
  • Foam seal seams to be doing it's job, no evidence of water infiltration between duct and sub cowl, no water in footwell from the cowl
  • No evidence of contact with underside of cowl panel, the design seems to give sufficient clearance to any existing physical features
Slight musty smell detected when running the system from cold, in particular after a stretch of wet weather. The odor dissipates after a few seconds. I believe this has nothing to do with the duct/filter and everything to do with the sub cowl being a bit of a breeding ground for funk since it tends to stay wet/damp long after the weather passes. For reference, I had an '07 BMW E90 and that thing smelled like a farm yard every time I used the system, even with a fresh filter and Lysol-disinfected ducting. Not too worried about the Jeep. ;)

I realize this isn't a long term test, but I think I'll leave that up to whoever might be interested in trying out the design for themselves. I've got a few minor modifications I'm making to some of the parts to improve the overall design. I may create a cartridge box that will accept standard filters as this one is specific to the VF1010 and I realize some might not want to spend the loot for the K&N. I'm also considering an optional cartridge box door/air horn design that may improve weather proofing even more (though this has not been an issue for me personally).

Beyond that, I'll likely upload all of the files here for anyone with a 3D printer to download and try out, along with some caveats and tips for printing, assembly and installation.

View attachment 465501

View attachment 465502

View attachment 465503

View attachment 465504

oh yeah GIF