Project Newfoundland - 05 LJR preservation

Coalcracker18

TJ Enthusiast
Original poster
Supporting Member
Joined
Apr 4, 2024
Messages
142
Location
PA
I found this 2005 Unlimited Rubicon last July in NJ after a few months of searching for a new Jeep project. It is a 1 owner vehicle with 361,000 miles driven and in bone stock condition.
This is the vehicle I had ultimately wanted to purchase but didn’t have the budget for it. This Jeep with the combination miles and current state of well shall we say northern exposure was well under budget. This is exactly what I was waiting to find.
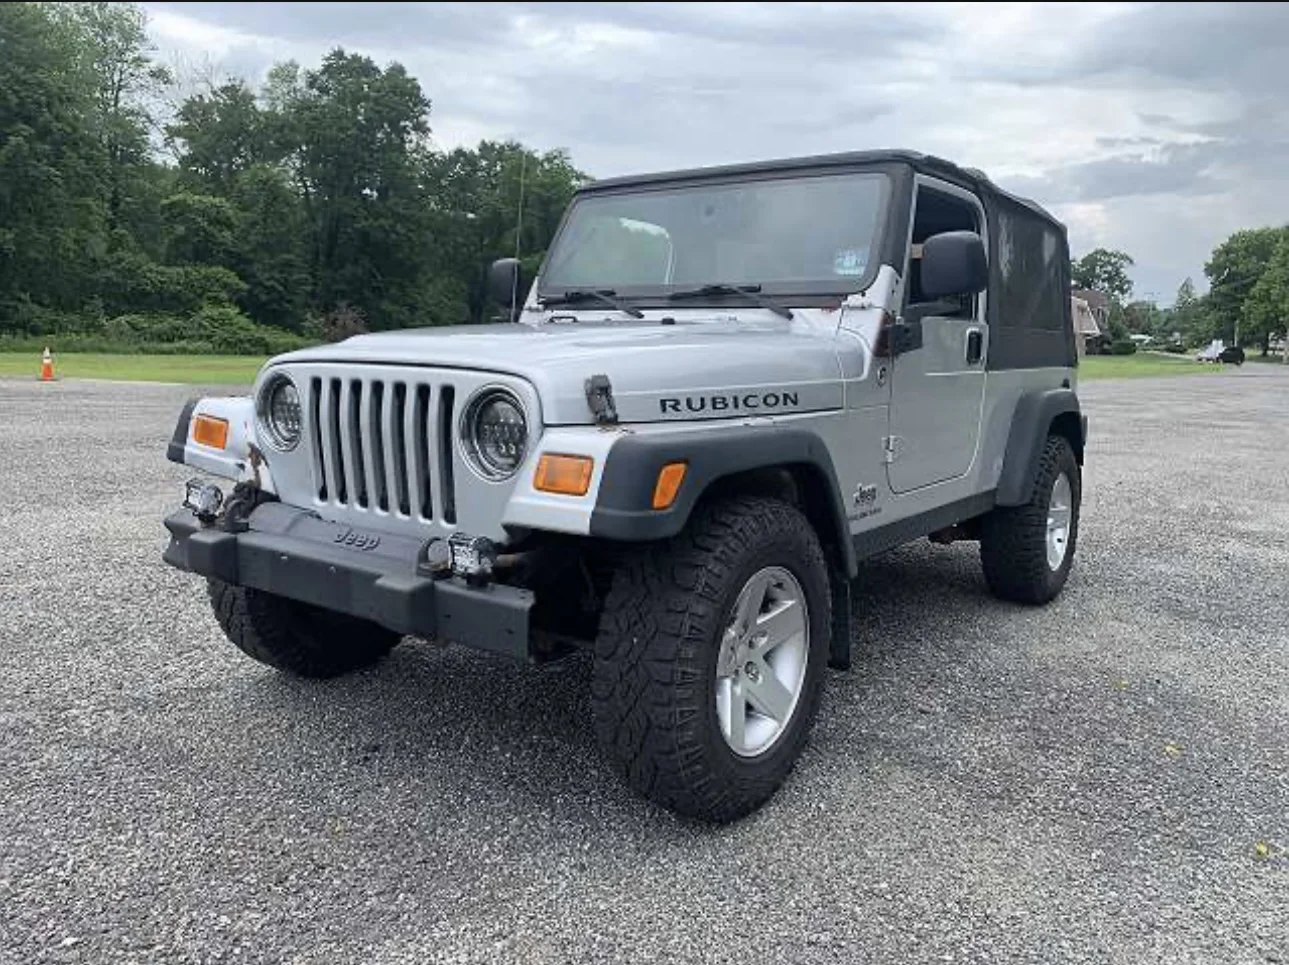
IMG_6007.jpeg


Things I knew going into this vs things I found out along the way.

I knew it was a 1 owner high mileage vehicle that was definitely going to need some work. It appeared from the pictures to be not to rotted. I called the dealer had a FaceTime to do a visual inspection and talk about the condition of the vehicle. He told me there was definitely surface rust on the frame but no holes, it had newer tires, the 4wd wasn’t working and the guy was daily driving it. The Jeep started right up sounded quite and when he closed the door it raind rust from underneath it. I laughed and said screw it, I’ll buy her.

It went to pick it up the following week. I drove it around a large gravel parking lot before I put it on the trailer and discovered that the 4wd light was on unless I actually put it in 4wd then it went out.
The lockers engaged but the rear light stayed flashing even though it was locked up.
The steering was like nothing I ever encountered before. It was incredibly stiff and almost impossible to turn at certain spots.
It did run strong and was very quite.
After a couple laps and getting it up to temperature I decided to put it on the trailer and get it home.


The first gut punch was when I went to hook up the chains and got a good look underneath with a flashlight.
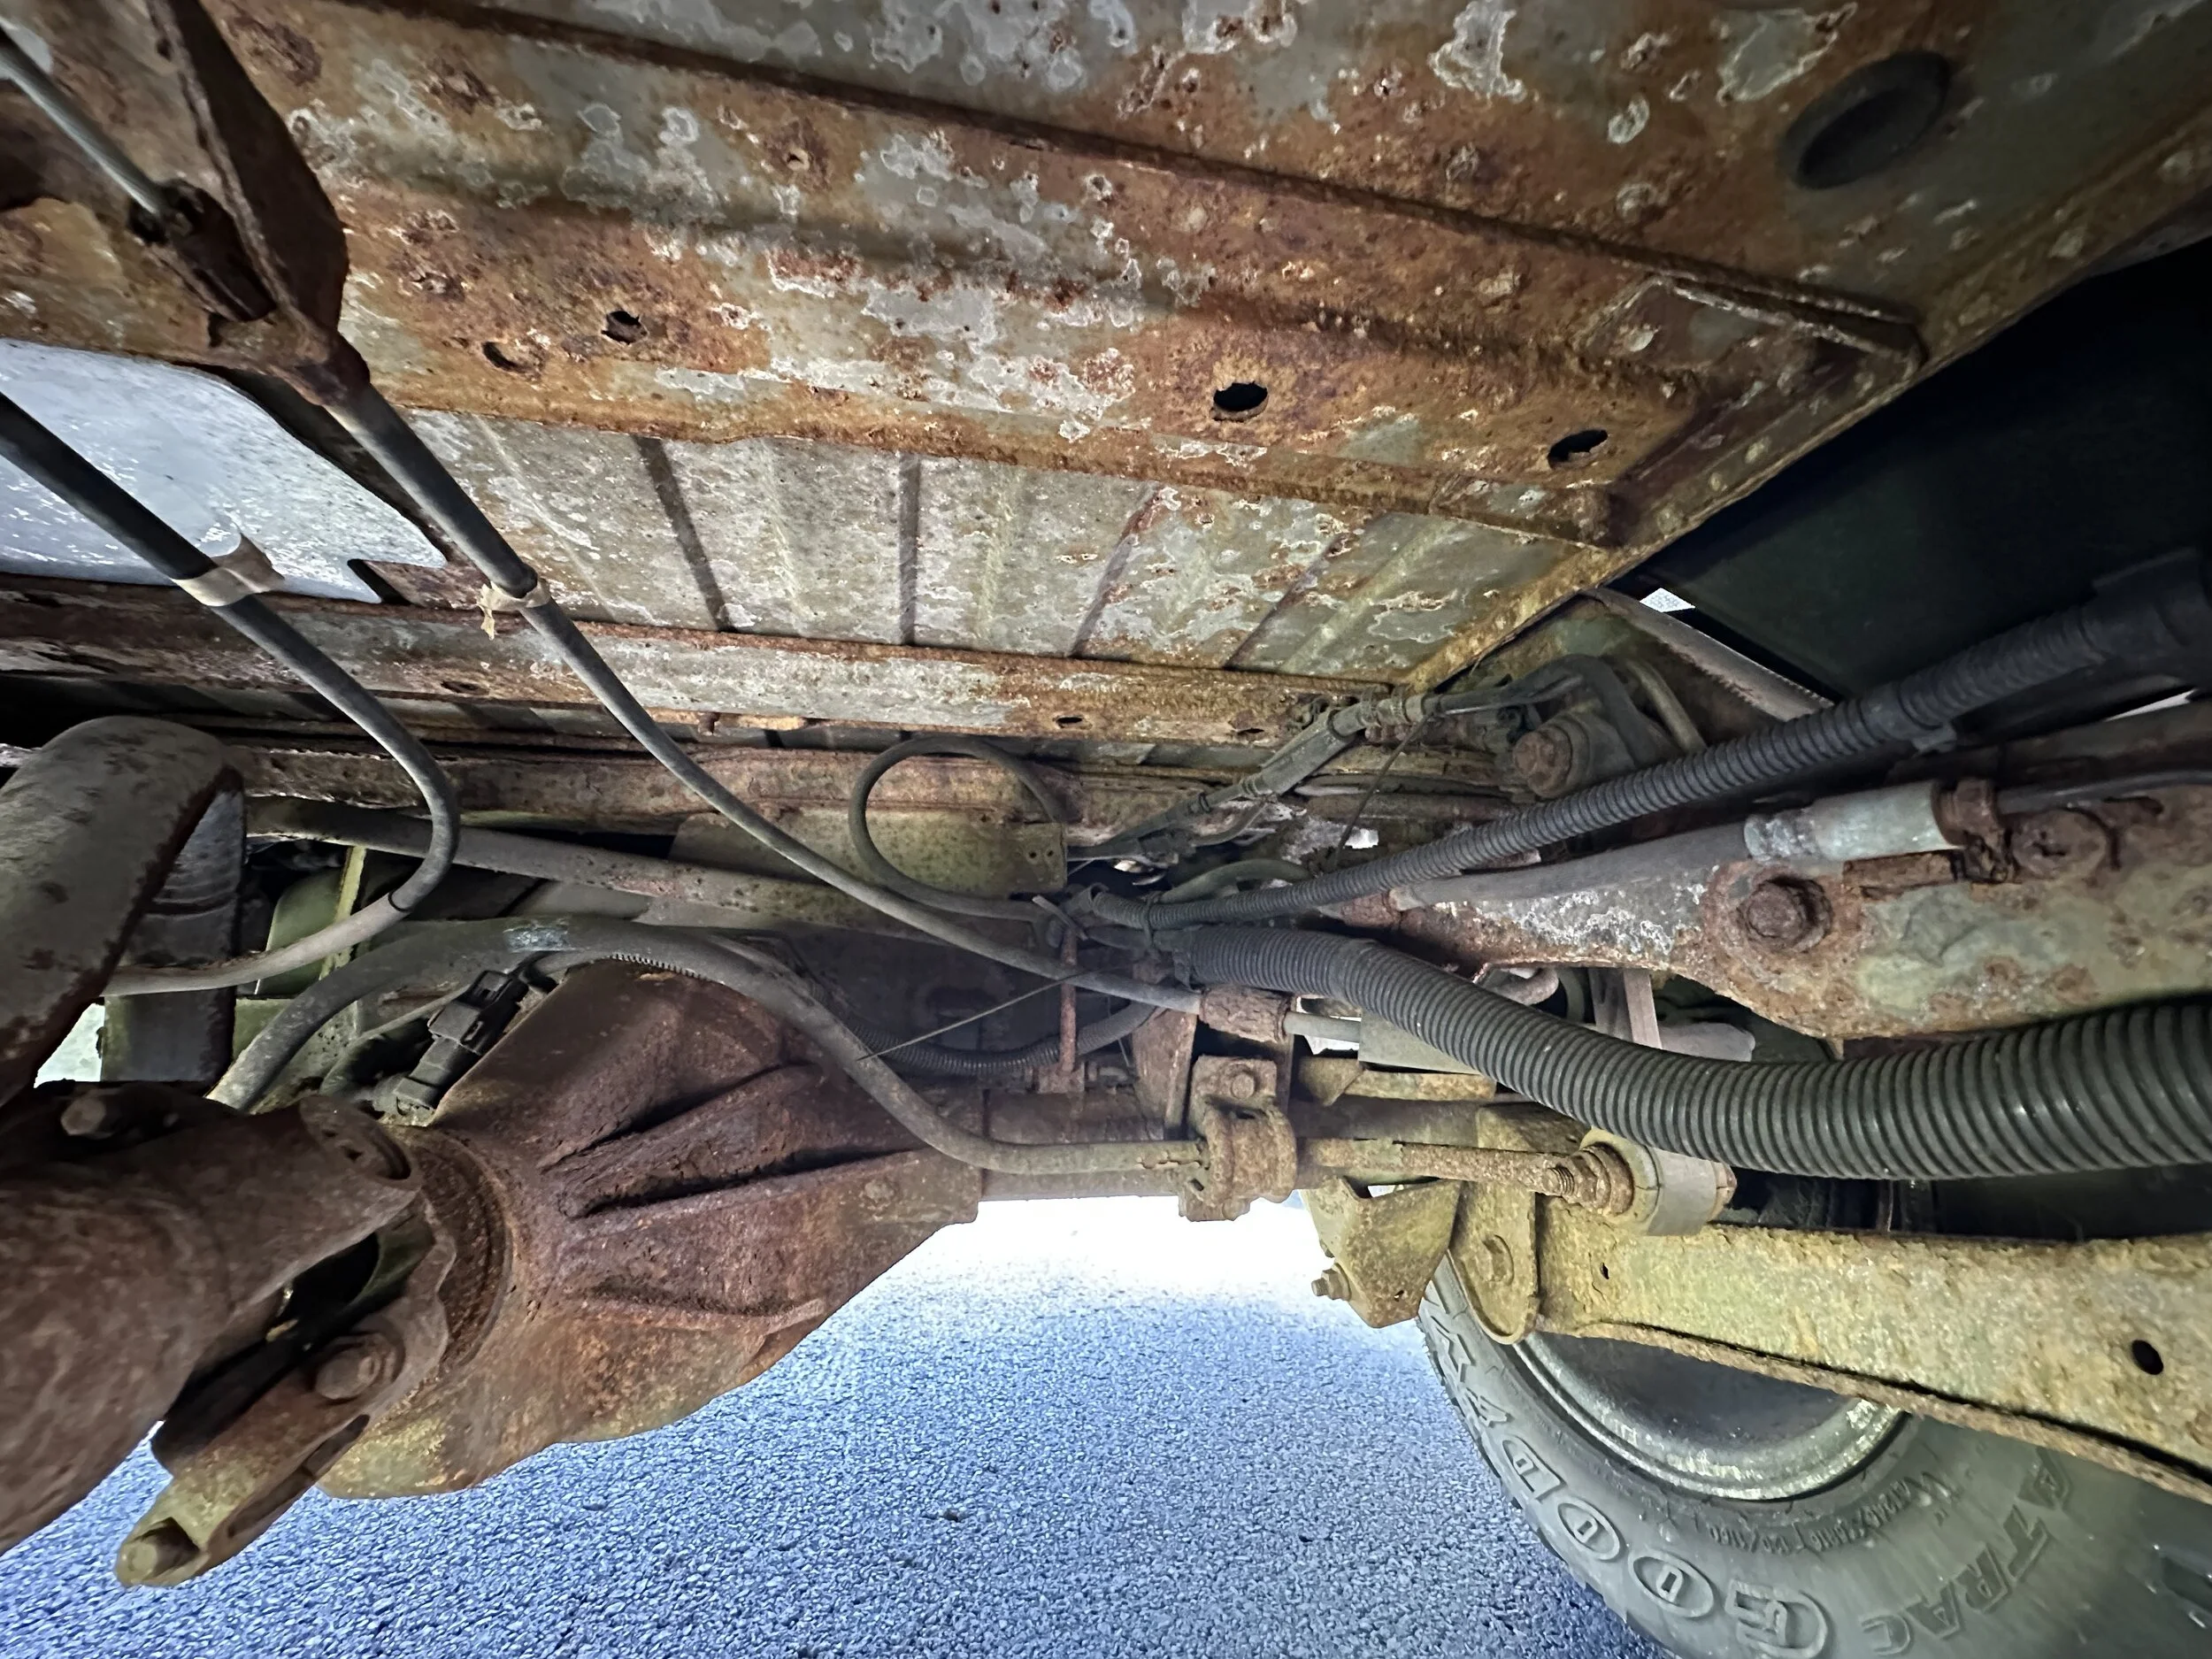
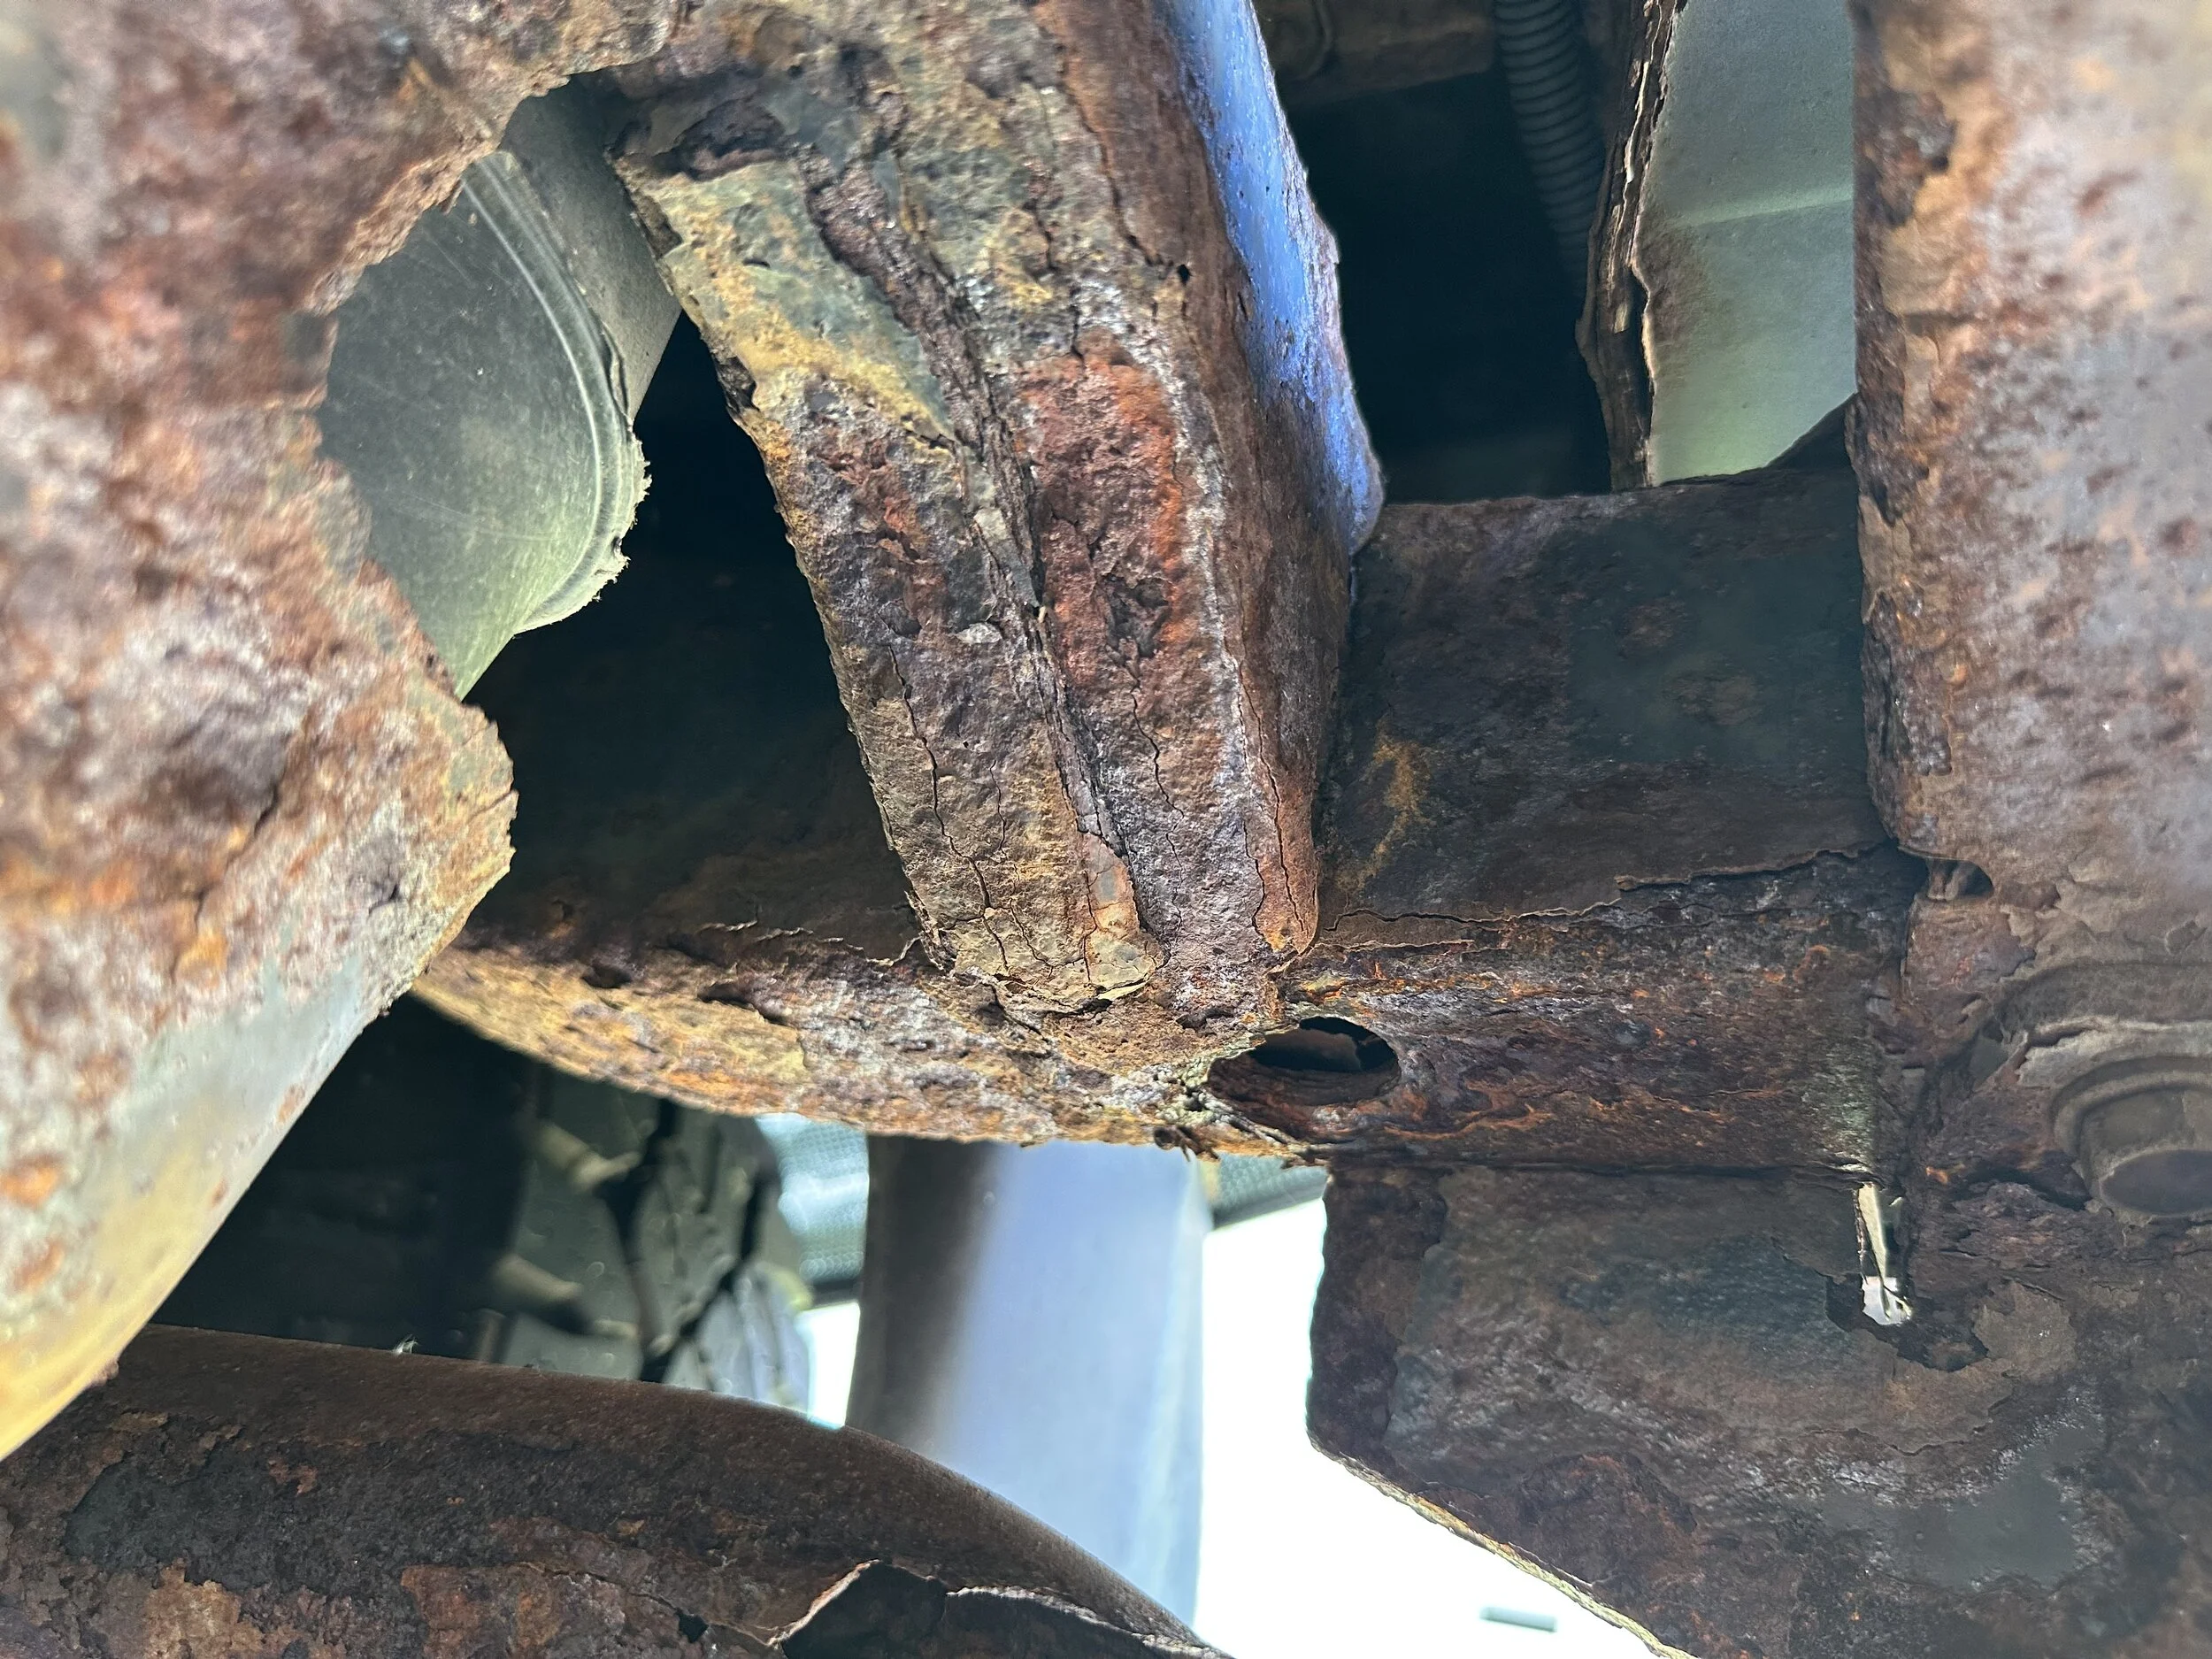
IMG_6056.jpeg


IMG_6062.jpeg


After I got it home I really need to consider my two options here. Part or repair? After a little research and finding out that only a little over 12,000 of these were ever made I just couldn’t part it out.
 
Last edited:
I spent the better part of my late teens up to my mid 30’s working and moonlighting for a dear friend who has now passed wholesaling cars. He and his two brothers had a retail car business but the majority of the vehicles were wholesaled on a weekly basis they also had a 4 bay body shop and 2 bay mechanic shop. I had a few years experience working on rotted junk.
So I decided to keep it and start finding out how bad it actually is.
The first couple things I did were drop the gas tank and center skid plate then and cut off the factory hitch.
Then I bought a 4200psi Cat pressure washer and blasted all the loose rust off to get a better idea what is actually going on. This is what I was left with.

IMG_8333.jpeg


IMG_7064.jpeg


IMG_7061.jpeg


IMG_7065.jpeg


IMG_7060.jpeg


I have to be honest I was pleasantly surprised once all the heavy scaly stuff was gone. The worst spot was where the hitch was mounted.
IMG_8339.jpeg


IMG_8340.jpeg


The next step is going to be removing the transmission and transfer case along with removing the body from the frame and putting it on 4x4 blocks. The rear axle will also be removed so I can really get in there and start deep cleaning the frame. I’ll be using a needle scaler and wire wheel on the grinder to see what I’m left with. I figure the needle scaler is going to be the revealer of truth to the real condition of the frame.
 
Props for taking this project on! I’m interested to see if you can salvage it. How is the body behind the fender flares, inner liners and Rubi rails?

Edit: do you mind sharing how much you paid for it? I’m curious
 
Props for taking this project on! I’m interested to see if you can salvage it. How is the body behind the fender flares, inner liners and Rubi rails?

Edit: do you mind sharing how much you paid for it? I’m curious

I consider the tub to be in pretty good shape. I’ve only got one hole where I blew threw it with the pressure washer. My main focus right now is getting the frame squared away so I haven’t really messed much with the body yet. I really only removed parts that were completed rotted out, the fenders tailgate and windshield frame.
I have to dig out the tailgate and take a picture of it. It’s comical, there is literally nothing left. I honestly thought it was going to fall off on the way home.

IMG_8404.webp


IMG_8398.webp


IMG_8399.webp


It seems a lot of them rot pretty bad in this location under the tail gate hinge but this one is solid surprisingly.
IMG_8405.webp


Don’t get me wrong it’s far from perfect and it’s not my intention to do a restoration project on this Jeep. That’s why the title of the thread reads preservation.

The last Jeep I did a frame off restoration caused me huge amounts of grief in my marriage and I’m not going through that again. I was working six days a week and dedicating Sundays to the project. My wife was not amused to say the least. But I was using a friend’s garage and those were his rules. I needed to be there every Sunday until it was finished enough to drive it out and load it on the trailer. It took us almost four months.

To answer your question of cost I paid 3k for it. And yes I am accounting for the complete cost of this project so I will have an exact number when I’m done.
 
I wish you luck my good man! I’m rooting for you. No offense but it’s nice to see someone putting the time in to save a Jeep that’s worse off than the one I’m putting all my time and $ into!
$3k is fair from a dealer.
 
I was able to bust a move today, I spent about four hours today cutting some ugly out of the back of the frame and replacing it with some fresh 10 gauge.
IMG_8410.jpeg

If you decide to take a project like this on your own do yourself a huge favor and buy a plasma cutter. Hands down the best investment you can make.
IMG_8413.jpeg


IMG_8414.jpeg

At this point I was racing against some forecasted rain this afternoon, so I didn’t get any pictures of the bottom section I had cut out but here is the finished product.
IMG_8427.jpeg


IMG_8430.jpeg


I still have to replace a section of the inner frame, but I’m going to wait until I have a new rear crossmember to weld in before I remove the crossmember that holds the gas tank in place.
 
  • Like
Reactions: L J
Here is a picture as she sits, everything is being done in the driveway. I forgot how much of a PITA it is working on the ground, but if you get it up in the air high enough to not really be hitting your head all the time it’s not to terrible.

IMG_8423.webp

IMG_8424.webp


IMG_8426.webp
 
Man I feel for you. I’ve been there.

Thanks bud. I checked out your profile and read through most of your rust repair thread, I appears you’ve already been there done that. I didn’t have near the problems with broken fasteners as you did, but then I used the torch on every single bolt I removed. That seems like it was the most tedious part so far. It literally took me hours of back and forth turning not to break them. Incredible amounts of patience was required because I knew the outcome of a broken bolt was major setbacks and extra work I didn’t want to do.

I have to agree with you that there is nothing more satisfying that taking something that someone might wrote off as junk and making it new again.

Any take aways you’d like to share? I’m also curious how the paints you used are holding up now almost six years later.
 
  • Like
Reactions: Mike_H
Thanks bud. I checked out your profile and read through most of your rust repair thread, I appears you’ve already been there done that. I didn’t have near the problems with broken fasteners as you did, but then I used the torch on every single bolt I removed. That seems like it was the most tedious part so far. It literally took me hours of back and forth turning not to break them. Incredible amounts of patience was required because I knew the outcome of a broken bolt was major setbacks and extra work I didn’t want to do.

I have to agree with you that there is nothing more satisfying that taking something that someone might wrote off as junk and making it new again.

Any take aways you’d like to share? I’m also curious how the paints you used are holding up now almost six years later.

Yeah, use an epoxy primer and top coat with regular paint. The KBS, POR, etc type paints haven’t really worked for me. Also…before putting a ton of work into the frame, make damn sure the center section is solid. If it is, protect it with some sort of internal frame coating (and fluid film). If it isn’t, bite the bullet and just replace it. I put a ton of work into mine, only to find a hole open up a couple years ago. So, now I’m hunting for a frame and the time/desire to do a frame swap. I didn’t protect the inside of mine, since I don’t drive in the winter. Don’t know if that would have prevented the issue I have now, but it can’t hurt.
 
Yeah, use an epoxy primer and top coat with regular paint. The KBS, POR, etc type paints haven’t really worked for me. Also…before putting a ton of work into the frame, make damn sure the center section is solid. If it is, protect it with some sort of internal frame coating (and fluid film). If it isn’t, bite the bullet and just replace it. I put a ton of work into mine, only to find a hole open up a couple years ago. So, now I’m hunting for a frame and the time/desire to do a frame swap. I didn’t protect the inside of mine, since I don’t drive in the winter. Don’t know if that would have prevented the issue I have now, but it can’t hurt.
I’ve used Nason green etch epoxy primer and TM9 Ordinance red oxide on two different frames before but they were media blasted to bare metal. I swear the Nason literally chemically bonded to the metal I couldn’t make it chip. The frame I did in red oxide I didn’t have around long enough to know if it stood the test of time.
I’ve also used SEM for top coat on my 03 TJ frame and on bumpers. It didn’t do anything for rust but it really held up to abuse well and didn’t fade at all in 10 yrs.

I am planing on using PB Surface Shield over the complete underside of the Jeep and inside the frame. I purchased a gallon of it and a sprayer.

If I had the room I would be doing a frame swap hands down. I just can’t swing it in my drive way, my property line ends at the edge of the drive. If I keep this Jeep a frame swap and better tub are on the books it just a matter of when and doing some planing if I’m still in the same house.

A good frame shouldn’t be too hard for you to track down. Might be a few bucks for shipping. There is a guy in Colorado that I’ve used before for shipping and his prices aren’t bad.
 
I’ve used Nason green etch epoxy primer and TM9 Ordinance red oxide on two different frames before but they were media blasted to bare metal. I swear the Nason literally chemically bonded to the metal I couldn’t make it chip. The frame I did in red oxide I didn’t have around long enough to know if it stood the test of time.
I’ve also used SEM for top coat on my 03 TJ frame and on bumpers. It didn’t do anything for rust but it really held up to abuse well and didn’t fade at all in 10 yrs.

I am planing on using PB Surface Shield over the complete underside of the Jeep and inside the frame. I purchased a gallon of it and a sprayer.

If I had the room I would be doing a frame swap hands down. I just can’t swing it in my drive way, my property line ends at the edge of the drive. If I keep this Jeep a frame swap and better tub are on the books it just a matter of when and doing some planing if I’m still in the same house.

A good frame shouldn’t be too hard for you to track down. Might be a few bucks for shipping. There is a guy in Colorado that I’ve used before for shipping and his prices aren’t bad.

Yeah, there is a guy in northern Indiana that generally has good ones. I just have to decide if paying 1800 bucks is worth it.
 
Yeah, there is a guy in northern Indiana that generally has good ones. I just have to decide if paying 1800 bucks is worth it.

I’d say it is, I mean you obviously like that Jeep a lot if you already put so much work into it.
Worst case scenario you buy it and have it laying around for a while, don’t use it and get most if not all your money back. Nothing is getting cheaper these days.
 
I spent the better part of my late teens up to my mid 30’s working and moonlighting for a dear friend who has now passed wholesaling cars. He and his two brothers had a retail car business but the majority of the vehicles were wholesaled on a weekly basis they also had a 4 bay body shop and 2 bay mechanic shop. I had a few years experience working on rotted junk.
So I decided to keep it and start finding out how bad it actually is.
The first couple things I did were drop the gas tank and center skid plate then and cut off the factory hitch.
Then I bought a 4200psi Cat pressure washer and blasted all the loose rust off to get a better idea what is actually going on. This is what I was left with.

View attachment 519767

View attachment 519768

View attachment 519769

View attachment 519770

View attachment 519771

I have to be honest I was pleasantly surprised once all the heavy scaly stuff was gone. The worst spot was where the hitch was mounted.
View attachment 519772

View attachment 519773

The next step is going to be removing the transmission and transfer case along with removing the body from the frame and putting it on 4x4 blocks. The rear axle will also be removed so I can really get in there and start deep cleaning the frame. I’ll be using a needle scaler and wire wheel on the grinder to see what I’m left with. I figure the needle scaler is going to be the revealer of truth to the real condition of the frame.

R+R that frame imho 🙈🤕, no offence brotha
 
The weather has been nice here the past couple weeks so not much time to work on the Jeep, family first. The boys want to be outside playing with dad.

We did have rain the past two days so I was able to refresh the rear axle.
It like the rest of the Jeep was in pretty rough shape.
IMG_8388.jpeg


IMG_8390.jpeg


IMG_8387.jpeg


The heavily rusted areas got the needle scaler and everything else got the 4” wire wheel on the grinder.
I wasn't 100% sure of the condition of the calipers so the were replaced. The E brake cables were seized so new were installed, both of the axle seals were leaking so new seals and bearings were installed.

One of the axles was scored pretty bad where the seal rides so I replaced it with a better used one.
IMG_8553.webp


The brake lines had a spot or two where the coating was peeled off and rusted and the rubber hoses were hard so I bought new ones as well.

I went with the Power Stop Rotors and Evolution pads. They were on sale last Oct $101 for the rear and $139 for the fronts. It was kinda a splurge spend but honestly not much more than regular brakes and rotors.
IMG_8550.webp

IMG_8549.webp

IMG_8548.webp

IMG_8551.webp


I’d have to say everything turned out well. It’s good enough for the type of rebuild I’m doing here. I mean outside of new carrier and pinion bearings everything is new.

I still have to replace the locker plug, the wires were damaged so I’m going to try and reuse the original. If not I have some Delco style plugs I can use to replace it.
 
It’s been a few weeks since my last post although I have been making slow but steady progress on the Jeep.

I finished up the repairs on the right frame rail. More of the same from the left side. I had to cut out the inner, outter and the bottom of the frame where the metal was thin
IMG_8751.jpeg


Also a new gas tank support crossmember fitted and burnt in, thanks to @mrblaine for supplying me the part!

IMG_8853.jpeg

IMG_8867.jpeg


I got a new pair of coil perches installed as well. I moved them back from the stock location an inch or so. When I was trying to figure where to put them I just had decided to put them on top of the springs and jack up the rear and where ever the seated them selves on the frame was where they were getting burned in. It turns out they put them selves in a very good position all on their own. I only had to adjust ever so slightly to get them exactly the same on both sides. When the suspension was fully compressed the center off the bump stops were perfect.
IMG_8882.jpeg
IMG_8885.jpeg


You might also be able to notice I applied a liberal dose of Rust Kutter on the frame and the tub. It appeared to work much better on the frame than on the body. I’m sure if I made another application it might work a little better.
IMG_8892.jpeg
IMG_8893.jpeg


I’m uncertain if I’m going to paint over the frame or just apply the PB Surface Sheild right on the bare metal. I’m going to add graphite to the wax to dye it black, if anyone wants to offer any advice I’m all ears. I’ve personally never used the stuff before and I’ve seen mixed opinions on painting the metal or just applying the Surface Sheild.


Here I have the rear crossmember fitted up waiting to get burnt in. I just had to put the tub back on the frame. One to make sure figment was good for the rear body mounts and two just for the satisfaction of seeing it mounted.

IMG_8890.jpeg


One last picture of how it is sitting as of now. For anyone who is wondering it’s sitting on JKS 2” springs. it netted about 11.5 inches or 3.5 inches the way it sits, I figure it’s at least 300 lbs light right now and I’m guessing it’s going to drop about an inch or so once the gas tank, bumper spare tire and rear seat go back in.

Hopefully I get to make a little more progress on it here and there. Basically when ever I have a free moment I try and accomplish something. Even if it’s just cleaning a part I need for later. It all adds up in the end. I originally had a goal of having it inspected by the Fourth of July but the weeks of endless rain we had this spring have pushed my goal back to Labor Day.
 
Last edited:
It’s been awhile since I have done any updates on the project It’s just been a super busy summer. I’ve done a few small things here and there but today I started getting the replacement engine ready for install. This sleeve was the biggest PITA I’ve come across on the project so far.
IMG_9792.jpeg


Words can’t express how grateful I was to have the engine out of the vehicle to replace this. The engine was out of an auto trans vehicle so I needed to remove this sleeve to get the new pilot bearing and sleeve in.

IMG_9795.jpeg


While I was at it I installed a new LUK flywheel and clutch. You can also see a new valve cover gasket in there too.

IMG_9801.jpeg


Also picked up a new set of Flowmaster cats a couple weeks ago when they were having the fire sale. I bought new hardware to mount them up as well. If anyone needs a reference the bolts are M10-1.50x50 and the Mopar PN is 06506546AA for the U nuts

IMG_9798.jpeg


Another part I’m very glad I replaced is the oil pump drive assembly. I got this from Amazon on the cheap as an open box.

IMG_9800.jpeg


You can see here the drive gear is pretty worn out.

IMG_9797.jpeg


I’ll also mention that I replaced the spark plugs, I think the last guy got his moneys worth out of them.

IMG_9318.webp


And I also noticed today that I have a cracked injector body. I guess I’m going to have to replace that as well. I’m just going to grab one out of the engine that came with the Jeep.

IMG_9802.jpeg


I’m really hoping to get the transmission mated up tomorrow and possibly have it back in the Jeep. If I didn’t spend two hours on the pilot bearing sleeve first thing this morning I probably would have had it done today. We will see what tomorrow brings.
 
Last edited: