Setrab and Transmission Thermostats Installation
These modifications are for those running an auto transmission, and especially the 42rle, and who live or wheel in environments that fluctuate between extreme hot and cold. If your goal is to get the transmission up to and keep it at a more static temperature then this is for you.
The 42rle is known to run hot. If you don’t have a temp gauge, get one. ATF begins to break down in the 230+F range. You don’t want that. In the winter your transmission won’t even get to 100F. You don’t want that either. A Setrab 53-10748-01 and an Improved Racing Compact Thermostat together are one possible solution.
Setrab
The Setrab can mount in front of the radiator. It’s a good idea to purchase the Black Magic Brakes V-Bar here. If you plan a steering cooler too then you can find the setup here. Make sure and buy enough hose as well. See Blaine's pictorial guide to installing the Setrab here. See @sunnysideup_lj write up for installing the Setrab here.
Thermostat
The Improved Racing Compact Transmisssion Thermostat constantly allows 10% of ATF to pass through to the radiator and opens to 100% when the bypass temp is reached. There are a number of bypass temperatures you can select. I chose 165*F, so I will use that number below for illustration only.
On a stock rig the ATF flows from the bottom line on the transmission through the line that goes into the right side of the radiator. Then it comes out the left side of the radiator and goes back to the transmission top inlet.
With the Setrab and thermal bypass, ATF flows from the bottom line on the transmission and into the inline thermostat. If temps are below 165*F the fluid simply returns to the transmission through the top line on the transmission. Once the ATF warms up to 165*F it passes through the thermostat and goes to the right side of radiator, then out the left side of radiator, turns 90* and goes to the right side of the Setrab, out the left side of the Setrab, back through the thermostat and through the hard line into the transmission top inlet.
Parts you will need:
Thermostat:
https://www.improvedracing.com/comp...bGuxwIDxlk8_G9u35hsiaLgiHih9Gsdlshv7IdaK7wBUE
Fittings, purchase 2 of each:
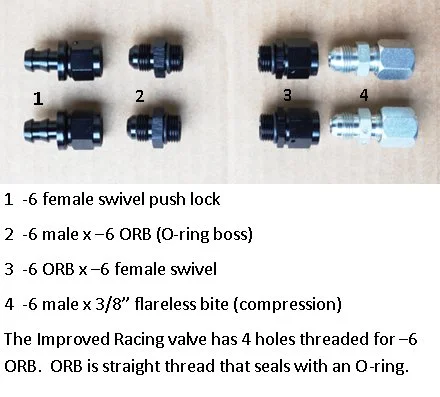
1. -6 female swivel push lock
Hose Fitting, Push-Lock -6 AN JIC Female, Black (FIT-200106): Push-Lock Rubber Hose Fittings - Straight | Racetronix
2. -6 male x -6 ORB (O-ring boss)
Adapter, -6 AN ORB Male to -6 AN JIC Male, Black (ADF-495100): AN JIC Male » AN ORB Male Adapters | Racetronix
3. -6 ORB x -6 female swivel
Adapter, -6 AN JIC Female to -6 AN ORB Male, Black (ADF-6JF6R): AN JIC Female » AN ORB Male Adapters | Racetronix
4. -6 male flare x 3/8” flareless bite (compression)
3/8" JIC 37° x 3/8" Tube Fitting | Titan Fittings
The hose is 3/8" and you need enough to go from the thermostat to the right side of the radiator and from the left side of the Setrab to the upper inlet on the Thermostat. You also need 4 Oetiker clamps. Blaine uses the Insta-grip hose and I sourced it from him.
The numbers of the fittings above correspond to the numbers in pic 1 below (Blaine's)
Pic 1
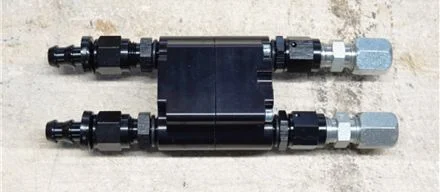
Pic 2 shows how they fit together with the thermostat.
Pic 2
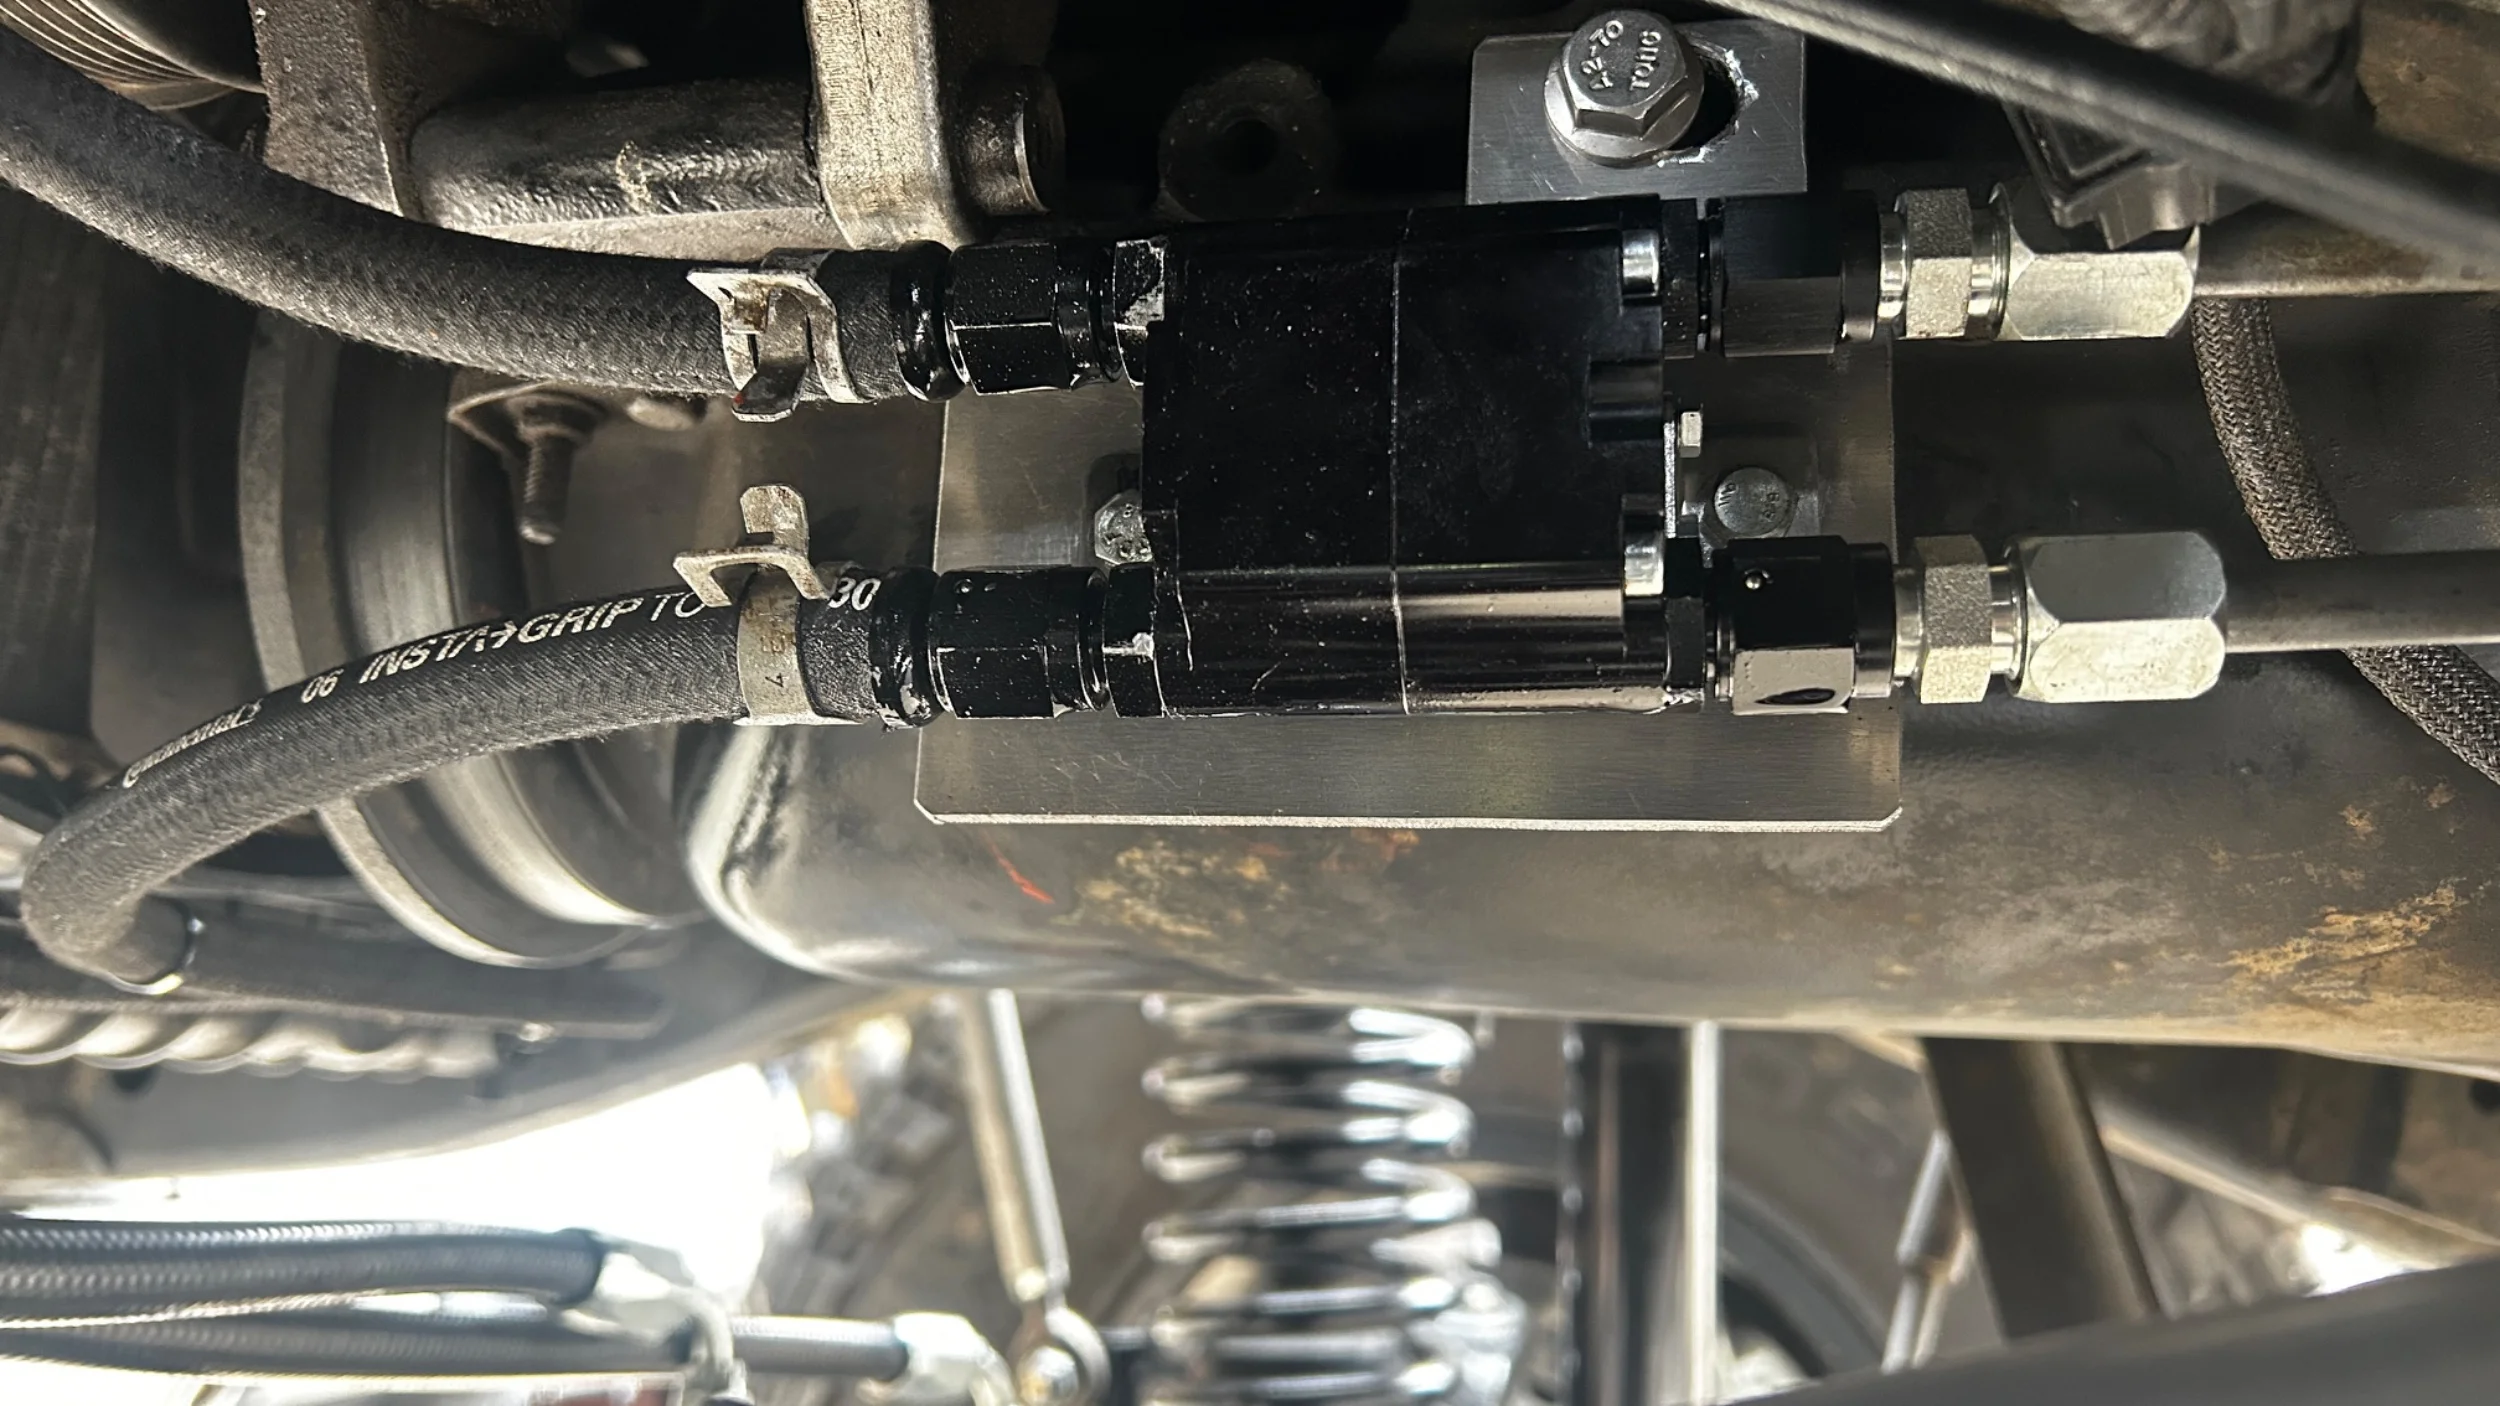
1. Note in pic 3 below that the location of the mount is in front of the exhaust and engine skid alongside the oil pan. You can see the type of bracket you need to fab up to mount the thermostat. I used a piece of 3/16" sheet aluminum. There are two possible bolt holes in the engine block you can use to mount the bracket. One holds the bracket for the 02 sensor. The other is empty. I think the holes are M10x1.5 (2004). I can correct this later if I find out that's wrong.
Pic 3
2. The thermostat comes with some mounting hardware. Use that to attach it to your bracket.
3. Make sure and mock up your bracket with attached thermostat several times to make sure everything will work before cutting your hard lines. The input and output on the thermostat are separated further than the lines in the stock routing. You will need to pull them apart when you mock it up so you cut them in line with each other. Otherwise the lower line will be too short when you separate them. I used a mini tubing cutter.
4. File off any sharp edges. Clean off any shavings and make sure the inside of the tube is clean. You can carefully use a q-tip dipped in ATF.
5. Connect fitting 3 to the thermostat.
6. Connect fitting 4 to fitting 3.
7. Connect fitting 2 to the thermostat.
8. Now put your bracket in place and loosely bolt the assembly to the engine block with your M10x1.5.
9. Connect fitting 4 to the hard lines.
10. Press fitting 1 on to the 3/8” hose. Some ATF in the lip of the hose and on the fitting helps. Heating the end of the hose for about 30 seconds with a heat gun helps too. You’re just trying to get it warm, don’t overdo it. The hose should slip on relatively easy then.
11. Now that you have one push fitting on the hose slide 2 Oetiker clamps on the hose (or constant tension clamps). 1 will go on each end (see Pic 3).
12. Measure hose from upper port to the left side of the Setrab. You route under the left side of the grill and up in the headlight cavity through the hole you drilled in the plastic. Don’t forget your Oetiker clamps (or constant tension clamps). Cut the hose the right length with hose cutters.
13. Measure hose from the lower port to the right side of the radiator. I route it straight forward and under the fan shroud to the right side of radiator to keep it away from the harmonic balancer. Use a hose cutter for a clean cut.
14. Make your final connections at the Thermostat. Attach the top one first so it’s easier to get to the bottom one after. Snug, not overly tight. No loctite on these fittings.
15. Start the Jeep and make sure there are no leaks.
16. If you lost some ATF when you breached the system be sure to check the level as described here and add as needed.
These modifications are for those running an auto transmission, and especially the 42rle, and who live or wheel in environments that fluctuate between extreme hot and cold. If your goal is to get the transmission up to and keep it at a more static temperature then this is for you.
The 42rle is known to run hot. If you don’t have a temp gauge, get one. ATF begins to break down in the 230+F range. You don’t want that. In the winter your transmission won’t even get to 100F. You don’t want that either. A Setrab 53-10748-01 and an Improved Racing Compact Thermostat together are one possible solution.
Setrab
The Setrab can mount in front of the radiator. It’s a good idea to purchase the Black Magic Brakes V-Bar here. If you plan a steering cooler too then you can find the setup here. Make sure and buy enough hose as well. See Blaine's pictorial guide to installing the Setrab here. See @sunnysideup_lj write up for installing the Setrab here.
Thermostat
The Improved Racing Compact Transmisssion Thermostat constantly allows 10% of ATF to pass through to the radiator and opens to 100% when the bypass temp is reached. There are a number of bypass temperatures you can select. I chose 165*F, so I will use that number below for illustration only.
On a stock rig the ATF flows from the bottom line on the transmission through the line that goes into the right side of the radiator. Then it comes out the left side of the radiator and goes back to the transmission top inlet.
With the Setrab and thermal bypass, ATF flows from the bottom line on the transmission and into the inline thermostat. If temps are below 165*F the fluid simply returns to the transmission through the top line on the transmission. Once the ATF warms up to 165*F it passes through the thermostat and goes to the right side of radiator, then out the left side of radiator, turns 90* and goes to the right side of the Setrab, out the left side of the Setrab, back through the thermostat and through the hard line into the transmission top inlet.
Parts you will need:
Thermostat:
https://www.improvedracing.com/comp...bGuxwIDxlk8_G9u35hsiaLgiHih9Gsdlshv7IdaK7wBUE
Fittings, purchase 2 of each:
1. -6 female swivel push lock
Hose Fitting, Push-Lock -6 AN JIC Female, Black (FIT-200106): Push-Lock Rubber Hose Fittings - Straight | Racetronix
2. -6 male x -6 ORB (O-ring boss)
Adapter, -6 AN ORB Male to -6 AN JIC Male, Black (ADF-495100): AN JIC Male » AN ORB Male Adapters | Racetronix
3. -6 ORB x -6 female swivel
Adapter, -6 AN JIC Female to -6 AN ORB Male, Black (ADF-6JF6R): AN JIC Female » AN ORB Male Adapters | Racetronix
4. -6 male flare x 3/8” flareless bite (compression)
3/8" JIC 37° x 3/8" Tube Fitting | Titan Fittings
The hose is 3/8" and you need enough to go from the thermostat to the right side of the radiator and from the left side of the Setrab to the upper inlet on the Thermostat. You also need 4 Oetiker clamps. Blaine uses the Insta-grip hose and I sourced it from him.
The numbers of the fittings above correspond to the numbers in pic 1 below (Blaine's)
Pic 1
Pic 2 shows how they fit together with the thermostat.
Pic 2
1. Note in pic 3 below that the location of the mount is in front of the exhaust and engine skid alongside the oil pan. You can see the type of bracket you need to fab up to mount the thermostat. I used a piece of 3/16" sheet aluminum. There are two possible bolt holes in the engine block you can use to mount the bracket. One holds the bracket for the 02 sensor. The other is empty. I think the holes are M10x1.5 (2004). I can correct this later if I find out that's wrong.
Pic 3
2. The thermostat comes with some mounting hardware. Use that to attach it to your bracket.
3. Make sure and mock up your bracket with attached thermostat several times to make sure everything will work before cutting your hard lines. The input and output on the thermostat are separated further than the lines in the stock routing. You will need to pull them apart when you mock it up so you cut them in line with each other. Otherwise the lower line will be too short when you separate them. I used a mini tubing cutter.
4. File off any sharp edges. Clean off any shavings and make sure the inside of the tube is clean. You can carefully use a q-tip dipped in ATF.
5. Connect fitting 3 to the thermostat.
6. Connect fitting 4 to fitting 3.
7. Connect fitting 2 to the thermostat.
8. Now put your bracket in place and loosely bolt the assembly to the engine block with your M10x1.5.
9. Connect fitting 4 to the hard lines.
10. Press fitting 1 on to the 3/8” hose. Some ATF in the lip of the hose and on the fitting helps. Heating the end of the hose for about 30 seconds with a heat gun helps too. You’re just trying to get it warm, don’t overdo it. The hose should slip on relatively easy then.
11. Now that you have one push fitting on the hose slide 2 Oetiker clamps on the hose (or constant tension clamps). 1 will go on each end (see Pic 3).
12. Measure hose from upper port to the left side of the Setrab. You route under the left side of the grill and up in the headlight cavity through the hole you drilled in the plastic. Don’t forget your Oetiker clamps (or constant tension clamps). Cut the hose the right length with hose cutters.
13. Measure hose from the lower port to the right side of the radiator. I route it straight forward and under the fan shroud to the right side of radiator to keep it away from the harmonic balancer. Use a hose cutter for a clean cut.
14. Make your final connections at the Thermostat. Attach the top one first so it’s easier to get to the bottom one after. Snug, not overly tight. No loctite on these fittings.
15. Start the Jeep and make sure there are no leaks.
16. If you lost some ATF when you breached the system be sure to check the level as described here and add as needed.
Last edited: