Round tail lights on 2006 Rubicon

Patrick Larson

New Member
Original poster
Joined
Nov 2, 2017
Messages
10
Location
Austin, TX, United States
Hi everyone. First post here. I bought some round tail lights and opted for the rubber grommet type with no screws. It has a built in reverse light which seemed to me to be ideal. That was until I got to the passenger side. Behind the tail light hole there is about 3/4" space. The tail lights I bought have a huge back that has two plugs for all the wiring. I don't think I'm going to have enough room. I'm considering standard truck led lights without the reverse lights built in. Does anyone have a recommended set that will work on this model? I have not cut yet, but I've removed the tail lights. Newbie mistake on my part for not knowing there was an obstruction behind the light. This is what I got. Any mods to this light would be appreciated as well. https://www.amazon.com/gp/product/B072SNG9M3/?tag=wranglerorg-20
 
I just installed those exact lights. Mine is an 01 and I have much more then a 3/4 inch space behind the light area. You should be able to get a good view by pulling the rubber panel from behind the wheel well and looking up.

20181215_151010.webp
 
I just installed those exact lights. Mine is an 01 and I have much more then a 3/4 inch space behind the light area. You should be able to get a good view by pulling the rubber panel from behind the wheel well and looking up.

View attachment 68207
4" hole saw did the trick? I've always been a fan of round tail lights
 
I just drilled around 30 holes into my quarter panels (15 per) for the MC rear fenders. I can tell you each hole you drill gets easier but each one still hurts.

View attachment 68210
This is golden. Just the pic I needed. My hole mark is also directly in the middle of the three screw holes! My issue was that the back of the lights seem to protrude too far into the hole. This is giving me the confidence. So all the jeeps on this forum have the same configuration? Did you run into a bracket behind there on the passenger side?
 
This is golden. Just the pic I needed. My hole mark is also directly in the middle of the three screw holes! My issue was that the back of the lights seem to protrude too far into the hole. This is giving me the confidence. So all the jeeps on this forum have the same configuration? Did you run into a bracket behind there on the passenger side?
I do not have any up close photos of the passenger side hole on my phone. I should be home around 3 today from work so I will pop the light out and take a quick photo of the inside for you. I do not recall a bracket getting in the way.

Just make sure before you cut to mark a pilot and measure from the bottom - top of the tub and left - right. You only get one shot. Oh and use plenty for tape to protect the paint in case the bit gets away from you. The last bit was difficult so I actually ran the bit in reverse so it wouldn't grip as hard.

Mine had a bit of the oblong shape still showing at the bottom but the grommet covered it. Ill take a photo of that as well.
 
Last edited:
I do not have any up close photos of the passenger side hole on my phone. I should be home around 3 today from work so I will pop the light out and take a quick photo of the inside for you. I do not recall a bracket getting in the way.

Just make sure before you cut to mark a pilot and measure from the bottom - top of the tub and left - right. You only get one shot. Oh and use plenty for tape to protect the paint in case the bit gets away from you. The last bit was difficult so I actually ran the bit in reverse so it wouldn't grip as hard.

Mine had a bit of the oblong shape still showing at the bottom but the grommet covered it. Ill take a photo of that as well.
I'm so glad you did this before me. the tape is a great idea. I have lots of painter's tape. Will that suffice?
 
I'm so glad you did this before me. the tape is a great idea. I have lots of painter's tape. Will that suffice?
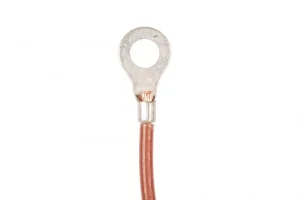
I'm not saying its the correct application but that is what I used. It's more or less to protect the paint in the event the bit bounces off and tries to hit something. Like I said just make sure your extra careful towards the end. Mine really wanted to bite in and move so like I said I just threw it in reverse and that made it much easier. The oem lights use the housing bolts that attach to the body as a ground so you will need to add a ground to the LEDs. What I did was bought 2 self taping screws and a wire. (I used white since it is the color of the ground on the lights) Then grounded them out by drilling self tapping screws into the fender well (with a similar fitting on the other end of the wire pictured below) from behind the lights and cut off the bit that protruded into the tire well.

I used marine rated wiring connections with shrink wrap built in so they wouldn't corrode.

5138de3cce395f5a18000001.webp
 
I'm not saying its the correct application but that is what I used. It's more or less to protect the paint in the event the bit bounces off and tries to hit something. Like I said just make sure your extra careful towards the end. Mine really wanted to bite in and move so like I said I just threw it in reverse and that made it much easier. The oem lights use the housing bolts that attach to the body as a ground so you will need to add a ground to the LEDs. What I did was bought 2 self taping screws and a wire. (I used white since it is the color of the ground on the lights) Then grounded them out by drilling self tapping screws into the fender well (with a similar fitting on the other end of the wire pictured below) from behind the lights and cut off the bit that protruded into the tire well.

I used marine rated wiring connections with shrink wrap built in so they wouldn't corrode.

View attachment 68216
Great info! Thanks a bunch. I've seen other videos doing the same with the tape. I do know the thing has to be grounded. I tested one light out and it worked like a charm. I'm still worried about behind the hole not having room. Would love to see the back of your lights and behind your passenger side light.
 
I got distracted with the family. Here are the photos. The tab has about an 1inch or so of clearance.
20181217_145437.webp
20181217_145452.webp
20181217_145456.webp
 
  • Like
Reactions: Daryl