Notice that my radiator was leaking when I was doing my oil change. So I got my spare Mopar radiator out of the attic and changed that too.

You are using an out of date browser. It may not display this or other websites correctly.
You should upgrade or use an alternative browser.
You should upgrade or use an alternative browser.
What did you do to your TJ today?
- Thread starter LJRubiconGuy
- Start date
still not very mobile post surgery, but mobile enough to prop my self in the shop for table top work. I don't think I can manage the in cab electrical work, but I can at least get things ready.
a/c disconnect & butt warmers

a/c disconnect & butt warmers
Soft top installed. First time in 3 years.
Looks great...


Both sides, same spot ripped the thread as I zipped in the windows.
Showed it to the wife:
Me: "I think I'll try to repair it."
Wife: "What time do you have. No. Buy a new top. Call it your Christmas present."
Me:

(We don't do Christmas present for each other... lol)
Looks great...
Both sides, same spot ripped the thread as I zipped in the windows.
Showed it to the wife:
Me: "I think I'll try to repair it."
Wife: "What time do you have. No. Buy a new top. Call it your Christmas present."
Me:
(We don't do Christmas present for each other... lol)
05Rubicon
Member
Installed my new PCM from WranglerFix.com and it works beautifully! HUGE shout out to WranglerFix!!! No more hard slamming 1-2 shifts when system is cold.
There is no way to weld the backside of this coil spring repair kit when welding it to the frame but I threw a big booger of a weld inside on the back half so maybe it will hold up lol one side done. Just need to let it cool off so I can put the rubber insulator and spring in.


That looks like a grenade-o-matic! Did it let go, or did you give it some help?
RFAASRMA
TJ Enthusiast
Got rid of the 33(ish) on JK Rubicon rims. I loved the look but couldn’t pass up the deal I got on 5 X 35 inch Cooper STT Pros.


That looks like a grenade-o-matic! Did it let go, or did you give it some help?
Well I had bought stuff to replace both sides because I knew the passenger side was rusted pretty bad. I was using my sawzall to cut the bump stop cup bolt out and the whole thing just broke off lol it was that thin. The driver side was still solid metal so I just cleaned it up and put a new insulator on the upper spring bucket/ perch.
Last edited:
Went wheeling with 18 other rigs to Pine Point out of Pinehurst ID. Ended up at the same mine as a few weeks ago. The view was awesome and I couldn't have asked for better weather for this time of year.


Went Jeeping up to Signal Peak today with a church group. Had a great time, except CEL came on P0174, lean fuel mixture. My digital gauge usually shows a pending P0174 at higher elevations, but CEL never comes on. Then get back home and it stops doing. Guess I’ll be checking that out, even if the CEL light goes off.
Then came home and grilled some burgers.


Then came home and grilled some burgers.
Got rid of the 33(ish) on JK Rubicon rims. I loved the look but couldn’t pass up the deal I got on 5 X 35 inch Cooper STT Pros.
View attachment 467350
View attachment 467352
View attachment 467354
Nice color Jeep
Kiwi TJ
I don't suffer from insanity I enjoy every minute
Supporting Member
Ride of the Month Winner
Went for drive to find some sun and founds some at the other side of the city…. Had a snack of a Beef cheese and onion sandwich with a magic view of the gulf sitting on top of a WW2 gun emplacement.

Would have been a top down day if that Southern wind had calmed down a bit.

Would have been a top down day if that Southern wind had calmed down a bit.
Went for drive to find some sun and founds some at the other side of the city…. Had a snack of a Beef cheese and onion sandwich with a magic view of the gulf sitting on top of a WW2 gun emplacement.
View attachment 467453
Would have been a top down day if that Southern wind had calmed down a bit.
View attachment 467454
All I noticed was the sandwich.
Working on a couple little things when I have the time. License plate relocation to the corner, savvy valance and tail gate skin, early TJ rear hinges. Ordered block off plates for the hinge cutouts from sendcutsend. Trying to figure out the intake situation. IATs are under control in boost with the meth injection now but the blower is still getting the air silly hot in vacuum. Looking to mimic the THOR design with the box extending the cowl outward. Not sure if it's worth my time and effort to design one myself or just buy their kit not needing the intake tube or filter.
I think I'm going to wrap the aluminum tail gate skin in black 3m then sticker bomb it with all the parts manufacturer stickers I've gotten over the years and see how I like it. If I don't like it I can just peel the whole sheet off. Kind of going for that whole quirky look with my seats and everything


I think I'm going to wrap the aluminum tail gate skin in black 3m then sticker bomb it with all the parts manufacturer stickers I've gotten over the years and see how I like it. If I don't like it I can just peel the whole sheet off. Kind of going for that whole quirky look with my seats and everything
Last edited:
Finally tackled the last suspect for the passenger side water leak.
I removed the cowl panel and the cabin intake shroud and could see a small bit of water remaining from last nights rain.
The weather stripping on the back of the cabin intake shroud was pretty brittle and probably provided little help. Removed the cracked weather stripping and applied an adhesive backed foam weather stripping in its’ place.
Painted the wiper blade arms while they were off using SEMA Trim Black to match all the other trim bits.
Checked the drain at the center front of the cowl area. I tried to snake a wire coat hanger down into the drain and could feel the resistance. No doubt it was clogged. After a bit of poking, I could feel things breaking up. Poured a quart of water into the cowl while continuing to prod and poke in the drain and the clog finally broke up. Poured a few more quarts of water in and could see all the debris draining out of the bottom of the vent. Finally the coat hanger went straight through with no resistance.
There was quite a pile of debris that had clogged the drain, as seen on the driveway..


Water is running freely and not pooling in the cowl, so we'll see if I've resolved it. It has rained the last seven weekends so chances are good it will again this weekend...
After watching a bunch of YouTube vids touting the benefits of Forever Black Trim Restorer, I decided to give it a try on the Bushwacker Flatties. Cleaned the flares with alcohol and let it dry for about an hour. Started to give the flare an application of the dye using the included sponge and.. this stuff sucks. It did absolutely nothing. Cleaned with alcohol again and went back to my favorite treatment.. CarSystems Restore Refinisher. I've been using this stuff for about a decade.. started it when I had my first JK. It doesn't last forever, nothing does, but it works a charm if you don't mind the shine and is good for about two months.
I am returning the Forever Black to Amazon.
Before and after...

I removed the cowl panel and the cabin intake shroud and could see a small bit of water remaining from last nights rain.
The weather stripping on the back of the cabin intake shroud was pretty brittle and probably provided little help. Removed the cracked weather stripping and applied an adhesive backed foam weather stripping in its’ place.
Painted the wiper blade arms while they were off using SEMA Trim Black to match all the other trim bits.
Checked the drain at the center front of the cowl area. I tried to snake a wire coat hanger down into the drain and could feel the resistance. No doubt it was clogged. After a bit of poking, I could feel things breaking up. Poured a quart of water into the cowl while continuing to prod and poke in the drain and the clog finally broke up. Poured a few more quarts of water in and could see all the debris draining out of the bottom of the vent. Finally the coat hanger went straight through with no resistance.
There was quite a pile of debris that had clogged the drain, as seen on the driveway..
Water is running freely and not pooling in the cowl, so we'll see if I've resolved it. It has rained the last seven weekends so chances are good it will again this weekend...
After watching a bunch of YouTube vids touting the benefits of Forever Black Trim Restorer, I decided to give it a try on the Bushwacker Flatties. Cleaned the flares with alcohol and let it dry for about an hour. Started to give the flare an application of the dye using the included sponge and.. this stuff sucks. It did absolutely nothing. Cleaned with alcohol again and went back to my favorite treatment.. CarSystems Restore Refinisher. I've been using this stuff for about a decade.. started it when I had my first JK. It doesn't last forever, nothing does, but it works a charm if you don't mind the shine and is good for about two months.
I am returning the Forever Black to Amazon.
Before and after...
Working on a couple little things when I have the time. License plate relocation to the corner, savvy valence and tail gate skin, early TJ rear hinges. Ordered block off plates for the hinge cutouts from sendcutsend. Trying to figure out the intake situation. IATs are under control in boost with the meth injection now but the blower is still getting the air silly hot in vacuum. Looking to mimic the THOR design with the box extending the cowl outward. Not sure if it's worth my time and effort to design one myself or just buy their kit not needing the intake tube or filter.
I think I'm going to wrap the aluminum tail gate skin in black 3m then sticker bomb it with all the parts manufacturer stickers I've gotten over the years and see how I like it. If I don't like it I can just peel the whole sheet off. Kind of going for that whole quirky look with my seats and everything
View attachment 467537
View attachment 467538
View attachment 467539
View attachment 467540
Where’d you get the hinges?
A little body and paint work...and a sammich... 
Shortly after taking possession of Tessie, I notice the "Trail Rated" emblem on the driver's side A pillar looked wonky. After a bit of minor poking and prodding, I discovered why...
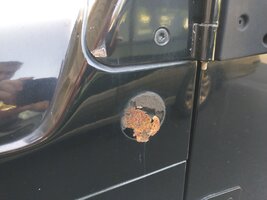
RUST!!! And a nasty little bit of it.
It's been looking like this for a month or two now and I figured I better do something about it before the weather gets too cold. Started grinding at it Friday evening and proceeded to move her into the 9'x20' garage in my rental. Not the best place to work, but UPS fecked up delivery of my new Acme downdraft paint booth, so what's a guy to do?
I didn't have access to a sandblaster, which would have been the best tool for the job, but managed to get everything cleaned up using roloc discs on my die grinder as well as a few burrs. There was some pitting, unfortunately, but as I also don't have access to a mig welder, cutting out the weak metal and replacing with a fresh patch wasn't in the cards. Fortunately the TJ's were built with some heavier gauge sheet metal than most other vehicles of similar vintage. No photos of the cleanup work as I was focused and forgot.
In prep for this repair work, I ordered a ColorRite color/clear kit in Black Crystal Clearcoat X8/DX8. But wanting something catalyzed for durability, I also picked up a couple of cans of SprayMax 2K clear and 2K epoxy primer (to use as a primer and sealer). I also snagged a small tub of glazing putty and hardener to smooth out the rough bits left behind after removal of the rust.
Feather edged the main repair area as well as some stone chips on the top of this same panel. The eagle-eyed among us may have noticed a damaged spot on the bottom edge of the hinge plate (seen in above photo), but I had a number of reason for not worrying about that now and it's a much easier fix. I was dealing with time, temperature and weather constraints and the other rust was a bigger concern and looked like absolute shit...
After sanding everything back, I applied a coat of epoxy primer over the entire panel, left it overnight and sanded it sufficiently for bonding of the glazing putty this morning. Skimmed with putty and blocked back smooth...
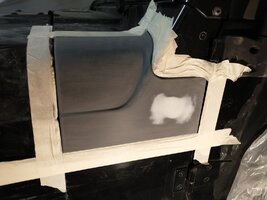
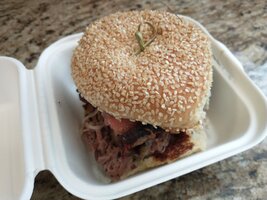
Decide to take a break for a sammy...a little smoked brisket number (with Alabama white sauce, slaw, pepperjack cheese and pickled red onions) from a local barbecue cafe...these things are like crack to a crack whore...
Back to work. Pulled of the protective tape, cleaned everything up, backtaped and masked in preparation for paint work.
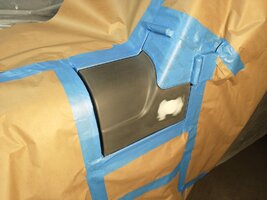
Wiped down, tacked off, epoxy "sealer" applied.
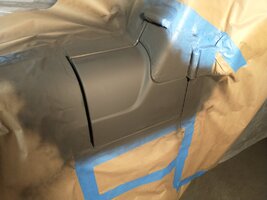
I forgot to shoot pics of the two color coats (how exciting would they have been?), but this is the last of the three coats of 2K clear about 30 minutes after spraying...
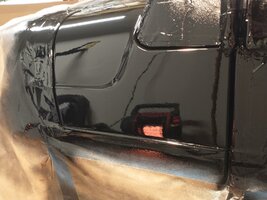
Fumes dissipated, fired up the buddy heater to help things cure a little better. Not my best paint work, but not bad for rattle cans and about the best I've done without proper equipment and space. I've got a few bits of dust but the three clear coats should allow me to nib them back without issue, then buff. I'll give it some time before doing that work, let things harden a bit.
The adjacent panels will be getting buffed as well to help match up. I had intended to just spot base the rusty area then clear the whole panel, but I couldn't let those other chips go.
To cap off the repair, I found a new trail rated badge from something called a Trailhawk, same badge but only in red....thought that might look sharp on Tessie's blackness....
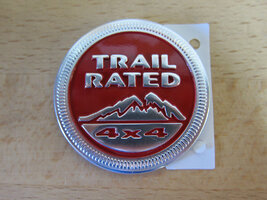
I need another brisket sammich, huffing paint fumes makes a man hungry.
Shortly after taking possession of Tessie, I notice the "Trail Rated" emblem on the driver's side A pillar looked wonky. After a bit of minor poking and prodding, I discovered why...

RUST!!! And a nasty little bit of it.
It's been looking like this for a month or two now and I figured I better do something about it before the weather gets too cold. Started grinding at it Friday evening and proceeded to move her into the 9'x20' garage in my rental. Not the best place to work, but UPS fecked up delivery of my new Acme downdraft paint booth, so what's a guy to do?
I didn't have access to a sandblaster, which would have been the best tool for the job, but managed to get everything cleaned up using roloc discs on my die grinder as well as a few burrs. There was some pitting, unfortunately, but as I also don't have access to a mig welder, cutting out the weak metal and replacing with a fresh patch wasn't in the cards. Fortunately the TJ's were built with some heavier gauge sheet metal than most other vehicles of similar vintage. No photos of the cleanup work as I was focused and forgot.
In prep for this repair work, I ordered a ColorRite color/clear kit in Black Crystal Clearcoat X8/DX8. But wanting something catalyzed for durability, I also picked up a couple of cans of SprayMax 2K clear and 2K epoxy primer (to use as a primer and sealer). I also snagged a small tub of glazing putty and hardener to smooth out the rough bits left behind after removal of the rust.
Feather edged the main repair area as well as some stone chips on the top of this same panel. The eagle-eyed among us may have noticed a damaged spot on the bottom edge of the hinge plate (seen in above photo), but I had a number of reason for not worrying about that now and it's a much easier fix. I was dealing with time, temperature and weather constraints and the other rust was a bigger concern and looked like absolute shit...
After sanding everything back, I applied a coat of epoxy primer over the entire panel, left it overnight and sanded it sufficiently for bonding of the glazing putty this morning. Skimmed with putty and blocked back smooth...

Decide to take a break for a sammy...a little smoked brisket number (with Alabama white sauce, slaw, pepperjack cheese and pickled red onions) from a local barbecue cafe...these things are like crack to a crack whore...

Back to work. Pulled of the protective tape, cleaned everything up, backtaped and masked in preparation for paint work.

Wiped down, tacked off, epoxy "sealer" applied.

I forgot to shoot pics of the two color coats (how exciting would they have been?), but this is the last of the three coats of 2K clear about 30 minutes after spraying...

Fumes dissipated, fired up the buddy heater to help things cure a little better. Not my best paint work, but not bad for rattle cans and about the best I've done without proper equipment and space. I've got a few bits of dust but the three clear coats should allow me to nib them back without issue, then buff. I'll give it some time before doing that work, let things harden a bit.
The adjacent panels will be getting buffed as well to help match up. I had intended to just spot base the rusty area then clear the whole panel, but I couldn't let those other chips go.
To cap off the repair, I found a new trail rated badge from something called a Trailhawk, same badge but only in red....thought that might look sharp on Tessie's blackness....

I need another brisket sammich, huffing paint fumes makes a man hungry.
Last edited:
Replaced trackbar at axle - One included on Currie/Savvy lift used the OEM 10mm and I had followed Currie instructions to drill the mount to 1/2".


Then pulled shifter to bend it due to the TT. Unfortunately, the shifter was more brittle than before when I've removed it and I damaged it try to get the cap out for the knob nut. At that point I just pried out the cap because the knob was shot and I can't look at it every drive with an indent.

Then pulled shifter to bend it due to the TT. Unfortunately, the shifter was more brittle than before when I've removed it and I damaged it try to get the cap out for the knob nut. At that point I just pried out the cap because the knob was shot and I can't look at it every drive with an indent.

