You are using an out of date browser. It may not display this or other websites correctly.
You should upgrade or use an alternative browser.
You should upgrade or use an alternative browser.

Kim's 99 Jeep Wrangler Build Thread
- Thread starter KimsJeep
- Start date
It’s a really good thing you ended up going with those engine mounts! Your stock ones were cracking badI haven't updated this in awhile. I seem to like to just put the things I do to it in the "what did you do to your tj today" thread. LOL
Since the last photos the main thing I did was add the winch.
View attachment 146363
Went on a 4 wheel drive run with a group here in Sac.
View attachment 146364
View attachment 146365
Installed some grab bars,
View attachment 146366
Then made them purple.
View attachment 146367
Installed a set of JKS quick disconnects I got from a member here.
View attachment 146368
Went on another 4 wheel drive run with another group here in Sac.This was the first time disconnecting my links. This is where I found out I wanted a lift. LOL
View attachment 146370
Me and my co pilot.
View attachment 146371
For that run I wanted to take some chairs and it is always a pain to have the chairs in the back and still be able to open my drawer to get to our lunches and all. So, I made a platform to hold the chairs. I'm going to make it cover the whole back in this summer, but in a pinch this worked.
View attachment 146369
My radio quit on me again, so I found this cheap radio at Walmart. With 2 year warranty, came to 22 bucks.
View attachment 146372
View attachment 146373
I was finding that when the door was fully open, I would grab the door panel toward the top to pull it shut. So I made a parachord lanyard to pull it with.
View attachment 146374
And finally, to get things all caught up. Today I installed my 1.25" Savvy BL and my Brown Dog 1" MML. For the most part I did the BL by myself.
View attachment 146375
View attachment 146376
Getting ready to start.
View attachment 146377
My helpers
View attachment 146378
View attachment 146379
We found these 2 hiding between the radiator and the grille. Hubby had to fish them out with a magnet.
View attachment 146380
Left over parts.
View attachment 146381
I forgot to take a pic of the original height. It was 18". I remembered to take a pic of the after. It just didn't come out that great. A little over 19" now.
View attachment 146382
Here are some after pics.
View attachment 146383View attachment 146384View attachment 146385View attachment 146386View attachment 146387
I can no longer see the grille guard from the inside.
View attachment 146388
I'm going to be painting that dirty piece to the left black eventually.
View attachment 146389
And here are the side by side pics. Before on the left after right. You can see how the grille guard now sits lower then the hood. I will be raising that up a bit eventually. I can't get to the headlight screws that easily with the way it is now.
View attachment 146390
View attachment 146391
Ok, all caught up.
Tray Burge
TJ Addict
The clear lens markers look really good, but I think you should paint your flares purple to match the trim.
Now the purple people eater is getting some beef! Trail worthy for sure! Good times!!!I haven't updated this in awhile. I seem to like to just put the things I do to it in the "what did you do to your tj today" thread. LOL
Since the last photos the main thing I did was add the winch.
View attachment 146363
Went on a 4 wheel drive run with a group here in Sac.
View attachment 146364
View attachment 146365
Installed some grab bars,
View attachment 146366
Then made them purple.
View attachment 146367
Installed a set of JKS quick disconnects I got from a member here.
View attachment 146368
Went on another 4 wheel drive run with another group here in Sac.
View attachment 146370
Me and my co pilot.
View attachment 146371
For that run I wanted to take some chairs and it is always a pain to have the chairs in the back and still be able to open my drawer to get to our lunches and all. So, I made a platform to hold the chairs. I'm going to make it cover the whole back in this summer, but in a pinch this worked.
View attachment 146369
My radio quit on me again, so I found this cheap radio at Walmart. With 2 year warranty, came to 22 bucks.
View attachment 146372
View attachment 146373
I was finding that when the door was fully open, I would grab the door panel toward the top to pull it shut. So I made a parachord lanyard to pull it with.
View attachment 146374
And finally, to get things all caught up. Today I installed my 1.25" Savvy BL and my Brown Dog 1" MML. For the most part I did the BL by myself.
View attachment 146375
View attachment 146376
Getting ready to start.
View attachment 146377
My helpers
View attachment 146378
View attachment 146379
We found these 2 hiding between the radiator and the grille. Hubby had to fish them out with a magnet.
View attachment 146380
Left over parts.
View attachment 146381
I forgot to take a pic of the original height. It was 18". I remembered to take a pic of the after. It just didn't come out that great. A little over 19" now.
View attachment 146382
Here are some after pics.
View attachment 146383View attachment 146384View attachment 146385View attachment 146386View attachment 146387
I can no longer see the grille guard from the inside.
View attachment 146388
I'm going to be painting that dirty piece to the left black eventually.
View attachment 146389
And here are the side by side pics. Before on the left after right. You can see how the grille guard now sits lower then the hood. I will be raising that up a bit eventually. I can't get to the headlight screws that easily with the way it is now.
View attachment 146390
View attachment 146391
Ok, all caught up.
OP
Ya. Those stock mounts were shot. Looking good.
Have you done the 2x4 test yet to see if you like the idea of going higher?
No, not yet. It's been cold and rainy. Next sunny day I plan to do it.
OP
It’s a really good thing you ended up going with those engine mounts! Your stock ones were cracking bad
Yah, I noticed that and told hubby they looked pretty bad. We also found out one of my rear shocks is shot. It's leaking whatever is in there. Looks like I'm going to have to get shocks asap. I'll probably just go with the Rancho 0-2" lift. I have read several say that even with a 2 inch lift, the 2-3" ones are too long.
OP
Got the lift put on today!! First thing we did was went to the car wash so hubby could clean the suspension a little.


We started in the back. Went pretty well but I will have to say, we are not very good at it. The rear is still a little out of adjustment. We didn't buy a bracket for the track bar and put it in the original track bar location. To do that, we had to put the adjustable part in first, then put the other end in. Here is where I ran into my first issue. I tried to tell hubby we needed to put it on the ground and then figure out how much adjustment we needed. Well, him being him, didn't want to do it that way. He measured it up in the air. We had do lower the exhaust to be able to turn the track bar to adjust it out a bit. Once we did get it back on the ground we measured and it is just under a quarter of an inch off. I'm calling it good enough for now and I may buy a bracket later down the road so it is easier to adjust.

Then we moved to the front. Here is where my other issue came along. We were doing good and it was going pretty smoothly. Then I told hubby we had to drill out the hole bigger to attach the trac bar. So he started to do it and didn't have a sharp bit, so he got it just so the bolt would almost go in. He said would be able to get it to thread in and it would be fine. Well, it wasn't. It messed up the threads. It wouldn't tighten up all the way and he ended up having to cut the bolt in half to get it off.

Had to run to the hardware store to get another bolt. Got back and he got the hole drilled out all the way this time and things went well after that. We got the front dialed in really nice. Even on both sides.

Here it is all done.


Some before and after pics.


With body lift and then with lift too.

The day I got it and now!

So it went pretty well except for hubby not wanting do do as some of the instructions said to do. LOL I'm going to take it on Monday, I hope, to get the alignment. It seems to look ok, and goes down the road fine, but figure from what I read it is best to have it done after a lift.
First thing we did was went to the car wash so hubby could clean the suspension a little. We started in the back. Went pretty well but I will have to say, we are not very good at it. The rear is still a little out of adjustment. We didn't buy a bracket for the track bar and put it in the original track bar location. To do that, we had to put the adjustable part in first, then put the other end in. Here is where I ran into my first issue. I tried to tell hubby we needed to put it on the ground and then figure out how much adjustment we needed. Well, him being him, didn't want to do it that way. He measured it up in the air. We had do lower the exhaust to be able to turn the track bar to adjust it out a bit. Once we did get it back on the ground we measured and it is just under a quarter of an inch off. I'm calling it good enough for now and I may buy a bracket later down the road so it is easier to adjust.
Then we moved to the front. Here is where my other issue came along. We were doing good and it was going pretty smoothly. Then I told hubby we had to drill out the hole bigger to attach the trac bar. So he started to do it and didn't have a sharp bit, so he got it just so the bolt would almost go in. He said would be able to get it to thread in and it would be fine. Well, it wasn't. It messed up the threads. It wouldn't tighten up all the way and he ended up having to cut the bolt in half to get it off.
Had to run to the hardware store to get another bolt. Got back and he got the hole drilled out all the way this time and things went well after that.
We got the front dialed in really nice. Even on both sides. Here it is all done.
Some before and after pics.
With body lift and then with lift too.
The day I got it and now!
So it went pretty well except for hubby not wanting do do as some of the instructions said to do. LOL I'm going to take it on Monday, I hope, to get the alignment. It seems to look ok, and goes down the road fine, but figure from what I read it is best to have it done after a lift.
Looking awesome!Got the lift put on today!!
View attachment 159964
View attachment 159965
We started in the back. Went pretty well but I will have to say, we are not very good at it. The rear is still a little out of adjustment. We didn't buy a bracket for the track bar and put it in the original track bar location. To do that, we had to put the adjustable part in first, then put the other end in. Here is where I ran into my first issue. I tried to tell hubby we needed to put it on the ground and then figure out how much adjustment we needed. Well, him being him, didn't want to do it that way. He measured it up in the air. We had do lower the exhaust to be able to turn the track bar to adjust it out a bit. Once we did get it back on the ground we measured and it is just under a quarter of an inch off. I'm calling it good enough for now and I may buy a bracket later down the road so it is easier to adjust.
View attachment 159966
Then we moved to the front. Here is where my other issue came along. We were doing good and it was going pretty smoothly. Then I told hubby we had to drill out the hole bigger to attach the trac bar. So he started to do it and didn't have a sharp bit, so he got it just so the bolt would almost go in. He said would be able to get it to thread in and it would be fine. Well, it wasn't. It messed up the threads. It wouldn't tighten up all the way and he ended up having to cut the bolt in half to get it off.
View attachment 159968
Had to run to the hardware store to get another bolt. Got back and he got the hole drilled out all the way this time and things went well after that.
View attachment 159967
Here it is all done.
View attachment 159969
View attachment 159970
View attachment 159971
Some before and after pics.
View attachment 159972View attachment 159973View attachment 159974
With body lift and then with lift too.
View attachment 159975
The day I got it and now!
View attachment 159976
So it went pretty well except for hubby not wanting do do as some of the instructions said to do. LOL I'm going to take it on Monday, I hope, to get the alignment. It seems to look ok, and goes down the road fine, but figure from what I read it is best to have it done after a lift.
Looks great!! Did you take measurements of the gain? It looks like a lot more than 2" in the rear.
OP
Looks great!! Did you take measurements of the gain? It looks like a lot more than 2" in the rear.
Sorry, I thought I replied to you, but was just looking through my build thread again and noticed I didn't.
No, I didn't take measurements and yes, the back looks a lot taller then the front. Not sure why though. To me the Jeep looks to sit level. At least to my eye it does. LOL
Maybe it sits that way because there is weight in the front and virtually no weight in the back? They are the heavy duty springs.
OP
OP
It was me! I was on vacation and was going up that way a lot that week. Still have a lot of exploring to do up that way.
Still have a lot of exploring to do up that way.
OP
Finally going to add to this thread again. Haven't done any major things just a few small ones. Most of you probably already read about this stuff in the "what did you do to your TJ" thread, but figured I'd update this thread.
Put some cheap halo headlights in. They are ok, but to me the high beams suck. I would get different ones but I really like the turn signal function they have. LOL

I also found some hard uppers. I ran them last winter and I like them, but I need to paint them black. That was supposed to be done this last summer, didn't happen. LOL Not sure if I want to still attempt in now that it is getting cooler, or just run them tan again till next summer.

I installed some better underhood lighting.

Hubby found a set of 32" tires, but I have yet to try them on the Jeep. I want to do that and if I do like them, I may have to have the rims powder coated. Never guess the color?

Then just recently I decided to redo my deck in the back. Found some product called Unicorn Spit. LOL Didn't come out as good as I was hoping but after I put some polyurathane on, it started to grow on me.

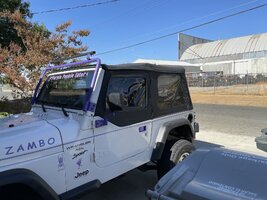
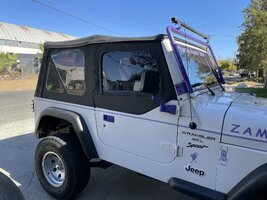
Thanks to this forum, I got a set of tinted soft uppers. I decided to buy new frames so I could have the option of switching to my old soft uppers if I felt like it. Those came the other day so I worked on putting the skins on the frames today.
I should have warmed them up before I started but I did the driver side cold. Took some working around but finally got it on with the help of a couple boxed end wrenches. LOL.


I decided to let the passenger side sit in the sun for a bit while I went and tried the driver side on the Jeep.
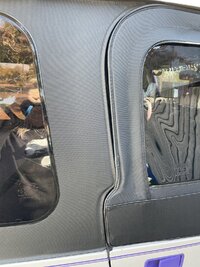
I wasn't to thrilled about a couple gaps here and there. This pic shows a hole at the bottom front corner. I'm thinking rain would easily get in there.

Also had some daylight coming through at the top.

I went back and looked at my old upper and found that I didn't get the bottom front corner completely in, so I set the upper in the sun and went to tackle the passenger side.
From this pic, it looks like there in no way they will fit the frames. LOL

Got that one done and installed. It had a lot smaller gap at the bottom corner. I felt comfortable with that. I also figured out how to do some adjustments to make it shut really well. No gaps!


I went back and managed to get the driver side bottom front corner on correctly and tried again. This time the hole was really small.

They shut a lot better than my old set. I may have to adjust them a bit now that I know how to do it. LOL Only thing is they do have a gap seen in the pic below, but the weather strip does touch everywhere it needs too. I'm happy with the results.


Because I kept my old uppers so I can use them if I wanted too, I had to make new zipper pulls.

And, that brings me back up to date on my TJ.

Put some cheap halo headlights in. They are ok, but to me the high beams suck. I would get different ones but I really like the turn signal function they have. LOL
I also found some hard uppers. I ran them last winter and I like them, but I need to paint them black. That was supposed to be done this last summer, didn't happen. LOL Not sure if I want to still attempt in now that it is getting cooler, or just run them tan again till next summer.
I installed some better underhood lighting.
Hubby found a set of 32" tires, but I have yet to try them on the Jeep. I want to do that and if I do like them, I may have to have the rims powder coated.
Never guess the color? Then just recently I decided to redo my deck in the back. Found some product called Unicorn Spit. LOL Didn't come out as good as I was hoping but after I put some polyurathane on, it started to grow on me.
Thanks to this forum, I got a set of tinted soft uppers. I decided to buy new frames so I could have the option of switching to my old soft uppers if I felt like it. Those came the other day so I worked on putting the skins on the frames today.
I should have warmed them up before I started but I did the driver side cold. Took some working around but finally got it on with the help of a couple boxed end wrenches. LOL.
I decided to let the passenger side sit in the sun for a bit while I went and tried the driver side on the Jeep.
I wasn't to thrilled about a couple gaps here and there. This pic shows a hole at the bottom front corner. I'm thinking rain would easily get in there.
Also had some daylight coming through at the top.
I went back and looked at my old upper and found that I didn't get the bottom front corner completely in, so I set the upper in the sun and went to tackle the passenger side.
From this pic, it looks like there in no way they will fit the frames. LOL
Got that one done and installed. It had a lot smaller gap at the bottom corner. I felt comfortable with that. I also figured out how to do some adjustments to make it shut really well. No gaps!
I went back and managed to get the driver side bottom front corner on correctly and tried again. This time the hole was really small.
They shut a lot better than my old set. I may have to adjust them a bit now that I know how to do it. LOL Only thing is they do have a gap seen in the pic below, but the weather strip does touch everywhere it needs too. I'm happy with the results.
Because I kept my old uppers so I can use them if I wanted too, I had to make new zipper pulls.
And, that brings me back up to date on my TJ.
Attachments