MiRustyjeep

Took another trip to Indiana today. I seem to find a lot of TJ stuff in the South Bend area...Anyway, Today was a "big find." Stopped by Baseline 4x4 for a new tub! Its from an 05 out of Virginia / Washington DC (according to the VIN). Had about 100,000 miles on it. Its not perfect...but it IS nearly rust free. It has a little bit of damage in the Drivers front rocker/firewall area. Should be a relatively easy fix. I'll weld in a new panel and straighten the firewall. Its in a place that is buried when fully assembled so the repair doesn't have to be perfect. Also, my rock sliders will over most of the rest of the repair.


1607383935020.png


1607383952227.png


1607383969801.png


1607384030881.png


And this is the worst of the rust. This is in the Drivers rear wheel well. Some of the other seams have a little too, but it should clean up with a wire wheel. I may even get a wild hair and sandblast it...

1607384096771.png


Finally, the minor damage I'll have to straighten out.

1607384143085.png


And this panel will be replaced.

1607384162209.png


Pretty stoked to get started on this. I'm gonna have to be really careful to not get into too far though. I will clean and paint my frame, probably replace the heater core. . I am going to use Rhinoliner underneath and put sound and heat dampening in the interior when it goes back together.

Not sure if I'm going to paint the whole jeep or not. Its black, so I don't have to...but I already have to paint a door, a tailgate, and the entire driver's side. I might as well do the rest of it. We'll see. Black is so boring...I really like Porche Pacific blue but Jeeps Gunmetal gray metallic is nice too. A nice muted color, but not black. Sarge Green or Jeep Green is good too, but my wife isn't as sold on green.
 
Started picking away at panel removal over the last couple days. I bought this book off eBay a few months ago. I should probably scan it in for the tech resources here.
IMG_20201227_173905171.jpg


Anyway, it lays out where all the spot welds are from the factory, where the seam sealer should go, where they used panel adhesive, etc.

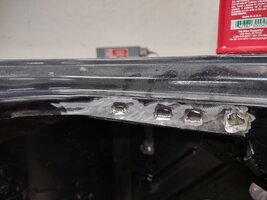
Anyway, I drilled my first 5 welds with a Brad point bit. It worked, but it was slow. Then I tried my belt sander/grinder with a 1/2 belt. That works a lot faster, but it also removes a bunch of material. Not a big deal on the panel I plan on replacing, but for the ones that have to come apart but I plan on reusing, it's less than ideal. This is what's left for a plug weld...IMG_20201227_173100903_HDR.jpg

Finally, I got my Blair spot weld remover tool. Holy cow... It's nice. It's just as fast as the grinder, but it leaves a nice 3/8" hole.

IMG_20201227_173057115_HDR.jpg


I've used the one from harbor freight before and it's junk compared to this. If you have body work to do, highly recommend you pick one of these up.

IMG_20201227_173201901_MP.jpg


I'm about half done with the weld removal. Still waiting to see exactly what I'll be getting to replace the panel with. I have a lead on a scrap tub there guy said he'll give me. I'm also watching a quarter cut on eBay going for about 150 bucks. The nice thing is that is not a high rust area, so I should be able to find a scrap tub somewhere and get what I need. I priced out a brand new panel and they want about 800 bucks for it!
 
Well...I couldn't help myself...

IMG_20201227_194354454.jpg


I cut it close to where the radiused corner for the door blends into the straight. All the corner cuts I've seen include that section, so I should be ok. I'm actually going to order some body hammers and see if I can straighten the original panel out. Should be a fun experiment, anyway.
 
  • Like
Reactions: psrivats and Alex01
Went to everyone's favorite Chinese import store today to pick up an inexpensive set of body hammers and dollies.

I figured I was replacing the panel anyway, so what did I have to lose... So..I started beating on the panel.

This is where I started.

IMG_20201228_191954129.jpg
IMG_20201228_192031978.jpg
IMG_20201228_200510415.jpg


Started hammering on the high spots from the back side.

I worked on it for about an hour. I made a drastic improvement. It's still not ready to use, but it's a whole bunch better.
IMG_20201228_205928957.jpg
IMG_20201228_205918564.jpg
IMG_20201228_205950484.jpg

I am getting some oil canning now, so I need to shrink the metal down. Time for a little youtube university.
 
Went to everyone's favorite Chinese import store today to pick up an inexpensive set of body hammers and dollies.

I figured I was replacing the panel anyway, so what did I have to lose... So..I started beating on the panel.

This is where I started.

View attachment 214008View attachment 214009View attachment 214010

Started hammering on the high spots from the back side.

I worked on it for about an hour. I made a drastic improvement. It's still not ready to use, but it's a whole bunch better.
View attachment 214011View attachment 214012View attachment 214013
I am getting some oil canning now, so I need to shrink the metal down. Time for a little youtube university.

Very nice. Is this your first time ever doing this type of work?

Body work is like black magic to me. The local body shop does a good bit of restoration work on older cars and I've watched them do some dent fixing in the past. It'samazing watching them work.
 
Very nice. Is this your first time ever doing this type of work?

Body work is like black magic to me. The local body shop does a good bit of restoration work on older cars and I've watched them do some dent fixing in the past. It'samazing watching them work.
Kinda. I've pounded on metal before, to bend brackets and stuff for fabrication. This is my first time trying to do class A surfaces on a vehicle.
 
Got a little bit further on the wrinkled corner of my tub today. I noticed with my newly flattened skin, the fender bolt holes were no longer lining up.

IMG_20210102_185043440.jpg


Further inspection showed that when this impact was sustained, it pushed the whole structure in.

IMG_20210102_185009107.jpg


I removed the flange that the fenders bolt into so I could re-align the metal below.
IMG_20210102_195808322.jpg


I flattened the bend using a piece of 1/4 bar stock and a C-clamp, then my hammer and dolly to get it back into form.

Got things lining up much better now.

IMG_20210102_201749538.jpg
IMG_20210102_201806720.jpg


I have a full oxy-acytelene set up at the house, so tomorrow I'm going to work out the rest of the dents and whatnot in the skin.
 
Along with my tub replacement this year, I'm going to take the next step on my suspension. I ordered the Rancho Springs that were incredibly cheap (less than 120 dollars from Summit Racing). They came in today, and they look decent. Wire size is the same as my OME springs. Fronts measure 22.25" long free length and the rears are 17.5" long. Decent length springs and very comparable to the JKS J-spec 3" lift spring. Rancho's pages describes the lift these are from as a 3.5" lift, so we'll see what happens when I install them.

The whole point of the bigger springs is to get longer shocks. I want at least 10" shocks under there. With the compressed lengths of most shocks that long, I'll need to add an inch to the upper mount of my front shocks even with the longer spring. For now, I'm just going to do some cheap shocks (Rancho 5000x P/N RS55255 and RS55256). They are about 10.7 travel in front and around 10 in the rear. I do plan on installing my springs first though, to make sure their extended and compressed lengths will work.

Finally I ordered a set of JeepWest's Geometry Correction Brackets. I was going to make my own, but for what Dave is charging, it didn't make sense to try and figure it out on my own. I've read as much as I can find on the Nth degree short arm lift and Geo Correction and I think its going to fix a lot of the issues I've had with my rig. Because of my location, I get into low traction situations nearly every time I wheel. Michigan is a very "low" state. We have a high water table, with lots of sand and clay. Those two materials both make mud prevalent in any off road park and on any forest service road. Any time there is a climb along with low traction, I get wheel hop. By all accounts, the Geo Correction should help with that.

Figure I'll give this a shot with cheap shocks and if I like it, try to outboard with some nice Fox Factory shocks next year.

My springs came in today...which is the whole reason I decided to type out this post...

1610227707685.png
 
Last edited:
Along with my tub replacement this year, I'm going to take the next step on my suspension. I ordered the Rancho Springs that were incredibly cheap. They came in today, and they look decent. Wire size is the same as my OME springs. Fronts measure 22.25" long free length and the rears are 17.5" long. Decent length springs and very comparable to the JKS J-spec 3" lift spring. Rancho's pages describes the lift these are from as a 3.5" lift, so we'll see what happens when I install them.

The whole point of the bigger springs is to get longer shocks. I want at least 10" shocks under there. With the compressed lengths of most shocks that long, I'll need to add an inch to the upper mount of my front shocks even with the longer spring. For now, I'm just going to do some cheap shocks (Rancho 5000x P/N RS55255 and RS55256). They are about 10.7 travel in front and around 10 in the rear. I do plan on installing my springs first though, to make sure their extended and compressed lengths will work.

Finally I ordered a set of JeepWest's Geometry Correction Brackets. I was going to make my own, but for what Dave is charging, it didn't make sense to try and figure it out on my own. I've read as much as I can find on the Nth degree short arm lift and Geo Correction and I think its going to fix a lot of the issues I've had with my rig. Because of my location, I get into low traction situations nearly every time I wheel. Michigan is a very "low" state. We have a high water table, with lots of sand and clay. Those two materials both made mud prevalent in any off road park and on any forest service road. Any time there is a climb along with low traction, I get wheel hop. By all accounts, the Geo Correction should help with that.

Figure I'll give this a shot with cheap shocks and if I like it, try to outboard with some nice Fox Factory shocks next year.

My springs came in today...which is the whole reason I decided to type out this post...

View attachment 216648

Good plan. Definitely plan for an outboard and good tuned shocks, they make a HUGE difference in ride quality.

Very curious to see how those springs work for you along with Dave's brackets.
 
  • Like
Reactions: Mike_H
Good plan. Definitely plan for an outboard and good tuned shocks, they make a HUGE difference in ride quality.

Very curious to see how those springs work for you along with Dave's brackets.
you and me both, Buddy. I was fretting a bit, trying to decide between buying these or saving for the Savvy's but in the end, I figured these are so cheap, I can probably sell them on marketplace for MORE than I bought them for originally!
 
Along with my tub replacement this year, I'm going to take the next step on my suspension. I ordered the Rancho Springs that were incredibly cheap (less than 120 dollars from Summit Racing). They came in today, and they look decent. Wire size is the same as my OME springs. Fronts measure 22.25" long free length and the rears are 17.5" long. Decent length springs and very comparable to the JKS J-spec 3" lift spring. Rancho's pages describes the lift these are from as a 3.5" lift, so we'll see what happens when I install them.

The whole point of the bigger springs is to get longer shocks. I want at least 10" shocks under there. With the compressed lengths of most shocks that long, I'll need to add an inch to the upper mount of my front shocks even with the longer spring. For now, I'm just going to do some cheap shocks (Rancho 5000x P/N RS55255 and RS55256). They are about 10.7 travel in front and around 10 in the rear. I do plan on installing my springs first though, to make sure their extended and compressed lengths will work.

Finally I ordered a set of JeepWest's Geometry Correction Brackets. I was going to make my own, but for what Dave is charging, it didn't make sense to try and figure it out on my own. I've read as much as I can find on the Nth degree short arm lift and Geo Correction and I think its going to fix a lot of the issues I've had with my rig. Because of my location, I get into low traction situations nearly every time I wheel. Michigan is a very "low" state. We have a high water table, with lots of sand and clay. Those two materials both make mud prevalent in any off road park and on any forest service road. Any time there is a climb along with low traction, I get wheel hop. By all accounts, the Geo Correction should help with that.

Figure I'll give this a shot with cheap shocks and if I like it, try to outboard with some nice Fox Factory shocks next year.

My springs came in today...which is the whole reason I decided to type out this post...

View attachment 216648
Watching this with interest, I have been looking at BDS springs as a lower priced alternative to Savvy and recommended by some on this site. Do you run your Jeep heavy? Half of my wheeling is on camping trips where I am pretty loaded(the Jeep that is!) the rest of the time it is pretty remote so lots of tools and recovery gear. Like your progress, you are way ahead of me!
 
  • Like
Reactions: Mike_H
Watching this with interest, I have been looking at BDS springs as a lower priced alternative to Savvy and recommended by some on this site. Do you run your Jeep heavy? Half of my wheeling is on camping trips where I am pretty loaded(the Jeep that is!) the rest of the time it is pretty remote so lots of tools and recovery gear. Like your progress, you are way ahead of me!
I don't think I run "heavy". Usually a soft top and no back seat. I do have steel bumpers and rocker armor though.
 
I think I'm done with the metal work necessary for this tub. Still needs a good sanding before I'll know for sure, but everything lines back up and it's relatively straight.

I have some panel additive and Sean sealer on order, so hopefully I'll get this back together in the next week or so. Then I'll work on getting the couple spots of rust cleaned up and rhino lining the bottom. After that, it's teardown time!
IMG_20210124_132110562.jpg
IMG_20210124_132103663.jpg
IMG_20210124_132029261.jpg
IMG_20210124_122517030.jpg
IMG_20210124_132118041.jpg
 
Lookin' good, bestsider (y)

Do you intend to blast, wheel, or just scuff the underside for the rhino liner application? That's on the other TJ project's to-do list for late-spring/early summer.
 
  • Like
Reactions: Mike_H
Lookin' good, bestsider (y)

Do you intend to blast, wheel, or just scuff the underside for the rhino liner application? That's on the other TJ project's to-do list for late-spring/early summer.
Probably a quick scotchbrite scuff. I could blast it...I have a compressor big enough to do it...but MAN its messy. The other option would be taking it somewhere...Which wouldn't necessarily be a bad option...hmmmm.....
 
Just a quick update for the day...I ordered a savvy tank skid, which completes my under skid aluminum conversion. I kinda wanted to get one of the old ones, vs the redesign

More importantly, my sealant and panel adhesive is here, and I ordered a new welding helmet, which should be delivered Friday. This weekend, I hope to get my new tub welded back together, so I can get to work on that project. I'm planning a wheeling trip to Drummond in May, so the deadline is out there!
 
Sounds like good progress! I just ordered a new welding helmet as well, what did you get? I found a good deal on a Lincoln Viking 3350. Wanted a Miller but they were all really expensive and the Lincoln seems to have a good reputation.

 
I went with
Sounds like good progress! I just ordered a new welding helmet as well, what did you get? I found a good deal on a Lincoln Viking 3350. Wanted a Miller but they were all really expensive and the Lincoln seems to have a good reputation.

I went with a sellstrom. Has a big view area and I got a pretty good deal on it through work.

https://www.mscdirect.com/product/details/95354494
I have a Miller too, that I don't like. Small viewing area. It was an entry level helmet and I know why, now. But you'd think they'd make entry level with a bigger f.o.v. because that's when you really need to see the area your working in.
 
  • Like
Reactions: Bud125
I decided to bail on the dent repair. I felt like I was chasing the same bubble all over. After looking at again this weekend, I wasn't happy with it, and knew it would bother me to put it back together. So...I bought a front quarter that I had been watching on eBay.
IMG_20210209_192511277.jpg


I'm going thru and cutting the spot welds out now. Hopefully, I'll be able to weld this in sometime this week.

Oh, and if anyone wants to know what the cross section of a Jeep tub looks like at the dash section....

IMG_20210209_194350258.jpg
 
Last edited: