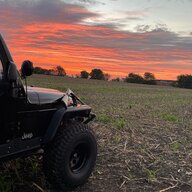
2005 Texas Jeep TJ Never Sell Build

The comment about pulling the head light bucket via the 3 nuts on the studs at the back side of the grill shell doesn't mean you shouldn't do it another way. It just means that if you are one who appreciates the easier path to a very simple method to do something, then it accomplishes that very nicely. It is the same as the folks who install a cable shifter without dropping the belly skid or who remove a front driveshaft without dropping the belly skid. Sure, you can do it, but the 3 minutes it takes to drop the skid makes the job easy, simple to do, and much faster to accomplish.

A gynecologist had become fed up with malpractice insurance and HMO paperwork, and was burned out. Hoping to try another career where skillful hands would be beneficial, he decided to become a mechanic. He went to the local technical college, signed up for evening classes, attended diligently, and learned all he could.
When the time of the practical exam approached, the gynecologist prepared carefully for weeks, and completed the exam with tremendous skill. When the results came back, he was surprised to find that he had obtained a score of 150%. Fearing an error, he called the Instructor, saying, “I don’t want to appear ungrateful for such an outstanding result, but I wonder if there is an error in the grade?”
“The instructor said, “During the exam, you took the engine apart perfectly, which was worth 50% of the total mark. You put the engine back together again perfectly, which is also worth 50% of the mark.”
After a pause, the instructor added, “I gave you an extra 50% because you did it all through the tailpipe, which I’ve never seen done in my entire career.”

That's fair, apologies, didn't mean it that I did it a better way. I've had some bad luck whatever I touch needs a half dam day worth of work, and I had to completely rebuild my son's 08 JK, the assembly all broke apart....and I just looked to avoid my luck. I pull that, and am waiting 6 days for headlight buckets.

My good friend is Dr. Uribe in Austin, Gynecologist, he's going to like this joke, much appreciated, and point taken.
 
I don't see any stripes on the new loom. (doesn't mean it isn't there, I just don't see it.) It will last longer if you get the stuff with the gray stripe on it which has a higher heat rating than the generic off the shelf stuff.

At 52 yrs old, my wife has asked I cut down on the curse words. You @mrblaine , are not helping that cause pointing out I’m ignorant often, But it is much appreciated giving me an education, ha.

So I bought it on Amazon, the stock at 3 different auto stores was terrible.

The bigger one has what looks like an orange or reddish stripe. Those two are way, way stiffer. Harder to open etc.

The smaller couple that came together, was much easier to open and no stripe. I noted it in my head when I used it, I think I said this seems flimsier.

Thanks for the heads up, is there a product note when it has the stripe? Ordering Amazon etc, curious if a weight or what? I’ll look and see if there are different details listed.

Thank you for the heads up, and for the product designs, this stuff is bad to the bone.

58906FA9-6604-43F3-BE09-1A0CC9CFAF7B.jpeg
 
Last edited:
  • Like
Reactions: JMT
At 52 yrs old, my wife has asked I cut down on the curse words. You @mrblaine , are not helping that cause pointing out I’m ignorant often. But it is giving me an education.

So I bought it on Amazon, the stock at 3 different auto stores was terrible.

The bigger one has what looks like an orange or reddish stripe. Those two are way, way stiffer. Harder to open etc.

The smaller couple that came together, was much easier to open and no stripe. I noted it in my head when I used it, I think I said this seems flimsier.

Thanks for the heads up, is there a product note when it has the stripe? Ordering Amazon etc, curious if a weight or what? I’ll look and see if there are different details listed.

Thank you for the heads up, and for the product designs, this stuff is bad to the bone.

View attachment 540637

Orange stripe seems more than adequate according to this.
https://kablekontrol.com/products/uv-rated-split-loom
 
  • Like
Reactions: cpwolf
Got these seat bushings on Amazon from another post in here.

There may be better ones, I saw these posted for cheap, and looked, my seat bushings were mostly gone, all the way.

With the seat risers I used the Torx 40 socket and ratchet on both sides of seat with ease. I can’t judge $17 of manufacturing for these, but they fixed my TJ seats for now, and are all black and not that orange in the Amazon pic. Went from zero bushing to something.

Waking up at 430am because I can’t sleep has gotten a lot of these smaller TJ projects under way, ha.

https://www.amazon.com/dp/B08D72MQB7?tag=wranglerorg-20

1F7C3BA5-E0F9-4981-B57D-4568EC942897.jpeg


DF6BF279-5F8D-4A47-A652-E19BF807A28B.jpeg


BE0B45E3-8578-4E40-A4ED-AA67C7F3079A.jpeg


4FA2AED3-BAE1-4660-9747-8BD7FFDCA16D.jpeg


0EE093DF-3B5C-48C8-A4E2-9BE52EE87F03.jpeg
 
Had this info today on a general section thread, but wanted to put it in my build thread.

Put Savvy Engine Skid on today. Got it painted yesterday.

I started with getting the brackets up on the engine mounts.

Then I used a strap to hold the front half of the skid and got the rear clamped.

Then I got the brackets on snug.

There was some weird fit, wasn’t straight in the back. The overlap I believe was at 1 1/2” on driver side and 2” on passenger.

I loosened the bolts up front, and moved on bracket in front of the tab on passenger.

It all lined up better and tried to focus on the order I read abover, overlap and covering the sides correctly, or lined up.

Then clearance up front.

Then I drilled and bolted in the rear, then tightened up the front and it all lined up well and is super sturdy.

Did a look over and like it, so it’s set

drivers side looked a touch higher, and I posted in General section,. Blaine let me know I had the LH side bracket upside down, so I flipped it and it all
Lined up perfectly. Putting the brace behind the bracket tab LH Drivers side, and it lined up perfectly with no cutting grinding or anything.

.

Ready to go test it when it’s not 105 degrees here again ha

A4AC4A13-CDB6-428E-B503-F8D146F4EE56.webp


19D6DD4C-692A-4C1A-8C99-C8164E33C281.webp


769A318A-27F4-4AFF-9B55-656468CAB284.webp


02125D08-AE96-4F44-816C-2A79475EF547.webp


186EED01-7D79-41C1-A19B-7C6DEA22432D.webp


5B919542-F920-4C05-9918-AE0D6CBC5C84.webp


9B47A00C-9740-4B62-9DAC-159753D2982C.webp


F0D7A789-6D02-4C90-A0A0-8E9F518A4776.webp
 
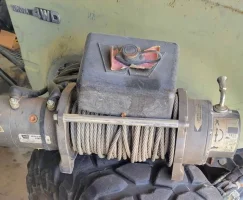
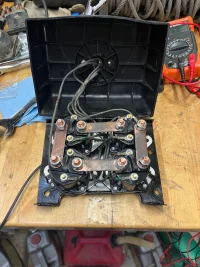
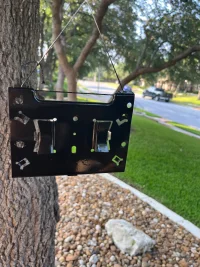
Found a Warn near Dallas and my son grabbed it for me last year, and just got around to getting it fixed and on the TJ to replace the Smittybilt.

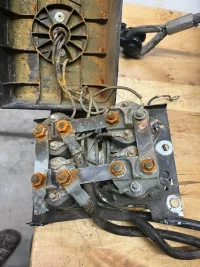
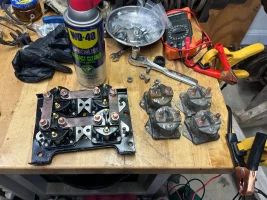
1. Four new Solenoid Relays with new nuts and lock washers from Amazon (wanted them quick)
https://www.amazon.com/dp/B0B8NJVS6T?tag=wranglerorg-20

2. Got a new connector cover.
https://www.amazon.com/dp/B07HCS8626?tag=wranglerorg-20

3. Cleaned up the cover of the solenoid control box, and used Flood Penetrol all over it. My TJ is black, kind of going with all black so I left the cover just plain black M.

3. Painted all the hardware Semi Flat black, and got a thumbscrew for the front connector to match the back two.

4. Cleaned up any wiring and rewired it.
5. Took out T50 and any other bolts and set them in EvapoRust and they look like new.

Tested and bam, works like new.

So $200 for the Warn M8000
$53 for new Solenoid Relays
$17 for new controller cover

So $270 and the Winch looks super clean. Paint is all good. Warn sent new stickers, I’ll hold for now.

I may come back in the future and paint the entire case black, but for now it looks great. Thanks for the tips and now I have 2 spare relays that tested good will be in the parts backup.

What it looked like.DB39635B-D260-4867-BCC9-7438C6EC4172.webp9F43AAE2-78C9-41B4-8B21-EA397EB3FA5C.webp

Painted and cleaned up everything.

11F8AC7C-CC55-477B-94F1-A97728888B0B.webp
788AED4F-E7E6-4AF7-9DCC-C492C67B88CE.webp
92F5C70E-CD1F-4759-B664-D5E8B7305463.webp

Got it on, painted up the front frame, bolts all in EvapoRust and got a coat of paint, and the wimch plate.

Went back on and got the metal line on straight.

5AA8D4D1-C211-411B-A3B7-290FBB19E778.webp


AE15829B-081B-4549-A5C4-D325471FAAB2.webp


57E481A0-CE91-41C5-BB53-47BAAA953328.webp


F4DB29A9-B365-4E1D-B06F-DFEB4BE5FE31.webp


6EBDF479-FB75-421F-9BEE-F8D7B67ADA39.webp


F2D74723-35EE-431E-823A-33109BFE25CD.webp
 
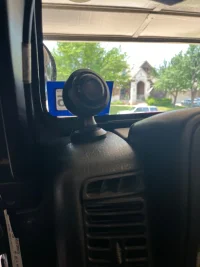
Finally decided I need better sound.
It came with a Pioneer deck that has BlueTooth. It works fine.

So I put in better apeakers
1. Polk DB5252 Component
2. Got some pods on AliBa a I believe. Only place I could find any easy.
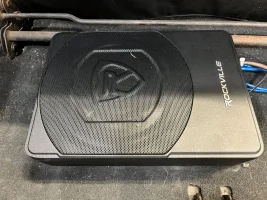
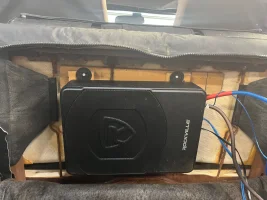
3. Added Rockville SS10P 10” sub

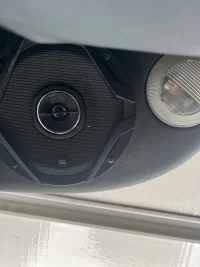
I already put upgraded speakers overhead in the sound bar.

Absolutely amazing difference. Worth every cent, and didn’t have to add an Amp for front speakers. I may, but it really isn’t. Needed

IMG_7746.webp


IMG_7747.webp


IMG_7748.webp


IMG_7744.webp


IMG_7745.webp


IMG_7740.webp


IMG_7737.webp


IMG_7721.webp


IMG_7720.webp
 
So once I put in the new front and powered sub....it wasn't enough, ha. I decided to do the rest.
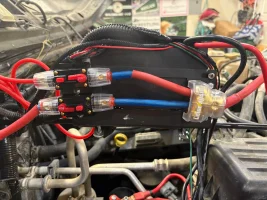
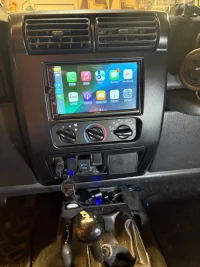
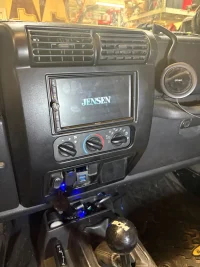
So I got a new Head Unit, new front Bezel, a 4 Ch Amp and new wiring and breakers. I put in JBL rear speakers a while ago, and front Polk recently.

Head Unit: Jensen CAR723W with wireless Apple Carplay
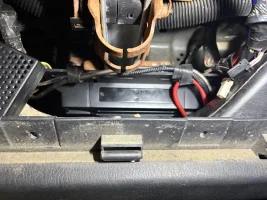
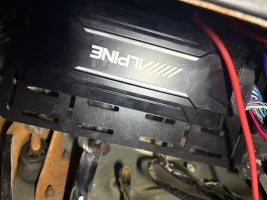
4Ch Amp: Alpine KTA-30FW Tough Power Pack
Powered Sub: Rockville SS10P
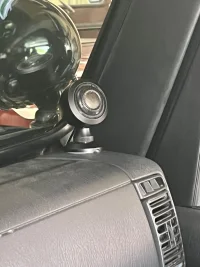
Front Speakers: Polk Audio DB5252
Rear Sound Bar Speakers: JBL GX6026 (Update 7/1/2025: pulled the trigger Crutchfield open box Polk DB652 for $79, couldn't pass up, will have in this week)
Front Amp mount: Taboo Customs TJ Under Steering Bracket
Double Din Bezel: Metra
Amp Power: Skar package with 4awg for rear powered and Crutchfield 8awg amp wiring for front amp.


So I chose a mid priced Double Din from Jensen that had good reviews. My TJ Had a wiring harness plugged in from the Pioneer single din that had been put in by the past owner long ago. I spliced everything in using Posi-Twist for the smaller gauge wires, super easy just twist wire ends and then twist these on.
https://www.amazon.com/dp/B00I1PFD4Y?tag=wranglerorg-20
Larger wires for power I went used shrink crimp etc on the only 2 that needed it going into the Amp harness up front.
I got a nice LEIGESAUDIO 2 way splitter off Amazon https://www.amazon.com/dp/B07KJZK78G?tag=wranglerorg-20

I used 2 breakers for the Powered Sub and the front Amp that I put on the bottom of the Auxbeam bracket https://www.amazon.com/dp/B07KJZK78G?tag=wranglerorg-20

https://taboocustoms.com/store/ampmountplate

With this head unit I had to bring the gain down as it's amplifying a high output. The Polk sound great, so do the JBL still, but they may get replaced in the future with something that can handle 100w not their 60. They are 6 1/2" speakers, some say don't mismatch because I have the 5 1/4 now up front, but they are component and the tweeter is on the dash, I feel like they match up well.

Absolutely thunders. I went through a bunch, but Enter Sandman is the one to use for gain setting. It pushes hard. Master of Puppets sounded great, and all the Tool songs I ran through. If it can handle that....I'm good, ha.


The wiring:

IMG_8060.jpeg


The Head Unit

IMG_8059.jpegIMG_8058.jpeg


The front amp and bracket
IMG_8055.jpeg
IMG_8056.jpeg


The Front Speakers

1751370328839.png

IMG_7747.jpeg


The Rear Speakers

IMG_7763.jpeg


Powered Sub under rear seat:
IMG_7745.jpeg
IMG_7773.jpeg
 
Last edited:
Just signed up to support and it suggested posting what I've got.
I'm in Cedar Park, TX outside of Austin in the Hill Country. My name is Jason, 48 years old. My first jeep was a CJ5 with a 4" lift, 304 V8 and 35" BFG's I bought in 1991 in college. I'm still sad I sold it when I got married after college to get a stupid Ford Explorer for work, ha. I went 2 full years with no top at all in that old girl, and loved every minute.
View attachment 171900

View attachment 394966

View attachment 394967
May 2016 I bought my oldest son a 2005 TJ with a 3.5" Rancho Lift 4.0 straight six with a 6 speed manual transmission. He just turned 15, so I got to drive it a ton for about a year until he turned 16....and this month he asked to take my truck back to Texas Tech, and I'm getting a TJ as a full time driver for a little while, and I'm never, ever selling it. Got it from a guy deploying to Afghanistan that wanted a 4 door when he got back....I should have known......it looked cool but was "Heavily Used" ha.

Day 1
View attachment 171901

When we got it, had 4.11 gears, ACT racing clutch (stiffest clutch I've ever used) 3.5" short arm Rancho lift, Flowmaster super 40 exhaust, 9000 LB Smittybuilt XRC wench, Smittybuilt front and back bumpers, Warrior steel tube fender flares, JCR Rock sliders, 6 KC Lights (old school not LED), 50" farm jack mounted, Ok Top, Bestop Half Bikini brand new, BT Windscreen, and Deck Cover all new and a Rooftop rack assembly.

I took him out to Hidden Hills Adventure Park in Marble Falls to start teaching him four wheeling. Rock Climbing was fun, but mud pits are always a hit.....and through experience you learn the cleanup in the engine bay is not always worth it, I'd rather rock climb, ha.

View attachment 171904

View attachment 171905

View attachment 171903
Then we went to work, with help from my brother who's been a mechanic since about 1982, and did a lot with 4 wheel drives at Off Road Unlimited building custom rigs in Houston, and a lot of huge oil field 4x4 Custom F150's that were shipped all over the world, crazy remote places like Siberia. I found this site looking because he said "We need to find some Jeep TJ guys that have experience with the little details that work on this Jeep."
We went to work:
Replaced the front bumper so it would have a quick attach tow bar.
Replaced Valve Cover gasket to fix 1 leak, the oil pan gasket to fix another, and then the rear main seal to fix the 3rd......it's bone dry for the past 3 years.
Put new pads on the roll bars, seat covers, new speakers and stereo with bluetooth to play music easier. Broke a rear axle and put in https://www.revolutiongear.com/prod..._tj_yj_and_93_98_zj_rear_axle_revolution_gear these revolution rear axles. That I actually had done, and I cannot remember if they took out the locker that was in the Dana 35, broke it backing out after baseball practice, just don't want to deal with lockers right now. Put on new front sway bar disconnects after we pulled the ball joint out having fun. Synchros went bad and last weekend just pulled the NSG370 transmission and took it to get a bench rebuild. Putting in a new LuK clutch, the ACT clutch was pretty worn. Just put in a rebuilt transfer case and front axle (it decided to drop out while towing it home from Texas Tech. Back when I towed my CJ I disconnected the axles....just in case....I know that's not necessary anymore, but I should have, ha. It was a one day 10 1/2 hour round trip to get out of the dorm quick during this COVID stuff, so I didn't even think to get under and check the u joints just in case, and of course. And new brakes last summer before heading to college. Also a new Quadratec top with the tinted windows for heat in Texas. I've got the new shift boot assembly coming to put in as well to cut some heat and noise.


View attachment 171919 View attachment 171920 View attachment 171921 View attachment 171922 View attachment 171923 View attachment 171918

The tires are close to needing replacement, I'm thinking 35" BFG muds because I like them, ha. And I bought them in 1991 for my first Jeep when Mickey T" and Dick Cepek's were the big thing and I put on BFGs.


This is the TJ thread, but I bought my 2nd son a 2008 JK and put 35's on it, a bumper and a jack and some lights, and a new top for now.

My fun goal was to first teach them on a standard, second teach them to off road and third to turn wrenches when you break something. Plus I get to drive them a lot, and hang out with my boys.

View attachment 171924

View attachment 171925


Of course, having my daughter and my wife.....looking over Lake Travis, now that's a good day wheeling!

View attachment 171926

Glad to be on here and LEARN from all the TJ folks that have a ton of experience. I'm looking to have fun and learn from others.

Later,
Jason from Texas

Awesome!
 
Finally decided I need better sound.
It came with a Pioneer deck that has BlueTooth. It works fine.

So I put in better apeakers
1. Polk DB5252 Component
2. Got some pods on AliBa a I believe. Only place I could find any easy.
3. Added Rockville SS10P 10” sub

I already put upgraded speakers overhead in the sound bar.

Absolutely amazing difference. Worth every cent, and didn’t have to add an Amp for front speakers. I may, but it really isn’t. Needed

View attachment 616542

View attachment 616543

View attachment 616544

View attachment 616545

View attachment 616546

View attachment 616547

View attachment 616548

View attachment 616549

View attachment 616550

Nice