I had to replace the distributor on my 97 4.0L over the weekend, and was a little surprised there wasn't a writeup that I could find. The process is technically covered in some of the oil pump replacement walkthroughs, because you'll need to remove/re-install the distributor to prime the pump. I couldn't find any of those write-ups either, so maybe they're on a different site. But we hate the other sites so I'll post one here. As usual, I wish I had taken more pictures. I'll be doing this on a friend's jeep in a couple of weeks, so I'll get more video as well.
I've called this walkthrough "the easy way" because most instructions you'll find include a lot of extra steps, which are absolutely not wrong but are also not always necessary. This primarily includes finding TDC before installing the new distributor. I presume everyone tells you to follow this process because it is more or less foolproof in terms of getting the distributor oriented correctly with respect to timing. But ultimately the only hard requirement is that the distributor be "timed" correctly with wherever the camshaft is in its cycle. Luckily the distributor tells you everything you need to know before you take it out.
Parts Required:
New distributor. I used an AutoZone brand Duralast Gold. The OEM one lasted 194k miles, something tells me this one won't go quite that far. You can likely re-use your old cap if you didn't get a new one. Mine also came with a new camshaft position sensor.
New distributor gasket: Felpro, AutoZone part # 70051
Some clean motor oil to lube up the new distributor shaft/gear.
Tools Required:
Phillips screw driver to remove the cap
Flat head screw driver to loosen the air intake clamp
Distributor wrench. I've had mine for years, worked on a Ford 289, Chevy 350, and now a Jeep 4.0L. I think it's probably 1/2". If you don't have a distributor wrench a crows foot will work, or a 1/2" box wrench.
Time Required:
30 minutes (less than the time it took me to write this up).
Steps:
1. I removed the air intake tube so I had easier access to the distributor. I loosened the clamp at the air filter box and just rotated the pipe out of the way.
2. Unplug all the spark plug wires on the distributor cap, including the coil wire (the one in the center of the cap). If you don't trust your ability to google the firing order, then mark each location (not just the wires...I hope it's obvious why marking the wires won't help you later).
3. Unplug the camshaft position sensor plug that hangs down below the distributor.
4. With a Phillips screwdriver, loosen the two screws on the cap and lift the cap off the distributor.
5. Loosen the distributer hold down bolt located under the right side (that is, the side closer to the radiator). It is difficult to get to, and can even be hard to see. A distributor wrench is really handy, but you can probably do it with a box end wrench and some patience. A ratcheting wrench might work too. Remove the bolt and put it in a safe place. The distributor will not rotate with this bolt out, it just keeps it from working it's way UP as the motor runs.
Some people will make a point to mark the orientation of the distributor relative to the motor to help you with the overall alignment when you put it back in. I don't bother with this step, as our distributors don't rotate like they did back when the dizzy controlled the ignition timing. Mark it, don't mark it, whatever; so long as the hold down bolt goes through the arm/bracket you know you're aligned properly.
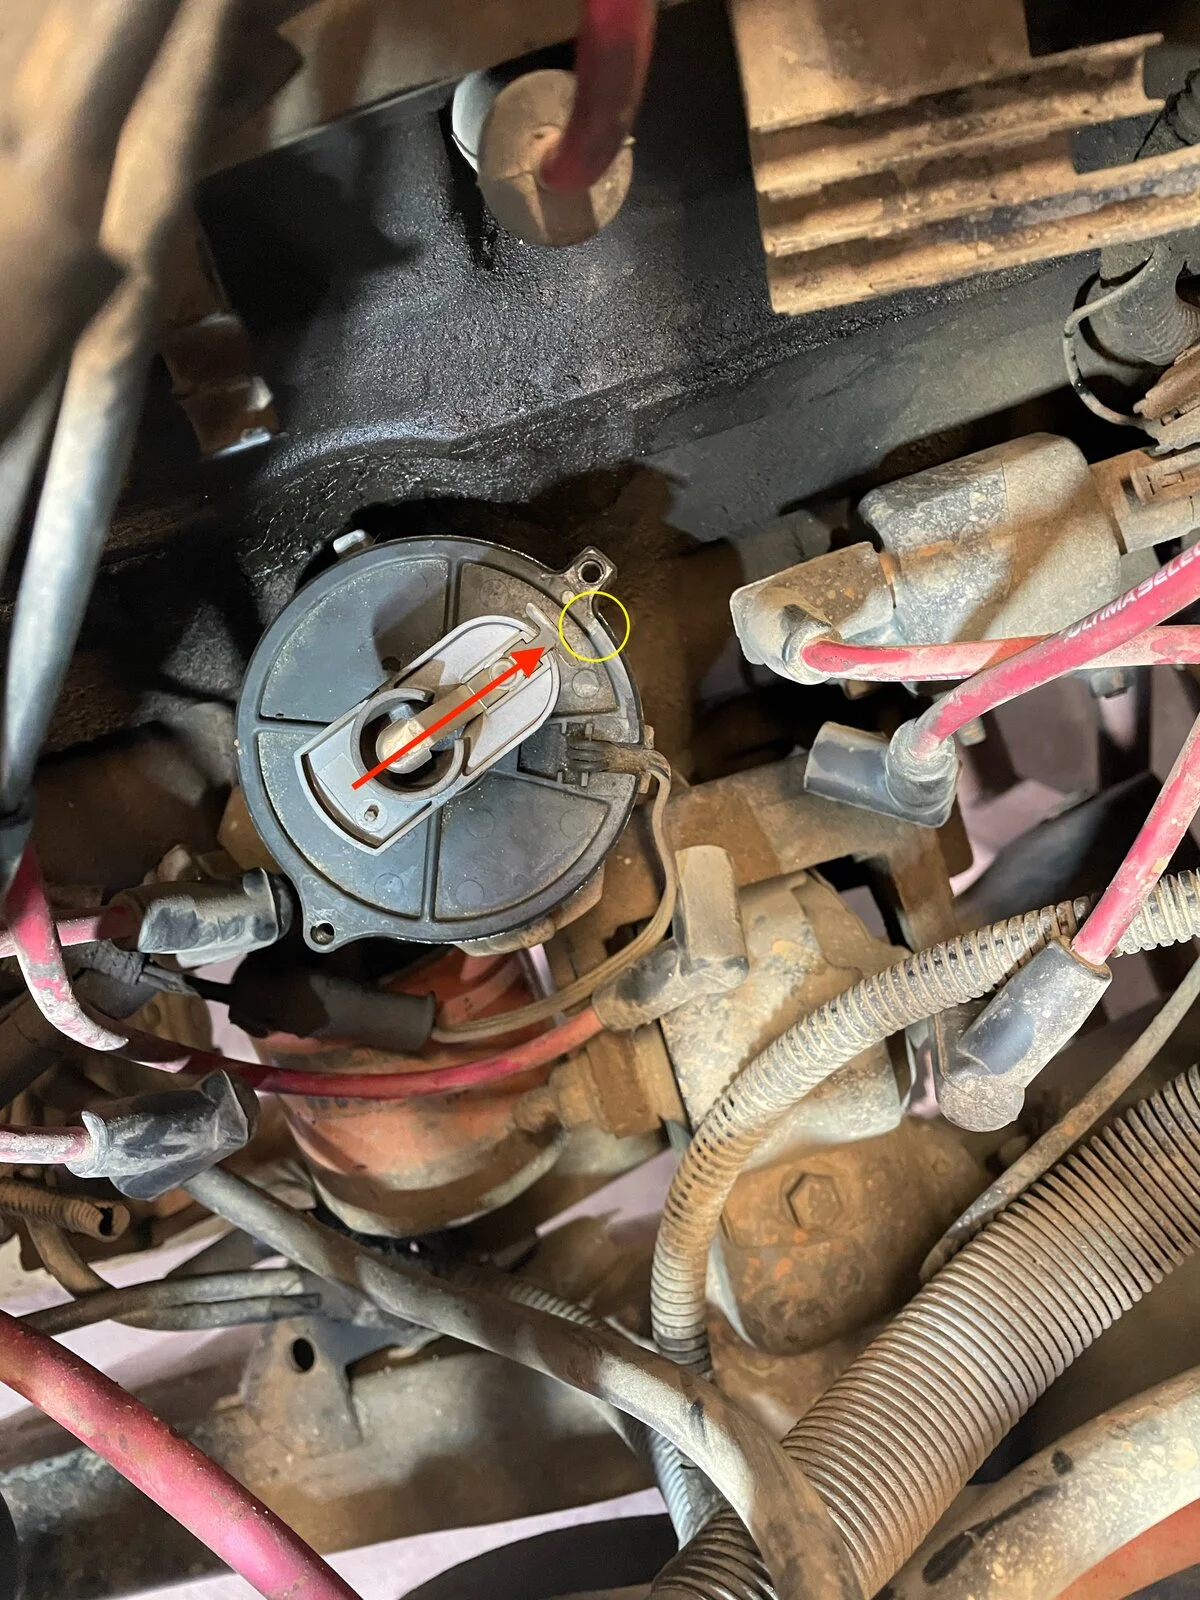
6. Get directly above the thing, and mark where the rotor is pointing. This is critical, as when we're done, the new distributor needs to be pointing in the same place. I say "critical," although you can clearly see my mark inside the yellow circle isn't exactly aligned with the rotor. I think there is a parallax effect going on, because when I looked at it with my own eyes, it looked much closer. Due to the way the gears mesh, it will be pretty obvious if you're off by one tooth. More on that when we install. Just do your best to mark where it is at before removal.
7. From underneath, and being careful to not be in the way of the rotor, lift the distributor up & out of the engine. Because of the way the gears are cut, the rotor will rotate about 30 degrees counter clockwise, meaning that the rotor will no longer be pointing at your mark. I have no idea why I'm so out of breath while doing this. Best I can guess is that it was really hot in the garage? Or that I'm out of shape. It's probably both. Sorry for the portrait video.
Rotor rotating CCW as you pull it up:
8. Immediately mark the new position on the old distributor. It will be easy to bump out of position once it's out of the engine. It's not the end of the world if you lose this position, it just means a trial & error method to get the new one aligned correctly. More on the when we install.
Go fetch your new distributor & gasket.
9a. Take the cap off your new distributor, and making sure the camshaft position sensor is seated well (check that the screw holes align), put a mark on the new distributor in the same place as your original mark on the old distributor (from step 6). We are marking where the final location should be, which is the same location as where the rotor was pointing when we started this process.
9b. Also mark the new distributor with the location identified in step 8. This is where we will point the rotor before we drop it in.
10. Dip the whole shaft in (preferably clean) motor oil, ensuring that the gear is well oiled. The camshaft itself should remain oiled which will in turn oil the distributor gear, so I don't know that this step is necessary but it was easy and pre-lubing is certainly not a bad thing.
11. Rotate the rotor to the mark made in step 9b.
What's that? You can't rotate the rotor on your new distributor? New dizzys sometimes (always?) come with a plastic pin that locks the rotor orientation to align with TDC. But if you aren't at TDC then that pin will prevent you from aligning properly. If you're the paranoid type, you may want to mark this orientation because there are TWO orientations that will allow the pin to fit back in should you decide you want to do that (you won't). The pin will fit in two different interior holes, one for 4.0 and a different one for the 2.5. Now that I think about it, I don't know if there is a way to tell by looking which alignment is which, so out of the box might be the 2.5L alignment. IDK. All the more reason to skip the TDC instructions.
12. Put the new gasket on the shaft, and hold it in place (it will want to freely slide back down the dizzy shaft.
13. Align the entire distributor such that the hold down arm/bracket is aligned with the bolt hole, and lower the distributor into the opening. You'll probably be off by a degree or two, but a simple wiggling of the entire contraption will usually allow it to start to seat. You'll know you're on the money when the rotor starts turning clockwise, although it can require a little bit more wiggling to get it to fully seat, with the hold down bracket flush with the engine block.. At this point the rotor should now be pointing directly at the mark you made in step 9a. The whole process should be the complete reverse of the video posted in step 7.
What's that? Your rotor isn't pointing at your mark? It's off by a noticeable amount? Here's what happened: your initial position was off just enough to cause your meshing to be off by one tooth. No problem. Pull the distributor back out & reset the position as per step 11. You may need to rotate it very slightly forward or backward to get the correct final alignment. It might take a few tries.
What's that? You can't get it to seat at all? Good chance you're well out of alignment, but no worries. Look at the bottom of your distributor shaft. Looks like a flat head screwdriver, right? Now shine a light down into the distributor hole in the engine. You'll see a slot that the end of the distributor needs to drop into. That's the oil pump, fyi. Get your rotor turned such that the "flat head screwdriver end" aligns with the slot in the oil pump.
14. Put the hold down bolt back in and tighten it down. 17 ft-lbs is the spec, but good luck getting a torque wrench on that bolt.
15. Reconnect the cam shaft position sensor wire.
16. Replace the cap & tighten both screws. This may depend on what brand component you use, but my distributor cap would only go on in one orientation.
17. Replace the air intake tube, tighten the clamp, and make sure any other hoses didn't get disconnected during the move.
18. Replace the spark plug wires according to the firing order, including the center coil wire. Note the subtle inclusion of the distributor cap screws on this diagram. I found another version of the firing order with the cap screws in a different location and it had #1 closer to where #5 is.

19. Fire up your Jeep, and listen for the smooth sound of a purring four liter.
What's that? It sort of worked but literally backfired? Actually I have no idea if this is possible on an I6, but I have it happen on a V8 one time. What happened was I followed the long process, including finding TDC, only I found it on an exhaust stroke rather than a compression stroke so I was 180 degrees out of phase. I think this may be possible if you have your rotor pointing 180 degrees out of whack.
20. Miller time.
I've called this walkthrough "the easy way" because most instructions you'll find include a lot of extra steps, which are absolutely not wrong but are also not always necessary. This primarily includes finding TDC before installing the new distributor. I presume everyone tells you to follow this process because it is more or less foolproof in terms of getting the distributor oriented correctly with respect to timing. But ultimately the only hard requirement is that the distributor be "timed" correctly with wherever the camshaft is in its cycle. Luckily the distributor tells you everything you need to know before you take it out.
Parts Required:
New distributor. I used an AutoZone brand Duralast Gold. The OEM one lasted 194k miles, something tells me this one won't go quite that far. You can likely re-use your old cap if you didn't get a new one. Mine also came with a new camshaft position sensor.
New distributor gasket: Felpro, AutoZone part # 70051
Some clean motor oil to lube up the new distributor shaft/gear.
Tools Required:
Phillips screw driver to remove the cap
Flat head screw driver to loosen the air intake clamp
Distributor wrench. I've had mine for years, worked on a Ford 289, Chevy 350, and now a Jeep 4.0L. I think it's probably 1/2". If you don't have a distributor wrench a crows foot will work, or a 1/2" box wrench.
Time Required:
30 minutes (less than the time it took me to write this up).
Steps:
1. I removed the air intake tube so I had easier access to the distributor. I loosened the clamp at the air filter box and just rotated the pipe out of the way.
2. Unplug all the spark plug wires on the distributor cap, including the coil wire (the one in the center of the cap). If you don't trust your ability to google the firing order, then mark each location (not just the wires...I hope it's obvious why marking the wires won't help you later).
3. Unplug the camshaft position sensor plug that hangs down below the distributor.
4. With a Phillips screwdriver, loosen the two screws on the cap and lift the cap off the distributor.
5. Loosen the distributer hold down bolt located under the right side (that is, the side closer to the radiator). It is difficult to get to, and can even be hard to see. A distributor wrench is really handy, but you can probably do it with a box end wrench and some patience. A ratcheting wrench might work too. Remove the bolt and put it in a safe place. The distributor will not rotate with this bolt out, it just keeps it from working it's way UP as the motor runs.
Some people will make a point to mark the orientation of the distributor relative to the motor to help you with the overall alignment when you put it back in. I don't bother with this step, as our distributors don't rotate like they did back when the dizzy controlled the ignition timing. Mark it, don't mark it, whatever; so long as the hold down bolt goes through the arm/bracket you know you're aligned properly.
6. Get directly above the thing, and mark where the rotor is pointing. This is critical, as when we're done, the new distributor needs to be pointing in the same place. I say "critical," although you can clearly see my mark inside the yellow circle isn't exactly aligned with the rotor. I think there is a parallax effect going on, because when I looked at it with my own eyes, it looked much closer. Due to the way the gears mesh, it will be pretty obvious if you're off by one tooth. More on that when we install. Just do your best to mark where it is at before removal.
7. From underneath, and being careful to not be in the way of the rotor, lift the distributor up & out of the engine. Because of the way the gears are cut, the rotor will rotate about 30 degrees counter clockwise, meaning that the rotor will no longer be pointing at your mark. I have no idea why I'm so out of breath while doing this. Best I can guess is that it was really hot in the garage? Or that I'm out of shape. It's probably both. Sorry for the portrait video.
Rotor rotating CCW as you pull it up:
8. Immediately mark the new position on the old distributor. It will be easy to bump out of position once it's out of the engine. It's not the end of the world if you lose this position, it just means a trial & error method to get the new one aligned correctly. More on the when we install.
Go fetch your new distributor & gasket.
9a. Take the cap off your new distributor, and making sure the camshaft position sensor is seated well (check that the screw holes align), put a mark on the new distributor in the same place as your original mark on the old distributor (from step 6). We are marking where the final location should be, which is the same location as where the rotor was pointing when we started this process.
9b. Also mark the new distributor with the location identified in step 8. This is where we will point the rotor before we drop it in.
10. Dip the whole shaft in (preferably clean) motor oil, ensuring that the gear is well oiled. The camshaft itself should remain oiled which will in turn oil the distributor gear, so I don't know that this step is necessary but it was easy and pre-lubing is certainly not a bad thing.
11. Rotate the rotor to the mark made in step 9b.
What's that? You can't rotate the rotor on your new distributor? New dizzys sometimes (always?) come with a plastic pin that locks the rotor orientation to align with TDC. But if you aren't at TDC then that pin will prevent you from aligning properly. If you're the paranoid type, you may want to mark this orientation because there are TWO orientations that will allow the pin to fit back in should you decide you want to do that (you won't). The pin will fit in two different interior holes, one for 4.0 and a different one for the 2.5. Now that I think about it, I don't know if there is a way to tell by looking which alignment is which, so out of the box might be the 2.5L alignment. IDK. All the more reason to skip the TDC instructions.
12. Put the new gasket on the shaft, and hold it in place (it will want to freely slide back down the dizzy shaft.
13. Align the entire distributor such that the hold down arm/bracket is aligned with the bolt hole, and lower the distributor into the opening. You'll probably be off by a degree or two, but a simple wiggling of the entire contraption will usually allow it to start to seat. You'll know you're on the money when the rotor starts turning clockwise, although it can require a little bit more wiggling to get it to fully seat, with the hold down bracket flush with the engine block.. At this point the rotor should now be pointing directly at the mark you made in step 9a. The whole process should be the complete reverse of the video posted in step 7.
What's that? Your rotor isn't pointing at your mark? It's off by a noticeable amount? Here's what happened: your initial position was off just enough to cause your meshing to be off by one tooth. No problem. Pull the distributor back out & reset the position as per step 11. You may need to rotate it very slightly forward or backward to get the correct final alignment. It might take a few tries.
What's that? You can't get it to seat at all? Good chance you're well out of alignment, but no worries. Look at the bottom of your distributor shaft. Looks like a flat head screwdriver, right? Now shine a light down into the distributor hole in the engine. You'll see a slot that the end of the distributor needs to drop into. That's the oil pump, fyi. Get your rotor turned such that the "flat head screwdriver end" aligns with the slot in the oil pump.
14. Put the hold down bolt back in and tighten it down. 17 ft-lbs is the spec, but good luck getting a torque wrench on that bolt.
15. Reconnect the cam shaft position sensor wire.
16. Replace the cap & tighten both screws. This may depend on what brand component you use, but my distributor cap would only go on in one orientation.
17. Replace the air intake tube, tighten the clamp, and make sure any other hoses didn't get disconnected during the move.
18. Replace the spark plug wires according to the firing order, including the center coil wire. Note the subtle inclusion of the distributor cap screws on this diagram. I found another version of the firing order with the cap screws in a different location and it had #1 closer to where #5 is.
19. Fire up your Jeep, and listen for the smooth sound of a purring four liter.
What's that? It sort of worked but literally backfired? Actually I have no idea if this is possible on an I6, but I have it happen on a V8 one time. What happened was I followed the long process, including finding TDC, only I found it on an exhaust stroke rather than a compression stroke so I was 180 degrees out of phase. I think this may be possible if you have your rotor pointing 180 degrees out of whack.
20. Miller time.
Last edited: