The Silver Fox LJ Build

I’m in the middle of prepping for some new Blaine hydro assist. Mainly I’m waiting on PSC to send me an RMA # so I can ship out my steering box for some modification. In the meantime I’m cleaning up the Fluxor bumper, installing Blaine’s ST fairlead, painting stuff, and thinking about what Blaine said. Shark Hide applied to bumper to avoid as much corrosion as possible in the future.

Before
View attachment 676418

View attachment 676419
After
View attachment 676420
View attachment 676439


View attachment 676422

Looks like you're getting a jump on St Paddy's to me.
 
I’ve been working on three projects up front in prep for Sand Hollow:

1. Setrab Transmission Cooler
2. Improved Racing Thermal Bypass
3. Hydro Assist

I moved the Setrab transmission cooler from the Red Jeep to the Silver Fox because it’s my DD and doesn’t see high temps when not wheeling. Plus, it and all the accompanying parts are pretty expensive and I may be selling it at some point.

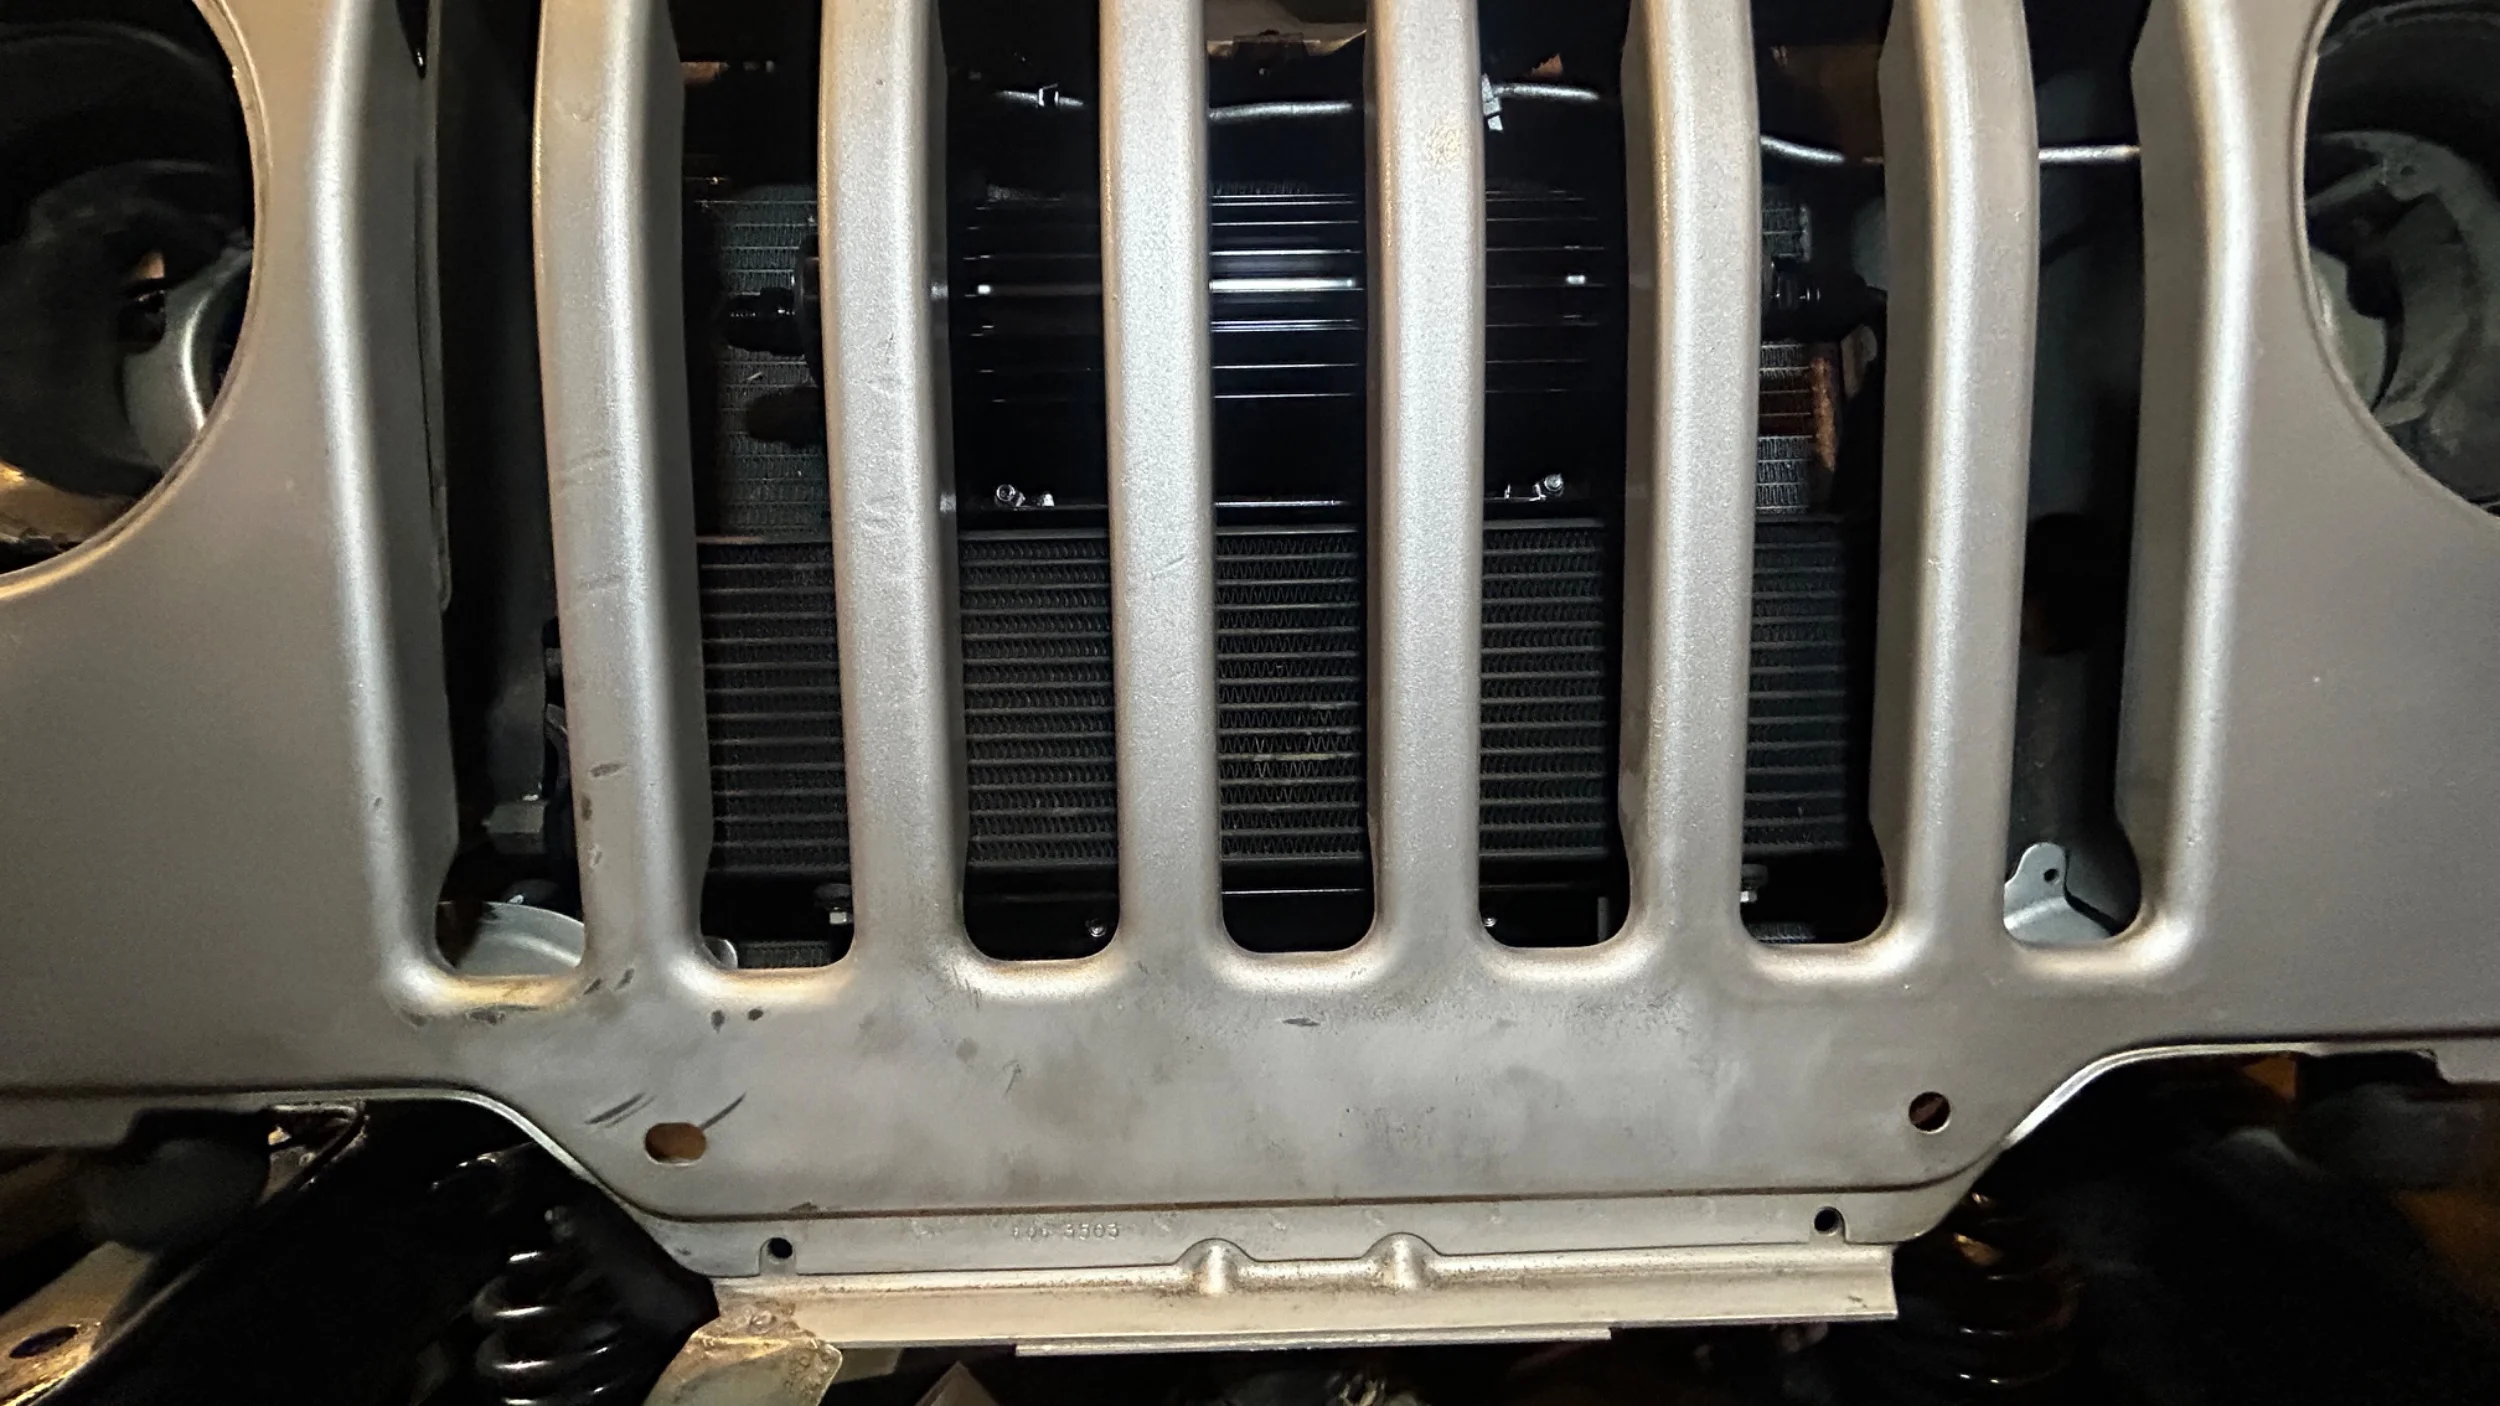
With Blaine’s Nearly Bolton Hydro Assist I got his new V-Bar so I could install the Derale steering cooler and Setrab transmission cooler nicely in the grill. My temps got up to 250*F in the Moses Lake dunes last summer, so I need a cooler for summer wheelin. It was a pain as usual removing the grill, but mainly because of my turn signal and side marker light wiring. Blaine’s kit comes with some nice well nuts to replace the four you destroy getting in there. The lowers are replaced with the thick ones to keep the lower bolt on the V-bar from rubbing the AC condenser. He thought of everything, even the same size head bolts as OEM and 3 replacement fir tree fasteners. Lots of detail. Nothing overlooked.
IMG_8717.jpeg

Then I went to install the Improved Performance thermal bypass for the transmission. It’s the compact version with -6an fittings and opens fully at 165*F. It gets so cold here that the temperature gauge usually doesn’t even read on the gauge because it’s under 100*F. With the Setrab cooler that’s doubly sure. Blaine sent me a list of all the fittings I would need. Here’s the thermal bypass and the fittings.

https://www.improvedracing.com/compact-high-flow-engine-transmission-oil-cooler-thermostat.html

2 each of the following.

1. -6 ORB x -6 female swivel.
Adapter, -6 AN JIC Female to -6 AN ORB Male, Black (ADF-6JF6R): AN JIC Female » AN ORB Male Adapters | Racetronix

2. -6 male flare x 3/8” flareless bite (compression)
3/8" JIC 37° x 3/8" Tube Fitting | Titan Fittings

3. -6 male x -6 ORB
Adapter, -6 AN ORB Male to -6 AN JIC Male, Black (ADF-495100): AN JIC Male » AN ORB Male Adapters | Racetronix

4. -6 push lock fitting for -6 hose
Hose Fitting, Push-Lock -6 AN JIC Female, Black (FIT-200106): Push-Lock Rubber Hose Fittings - Straight | Racetronix

Blaine prefers the Insta-grip hose that he uses on the steering coolers and I bought some from him because I could only find it in large quantities for around $2,000.

It’s scary (for me) cutting the transmission hard lines, but used a small cutting wheel and got it done. Then I realized with the spacing between inlet and outlet I needed the transmission lines farther apart. That meant the lines were not equal length anymore, so I had to cut one of the lines again. Built an aluminum bracket basically mimicking pics of Blaine’s. It turned out good. Then routed all the hoses from the bypass to the radiato out to the Setrab and back to the bypass.
IMG_8716.jpeg


Next I started working on the Hydro Assist. I’d already installed the steering Cooler on the V-Bar so I installed the new pump. Blaine sent an M8 1.25” bolt for the one replacement that is no longer a through bolt.
IMG_8718.jpeg


My steering box was still at PSC so I was waiting. It gets here tomorrow. It should be the last piece. Meanwhile I tried to find a place for the PSC reservoir. Fortunately if left a space on purpose when doing the HiLine fenders. The distance is about 11-12” and it’s above the pump. I routed the hose in a way it would have some slack under engine torque.
IMG_8719.jpeg

Then I test fit and built as many hoses as I could without the steering box.

Somewhere along the way I was working on the PSC steering cylinder mount at the axle. You have to beef up the bracket. Blaine sends that in his kit. Weld on when you’re happy. It may need a little modification. Mine did. Worked great. If you have a midarm you have to make a strap to support the backside of the bracket and it’s basically a 2x7”x1/4” steel cut specifically to shape (it’s very close to the spring), and then you bend it like a lazy S to fit. Took awhile with a hammer and vice. Drill your 1/2” hole, put the bolt through with the spacing cylinder, and weld it in place.
IMG_8720.jpeg
IMG_8722.jpeg

There’s a snazzy bracket Blaine sends with his kit for the drag link side of the PSC Cylinder. I ground down the drag link and painted it and the bracket days before so it was fully cured. It’s going to be perfect.

IMG_8721.jpeg

Now I’m just waiting for the steering box to arrive tomorrow and I can get it back on the shaft, bolted to the frame, and reinstall the pitman arm. Then I can test fit and make the hoses and run them to the box. At the end of the day I’ll be able to bleed the system. Just praying no leaks and everything works.

 
Last edited:
Blaine prefers the Insta-grip hose that he uses on the steering coolers and I bought some from him because I could only find it in large quantities for around $2,000.
I sorta prefer. I believe that the Aeroquip socketless is a better hose. What I don't like about it is the price nowadays and the cover tends to crack where it has expanded over the fittings. I've never seen it fail or have a problem due to that, but it annoys me nonetheless. The Insta-grip is the TC version which stands for Textile Cover which adds a bit of abrasion resistance and it reduces the likelihood of cracks in the outer cover. It is also a hose we've never had a single failure of in use.

Like most things, it is a good blend of performance, durability, availability and cost.
 
Last edited:
To get the steering box back on the steering shaft splines, I tied off the steering shaft to the lower control arm, so I could exert force upward. Slipped in pretty easy at that point.

Steering box looks brand new!

Got the cylinder attached to the drag link and everything tightened down with the rotation between 40 and 45° due to the tie rod ends.

Hope to do a little bit more tonight maybe and start connecting some hoses.

IMG_8727.jpeg


IMG_8728.jpeg


IMG_8729.jpeg


IMG_8730.jpeg


IMG_8731.jpeg
 
Last edited:
To get the steering box back on the steering shaft splines, I tied off the steering shaft to the lower control arm, so I could exert force upward. Slipped in pretty easy at that point.
For others not familiar, the easy way is to move the lower shaft out of the way and mount the steering gear to the frame. The steering shaft is collapsible, so collapse it a small amount, line up the flat spot on the splines, grab the lower section and just wiggle it onto the splines. Lot easier than trying to stab the shaft with the steering gear.
 
Great tip Blaine.

The area above the steering box sure gets crowded with all the hoses from the reservoir, pulley, both coolers and the vent tube.

I got the last hoses built and installed for hydro assist. I have several things to put back together again so I can bleed the system. Stay tuned. I hear this can take awhile. Here are the cylinder hoses at full droop. I want to find some straps, maybe Velcro straps to link the hoses together.

IMG_8735.jpeg
 
Great tip Blaine.

The area above the steering box sure gets crowded with all the hoses from the reservoir, pulley, both coolers and the vent tube.

I got the last hoses built and installed for hydro assist. I have several things to put back together again so I can bleed the system. Stay tuned. I hear this can take awhile. Here are the cylinder hoses at full droop. I want to find some straps, maybe Velcro straps to link the hoses together.

View attachment 681941
Washers go on the inside of the draglink clamp to add more width, not the outside. I typically wind up with the bolt head on the inside and the nut on the outside so there is more room to clear the trackbar.

If you can remove and install the hoses for the cylinder at full droop, they are too long. They need to be pulled pretty tight so they don't wind up interfering with something.

The collars on the high pressure hoses need to be within one turn of bottoming out. That single turn is so you can tighten the tube nut onto male AN on the cylinder and then make fine adjustments to twist the hose. My fittings on the steering gear almost always point mostly straight back, not down at a 45.
1775744194235.webp

I use several heavy duty non toothed zip ties to clamp the hoses to each other.
 
  • Like
Reactions: JMT and Apparition
Washers go on the inside of the draglink clamp to add more width, not the outside. I typically wind up with the bolt head on the inside and the nut on the outside so there is more room to clear the trackbar.

If you can remove and install the hoses for the cylinder at full droop, they are too long. They need to be pulled pretty tight so they don't wind up interfering with something.

The collars on the high pressure hoses need to be within one turn of bottoming out. That single turn is so you can tighten the tube nut onto male AN on the cylinder and then make fine adjustments to twist the hose. My fittings on the steering gear almost always point mostly straight back, not down at a 45.
View attachment 681942
I use several heavy duty non toothed zip ties to clamp the hoses to each other.

The washers are inside the drag link bracket. In the pic you’re seeing some missing paint around the bolt head.

I’ll address the other issues! Thank you!
 
  • Like
Reactions: Wildman
Washers go on the inside of the draglink clamp to add more width, not the outside. I typically wind up with the bolt head on the inside and the nut on the outside so there is more room to clear the trackbar.

If you can remove and install the hoses for the cylinder at full droop, they are too long. They need to be pulled pretty tight so they don't wind up interfering with something.

The collars on the high pressure hoses need to be within one turn of bottoming out. That single turn is so you can tighten the tube nut onto male AN on the cylinder and then make fine adjustments to twist the hose. My fittings on the steering gear almost always point mostly straight back, not down at a 45.
View attachment 681942
I use several heavy duty non toothed zip ties to clamp the hoses to each other.

Once again, ol' "Eagle Eyes Johnson" amazes me with his powers of observation...
 
  • Like
Reactions: hosejockey61
Your kids likely have other than a potato for a camera, borrow it.
Are you channeling Zorba this morning?

The danger as always is finding stuff that is mid process like the loose pitman and as soon as I say something, I'll get told it has already been tightened.
Better to say something than to not, as far as I'm concerned. I have been saved by your observations more than once...
 
Are you channeling Zorba this morning?
I'd sooner cut my dick off.
Better to say something than to not, as far as I'm concerned. I have been saved by your observations more than once...
A slightly higher quality pic stops smeared paint from the socket from looking like a mistakenly placed washer.
 
I can’t thank Blaine Johnson enough. The guy is amazing. Insane big brain. I can’t believe a rig like this can drive like this. Full gas 5.89’s off the line screeching the brakes with the smell of fresh rubber and steering like I can’t believe. I may be as dumb as dirt but he put up with me, my poor terminology or simply lack thereof, patience, and looking out for my best interest despite all that and more.

I really didn’t think I was going to be ready for Sand Hollow. Last week I thought I just had to bleed the hydro steering, but after I finally got Swepco 715 throughout the system and started the Jeep for the first time 30 seconds, I had two fittings on the thermal bypass leaking like a sieve. I couldn’t figure it out. Blaine thought I may have overtightened them and ruined them, which is one good reason for this. I ordered more fittings Friday and they arrived today. Installed them snug and still leaking. Pretty down at that point since I’ve got plenty more to do before Sand Hollow and I really need the rig sound. I tightened them a bit more. Still leaking. A bit more, still leaking. At that point I just started studying the fittings online and trying to understand all the fittings I used on the bypass. I kept looking and realized I did something stupid. I installed one of the fittings the opposite way it should go. Like, dumb as dirt, right?! I swapped them both around and walla, no leaks. I finished bleeding the hydro assist. Then I spent about 2 hours getting everything put back together; fenders, bumper, winch, headlights, battery. Went over everything. Tightened up the Swayloc bolts. Got the tires on. Did one more lock to lock steering with the wheels down. G2G.

This thing is freaking awesome! I drove around and it’s amazing to me. Blaine knows these systems and how they work together. I could never figure all this out. I’m very thankful because when you get behind the wheel you really can’t believe how it feels and what it can do. I can’t wait to get it on the trail tomorrow afternoon.

Blaine recommended the 17” BBK for mine. He’ll recommend what you need for yours whether it’s brake pads and rotors or a whole BBK. He knows just listen to what he says. He’s been doing this for a couple decades and trial and error in the hardest wheelin on the planet; JV. His nearly bolt on hydro assist and other recommended parts are just awesome. I was super intimidated by it all, but he walked me through. I feel like now this rig has completely transformed. I’m pumped just to drive it some more and feel it all out. See you in Sand Hollow!

IMG_8770.jpeg


IMG_8767.jpeg


IMG_8768.jpeg
 
Last edited:
I can’t thank Blaine Johnson enough. The guy is amazing. Insane big brain. I can’t believe a rig like this can drive like this. Full gas 5.89’s off the line screeching the brakes with the smell of fresh rubber and steering like I can’t believe. I may be as dumb as dirt but he put up with me, my poor terminology or simply lack thereof, patience, and looking out for my best interest despite all that and more.

I really didn’t think I was going to be ready for Sand Hollow. Last week I thought I just had to bleed the hydro steering, but after I finally got Swepco 715 throughout the system and started the Jeep for the first time 30 seconds, I had two fittings on the thermal bypass leaking like a sieve. I couldn’t figure it out. Blaine thought I may have overtightened them and ruined them, which is one good reason for this. I ordered more fittings Friday and they arrived today. Installed them snug and still leaking. Pretty down at that point since I’ve got plenty more to do before Sand Hollow and I really need the rig sound. I tightened them a bit more. Still leaking. A bit more, still leaking. At that point I just started studying the fittings online and trying to understand all the fittings I used on the bypass. I kept looking and realized I did something stupid. I installed one of the fittings the opposite way it should go. Like, dumb as dirt, right?! I swapped them both around and walla, no leaks. I finished bleeding the hydro assist. Then I spent about 2 hours getting everything put back together; fenders, bumper, winch, headlights, battery. Went over everything. Tightened up the Swayloc bolts. Got the tires on. Did one more lock to lock steering with the wheels down. G2G.

This thing is freaking awesome! I drove around and it’s amazing to me. Blaine knows these systems and how they work together. I could never figure all this out. I’m very thankful because when you get behind the wheel you really can’t believe how it feels and what it can do. I can’t wait to get it on the trail tomorrow afternoon.

Blaine recommended the 17” BBK for mine. He’ll recommend what you need for yours whether it’s brake pads and rotors or a whole BBK. He knows just listen to what he says. He’s been doing this for a couple decades and trial and error in the hardest wheelin on the planet; JV. His nearly bolt on hydro assist and other recommended parts are just awesome. I was super intimidated by it all, but he walked me through. I feel like now this rig has completely transformed. I’m pumped just to drive it some more and feel it all out. See you in Sand Hollow!

View attachment 682836

View attachment 682837

View attachment 682838

Amazing work, the rig has transformed for the better Jeremy! Look forward to hearing your thoughts on it's performance at Sand Hollow, especially the steering/suspension improvement that you've done. And yes Mr. Blaine is THE man for these things.
 
  • Like
Reactions: Apparition and JMT
Amazing work, the rig has transformed for the better Jeremy! Look forward to hearing your thoughts on it's performance at Sand Hollow, especially the steering/suspension improvement that you've done. And yes Mr. Blaine is THE man for these things.

I look back Maximus. It’s really everything I wanted in a rig. Everything I need and nothing I don’t. There are a few things to polish up, and the front Rancho’s seriously dive so I need some tuned shocks to replace. Other than that super happy!!!

I’ll do some better updates tomorrow with more details.