
You are using an out of date browser. It may not display this or other websites correctly.
You should upgrade or use an alternative browser.
You should upgrade or use an alternative browser.

James & The Sahara Build Thread
- Thread starter JamesAndTheSahara
- Start date

L
LTTJ
Guest
Looks like an awesome start! I'll be excited to see how the new tires look tomorrow!
Sent from my iPhone using Tapatalk
Sent from my iPhone using Tapatalk
Another update! I had a solid 6 hours in the shop today. I got the Brown Dog 1" MML
Good stuff man! Looking forward to tomorrow's update! Keep up the hard work

Awesome! Especially about you and your Dad. Hope you get some well needed rest. Glad you had no prob on the MML. It's beefy, eh? Give you more clearance under oil pan and hopefully solve the vibe probs coming with the SL.Another update! I had a solid 6 hours in the shop today. I got the Brown Dog 1" MML & the Savvy 1.25" Body lift installed today. I thought I knew what to expect. Nearly everything I thought was going to be hard was really easy and the parts I thought would be hard were insanely easy. I don't know if my early generation TJ with AC is different than everyone's Jeep, but I had no issues with doing the 1" MML. It took about 2 hours start to finish going pretty slow. I didn't have to remove the engine bracket and the driver side just slide right out with no issues with the AC compressor. Lucky me! On the body lift today I could not for the life of me get enough space for the rear quarter body lift pucks. It wasn't until 2 hours later I realized my Gobi Roof Rack's frame tie in was connecting the body and the frame and fighting against me, ugh. Noob mistake, but one I won't forget. The Savvy extensions for the radiator support make sense, but were miserably terrible to install them in that tiny hole with a slit access hole in the body. It took nearly an hour just to fish the bolts through to do the mount, granted I like the finished product.Tomorrow will be the shocks/springs/tires/bump stops (The stuff I have been so excited for). Here is a couple photos of the install and how she sits now. Wish I had more for you guys but I guess it'll have to wait until tomorrow!
View attachment 18684 View attachment 18685 View attachment 18686 View attachment 18687 View attachment 18688 View attachment 18689
I did also want to add that my dad helped with the install even with no automotive background whatsoever. It meant more to me than he realizes and glad I got spend some quality time fighting the Jeep today with him today.
Hopefully! They were quite beefy, hoping it solves any vibes from the SLAwesome! Especially about you and your Dad. Hope you get some well needed rest. Glad you had no prob on the MML. It's beefy, eh? Give you more clearance under oil pan and hopefully solve the vibe probs coming with the SL.
 .
.
I suspect you'll be good and never know a vibe!Hopefully! They were quite beefy, hoping it solves any vibes from the SL
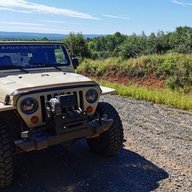
derekmac
TJ Addict
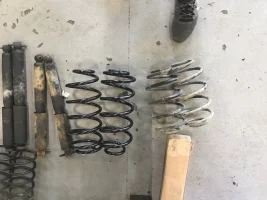
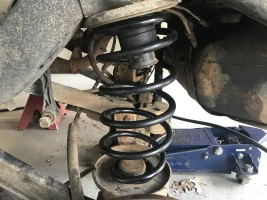
Today was as some would call it: "One of those days". It started off quite well, I started in the rear and worked my way up front. Once I got everything out of the way I noticed my Jounce bumpstops had completely rotted away on the rear, and to later find the front were as well. These are quite expensive from the dealer so I will have to source them from a junk yard another time I propose. Starting taking my bumpstop measurements to learn in my instance my shocks will be the limiting factor. I assumed my rear would need 2" bumpstops MAX when I bought my hardware this morning and it appears 2.5" bumpstops would suit me slightly better if my sway bars were disconnected to prevent the shocks from becoming uncomfortably close to bottoming out, but 2" appears to be a fine solution without bottoming out the shock. I only got to bumpstop the rear today, the front I could not for the life of me get the front track bar off the frame mount. I tried using the only pickle fork the shop has and still couldn't get it out. I ended the day trying to get the rear completely done and I couldn't get the trackbar 1cm more to clear the hole completely to get the bolt through (Frame side). I'm going to try a couple other solutions proposed by members to getting this thing closer but really wish I had the relocation bracket. I asked the jeep club locally if anyone has a relocation bracket I could buy off them but haven't heard anything yet. The positives are the back is properly bumpstopped with the shocks and coils installed. The goals for tomorrow are reinstall the rear trackbar to the frame side, remove & replace the trackbar in the front, bumpstop the front, and install the new coils/shocks and leave. Here are some pictures from today:
Old Coils:
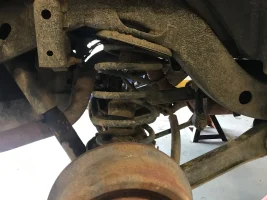
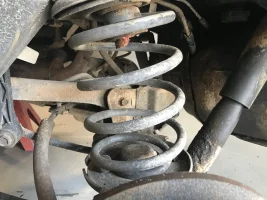
New Vs Old Equipment:
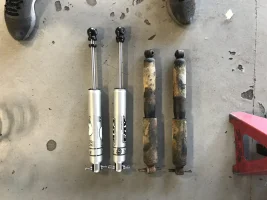
Bumpstopping completed in the rear:
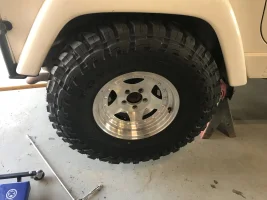
The annoying front trackbar I could get out (I did remove the cotter pin and nut don't worry, just can't remove the trackbar from the frame since it's now since its seized onto the Jeep's frame after 18 years).
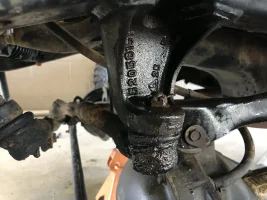
Didn't think the project would take more than two days, but having never lifted a Jeep this is all very new to me and going off people's recommendations for finishing things up. I would like a fully adjustable rear trackbar in the rear, but finances couldn't justify one at this time. Hoping tomorrow goes a bit smoother so I can enjoy it a bit more lol.
Old Coils:
New Vs Old Equipment:
Bumpstopping completed in the rear:
The annoying front trackbar I could get out (I did remove the cotter pin and nut don't worry, just can't remove the trackbar from the frame since it's now since its seized onto the Jeep's frame after 18 years).
Didn't think the project would take more than two days, but having never lifted a Jeep this is all very new to me and going off people's recommendations for finishing things up. I would like a fully adjustable rear trackbar in the rear, but finances couldn't justify one at this time. Hoping tomorrow goes a bit smoother so I can enjoy it a bit more lol.
Last edited:
Heat gun heat or torch heat? It is seeping grease right now since the bushing has failed so its quite messy at this time.You could try some heat on the TB mount.
Take a BFH to the frame side mount of the TB. unscrew the nut but leave it on by a couple of threads, then beat that mount close to the tie rod like a red headed step child. It should pop loose.
I might have a OME rear TB relocation bracket for you. I'll be replacing mine with an angles JKS bracket after doing my SYE.
I might have a OME rear TB relocation bracket for you. I'll be replacing mine with an angles JKS bracket after doing my SYE.
Torch preferably. You could try the bfh like @bobthetj03 said but not sure how much leverage you can get since the stud is tucked in the bracket pretty deep.
You're saying hit the front trackbar on the opposite side of the frame mount to bust it off? Whats the purpose of leaving the nut on the top of the frame mount? Just trying to understand to make sure I know what I'm doing. I appreciate the offer with the OME bracket but I have the Metalcloak bracket coming already paid for. Metalcloak said it should be here late next week, but need a solution for tomorrow.Take a BFH to the frame side mount of the TB. unscrew the nut but leave it on by a couple of threads, then beat that mount close to the tie rod like a red headed step child. It should pop loose.
I might have a OME rear TB relocation bracket for you. I'll be replacing mine with an angles JKS bracket after doing my SYE.
Disregard the question, it has thus been cleared up. I really appreciate your help Bob!
Last edited:
I have a blowtorch I can bring. Any caution when using it on the trackbar, should I use it on the top side like the bolt or the bottom side where the flame would hit the rubber?Torch preferably. You could try the bfh like @bobthetj03 said but not sure how much leverage you can get since the stud is tucked in the bracket pretty deep.
The usual caution when using flame around rubber and grease. I would hit it around the top side. Leaving the nut on keeps the object from flying out uncontrolled and to keep the stud from flaring and becoming stuck after beating on it.
Thank you so much for the help Rob!The usual caution when using flame around rubber and grease. I would hit it around the top side. Leaving the nut on keeps the object from flying out uncontrolled and to keep the stud from flaring and becoming stuck after beating on it.
Try the BFH first before setting your jeep on fire. Hit the cast mount that is welded to the frame, but as close to where the tie rod stud goes thru the mount hole. This trick is also used to loosen the tie rods and drag link from the steering arms/pitman arm. Just don't take a 10lb. sledge to it, k. Lol!
Do you have a picture of what I should hit specifically? The exposed bolt?Try the BFH first before setting your jeep on fire. Hit the cast mount that is welded to the frame, but as close to where the tie rod stud goes thru the mount hole. This trick is also used to loosen the tie rods and drag link from the steering arms/pitman arm. Just don't take a 10lb. sledge to it, k. Lol!
Do you have a picture of what I should hit specifically? The exposed bolt?
Similar threads
- Replies
- 4
- Views
- 1,223


- Replies
- 30
- Views
- 5,539

- Replies
- 1
- Views
- 290

- Replies
- 7
- Views
- 1,316

- Replies
- 26
- Views
- 5,869
