What did you do to your TJ today?

did my break-in gear oil change for the 4.56's I had installed back in August. I'm a couple hundred miles late, but the Jeep has been parked while I slowly worked through an SYE an hour at a time. There was less metal on the magnetic fill plugs than I expected.

View attachment 142378

View attachment 142379

It's the first time I've ever drained 85W140...holy moly that stuff is thick. No wonder it takes so long to squeeze it out of the bottle. Being in the 40s in my garage didn't help, I'm sure. It was everything I could do not to spray it out with brake cleaner, but the FSM is pretty clear about not using solvents like gasoline or kerosene so I flushed it out with some 5W40 I had left from a European car I sold awhile back.

Looks awesome though - I thought brake cleaner or throttle body cleaner were always the go to recommendations for cleaning out diffs?
 
Looks awesome though - I thought brake cleaner or throttle body cleaner were always the go to recommendations for cleaning out diffs?

I've always done it when preparing for diff work where the carrier is being removed and will have time to be completely dry and all brake cleaner to evaporate. I had pause about spraying it in there and dispersing in the oil and then being closed back up in there, so I checked the FSM and sure enough, it says this:

1582666611629.png


Whether it would actually cause any premature wear to the gears, I have no idea, but when the FSM says something in bold, I like to follow it.
 
I've always done it when preparing for diff work where the carrier is being removed and will have time to be completely dry and all brake cleaner to evaporate. I had pause about spraying it in there and dispersing in the oil and then being closed back up in there, so I checked the FSM and sure enough, it says this:

View attachment 142384

Whether it would actually cause any premature wear to the gears, I have no idea, but when the FSM says something in bold, I like to follow it.

Good to know - I will say, in every tutorial/explainer I watched for diff fluid changes, the person doing the deed explicitly mentioned doing it on a hot sunny day so that the cleaner would have adequate time/heat to evaporate and that this would mitigate any problems caused by spraying it all up in the diff and gears.
 
Good to know - I will say, in every tutorial/explainer I watched for diff fluid changes, the person doing the deed explicitly mentioned doing it on a hot sunny day so that the cleaner would have adequate time/heat to evaporate and that this would mitigate any problems caused by spraying it all up in the diff and gears.

probably a good point and that would probably do it. I would just want to make sure all of the old oil is out and the inside of the housing is bone dry. There aren't many hot sunny days to come by in late February in Colorado, so 45 degrees in my garage was about the warmest I was going to get.
 
Not today but recently installed my Di Tech mirror relocation brackets. This is the best option I have seen for doorless mirrors. I had cheap mirrors that went in the top hinge but they vibrated badly and no matter how much I tightened them they would try to fold at highway speeds. Just a slight bump in the garage or parking lot would move them also. The factory mirrors are the best option and I think these brackets are the best brackets available. These brackets put the mirrors at almost the doors on position. Mounting points are the top door hinge and the top two dashboard screws.

IMG_5153.jpeg


IMG_5155.jpeg


IMG_5157.jpeg


The drivers side did not fit perfect and angles away from the vehicle but that is very easily compensated for.

IMG_5156.jpeg


IMG_5158.jpeg


The passenger side fit a little better but still very satisfied with both.

IMG_5164.jpeg


IMG_5167.jpeg
 
Not today but recently installed my Di Tech mirror relocation brackets. This is the best option I have seen for doorless mirrors. I had cheap mirrors that went in the top hinge but they vibrated badly and no matter how much I tightened them they would try to fold at highway speeds. Just a slight bump in the garage or parking lot would move them also. The factory mirrors are the best option and I think these brackets are the best brackets available. These brackets put the mirrors at almost the doors on position. Mounting points are the top door hinge and the top two dashboard screws.

View attachment 142397

View attachment 142405

View attachment 142410

The drivers side did not fit perfect and angles away from the vehicle but that is very easily compensated for.

View attachment 142417


View attachment 142418

The passenger side fit a little better but still very satisfied with both.

View attachment 142419


View attachment 142420
How easy do these brackets pop on and off if at all?
 
Not today but recently installed my Di Tech mirror relocation brackets. This is the best option I have seen for doorless mirrors. I had cheap mirrors that went in the top hinge but they vibrated badly and no matter how much I tightened them they would try to fold at highway speeds. Just a slight bump in the garage or parking lot would move them also. The factory mirrors are the best option and I think these brackets are the best brackets available. These brackets put the mirrors at almost the doors on position. Mounting points are the top door hinge and the top two dashboard screws.

View attachment 142397

View attachment 142405

View attachment 142410

The drivers side did not fit perfect and angles away from the vehicle but that is very easily compensated for.

View attachment 142417


View attachment 142418

The passenger side fit a little better but still very satisfied with both.

View attachment 142419


View attachment 142420
Wow i like that!
 
  • Like
Reactions: Viking Jeeper
Took the TJ to my mechanic this week for its annual inspection & he pointed out that my rear sway bar links & bushings were shot, there was a ton of play going on. I had noticed this before but always ignored it, these bushings are probably the last part of the suspension that remained from the prior owner if not the factory.

Picked up everything from Rock Auto, $48.00; ordered it Tuesday & it arrived Thursday, love that place:

View attachment 141877View attachment 141878View attachment 141879

Friday rolled around & I got a call from the boy requesting some homemade pizza so I busted out of work around 1pm to make some dough. So here are the random TJ unrelated shots of a caramelized onion with sage & goat cheese pizza (daughter’s request) & a standard pepperoni (son’s request), also made a Hawaiian for the son’s girlfriend but it wasn’t very photogenic. Almost never see both kids at home at the same time, that was really cool:

View attachment 141880View attachment 141881View attachment 141882View attachment 141883

Saturday morning & time to "pop in the new parts". This started off as another “easy 30 minute job” that turned into a complete pain in the balls, there are a total of 8 bolts that have to be removed to pull the links & bushings out, 7 of which of course came out without an issue while 1 snapped the bolt head off leaving the rest of it completely intact. There is zero room to work the other end sticking out of the nut that’s welded to the mount so rather than making some lame attempt at getting this thing out (been there done that & it aint worth the agg), I tapped out & drove it over to my mechanic’s house & he coaxed it out.

View attachment 141884View attachment 141885View attachment 141886

Since I couldn’t finish right away I took the opportunity to clean up & paint the bar & the bushing brackets.

View attachment 141887View attachment 141888

a couple hours later I Ubered over & picked up the rig, sans stuck bolt. One thing I noticed driving it there & back without the rear sway bar, I noticed zero difference. Wasn't sure if it was because the one on there was useless due to the worn bushings or they're just not all that useful. Anyway, I left it until this morning allowing the painted parts to dry. Went out about an hour ago & reassembled everything, new stock length links/bushings and new axle mount bushings:

View attachment 141890View attachment 141891View attachment 141892

Took it out for a test drive, felt great, maybe tighter in the rear, took some corners at speed & everything feels great; not sure if it's all in my head but it does feel tighter overall. This vehicle surprises me the longer I own it, it handles amazingly well. Maybe my expectations are low, I don't know, but I push it more & more the longer I drive it & it never gives me the feeling like it's going to let go. While I don't push it through turns as I do my Subaru I've gotta say it's not all that far off.
I did mine the same way....all Moog stuff and painted the sway bar too as my factory one were stuffed..
 
Not today but recently installed my Di Tech mirror relocation brackets. This is the best option I have seen for doorless mirrors. I had cheap mirrors that went in the top hinge but they vibrated badly and no matter how much I tightened them they would try to fold at highway speeds. Just a slight bump in the garage or parking lot would move them also. The factory mirrors are the best option and I think these brackets are the best brackets available. These brackets put the mirrors at almost the doors on position. Mounting points are the top door hinge and the top two dashboard screws.

View attachment 142397

View attachment 142405

View attachment 142410

The drivers side did not fit perfect and angles away from the vehicle but that is very easily compensated for.

View attachment 142417


View attachment 142418

The passenger side fit a little better but still very satisfied with both.

View attachment 142419


View attachment 142420
Looks awesome
 
  • Like
Reactions: Viking Jeeper
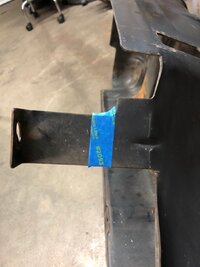
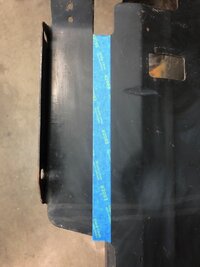
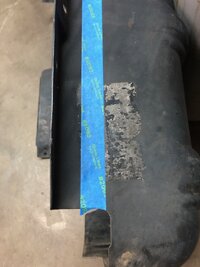
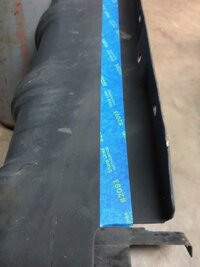
Ok, so just as a double check I wanted to run this past everyone. I have a 1" body lift and I've read that I can now zip 1" out of a factory skid to tuck it up a little. That being said, is this a good measurment method? And if it is, how does the placement looks as far as where I should remove the material? (the plan is to cut the tapped section out)

IMG_5973.jpg IMG_5974.jpg IMG_5975.jpg IMG_5976.jpg
 
  • Like
Reactions: Alex01 and matkal
Well today I fixed my brake lights by flipping on and off the Hazard Switch about 30 times and spraying WD40 in there.

All other lights were working, bulbs were good, fuse was good, I was stumped.
One of the oddest fixes I've come across, but I can verify it worked.
 
Well today I fixed my brake lights by flipping on and off the Hazard Switch about 30 times and spraying WD40 in there.

All other lights were working, bulbs were good, fuse was good, I was stumped.
One of the oddest fixes I've come across, but I can verify it worked.
YEAH!!!
Goodness is found in the outcome!
 
Oh that's fun. I had the same issue. Hold on, I think I did a write up on the repair, let me attach it! You have to take the seat out and take it apart.
https://docs.google.com/document/d/1hNnHm45eBQoH0PpQFZAi2MHH3G02GqpBt90XzyZfgMo/edit?usp=sharing
I just got way too excited remembering I had written this and finally being able to help someone with it :LOL:.

Looking at this now, I wish I would've added pictures. I know I took at least a couple... Anyhow, if you have any questions feel free to ask away. Although, I don't have that Jeep anymore (R.I.P.) so I can't go check how I did it. Now that I think about it, I'll go post this in the how-to section before I forget.
Do you have a picture of where the cable under the seat attaches? The cable is there with the end still on it
 
Do you have a picture of where the cable under the seat attaches? The cable is there with the end still on it
I can't find the pictures, but when I posted the write-up in the how-to section, I noticed there were already some posts of the same how-to, some with pictures:

https://wranglertjforum.com/threads/how-to-repair-a-broken-seat-cable-in-a-jeep-wrangler-tj.21936/https://wranglertjforum.com/threads/how-to-repair-broken-passenger-seat-track-release-cable.3237/
 
  • Like
Reactions: TDB55
Adjusted the toe in but first I had to make a measurement tool. A friend of mine used to race stock car and I copied his tool design sort of. This allows leaving the tires on.
0226201412.jpg
0226201410_Burst01.jpg
0226201410.jpg
0226201339c.jpg
0226201339b.jpg

According to this tool my toe in was 7/8 inch. After wire brushing, copious amounts of PB Blaster, and a big f'n pipe wrench, I got that measurement down to 1/8 inch.
0226201408a.jpg

Wondered why my tj didn't like rutted pavement, especially under braking. Much better now.
 
What started as simple dead headlight turned into a rebuild of the passenger side headlight wires. Second time I have had to due it. Getting close to just buying a new wiring harness.