SSTJ's '97 SE 2.5

What size wheels were/are you running when this happened? I have 16" Moabs and am wondering if I'll run into problems if I replace the stock Torx truss hardware with a standard flanged hex and a washer.

I was running 30x9.5 BFG KO2s on stock "Ravine" wheels (as in my current profile pic). It was only at full turn, but obviously still a problem. Once I swapped the orientation of the bolt back to original, the problem was solved.
 
I was running 30x9.5 BFG KO2s on stock "Ravine" wheels (as in my current profile pic). It was only at full turn, but obviously still a problem. Once I swapped the orientation of the bolt back to original, the problem was solved.

The back of your "RAZ" cd player had three hookups - two 7 pin and a 2 pin. I am in the same boat with my 98 TJ, trying to go to stock. Did you end up using the 2 pin port on the back of your RAZ radio? I have installed mine but it's acting up. I don't have the two pin connector on my wiring harness, just the two 7 pin and the antenna.
 
The back of your "RAZ" cd player had three hookups - two 7 pin and a 2 pin. I am in the same boat with my 98 TJ, trying to go to stock. Did you end up using the 2 pin port on the back of your RAZ radio? I have installed mine but it's acting up. I don't have the two pin connector on my wiring harness, just the two 7 pin and the antenna.

I actually don't even remember the 2-pin plug. What is that for? I use the two 7-pin plugs, and of course the antenna plug.

What is yours doing when it acts up? Did you also ground it?

Edit: This thread calls it a CCD (around post 10 or so). Sounds like it did not come on all RAZ stereos. Can't remember whether mine has it or not.
 
Last edited:
I actually don't even remember the 2-pin plug. What is that for? I use the two 7-pin plugs, and of course the antenna plug.

What is yours doing when it acts up? Did you also ground it?

Edit: In a pic, I see the plug you're referring to. No, I didn't use it. I think it's either for an external multi-disc CD changer, or a security system, or something like that? I know I asked once on here, but now I can't remember.

Thanks. My setup here. The radio I am installing is acting up, not sure it's over the missing connector (I don't think it is). I'll try a secure ground but I have a feeling the radio is acting up. These are largely plug and play I am guessing.

image008.jpg
 
Yes, I think that two-wire plug is for the multi-disc changer.

What is it doing when it acts up?
 
Yes, I think that two-wire plug is for the multi-disc changer.

What is it doing when it acts up?

Can't get the display to come up, can hear some radio through speakers but volume doesn't seem to work. I did get the ground hooked up, still no change. Hopefully a bad unit. Thanks for the tips on the two wire plug.
 
  • Like
Reactions: SSTJ
1997 SE. Four-cylinder model from a transition year, so it's somewhat “special”.

Joined in 2020 as novice. Here are some threads I try to manage:
———

This build thread is more for notes than updates. Keeping it close to stock anyway. TOC below links to other posts in this thread:

Following
 

ELECTRICAL​


Connectors:
  • Learned about connectors here. Critiqued insulated connectors here.
  • Learned about crimping tools here.

Relays:
  • Learned basics of relays here. Later, made a resource thread about relays here.
  • Learned about current across relay pins here.

Routing:
  • For running wires, made a thread here about holes in the firewall.
  • Posted here about hiding wires in split loom. This loom and these clips worked well.
  • When working in tight spaces, smaller zip tie mounts are helpful.

Grounding:
  • Learned about where to ground (battery vs nearest metal) here.
  • Learned about factory grounding here (when not to scrape paint away).

Theory:
  • Asked a theoretical question about parallel wiring here, in the context of speaker volume.
 
Last edited:
  • Like
Reactions: Wildman

Gas Tank Click-Out

  • For years, pump clicked out (acting full) at 3/4 of a tank.
  • This thread got me thinking, but as mentioned here my issue was different.
  • Dropped gas tank when treating skid and surrounding areas for rust.
  • Solution and happy ending reported here. Tank also now holds 4 extra gallons.
  • Sounds like this was a common issue for early 97 models. TSB here.
 
Last edited:

AC Compressor

  • Came up suddenly, few miles from home. Posted here for quick diagnosis.
  • Installed a non-AC serpentine belt to buy some time.
  • Considered replacing clutch, and got advice here.
  • Decided to replace compressor, and got a GPD 9622829.
  • For installation, FSM told me I needed spring lock disconnects and some oil.

  • Found a shop to drain the system for free since I'd return to re-charge it.
  • Removing compressor and accumulator was easy. Spring locks were stubborn.
  • Recovered oil from compressor and accumulator:
    • Recovered ~100ml from accumulator (FSM says 120).
    • Recovered ~40ml from compressor (FSM doesn't say).
    • Oil looked clean. Posted and asked for feedback here.
  • Decided not to flush the system, based on advice here and here.

  • Replacement kit came with oil. Asked here how much of it to put back in.
    • Compressor came with ~175ml of oil.
    • Drained compressor and put back in ~40ml.
    • Added ~110ml to the accumulator, via the outlet to compressor tube.
  • Replaced compressor:
    • Cleaned mounting bolts with wire wheel.
    • Cleaned mounting threads with nylon bore-brush and compressed air.
    • Torqued bolts to 21 ft-lbs as per FSM.
    • Replaced o-rings on manifold, lubed with oil from compressor.
  • Replaced accumulator.
    • Came with new o-rings, so no need to replace.
    • Lubed o-rings with oil from the new compressor.
    • Moved clutch cycling pressure switch from old accumulator to new.
  • Replaced fixed orifice tube.
    • Disconnected liquid line from condenser outlet, below passenger headlight.
    • Removed fixed orifice tube. Required extra long, thin, needle-nose pliers.
    • Lubed with compressor oil and replaced at same orientation as original.
  • Compressor kit came with many extra o-rings, and site says they're for entire system.
 
  • Like
Reactions: Wildman
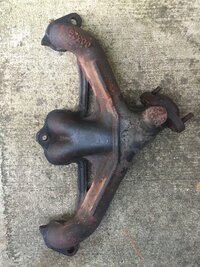
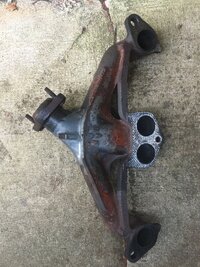
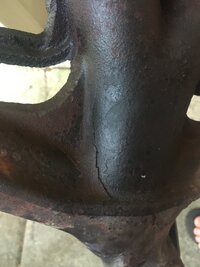
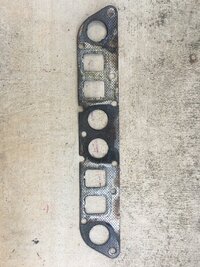
Exhaust Manifold and Gasket
  • Manifold cracked, and was welded, back in late 2000.
  • Recent signs of another crack:
    • 13.06 MPG and 14.86 MPG on two recent tanks.
    • Come-and-go fluttering/ticking sound.
    • Exhaust smells more strongly lately.

  • Read about replacement options here and here. Asked about others here.
    • No option of flex-bellows on the 2.5L engine.
    • Cheap Chinese manifolds (or headers) crack more quickly.
    • OEMs are no longer available. Can buy used, but hard to find low-mileage ones.
    • Some aftermarket ones have a blank O2 port (for YJ 2.5) that can cause trouble.
  • Read about replacement process here and here.
    • Updated second link with best tips.
    • Asked what else do to while I was at it, here.

  • Tried and failed to find a good-condition OEM. Decided to buy the Dorman.
  • Process went smoothly. Updated this post with lessons learned.
  • Engine ports were fairly clean. Cleaned mounting surface as described here.
  • Considered gasket options here. Used intake-and-exhaust that came with Dorman.

  • Discovered bolts where studs should be. Explored the pros and cons here.
  • Discovered broken stud fragments in threaded holes. Explored options here.
  • Some day, will remove fragments and replace studs. Exploring hardware options here.
  • Finally learned about a TSB on this, mentioned by @Blackjack, here.


IMG_6581.JPG


IMG_6582.JPG


IMG_6584.JPG


IMG_6583.JPG
 

O2 Sensors

  • This thread got me thinking.
  • This thread gave the part numbers.

  • 2.5s have only two sensors.
    • Upstream is at the top of the down-pipe, just below the exhaust manifold.
    • Downstream is right next to the catalytic converter.
  • When replacing manifold (linked above), replaced upstream sensor.
  • When working on exhaust (linked above), replaced downstream.
  • Reset the PCM as per instructions here.
 
Last edited:

Starter Motor

  • Starter motor began seizing, providing no crank unless tapped with hammer while turning the key.
  • Part appears to be stock: Chrysler number is 56041013, and Mitsubishi number is M001T79482.

  • Ordered OEM 56041013 from FactoryChryslerParts.com, but turned out to be unavailable everywhere.
  • Purchased ACDelco Gold 337-1088. Ended up returning and bought a rebuilt Denso (280-4149).
  • Will look into rebuilding the OEM some time.

  • Installation was simple, following FSM.
  • Mounting bolts were an E-12, so had to buy a set of external torx sockets.
  • Found some gaps after installation, and asked about them here.
 
  • Like
Reactions: Blackjack

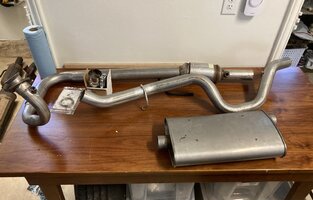
Exhaust System

  • Exhaust odor and gas mileage suggest catalytic converter could be bad.
  • At almost 100k miles, decided to remove and find out.

  • Started this thread to find part options and get advice.
  • Started this thread to ask about anything else worth doing at the same time.
  • Considered some universal fits, like Magnaflow #99005HM or Flowmaster 2220125 or Walker #15841.
  • Considered some direct fits, like or Flowmaster #2040003 or Crown 52018933K (Complete Kit).
  • Was leaning toward the Walker for price and ease of install, but then found this for $80.

  • Got advice about working on exhaust without welding here.
  • Got advice about ring seals/gaskets here.
  • Got advice about heat shields here.
  • Got advice on the installation here.

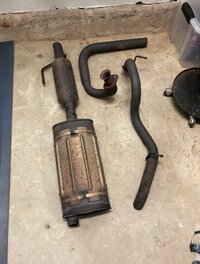
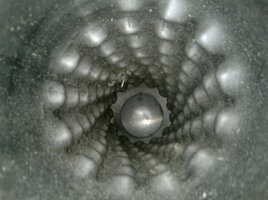
  • Removal went smoothly. Ended up cutting the original system into three pieces.
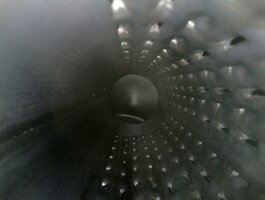
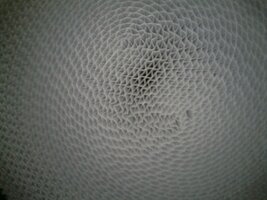
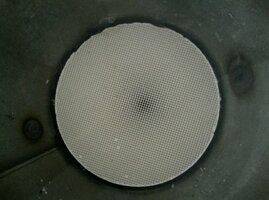
  • Posted pics of original catalytic converter here. Looked surprisingly good.
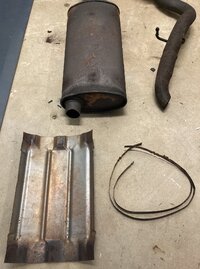
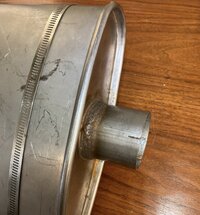
  • Cut small slits in the muffler pipes to allow band clamps to compress a bit more tightly (pics below).

  • Bolts at manifold outlet were frustratingly short. Longer replacements made job much easier.
    • But put the nut on the top (for clearance).
  • 2.5s do not have ring-seal/gasket between down-pipe and manifold.
    • With longer bolts, one could be added, or use Permatex.
  • Do not torque the down-pipe to the manifold until after connecting exhaust and tail pipe.
    • This allows necessary play and alignment.
  • Do not attach O2 sensors until the job is done. The "tree" clips are difficult to remove without damaging.
  • Band clamps are cheaper and easier to work with than muffler clamps. But I ended up going with these.
  • Factory exhaust pipes are 2.25". Some aftermarket pipes are 2.5".

Old System​
New
System​
Reusing Heat Shield​
Inside
Old
Muffler​
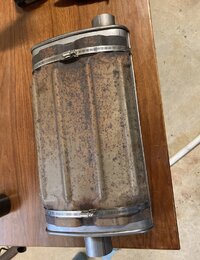
Inside
New Muffler​
Inside Old
Catalytic Converter​
Inside New
Catalytic Converter​
Slits in
Muffler Pipe​


Screenshot 2023-03-29 at 5.39.27 PM.jpg

Screenshot 2023-03-29 at 5.39.38 PM.jpg


Screenshot 2023-03-29 at 5.39.47 PM.jpg


Screenshot 2023-03-29 at 5.42.04 PM.jpg


Screenshot 2023-03-29 at 5.41.18 PM.jpg


Screenshot 2023-03-29 at 5.41.43 PM.jpg


Screenshot 2023-03-29 at 5.41.50 PM.jpg


Screenshot 2023-03-29 at 5.41.08 PM.jpg


Screenshot 2023-03-29 at 5.42.12 PM.jpg
 
Last edited:
  • Like
Reactions: Blackjack

Tune-Up Notes

  • While reviewing old service invoices, became concerned about brand selection.

  • Read about oil and filter selection on several threads here. Too many to link.
  • Chose Fram Conventional 10W-30 and Fram Tough Guard TG-16 filter.
  • Read about oil analysis here. Posted my results here. Asked about fuel in oil here.

  • Read about spark plugs here and a few others. Chose Autolite XP985 with this style set tool.
  • Read about spark plug wires here and here. Chose Mopar replacements.
  • Copper-based anti-seize on threads of plugs. Dielectric grease on wire caps.
 
Last edited:

Sway Bar Links

  • Tracked down a rattle and found my links were shot. Video here.
  • Could not remove the upper link without a puller, so asked here and got a simple one.
  • Replaced with a pair of Detroit Axles from PartsGeek.
  • Learned here about the zerks, which got me reading about grease. Learned this.
 

Fuel Injectors

  • My 95k mile oil analysis reported 2.3% fuel in the oil. Learned here that I may have leaking injectors.
  • Removed injectors and inspected for these issues. (Before and after pics of injectors are there.)
  • Asked here about a cleaning/testing but decided against it.
  • Replaced all o-rings with fel-pro from Amazon.
 
  • Like
Reactions: Irun

Fuel Injectors

  • My 95k mile oil analysis reported 2.3% fuel in the oil. Learned here that I may have leaking injectors.
  • Removed injectors and inspected for these issues. (Before and after pics of injectors are there.)
  • Asked here about a cleaning/testing but decided against it.
  • Replaced all o-rings with fel-pro from Amazon.

You're going high tech here. Oil analysis is something I've thought about, but never done.
 

MILs and CELs

  • First time experiencing several codes at once. My 97 gives two-digit MIL codes on the dash.
    • Learned about different between MIL and DTC and HEX here.
    • Explored a few code-readers, which gave different results than my MIL on dash. Posted about it here.
    • Wanted a code reader that gives hex codes, to be more specific than FSM. Posted about it here.

  • Code 42 (P1388 or P1389), for the Auto Shutdown Relay.
    • Posted about it here. Code went away before I figured it out.
  • Code 31 (P0441) for evap control system.
    • Posted about it here. Learned how the purge valve operates here.
  • Code 65 (P0551) for power steering pressure sensor.
    • Posted about it here. Related discussion here.
 
SPRINGS

Notes below are for a minor lift on a stock-light SE, running 31" tires of smaller, and driving primarily on-road.

For others' opinions on the best approach, see here.

———

OPTIONS


Stock springs sit at around 12" long in front and 8" long in back. According to this post, the part numbers for the springs of a stock, soft-top SE are 126 (front) and 103 (rear).

Blaine makes it clear that OEM TJ springs are "progressive-rate", not just "progressive-wound" or "variable". Progressive-rate means that the coil itself is tapered into different thicknesses along its length, whereas "progressive-wound" or "variable" is true of many aftermarket springs, and just means they are wound with variable spacing between the coils.

Company​
Style​
Front Part #​
Front Relaxed​
Front Loaded​
Front Rate​
Front Load​
Rear Part #​
Rear Relaxed​
Rear Loaded​
Rear Rate​
Rear Load​
Jeep/OEM​
Progressive​
126 (SE)
(SoftTop)​
17" or 17.25"​
12"​
126 lbs/in​
?​
103 (SE)
(SoftTop)​
12"​
8"​
103 lbs/in​
?​
Moog​
Constant​
3224
(4.0L)​
16.39"​
11"​
134 lbs/in​
719lbs​

3229​
11.28"​
8"​
200 lbs/in​
635lbs​
Moog​
Constant​
3228
(2.5L)​
16.18"​
11"​
124 lbs/in​
650lbs​

3229​
11.28"​
8"​
200 lbs/in​
635lbs​
Moog​
Constant​
3226
(Rubi)​
17.25"​
11"​
134
lbs/in​
834lbs​
3227​
12.11"​
8"​
200
lbs/in​
821lbs​
AC Delco​
Variable​
45H0279​
16.2"​
11"​
??? lbs/in​
45H2104​
11.3"​
?"​
??? lbs/in​
OMIX​
???​
18274.01
???​
???​
???​
???​
Dorman​
Constant​
15.75"​
???​
135​
H&R​
Variable​
52107​
16.375​
???​
???​
52107​
12.625​
???​
???​

Great testimonies about H&R springs on the forum. But are claimed to give additional 1–1.5" of height. With a stock-light SE, that may be more like 2".

———

INSTALL

I ordered the Moog 3226. Found that after detaching the sway bar links and track bar, the rest could be done without removing the wheels. Just freed the upper shock mount and jacked up the frame (the side with tire on level ground), which provided enough room to swap the spring—even these Moogs, which are about 1" longer than stock. After install, those put the front at 12+5/8". That's a bit more lift than @TrueTexas got on his 4.0.

For the rear, I installed Moog 3229s. Followed this guide, but made these changes. Learned here what the plastic isolators were for. After install, those put the rear right at 8". Interesting that the Moogs had less free length than OEMs.

Replaced all four stock jounce bumpers with these.

Increase in height threw off alignment, so followed this thread to correct.
 
  • Like
Reactions: Wildman